Leaderboard


Popular Content
Showing content with the highest reputation on 12/09/2021 in Posts
-
3 points
-
It is with great sadness I make this announcement as we have lost one of our own. Unfortunately Terrell Reber TK-1787 (SuperTrooper), know by many as ATA Affordable trooper Armor has passed away. If you were ever fortunate to have spoken with Terrell, you will know he had an affect on people. He had a way with words that made you feel like a lifelong friend, he was intelligent, talented, and believed everyone should have the opportunity to live out their Stormtrooper dreams. Terrell is a huge loss to our community in many ways. His service to FISD our members and the Legion at large will never be forgotten. Rest in peace good sir, and may the force be with you always.2 points
-
2 points
-
Hello Everybody! Thought I would re-introduce myself since its been like 9 years since I've posted haha Started with a CAP TK back before I joined the 501st and unfortunately outgrow it before I could have made it official but recently purchased a AM armor kit since it fits bigger dudes like myself. Hopefully start a build thread soon and finally join the ranks of the FISD -Adriel2 points
-
YAAAASSSSSSSSSS!!!!! Thank you Joseph and everyone else!!!! I'll compose a more coherent reply shortly.2 points
-
I have made some screenshots of the in-game model that's been updated with better quality textures few years ago. I am including images of plasma thrower/cannon too, which would be super helpful to build an accurate one. I am planning to make 3D print files using this super low poly model as a base. Here is the photo dump link: https://drive.google.com/drive/folders/1c_hOc1ejHGla3RzQvcGZmRE8sXiqG_44?usp=sharing I've found out that there are some details that don't align with the current CRL such as the knee ammo pack. Is this the place to talk about this? Anyways, here are some sample pics1 point
-
That makes sense. I want to use the same PVC because it has padding on the inside to make it fit snug over the support rod. But, the more I look at the whole thing, I could use duct tape just on the parts that you can't see through the barrel holes. I was worried it would look bad, but there are sections where there are no holes to see through the barrel where I can put the tape without it showing. Thanks!1 point
-
Personally I would try to find a piece of pipe which fits a little better. You may even be able to find a tube that goes between the two. But if you go with what you have it really depends on how much of a gap there is, I have used strips of plastic sign to take up some slack in pipes before, you could also add some glue, depends if you want to add electronics as it's best not to glue so you can get access if you need to fix anything. Another fix you could wrap duct tape around in some areas until you fill the gap.1 point
-
Nice work, well done1 point
-
It looks great Trooper !!1 point
-
Congratulations and welcome to the EI ranks trooper1 point
-
Congratulations Adam, well deserved1 point
-
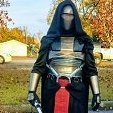
I happened to have a spare set of Trooperbay vinyl stripes on hand, so I did this fix immediately. Mr No Stripes Saves Christmas. Spacing on the left with my CORRECT new stripes. Spacing on the right. So much better! FIXED!!! Ready to apply for Centurion.1 point
-
I received EIB today!!!! Approval 1037!!! And my one big thing to fix for Centurion is my tube stripes. Which is... embarrassing. See, I was told that my tube stripes were backwards back in 2019. And I have a clear memory of fixing them! I ordered two sets of the tube stripe vinyl from trooperbay and have one set left. I knoowwwwww I fixed them. However, the stripes on my bucket exactly matched the original pix showing my backwards stripes, down to the millimeter. Even if I managed to re-apply the stripes backwards, I don't think I would have had the placement so exact... I can only surmise that I never did that fix. Very embarrassing. Anyways, here's a bunch of pix of tube stripes. WRONG. Backwards. I have no idea how I didn't fix this. OR where that second set of spare stripes went. Mr No Stripes Saves Christmas. Carefully measured and laid out. And fixed! It's so subtle but so much better. My left side was quite a bit too low. I had the right really good, but this one wasn't at the level. Careful alignment. Have I mentioned that I love these vinyl stripes? Yeah. That's the good stuff. Spacing on the right. FIXED!!! Ready to apply for Centurion.1 point
-
Hi Jessie, and thank you for your EIB application! CRL and EIB Application Requirements: All required photos have been submitted, and on behalf of the entire D.O. staff we are pleased to welcome you to the rank of Expert Infantry. Congratulations! Other-Armor Fit/Assembly; In this area we review observations made by your fellow troopers and the DO team. Some observations may lead to suggestions to improve the overall look of your armour. Note that we consider both text (CRL) and pictures (screen caps/ additional reference images) when reviewing/approving submissions. Not all items may be specifically listed in the CRLs but may be required for higher levels. Thank you again for your patience, Jessie. Just a couple of things to mention here. -Ideally , the ear screws should go aligned with the rear edge of the Traps. It is mentioned for your consideration only (we know this is a difficult issue to fix). Reference images -The angle on the top of the sniper knee plate. It's close, but for a better look we are recommending that you trim it down (to closer match the reference images). Reference images *************************************************** Centurion Requirements In this section we prepare you for Centurion. Because Centurion photos show more detail than EIB, items pertaining to Centurion might be seen there and not here and additional photos may be required. We try to point out all that we can from what we see, but the final accuracy is the responsibility of the trooper. CRL L3: There should be a minimal gap between the shoulder armor and the chest/back plates. Your left side is perfect. You just need to adjust the strapping on the right side a little...An easy fix. Reference images CRL L3: The top of the ABS ammo belt should sit at or just above the bottom of the central and vertical abdomen button panels. The position of the belt is ok (according to crl). You just need to raise it a little for a better look. Reference images CRL L3: "Ideally there is no gap between the abdomen and kidney armor". Although it's not much gap, we think that we can see them a bit closer. Maybe just a matter of tightening up the canvas belt. Reference images As seen in the reference images, there are no gaps on the lower ridge of the thighs. Although the gap is very small, we suggest gluing a small piece of ABS behind that gap. You can then fill it with some ABS paste for a perfect finish. Reference images Finally, you can give to the blaster a light coat of paint in these areas(to remove weathering), since according to the CRL, "T-tracks and grips shall have the appearance of black plastic". And that' s all Jessie. We hope to see your Centurion application soon.1 point
-
Congratulations Trooper! Do those fixes and shoot for LV.3 next.1 point
-
Congratulations trooper!! Onward to Centurion!!1 point
-
Congratulations Trooper!!! Welcome to the ranks. Looking forward for your Centurion app.1 point
-
Congratulations Adam!!!1 point
-
Hi, Adam, and thank you for your application for ANH Stunt EI! CRL and EIB Application Requirements: All required photos have been submitted, and on behalf of the entire D.O. staff we are pleased to welcome you to the rank of Expert Infantry. Congratulations! Other-Armor Fit/Assembly; In this area we review observations made by your fellow troopers and the DO team. Some observations may lead to suggestions to improve the overall look of your armour. Note that we consider both text (CRL) and pictures (screen caps/reference images) when reviewing submissions. As I mentioned before, this is one of the best submissions I have seen in quite a while, brother. Great attention to detail and a super nice overall build, and just a couple of items here to go over: As stated in the CRL, the fall of the tube stripes should ideally face forward, but yours are on the wrong sides. Not a deal breaker, but when you apply for Centurion we really, really hope you will consider replacing those for a much better overall look. Reference images Just a heads up for your next build, but in a perfect world the rear thigh cover strips should be more in the center. Centurion Requirements; In this section we prepare you for Centurion. Because Centurion photos show more detail than EIB, items pertaining to Centurion might be seen there and not here and additional photos may be required. We try to point out all that we can from what we see, but the final accuracy is the responsibility of the trooper. Nothing to see here.... move along. Way to go, Adam, and I look forward to seeing your Centurion submission soon! Time to get out and show off that armor as the newest EI from the Dewback Garrison!1 point
-
Ok. So it feels way better without the elastic on the middle of the chest piece. I couldn't get my snaps on the shoes and shins by myself and I know the color looks weird, but this definitely gave me room to breathe and I could walk around comfortable for the first time. I did make a bigger piece of elastic mid chest to "pull" the chest piece down. Patiently still waiting on Mark to send my buttons and strips.1 point
-
Nope, just slightly bad case of OCD. Forgot to mention the TX part, but I am thinking it's a reference to THX-1138. I really gotta' get out more often.1 point
-
Great news, congratulations and welcome to the ranks trooper, you can request higher access here1 point
-
It is with a heavy heart that I mourn the passing of Terrell Reber, who was my XO for many of the early years of FISD and later became DL in his own right. In that time, he contributed his insight and wisdom in many areas most particular in the areas of armor, molds, and armor making. He was the first person to find a legitimate, conflict free path to selling TE derived armor when he founded ATA. It may be hard to believe, but there was a time those years back when a decent set of FX armor was $1200 and TE type armor was hard to acquire from a reputable person. ATA changed much of that, and ATA set the bar for providing quality armor at an affordable price. Hence ATA: affordable trooper armor. He was very picky about quality and hunted for plastic suppliers who would provide virgin material with the right shade of white. He could have charged more and had a long wait list, however felt that would be against his principles. These days there are many options for people to procure quality TE type armor at an affordable price, and we have a solid list of reputable makers. It can be hard to believe that it wasn’t always this way, or that even having a public list of vetted armor makers was considered taboo. With a glance at a picture, he could tell you the make of the armor or helmet and could spot all the “tells” that was uncanny. He gave selflessly his experience and advice to FISD members time and again. However, most of all I will remember him as someone who was always there to take a phone call when needed. Who gave selflessly to this hobby that he loved. 43 is just too young. Buckets off, as I drain it of my tears.1 point
-
1 point
-
Oh no.1 point
-
Welcome to FISD Don, great looking set of costumes. Well done. Yuo may want to take a look to this useful index . Good luck !!1 point