Leaderboard


Popular Content
Showing content with the highest reputation on 10/05/2021 in Posts
-
The final touch is ready. (Holster screws will come later once I sort that thing out) Bad paint job fake metal part to be replaced with real aluminum part my brother milled for me!2 points
-
Confidence and ability come from a big pile of mistakes in my experience. You should see my "failures" pile in my work room!2 points
-
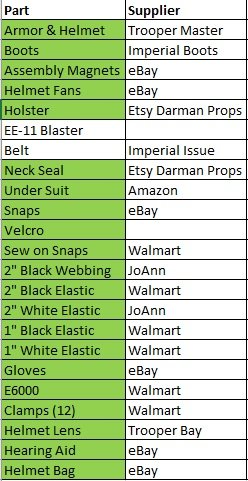
After reading/researching other build threads here, observing and talking to local garrison members I am starting one of these threads! My first official build step (other than acquiring the kit). I just purchased a kit from a fellow garrison member here in VT who lost interest in the build . The good thing is it is staying within our local squad and most of the trim work is done (only the belt, ab boxes and ankles left). All the soft goods came with the purchase as well . The kit is from Back Stage Props, that I believe, has since gone out of business. I have two other members @ShadyP here that bought this run a few years ago who I will be working with. The known issue with this early kit is the lack of a return edge on the chest yoke. I am in communication with a few vendors to see if I can get a replacement part instead of trying to build an edge. Here is what I have so far with a few pics: Boots: Imperial Boots Belt kit: Belts of The First Order Pouches x2: Trooper Bay Gaskets: Geeky Pink (he and I are are ironically close in size- 5'6" and slim) Tactical vest Gloves: Endor's (I think) Under suit: UK Extreme Racing Helmet: Anovos "BBB Day" for me was the day I got to pick everything up from my fellow squad member! Nice boxes of pre-trimmed armor I started to lay everything out and label L/R Belt Kit Blaster base and shoulder bell hanger Greeblies (I think everything is here?) Gaskets1 point
-
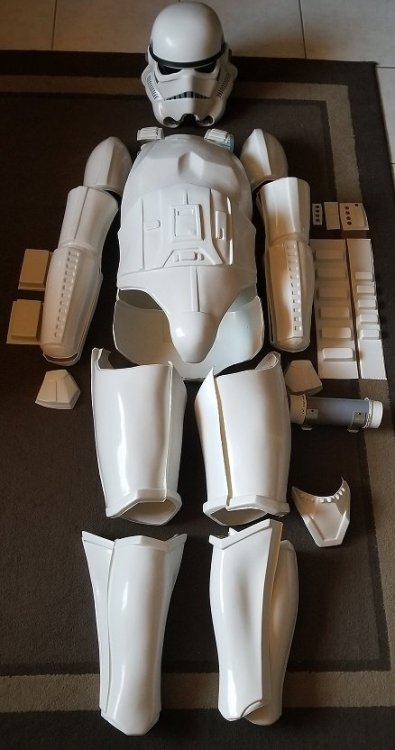
I've been reading and learning about TK builds and how the ISD helps along the way. The amount of info available here is amazing. Thank you for what you do here. This is my second 501st costume build. My First is ROTJ Boba Fett Hero that I built after being laid off in 2020 due to COVID. I've been trooping as Boba with the 501st and loving every minute of it for almost a year. The 501st will not allow more than 1 of the same character to troop at the same time. (Ex: not allowed to have 2 Vaders or Bobas or you get the idea.) You can have as many TK's as you like though. So, I decided to build a TK allowing me to go to more troops. I've got a good start on my build. All of the parts are in hand except the E-11 which is being built by Quest Designs and the belt since I won't know which size to buy until the armor is assembled. I commissioned my helmet build from Trooper Master and he did an amazing job. I am adding the fans, sound system, upgraded lenses & padding. I also painted the inside black with Plastidip. I've trimmed all of the armor and am ready to start gluing it together with E6000. A good friend of mine built 2 TK's to Centurion Level, one is a sand trooper. He is guiding me through my build. My goal is to get Centurion approval. After building a Boba Fett this should be fairly straight forward. (I hope)
.thumb.jpg.6b027198eeb5507e40dc5a6b30cdb907.jpg)
 1 point
 -
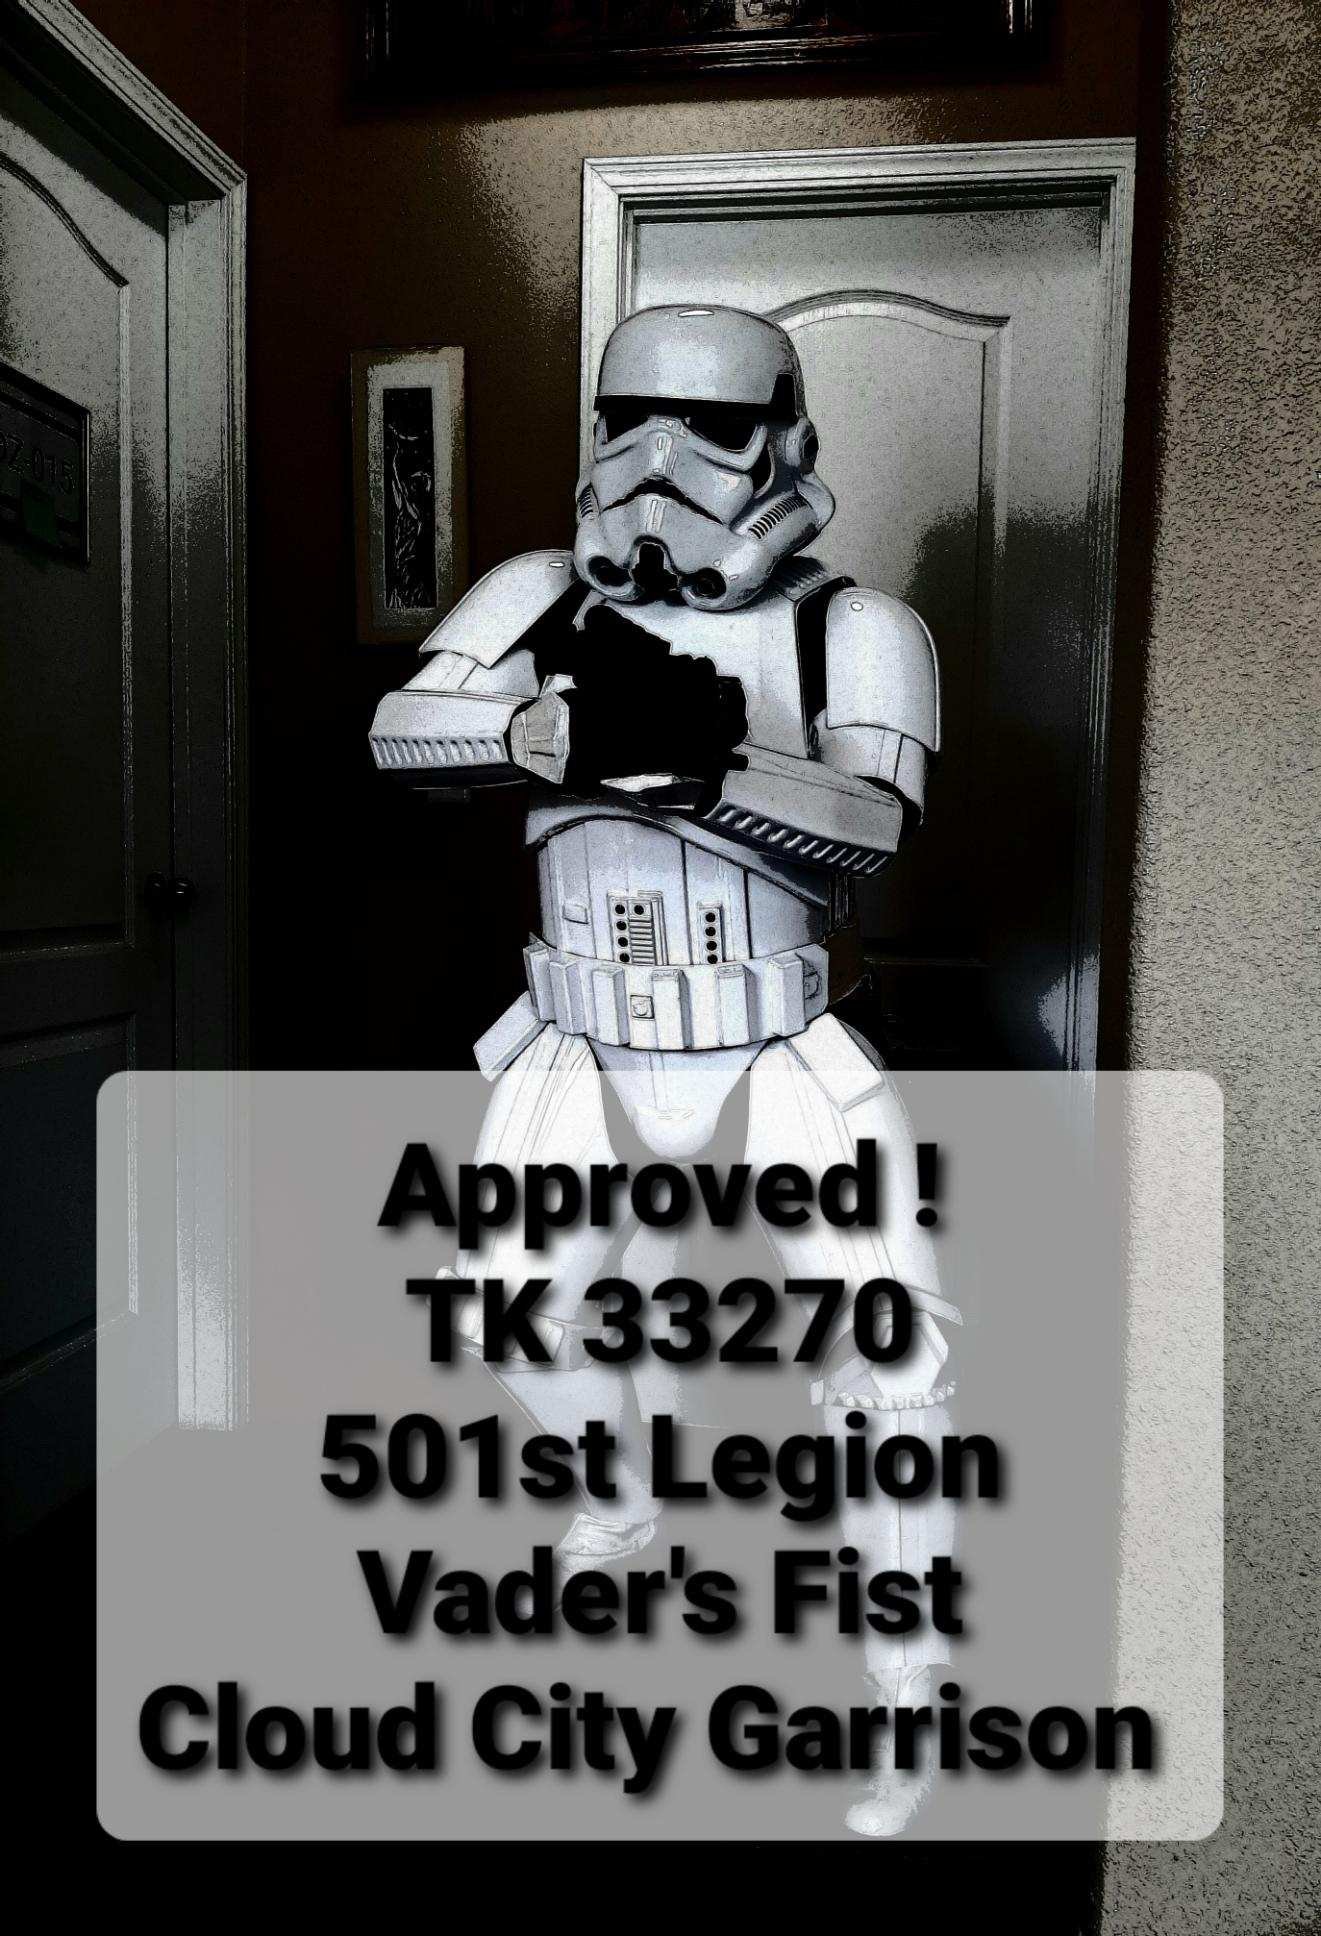
Newly minted and approved ! I'm TK 33270 just approved this month. I'll be serving with the Cloud City Garrison (OR/WA) and looking forward to my first troops! Long Live the Empire!
 1 point
 -
Hello and Hallo, I can't believe that I finally got to this point where I get to introduce myself to all of you again -- this time as a TK...! Because I get a whole new post for myself, I decided to use this space to talk about my journey to the 501st, how I chose my costume, as a way to say "thank you" to all those that I've already thanked several times before, but will do so again, because their help was so very much appreciated, and of course to explain why I chose to be TK-66744. I hope this is at least a bit enjoyable to read My journey to the 501st Legion starts with a 12 year old Luca, who isn't that much of a Star Wars fan, but has just discovered the wondrous (and kind of terrifying) world of fanfiction. Younger me decided to get an account (which soon gained me the nickname "Morgi") and slowly started to fall in love with the Star Wars stories and through that Star Wars in general. Honestly, without that fanfiction, I probably would not be this much of a Star Wars enthusiast. One fanfiction in particular caught my eye back in December 2015. It was a story about Darth Vader and the Empire with some truly amazing Stormtrooper characters. You could find me every single Friday waiting for that next update. The author soon let the reader know, that she herself is a member of the 501st Legion, talks about trooping and all the amazing people. I wanted that and decided to keep saving money until I finally would get to buy my own set of Stormtrooper armor. In the meantime, I wanted to meet members of the 501st and to get to gush over those characters, to admire those Vaders and Stormtroopers not only through a screen. Somehow that dream of meeting those characters never worked out. The dream to become a member of the 501st Legion myself grew instead -- what better way to meet a Vader or a Stormtrooper than being inside that armor yourself, right? At age 17, I got fully immersed in the topic, watched videos about the 501st on YouTube until they could only offer me those short clips that had about seventeen views and were from 2009. I was hooked. Instead of studying for my graduation, I decided to watch Star Wars movies and 501st videos until I came to the conclusion that I would buy my own armor. I researched on here and finally decided to go with an RS kit. At the end of May, two days before my oral exam in history, the first box arrived and my mother had to take that box away until the first of June, so that I could actually focus on the exam. During the whole month of June I worked on my armor using those nice videos and tutorials online. My birthday gifts consisted of a neckseal and similar accessories. At the beginning of July I then decided that I would need to get more specific help than that material could offer and I got an account on here. The next month went by in a blur with daily updates on my build thread and an absolutely amazing support from all the members on here. Thank you very much! In fact, the build went well enough, that when I met up with Tino (T-Jay) towards the end of August to take my Approval Pictures, the GMOs had nothing bad to say about my armor. At this point a huge thank you (again) to Tino for the hours that he's helped me so far and continues to help me. You've become an absolute cornerstone in my journey to becoming a TK, from advice on regards to trooping, over help with my armor and the approval pictures to helping me choose my TK number (you're right. Using the number you get when you look up "Morgi" on a mobile phone number pad is kinda neat ). Oh, and of course a huge thank you for showing me all your props! Those were the first screen accurate props that I'd ever seen (12yo me would've been horrified that it took me over five years to make that dream come true, haha) and I'm still blown away by the experience...! Long story short: At the beginning of September I then got the happy news that I've been accepted into the 501st Legion as TK-66744 Thanks for all the information on here, the individual help and the continuous support during my build! There's nothing more for me to say, except that I'm looking forward to meeting more of you, to being a part of the Legion and to finally have that first troop at the beginning of October. Thanks for reading all of this, I know it's a tad longer than most posts here Luca/Morgi/TK-66744 German Garrison1 point
-
Rejuvenate the FOTK builds in VT-woohoo! Looking forward to getting on with our builds1 point
-
Wow this looks nice l! I’m going to have to see about getting one of these. still waiting on my Hellhounds I ordered several months back, having another E-11 I can put electronics in would get great. -- UPDATE: Ordered one!1 point
-
Boba looks great. You’ll have no issues with the TK. The resources here are incredible and the response to questions is typically quick and meaningful.1 point
-
I tried to match the inside surface shape.1 point
-
Hi Chris, welcome to FISD. Amazing Boba Fett you have mate!! congratulations and glad to read a friend is helping you to make your armor to L3 level, that's great!! Looking forward for your advances and photos.1 point
-
Looking forward to seeing your progress good luck1 point
-
Good luck and keep on going ahead. That's the attitude. Pd. That indersuit looks great!1 point
-
Wow Kevin, sorry to read of your woes. Looks like you are recovering from all this and heading towards the finish line. Best of luck with your approval sir.1 point
-
Funny you said that, I just asked a guy I know from the 501st and he mentionned chicago screws too haha! Just bought some off Amazon. Thanks!1 point
-
Wow, so this has been a long time. I'm not quite dead yet! Sadly, if things could have gone wrong, they have... So, where to begin... Shortly after my last update, I was working on the back/yoke seam when disaster struck. Trying to sand the seam smooth, it was getting to a point where the plastic was thinning on that back ridge so much it was nearly see-through. Before I went any further and potentially sanded a hole through the armor, I decided to reinforce it with some ABS sludge. I inverted the back piece and filled that ridge with the sludge, then left it overnight to cure. Unfortunately, I guess it was still reacting, and melted the entire ridge, essentially destroying the back plate.. I contacted KB for a replacement, but before they were able to get to making one, I found someone selling an already finished KB kit that just needed some paint. Huzzah! But wait, it's not over... I got the kit, everything pretty much looked okay, so I went right to paint. I built a makeshift paint booth in my garage, using 1/2" pvc pipe and plastic sheeting to make both a booth, and something to hang the armor off of while I painted. After much trial and error I finally got all the white laid down perfectly, using the Rustoleum Professional series of spray. Next step was the clearcoat, which I was going to use the 2k spray clearcoat with the activator and such. Wanting to make sure I didn't waste any, I wiped down all of the armor with a tack cloth. Unfortunately, that seemed to have left a sticky residue on the armor, because every single particle of dust seemed to magnetically draw to the armor from out of nowhere. I didn't think to check before I started applying the clear, as when I left it everything was spotless. As I go part by part, I realize the debris is there, but silly me figured I can't stop because I've already popped the can and don't want to waste it (note to self... stop what you're doing next time). Once the clearcoat dried and I could see what I did, I proceeded to cry myself to sleep and ponder my life decisions. At this point, other life events take over (pandemic and all), so I have to put things to the side for a while. Unsure of wanting to try and sand down the clearcoat and re-do it myself due to time and such, I happened to find a prop making company that was taking new orders, and they had apparently done a number of FOTK commissions before. Great! I can have someone else finish the armor while I work on other things and hopefully get it back all painted, then I can work on strapping and all those fun things. Long story short, I send them every part I have, from both my original kit and the "already done" kit, with the agreement for them fix/repaint the clear, and if there are any parts that have issues they can use my "original kit" parts to do whatever is needed. They offer to fully complete both kits, which wasn't needed but hey, figure if something breaks I'll have a spare ready. I asked them to take their time and do it right. Four months later... they tell me its nearing completion, so I ask if it'd be possible to have it for my birthday this year (August 1st). Not to derail this with ranting about other peoples work, but they tell me a date it'll be ready, go to meet to pick it up, and like 1/3 of the parts are missing. I look over the work, and the paint is awful - it's full of debris, severe orange peel in some places, paint runs, paint filling seams that are not supposed to be seamless, chips in the paint, odd stains and marks. I tell them to stop working on whatever else they were doing with my armor and send it back. Two weeks later, I finally have my parts. While the paintjob wasn't great, I could get away with approval because it's likely things that can't be seen from a distance... basically like vanilla bean ice cream - looks solid white, till you get up close and notice all the flecks in it. That was until I got the helmet, which was just... bad. They completely painted over the black stripe that goes around the bottom area of the helmet, plus a massive paint run that is chipping off on the left cheek. Ugh. Now I can't even get approved till I fix at least the helmet. So, now I'm back to roughly where I was at the time of my last post. Luckily after working with some squadmates, I we picked the best bits of armor that should be approvable, and painted in the missing stripe along the bottom of the helmet. I'll probably strip it later and re-do it, but for now I just want this done. Working on the belt and strapping now, so hopefully later this week... One bit of good news, I got a fancy undersuit for it! I'll avoid vendor names to protect the innocent, but it's basically an integrated undersuit, with the gaskets part of the pants and shirt, with all the mounting and velcro built in. Also has a pouch for an amp which is what you see on the "suspenders" there. Took under a minute to put on Moral of the story - take your time and do it yourself, you can do it!1 point
-
Very nice, a metal will will save it from getting scratched in use1 point
-
Not specifically but if you read through the first page of vendors some mention who supplies commission suits You may also be able to reach out to your local garrison, some members will build armor for others at a price. You can find a lists of garrisons here https://www.501st.com/members/displayUnits.php1 point
-
Wow man nice work on the finish.1 point
-
Yes I know it’s been a while… starred doing a few things on this, perhaps I’ll make some progress. I made a better trigger1 point
-
These are awesome photos Alexander, thank you for sharing.1 point
-
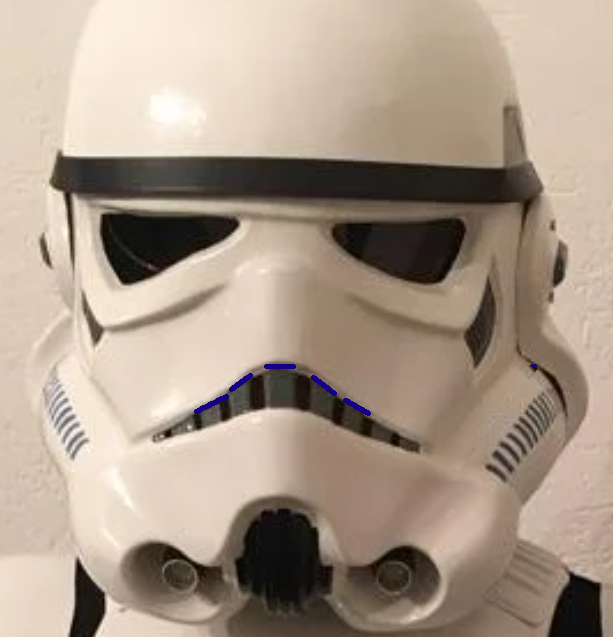
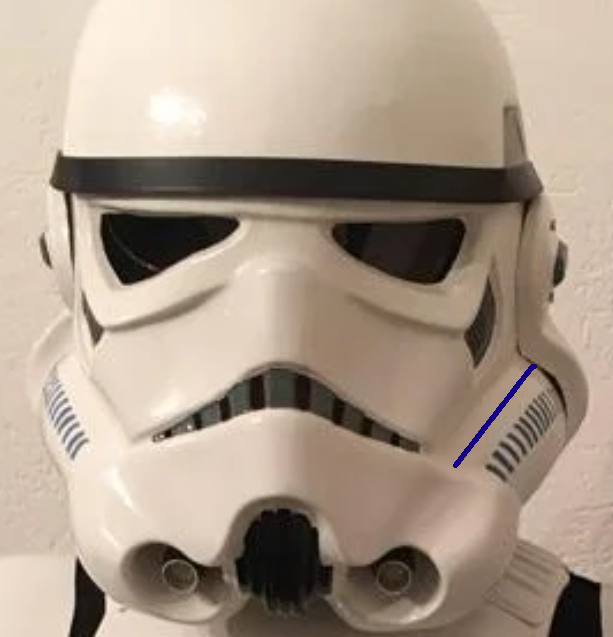
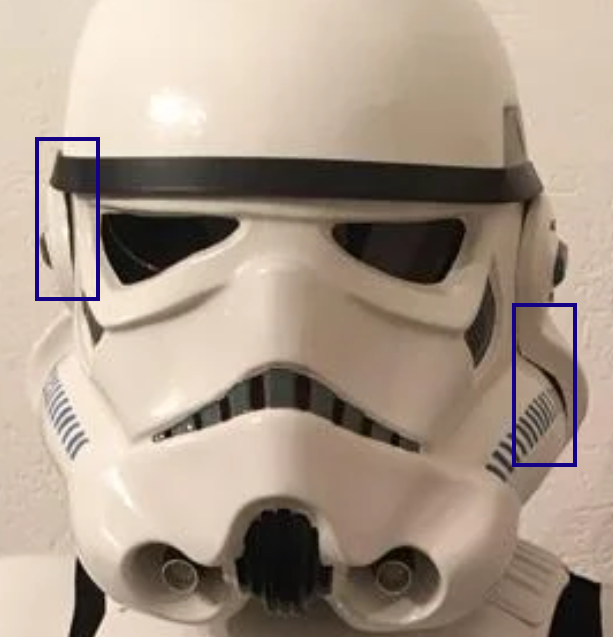
Just noticing a couple of things on your helmet. From the CRL: Frown is painted gray and does not leave the teeth area. You have some paint on the gums which will need to be removed, mineral turps and toothpick/cotton buds will work. Also From the CRL: Ideally, the tube stripes are positioned approximately a pencil width from the side of the cheek. Although this is for Level 2 your tube stripes are quite a ways from the side of the cheek You could also reduce the gaps between the ears and helmet Also it looks as if the vocoder could lines/bumps could be a little more defined
 1 point
 -
Great images1 point
-
well, it's been about 2 years since I put this armor project down and focused on other aspects of life and the 501st. After a squad mate sold his kit to another Vermonter I have some reinvigorated interest in finishing this project. Looking back through my parts I remembered that I need to replace the yoke and TD as well as my shoulder bells and possibly back plate. With two of us working on these kits again in VT I'm hoping to find a vendor to provide us both the parts at the same time. Time to start messaging vendors I guess. If anyone has suggestions as to who can ship parts fastest, I'd love to hear them.1 point
-
That makes sense! I will get in contact with you! Currently juggling responsibilities as a father of twins (5 weeks old) and life. Printing progress is a bit slow1 point
-
Helmet Interior Upgrade The Anovos Standard Line helmet, as you can see above, comes with a pre-installed hard hat liner but is otherwise unfinished. To get a nice, clean look, I used Plasti-dip and acrylic black paint as I've done with most other helmets. 1) Remove the hard hat liner. It's held in with a pair of screws - once you remove those you can simply pull the liner off the tabs. 60150F4D-0D5B-48CC-8312-8472AE64AB61 by Taylor Goodson, on Flickr 2) Cover the areas we don't want touched with the Plasti-dip with painter's tape. The tabs, lenses, and black plastic interior pieces were all covered as well as the bottom lip to protect from spraying the dip. BA32FC57-ACDD-4537-9470-4F5DC63D6E40 by Taylor Goodson, on Flickr 3) Spray the interior. I do a couple light coats followed with a heavy coat to finish it off. CB2A6C97-B2C5-4DE8-83A2-B7C94B89DBBC by Taylor Goodson, on Flickr 4) Before the Plasti-dip dries, carefully remove the painter's tape. If you wait too long, the plastic dip can harden over the tape and pull up with it. CD9B58A4-37B3-4F2A-953B-982C40EE643F by Taylor Goodson, on Flickr 5) Clean up hard to reach areas and taped-off edges with black paint. You could also follow-up with the brush-on Plasti-dip, but I find just a touch of black paint to be easy and effective. Here's a shot of the chin vent detail that was taped off before being touched up. 92D71121-39F0-45E2-8D72-B48F7E86B5AB by Taylor Goodson, on Flickr And here's what it looks like after: 5A1F89E4-399E-49DC-B614-A187D87595FB by Taylor Goodson, on Flickr 6) Finally, re-install the helmet liner (if you choose to use that over padding). C705B5B6-D374-4C4F-9740-33A0F5DFD542 by Taylor Goodson, on Flickr Now it's ready to go!1 point


.jpg.f1bde59f619163301eb21351cc056138.jpg)