Leaderboard


Popular Content
Showing content with the highest reputation on 07/02/2021 in Posts
-
I'm 5' 11" and must be one of the lucky ones, I can put everything on without issue and with ease, can dress is 5 minutes, didn't need mobility cuts either, and although I don't sit in chairs I do sit on their arms or corner of a table. All comes done to your height, weight and armor. If you are tall you really shouldn't have mobility cuts as it does leave a lot of black showing in the rear.3 points
-
Ah, got it! Makes sense on the mic tips. I added to my other post, but I'd ensure you reinforce your shoulder bridges with some extra ABS too - they're a very weak and crack-prone area, but easy to add strength to. I also like to add a little velcro to the tongue of my boots and front inside of my shins to help keep them from twisting or riding up. Again, none of this accuracy related, but should help on your upcoming troops and I'm here anyways, so why not haha Great work!3 points
-
Here's the new frown.3 points
-
Sorry for the late reply, but I think Airsoft grip is fine at all levels for R1, and I really wouldn't even have a problem with EI for ANH/ESB, but for Centurion the grip should be replaced and the power cylinders need to match official references (or at least be close).3 points
-
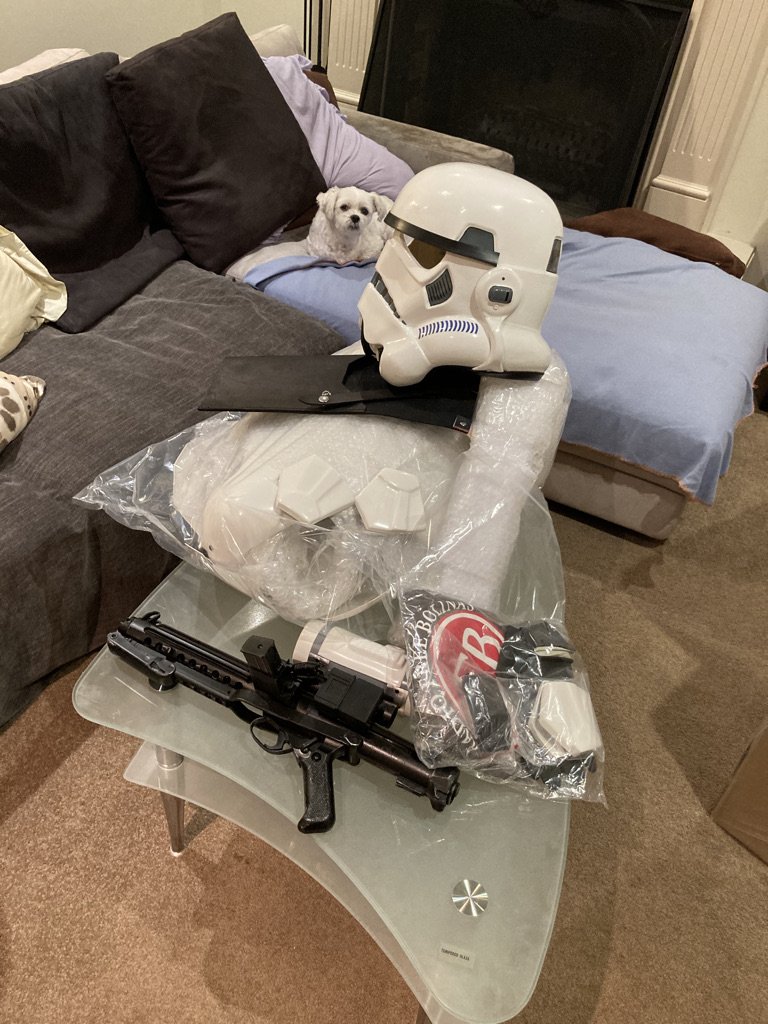
Sensory overload - RSProps delivery arrived today - haven't unpacked it all but OMFG
 3 points
 -
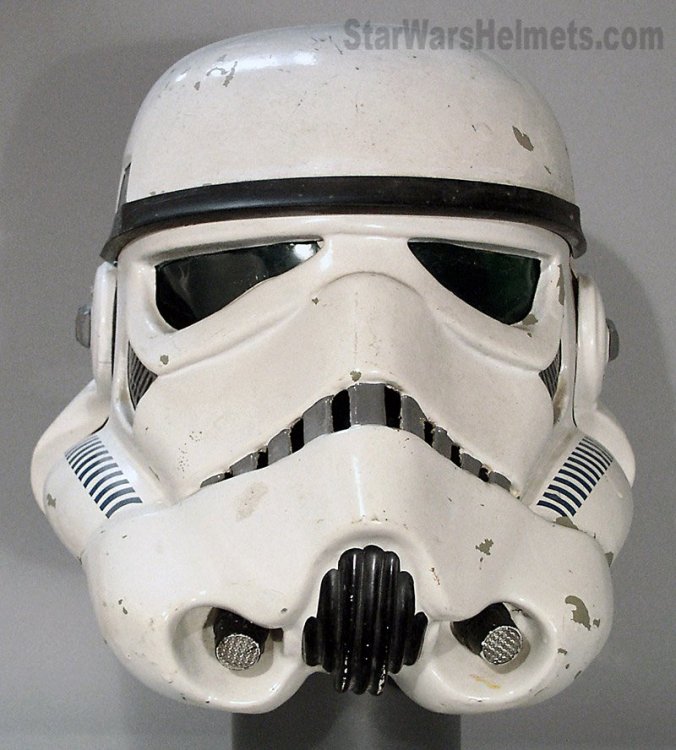
Here are some picture of the Quest Design E11 as promised. I can always add more if anyone would like another angle. In the last two I laid the Fieldmarshal BlasterFactory E11 next to it for size reference. I think it’s a very well done resin E11. Probably one of the best I’ve seen but there are some issues. One thing I was disappointed by was the lack of writing on the M38. Something I was very much looking forward to whiting out. I also bought an upgrade kit from Tino, that has a lot of metal parts and screws you can add to an resin E11 to make it more realistic. I still have yet to add those pieces. And like Joe said, the Hengstler does need to be raised up a bit. But overall, it’s honestly pretty well done. Very clean seams, and overall very clean piece. I definitely got my money’s worth. It was a good purchase, in my humble opinion3 points
-
I think you will find a lot of the Stormtroopers found the suits uncomfortable and couldn't get full movement and they had people to help them dress, they had minimal gaps and would hit in a lot of places, you can see this by the amount of cracks that appeared in the armor during filming. You will find your arms can hit the chest no matter where the biceps sit, but you are wearing an outer plastic suit, not a dinner suit Personally I'd try to bring the biceps up a little and see how it feels, you shouldn't need to trim anything off them. Look how far up the biceps are here2 points
-
Looks like you have a little room to bring the biceps up, you could then have a bigger gap between them and your forearms2 points
-
Indeed ! a couple of times I have tried to put on my shoulder-arms section I have ended doing contortionist like movements and a nice back pain2 points
-
Seem to remember Ross telling me his armour is thin, I think only 1mm abs, so is very flexible compared to most armour. Makes it look easy! [emoji23]2 points
-
Something like this2 points
-
Hi James. before any cut, I would like to suggest to check this video about dressing solo. It has been so useful to me, but most of the time when trooping and if it's possible , I ask for some help from fellow troopers mainly with arms . Note that in order to gain more mobility you can turn the forearm curve to allow more space between the bicep and forearm. Hope this can give you some light.2 points
-
Older photo, but it definitely helps when your soon-to-be wife is also a Jawa, so she understands hoarding treasures......2 points
-
Hey brother... A quick look at my Centurion awards will tell you the answer is ABSOLUTELY yes! And add HWT on there too! I achieved all of them with the same Anovos base armor. As you said, it does take some switching out of accessories - especially the helmets and belts, but it can be done with some attention to detail. One tip is to have your plastic belt be detachable - mine uses Line24 snaps instead of rivets under the belt covers, so I only had to purchase separate canvas belts and 2 holsters. The holster is still required for all three, but you could carry the DLT instead of the E-11 on your L2/L3 action photos, sure. Let me know if you have any questions and I'm happy to help. Don't be surprised if you see my FOTK go from TFA to TLJ, then TLJ-E too!2 points
-
Fantastic job on this armor, James! One thing that jumped out at me are the elastic bands on your shoulder bridges. Yours seem to be round instead of flat... these will be fine for EI, but for Centurion they will need to be the flat type. I know this seems like a small detail, but Level 3 is all about the details. If you are having trouble sourcing the correct ones I am happy to mail you as set of them (no charge), just PM me if interested.2 points
-
The shipping wasn’t actually too bad. The price wasn’t bad either. Especially with some of the prices that are being asked for the rubber ones. They gave me updates as to when the blaster would be ready, when it was packaged and then when it was shipped. Very nice people. I would trust a rubber blaster better for trooping. A little less weight and you don’t have to worry about dropping and breaking it. I’ve heard that can happen with the little kids pretty often. Lol.2 points
-
Rogue one TK builds Obviously, I have overhauled this roster. Please let me know if I am missing anyone or if anything is incorrect. Updated 7/5/2022 Forum ID TK ID # Date Started Date Approved Location Variant 501st Approved EIB Centurion Armor Brand Helmet Brand WIP Thread Jimmiroquai 82480 3/26/2017 6/11/2017 Philippines TK Yes Not Yet Not Yet Jimmiroquai Jimmiroquai Link THMAustin 6/28/2017 9/19/2017 Oklahoma TK Yes Not Yet Not Yet Jimmiroquai Jimmiroquai Link darthcue 35679 8/11/2017 12/25/2017 Philippines TK Yes Not Yet Not Yet Jimmiroquai Jimmiroquai Link Yoshix 42131 11/29/2017 1/29/2018 Florida TD Yes Not Yet Not Yet Jimmiroquai BS Mod Link Parquette 33130 9/26/2017 5/25/2018 Illinois TK Yes Not Yet Not Yet Ensemble BS Mod Link porg_executioner 24333 2017 6/1/2018 Puerto Rico TK Yes Not Yet Not Yet Jimmiroquai Jimmiroquai Link 11B30B4 20980 4/2/2018 7/22/2018 Georgia TK Yes Yes Yes Jimmiroquai Jimmiroquai Link Vader’s Wingman 12/24/2018 11/29/2018 Florida TK Yes Not Yet Not Yet Jimmiroquai Jimmiroquai ? CommissarGurka 23191 6/12/2019 10/13/2019 Michigan TK Yes Not Yet Not Yet Jimmiroquai Jimmiroquai Link Imperial Valour 16477 7/6/2019 12/1/2019 Texas TK Yes Not Yet Not Yet 850 AW HSP Link Roukie 1 10868 2/18/2020 7/28/2020 Germany TK Yes Not Yet Not Yet 850 AW BS Mod Link Twelveravens 61372 6/21/2019 9/10/2020 Virginina TK Yes Not Yet Not Yet 850 AW BS Mod Link Morgul702 91089 3/31/2020 WIP Florida TK Not Yet Not Yet Not Yet Jimmiroquai Jimmiroquai Link Kal Akaan 73105 7/1/2020 WIP Georgia TK Not Yet Not Yet Not Yet 850 AW Nico Henderson Link TheRascalKing 61490 7/17/2019 3/9/2021 California TK Yes Yes Not Yet Jimmiroquai Jimmiroquai Link NotRookie 55305 10/22/2017 WIP Florida TK Not Yet Not Yet Not Yet Jimmiroquai Jimmiroquai Link NaturalBornDT 42011 5/20/2018 WIP Florida TK Not Yet Not Yet Not Yet Jimmiroquai Jimmiroquai Link tsongololo 19155 2/15/2019 WIP California TK Not Yet Not Yet Not Yet 850 AW BS Mod Link TK 14166 14166 7/15/2019 1/4/2021 California TK Yes Not Yet Not Yet Jimmiroquai Jimmiroquai Link NapalmSeth 13821 8/13/2019 WIP Florida TK Not Yet Not Yet Not Yet Jimmiroquai Jimmiroquai Link Darth147 12714 12/5/2019 WIP California TK Not Yet Not Yet Not Yet Jimmiroquai Jimmiroquai Link SkepticalBoy 10268 4/15/2019 WIP Washington TK Not Yet Not Yet Not Yet Jimmiroquai Jimmiroquai Link Big Deal 10/12/2017 WIP Canada TK Not Yet Not Yet Not Yet Jimmiroquai Jimmiroquai Link Zeddy 4/14/2018 WIP Australia TK Not Yet Not Yet Not Yet Jimmiroquai Jimmiroquai Link cjkirk11 7/26/2017 WIP Unknown TK Not Yet Not Yet Not Yet Jimmiroquai Jimmiroquai Link Sascha9481G 5/22/2017 WIP Germany TK Not Yet Not Yet Not Yet Mod OT BS Mod Link TerribleBen 10545 2/22/2020 12/20/2021 Washington TK Yes Not Yet Not Yet 850 AW BS Mod Link DarthBiscuit 70017 4/20/2020 11/16/2020 California TK Yes Not Yet Not Yet Jimmiroquai Jimmiroquai Link Th3DarKn1ght 7/13/2020 WIP South Carolina TK Not Yet Not Yet Not Yet Jimmiroquai Jimmiroquai Link Nicker 6/10/2020 WIP United Kingdom Incinerator Not Yet Not Yet Not Yet 850 AW Nico Henderson Link MMcFett 7/6/2020 WIP New Mexico TK Not Yet Not Yet Not Yet HSP HSP Link Junos 1/18/2020 WIP Michigan TK Not Yet Not Yet Not Yet 850 AW HSP Link PaqMan11M 4/30/2020 WIP Florida TK Not Yet Not Yet Not Yet 850 AW BS Mod Link Battleborn Props 6/17/2020 WIP Nevada TD Not Yet Not Yet Not Yet 850 AW 3D Print Link NessD 30988 5/3/2020 6/27/2022 Germany TK Not Yet Not Yet Not Yet 850 AW BS Mod Link Zanzabar 1/14/2019 WIP Canada TK Not Yet Not Yet Not Yet Jimmiroquai Jimmiroquai Link BigJasoni 51923 8/9/2020 11/7/2020 Virginia TK Yes Not Yet Not Yet Akira Y 3D NFD 3D Link TC5800 5800 8/9/2020 WIP Pennsylvania TK Not Yet Not Yet Not Yet HSP HSP Link TK3373 3373 8/18/2020 WIP New Zealand TK Not Yet Not Yet Not Yet 850 AW BS Mod Link Cobratrooper 9084 9/13/2020 WIP Germany TK Not Yet Not Yet Not Yet 850 AW HSP Link CountCunning 30180 6/29/2021 WIP Canada TK Not Yet Not Yet Not Yet Jimmiroquai Jimmiroquai ?1 point
-
Name: James Username: fishgoh0nk TK-83751 Southern California Garrison Orange County Squad Armor Maker = ANOVOS Helmet Maker = ANOVOS Blaster Type = S&T E-11 (Airsoft) Height = 5'11 Weight = 200lbs Boot Maker = Imperial Boots Canvas Belt = @TKittell belt Hand Plates = @justjoseph63 silicone handguards Electronics = Raspberry PI Zero W, iComm, Aker amp, @ukswrath SHA hearing assist, quad fans Neck Seal Type = ANOVOS Holster Maker = ANOVOS Full Body Front Back Right Right Raised Left Left Raised Bang Bang Bang Details Right Left (paint chipped when wearing, will touch up) Helmet Front Left Right Back Lens color HOVIs & Vocoder S Trim Armor Armor Strapping Arm strapping Forearm wrist returns Cod Elastic Elastic shoulder ties Ab button panel 1 Ab button panel 2 Thigh ammo Left Thigh ammo right Sniper knee Belt Accessories Neck seal Gloves Boots Thermal detonator E-111 point
-
Brilliant, and much cheaper! Thanks Glen1 point
-
I discovered that since the forearm to bicep strap is on the outside of the elbow, the bend is actually stretching, pulling my bicep down as the arm bends in the process. I can redo some of the elastic strapping to raise the bicep. Thanks for all the info. Needless to say, my mobility dreams have somewhat been quashed, better put away my cardboard mat and Adidas shoes.1 point
-
Enlisted barracks Off Topic Page 90 Complete gmrhodes13 Page 89 Complete gmrhodes13 Page 88 Complete gmrhodes13 Page 87 Complete gmrhodes13 Page 86 Complete gmrhodes13 Page 85 Complete gmrhodes13 Page 84 Complete gmrhodes13 Page 83 Complete gmrhodes13 Page 82 Complete gmrhodes13 Page 81 Complete gmrhodes13 Page 80 Complete gmrhodes13 Page 79 Complete gmrhodes13 Page 78 Complete gmrhodes13 Page 77 Complete gmrhodes13 Page 76 Complete gmrhodes131 point
-
I disconnect the lower rivets to open the armor and get inside .1 point
-
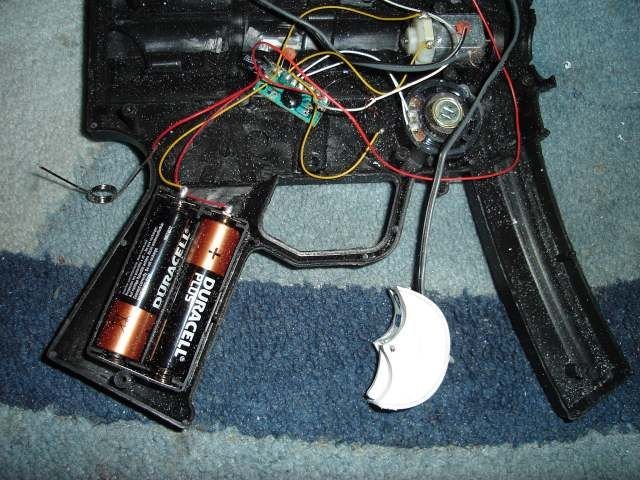
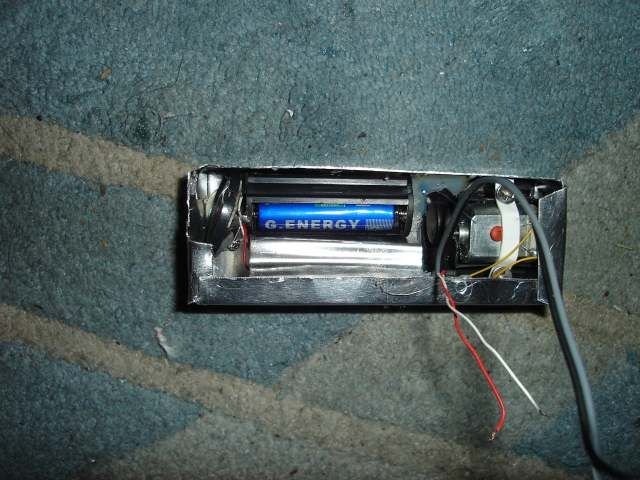
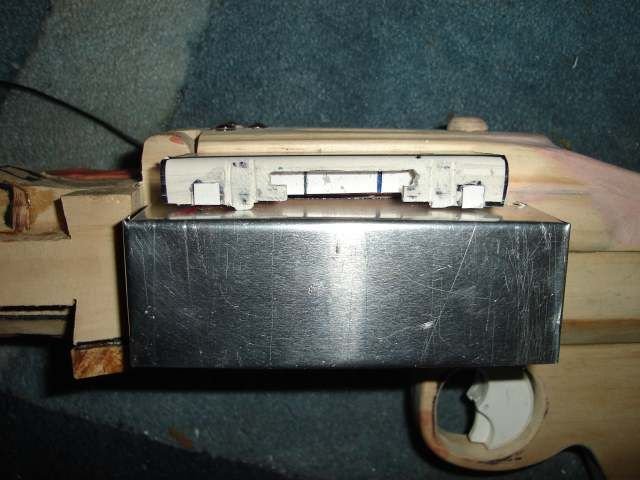
In the past I've used toy guns and taken the electronics out, very small circuit boards, add a high bright LED so it fills the barrel with light and also add small disk flat batteries to save on space, they do last quite a long time. This one.also had a vibration motor, can feel it through the gun. This is an old build so I used AAA batteries. I also tried a few MP3 boards which are quite small, just a case of adding a switch and LED. I also add a speaker jack so I cam run a cable to the Aker amp. If you are interested the build is a basic scratch build https://www.whitearmor.net/forum/forum/118-blastech-dlt-19/page
 1 point
 -
Funny, this dressing video was probably one of the first 10 videos I watched immediately after ordering the armor. It's like I've finally come full circle. I can do everything minus putting on a shoulder bell after the first shoulder bell has been donned. I think I might need to alter the method, I notice he's raising his elbow high for chestplate clearance. Let me give that shot.1 point
-
Thanks! And yes I did - those are trooper bay ears on an Anovos bucket. The HOVI tips are from Ukswrath speaker system. Thanks for the tip about the holster and the belt ammo box! Let me put some velcro on right now actually1 point
-
Looks awesome! Out of curiosity, did you replace the ears on your helmet? And if you're going for extreme accuracy, belt box elastic should be 'woven', not 'ribbed'... and I can see you replaced the mic tips, but would recommend a pair from @ukswrath or similar that have the correct inner details. Also, absolutely not accuracy-related, but I would strongly suggest adding a bit of fuzzy velcro to the back of your holster and belt to cover the metal rivets - otherwise when you wear your armor enough, they'll eventually scuff and scratch that pretty armor! OHOHOH and reinforce your shoulder bridges with some extra strips of ABS!!!1 point
-
That looks good to me, but.... I'm no DO or armourer, so before trimming check in with someone that signs off on outfits. I'd hate for you to ruin your shoulder bells if I gave bad advice! If you don't have a local/garrison armourer to check with then post that pic and question here: https://www.whitearmor.net/forum/forum/191-tk-pre-approvals/ For sure you'll get the right answer there1 point
-
Here's a link where the shoulder bell curve is discussed. Might help https://www.whitearmor.net/forum/topic/28085-angled-shoulder-bells/1 point
-
That bit I'm not sure. Best to run that exact question to someone like a DO to check. When you say shoulder bell strapping, do you mean because your shoulder bells hit against your chest plate? If that's the case then do you have any curve on the inside edge of your shoulder bell, as if not this might help. I'll have a look for some ref pics to show what I mean1 point
-
Yes, same problem. I am considering trimming a little more in the curve of the elbow pit part of the forearm to allow more easy bending, but its a fine line before you could remove too much. The armour definitely wasn't designed with practicality in mind! I don't have voice system yet, but I do have fans and hearing assist, both of which have controls in the helmet. All I can suggest is to try as much as possible to position your system such that the controls are as easy to reach as possible (easier said than done I realise).1 point
-
Love it mate. Yep, getting lots of outfits out of the minimal amount of armour is a VERY attractive proposition, so good to know how simple it is, and looking forward to getting stuck in (once my bank account has recovered!). Also, thanks for the tips on HWT weathering; that's going to be very useful. Plus, multiple helmets and blasters mounted in prominent positions around the house has got to look cool, but does require a very understanding wife. Watch this space for future submissions. Thanks Justin. All very much appreciated.1 point
-
Yeabuddy. It absolutely is, but buying more accessories is still cheaper than buying more armor! I like to try to get every approval I can out of my suits to keep me out of trouble and make the cost feel 'worth it' (I also have 3 'approvals' for my Imperator-level Staff Officer with the same base!). The HWT DOES require light weathering, but only at the higher levels of approval. I used black mascara and a blush brush and kept it light - it was easy to remove it with some cleaning wipes and Novus polish when I wanted to go back to shiny - just watch out for any cracks/crevices, or white soft goods like shoulder straps and canvas belts. The holster and fixing is required for all three costumes (not the HWT tho, so use your ESB belt with no holes). The ANH-S and ANH-H CRL's list the DLT as an optional weapon, so you can carry it for your action photo and use it for your blaster approval INSTEAD of an E-11 for those two (and HWT). ESB requires an ESB blaster. Glenn is a legend and will VERY likely stay ahead of me overall, but I'll admit that I do like the look of the gold frame on that EIB award........1 point
-
Looks good, some nice references http://www.starwarshelmets.com/original-ANH-Stunt-Stormtrooper-armor-helmets.htm
 1 point
 -
Yes more trimming, be amazed howuch more view you will have1 point
-
God, the ears! Thank you, gmrhodes13, for your crazy fast feedback. For the eyes, did you mean could do with more meat or more trimming?1 point
-
Nice clean submission, good luck with approval, as if you'd need it1 point
-
Beautiful job on your armor James, good luck with your application.1 point
-
Tino's E-11 upgrade kits are incredible, and I wouldn't do a build without one! They definitely add the level of authenticity that us OCD types look for, lol.1 point
-
Good to see this list growing with some solid number coming through now.1 point
-
@1nfern0 @TKSpartan so my buddy suggested taking a piece of white t shirt and soaking it in super glue and putting behind to reinforce that area. So I used abs paste first and followed his suggestion it really does feel solid. We will see how it holds up for 4th of July march.1 point
-
Oh you like that Imperial Cog stamp, dontcha? hahaha ;P I tried to put care into each package and hope they all continue to arrive safely and expediently. I know merch can be tricky and it TRULY does take a lot of time and care to ensure things go out smoothly, efficiently, and with good communication and documentation, but I was happy to give back to this community that has given me so much - ESPECIALLY to those of you that have gone above and beyond by EARNING those Centurion awards. I've done it (several times now!) and know how much work is involved, so I am proud of each and every one of you and hope you wear the pins with that same amount of pride!1 point
-
Shawn Knight TK 27928 Letter Centurion Chemi https://www.whitearmor.net/eib/certificates/27928-centurion.png1 point
-
Hi David, I had the same problem. What I did is to apply some hot water bath to bend forward the sniper knee, glued a piece of abs scrap behind each side and use ABS paste to repair. As you said never ending fix with plastic.1 point
-
Darn… have you glued some scrap ABS to the back to reenforce it?1 point
-
Got the last of the major trimming finished and did a quick rough fitting. Looks like everything will fit pretty well hopefully. Sent from my SM-G991U using Tapatalk1 point
-
Thanks for the advice!1 point
-
With TFA this area is recessed (as it currently is) with a decal. Most, if not all seam imperfections will be remedied with the inner cover strip and exterior filler. That said, unless you want to see cracks begin to form at the seam areas later on I can't express how important it is to use some type of plastic welder epoxy to connect sections. My armor is over 5 years old with absolutely no cracks. Keep up the good work.1 point
-
This may provide some insight into the differences in action scenes where their firing and what I'll loosely refer to 'carry' shots. Then again, it may not. I say this because it depends on whether the screenplay, Directors or Consultants had any intent to resemble Military bearing. Now let me qualify this by saying it certainly appears, from those pictures, they had some consistency in mind so I'm guessing they benefited from some Military Advisers and wanted the Stormtroopers to appear every inch, the professional soldier. Personally, I think they did a fair job in this regard but I'm not comparing it to my training, which was very rigid with regard to Close Order Drill. The consistency I'm referring to is the carry mode or what we refer to as "Port Arms". This is a mode where all (military) troops are trained to carry their weapons in an and exact, specific way. I noticed the Stormtroopers are almost always carrying the E-11 in their Left hand when they are either in formation, marching, or just plain shuffling about. Since they don't have slings and it would have looked very un-military to carry them around in a holster, they went with two common modes (all seem to be left handed). A "high Port Arms" which you can see in the picture above where they're following closely behind Vader, and a "Low Port Arms" where they're in formations or marching and seems to be level with the deck and carried about the waistline, height-wise. So the carry mode seems consistent the majority of the time. As far as what hand you are or what hand you shoot with, that does not having any bearing on the carry mode (Port Arms) because this is intended to be the same. As far as what hand you shoot with in an action shot or pose, I'd say this, just like most Military training, depend on which hand you use to shoot or pull the trigger with. In short, if I interpret these pictures correctly, I'd say Trooping should involve attempts to adhere to the intent of the Stormtroopers which was to maintain consistency in how the weapons were carried as in a high or low "Port Arms" mode where the left hand is on the grip and the right hand is on the barrel guard. This part I say with some humor intended: If your in a hero shot (see both Han and Luke tot-in em around single handed with the weapon pointing toward the deck), then it certainly seems appropriate to 'cowboy' it. Whether this is ironic or intended to display their lack of military bearing, I couldn't say but it certainly seemed appropriate for the characters they played. With regard to shooting poses, this, just like the military, could vary (and is acceptable) among Troopers depending on which hand you shoot with. Again, this is my interpretation/opinion with the assumption that you want to play the part of a Stormtrooper in addition to just looking like one. I also don't want to infer that all Trooping should be rigidly military affair. Now if you want to get really good and do some formations with close order drill movements, I'm your man! Hope that helps :-)1 point
-
Keep in mind that you will get the exact same shape of armour. Pulled from the same moulds made from an original ANH armour. PVC is pure white and high gloss, that's what makes it a bit more idealized and "prettier" to the public eye. It's the only "sanitized" detail about the PVS suit, if you will. ABS is more for accuracy purists since the shade of slightly off white, more satin ABS the RS guys use is a perfect match of the original ABS used for the prop/costume back then. I know, I checked in person. Also, PVC is more flexible and thus the better choice for trooping on a regular basis. This pic might help. 2 RS kits, PVC on the left, ABS on the right. Normal room lamp, the difference is most noticeable with flash photography, but not so much in direct sunlight. Sunlight really brings out the gloss of the PVC, though.1 point
-
i dont think they were resin at all myself. Like most machine guns, the MG 34's barrel is designed to be easily replaced/removed to avoid overheating during sustained fire. if a fully assembled MG-34 the light machine gun version weighs 26.7lbs (there is a heavy machine gun version as well) the inner barrel is solid steel and i am sure weighs at least 10 lbs alone (just a estimate) removing it would bring the weight down to under 20 lbs. since the t-tracks were over the holes in the barrel it is hard to say for sure or they replaced it with a wooded dowel perhaps, but they did do this for the MG-15 as seen below you can clearly see the inner barrel is removed from the MG-15, and since there is no t-tracks you can see right through it this IMO was to clear up cutoms issues as well as reduce the weight of the gun by a substantial amount....
 1 point