Leaderboard


Popular Content
Showing content with the highest reputation on 05/10/2021 in Posts
-
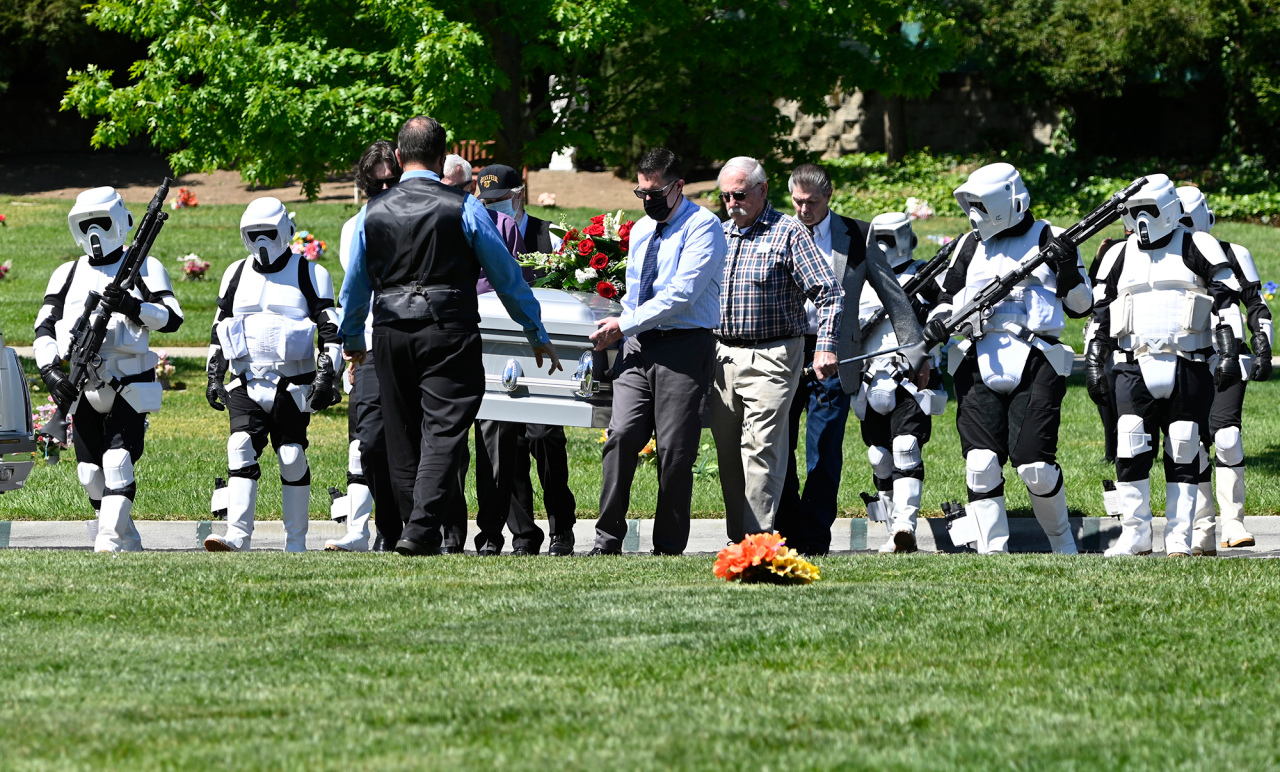
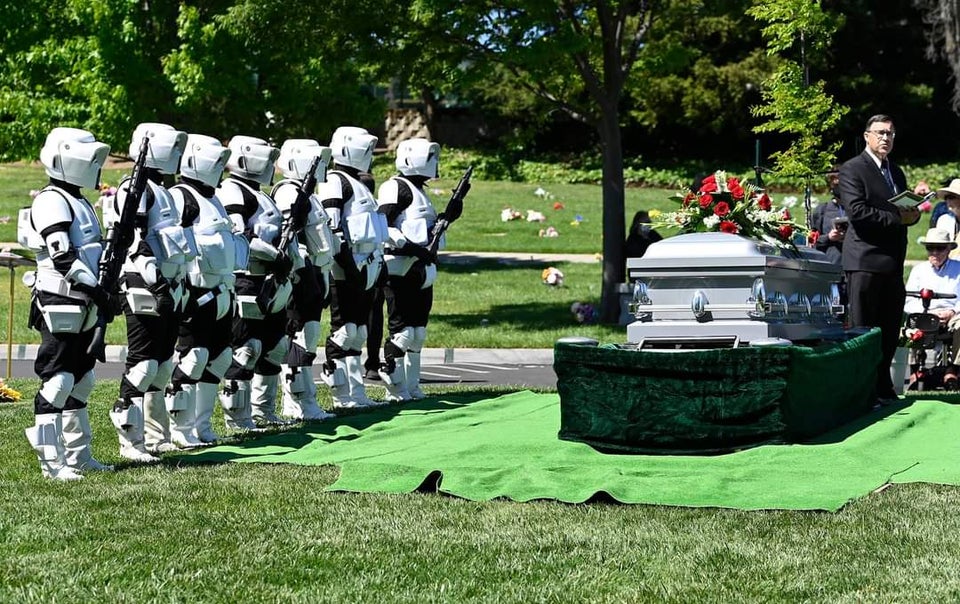
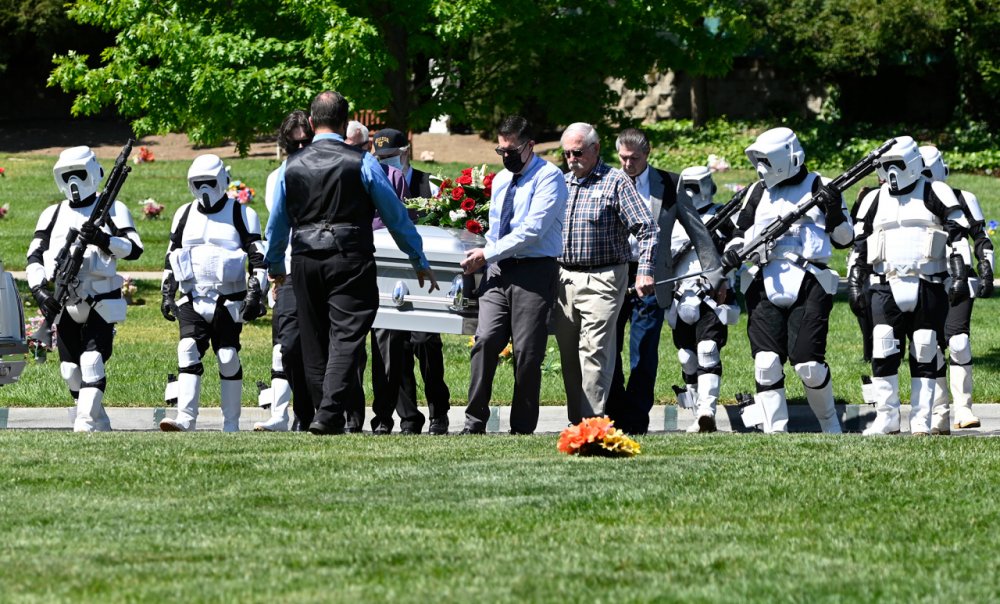
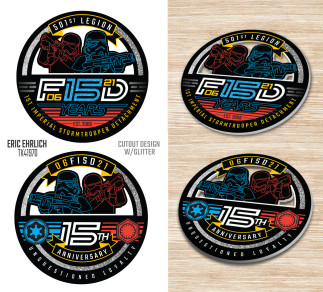
NEW In Memoriam Detachment Leader Merchandise FISD 15th Anniversary Coin Design Contest Hall of Fame Just For Laughs In the Media Member Support INFORMATION & AWARD PROGRAMS Common FISD Acronyms and TK Glossary Pre Approval Forum 3D Section Field Exercise Award Imperial Attaché Program Fire Teams EIB & Centurion: What do these terms mean? Advanced Tactics Awards Public Relations Staff List 2020 Follow FISD It is with great sadness that we share the passing of the great Felix Silla (1937-2021) 16 April 2021. Felix brought to life the role of The flying Hang-Glider Ewok in Star Wars: The Return of the Jedi. He also worked as a stunt performer for Lucasfilm classics such as Howard the Duck and Indiana Jones and the Temple of Doom. He is best known for his roles as Twiki in the television series Buck Rogers in the 25th Century and Cousin Itt in The Addams Family. In his own words displayed on his website, "I am proud to have entertained over 3 generations of T.V. and Film viewers, and hope I have given you a few laughs... and screams!" Thank you Mr. Silla, for sharing your talents with the world. Our condolences go out to his family, friends. "Buckets Off" Legendary model maker Ira Keeler, 80 years old, passed away on April 15, 2021 after a long illness. Ira was a self-taught model maker, a truly gifted artist and craftsperson. Best known for his work at Industrial Light and Magic, for nearly two decades he was an invaluable member of the team and contributed to dozens of projects. Ira is survived by his loving wife of 56 years, Joy; daughter, Dawn; son, Shawn; granddaughter, Jessica; grandson, Matthew; brother, Dave and sisters, Nita and Rita. Our condolences go out to his family, friends. "Buckets Off" Greetings fellow bucket heads, and welcome to the May edition! We have a few announcements to make this month but I will leave those for the most part with various other staff members to cover off. I will discuss the boring stuff lol, and offer an update on how we are tracking to plan for the year thus far. We had the benefit of starting a little earlier than most, bypassing a full election so we are looking at the best part of the last 3 months worth of work. I feel it's always good to talk about where we have come from and to where we are going next, and plan updates also give good transparency and keep your command staff accountable. Lets take a look. The biggest and to be honest, toughest job by far is the forum clean up. We have been going strong on this for over a year. One of the most time consuming aspects continues to be Photobucket image restoration. I'm not joking, this has been monumental. The benefits are well worth it though, so many threads can now be viewed in all their former glory, and the gems we have discovered during works have been wonderful. Work will continue, until we have rectified as much as possible, then we shall move into another phase of restoration which is refinement of content. This will lead to the creation of some new sections and or name name changes. In doing this, we can also launch new initiatives which are part of the future planning, but we are not there yet. One such change spurred on by the clean up was the launch of the Newsletter archive. There is some serious history in those pages well worth preserving and reading through, and we believe was definitely worth the investment in time. It's now easy for everyone to jump in and enjoy the content from the last 10 years. If you haven't already, go take a walk down memory lane. Another new section of the forums"The TK Trading Post", was created to cater for those who are starting out in the merch trading game. You have a detachment based home for in house trading of coins patched pins etc, it's also a bit of fun and a good way to talk with other like minded members. Being mindful in further improving that experience, we also now have an easy to find archive of all the FISD coins and patches made to date. The FISD "Coin and patch Repositories". These will continue to gain additions as we release new and exciting merch items into the future. We hit the Centurion 500 milestone in great stride, and opened the sales thread for an exclusive to the 500 Centurions, special edition pin. These should be going to manufacture as we release this months Newsletter so keep an eye open for updates if you have ordered. The Force Unleashed Stormtrooper, finally a 501st approvable costume. Yes our very own Newsletter publisher Glen gmrhodes13, built weathered and painstakingly brought this costume to life. The CRL was presented to the LMO team and subsequently approved. It's great to have another addition to the TK line up, and a slightly dirtier one at that. FISD 15th anniversary planning. This has been discussed at great length and suffice to say we have some awesome things planned already. You will see further into in the newsletter we are already set with our first celebratory merch item design, we did this through a competition format with your command team voting on the eventual winner. Make sure you keep reading to find out all the details. What's to come? New Forums sections that will continue to bring forum engagement from the membership. Some will be tethered to our Social media platforms where information posted out there will bring people in to see the main content. More CRL work will come later in the year, these are always decent sized tasks specially where some do need major work and re writes. We need the right people available to work on some of these because they need to be done well so please be patient if you are indeed waiting for one to be updated. More merch is in the planning but we are mindful that it needs to be items you guys and gals want, this being our anniversary year gives us plenty of reason to celebrate come July, and that will last right through to next July so there is plenty of scope ahead. That's it from me this month, now you can get on with reading all the truly exciting stuff With Unquestioned Loyalty Andrew Franke TK11469 "Sly11" Detachment Leader CENTURION500 PINS CLOSED Run has now closed, you can find updates here FISD 15th Anniversary Coin Design Contest NOW CLOSED In the interest of transparency, and just for fun, I suppose... I have to tell all of you, that these entries generated more excitement and discussion among the Detachment Staff than I have seen for previous design contest submissions. There was a lot, and I cannot stress this word enough a LOT, of excitement surrounding all of them and ways that we could potentially use more of them. The closest that I believe I have seen before was leading up to Celebration Orlando in 2016-2017, and there was a great deal of energy there, too. On behalf of the entire FISD Command Staff, I express heart-felt and tremendous thanks to every one of you who took the time to develop and put together a design for submission. We do know that these are purely labors of love, and we are truly blessed to have such a strong, engaged, and talented community here at the FISD. So, again, thank you.When all was said and done though, a winning entry was decided on, and that entry was created by Eric Ehrlich, TK-41970, “Etrooper70” of Star Garrison’s North Texas Squad! The design will now need LFL approval, keep an eye out for the interest thread coming soon With Unquestioned Loyalty Tim Waychoff TK51878 “Dark CMF” Executive Officer Greetings Troopers! The impact of COVID has dampened the spirits so why reflect on some of past log entries!This little gem I found in the halls - please welcome TK - 20187 Troy to the Stormtrooper Hall of Fame!https://www.whitearmor.net/forum/topic/47878-tk20187-troop-log-46-02032021/?do=findComment&comment=681515 With Unquestioned Loyalty Aaron Gibson TK-99725 "Pyrates" Curator Hall of Fame Funeral of Ira Keeler Scout troopers with The Golden Gate Garrison of the 501st Legion escort the coffin of Ira Keeler of Vacaville during his funeral service at the Vacaville-Elmira Cemetery. Keeler worked for Industrial Light and Magic, for nearly two decades, and worked on dozens of movies including, Star Wars: Return of the Jedi, Indiana Jones and the Temple of Doom, Back to the Future, and Jurassic Park. Family members and several of his former co-workers spoke in glowing terms during the service Geeky Pins Fire Restoration Fundraiser "Troopers Helping Troopers" Hello FISD legion members, On April 29, the building across from Teresa Nuthall's (TK-41307 of Badlands Garrison - Crimson Aurora Squad) literally burst into flames. Thinking quickly, she dialed 911. The wind blew the fire and smoke quickly onto/into her own building melting her shop front, burning her chairs, melting her vinyl, and wrecking her sign. Her window frame is ruined and it needs to be replaced along with the window, and there is water damage to the front of the building and deck as well. The fire burned so hot her metal door warped. She cannot properly close up her shop. The front of her shop has literally melted. The door is custom sized and needs a to be custom built to be replaced. Not only that, but the entire front of her shop was full of fabric, papercraft, and inside of her shop that is now irreversibly smoke damaged that needs to be replaced. Even when she removes those items, there is still smoke damage to the basic structure and it needs to be professionally cleaned. The person that was in charge of the building that caught fire is without insurance and will not be paying for any of these damages. Teresa is the epitome of a "Bad Girl Doing Great". She has spent this entire pandemic sewing tens of thousands of masks, giving them out to her community, to first responders, to anyone who ever even asked both locally and all around the world. As her 501st brothers and sisters, we would like to help HER out in her time of need: Troopers helping Troopers. For this reason, we have created "Geeky Pinks Fire Restoration Fundraiser". The following items are up for bid: -1 Temple Armoury Original Trilogy TK bucket from Vincent Vigil Jr. -1 X-wing bucket from Walt's Trooper Factory -1 Shadow Guard bucket from Walt's Trooper Factory -1 Signed book and photo from Lindsey and Brian Muir -1 Peter Mayhew Foundation memorial coin from the Peter Mayhew Foundation -1 $100 towards any 3-D Printed Blaster at Premier Props -1 1 Autographed Helmet stand (any style) crafted by Charles "Woodchuck" Bowman **With more donations to come! Raffle Tickets are $25.00 each and buys you one chance to win one of the items below. The more tickets you purchase, the more chances you have to win. We are limited to 200 Raffle tickets, with a $5000 goal (USD). Drawings will be done live on YouTube and posted to the identical thread on the Legion forums. Important, please read the below carefully. To enter the raffle, send payment to [email protected] along with your Full name, TKID, Forum Name, Phone Number, and Address. After you have paid for your entries add your your name, PayPal Transaction ID and the amount of tickets you have purchased in a post on the Legion boards. This is required by legion for tracking. The link below will take you to the thread on the legion boards where you need to leave your details. https://www.501st.com/forum/viewtopic.php?f=41&t=108700 INFORMATION & AWARD PROGRAMS For a full list of FISD awards head here Are you new to the FISD and wondering what the heck all those abbreviations and strange sounding terms mean? To help you @justjoseph63 has started a list of the most commonly used ones that will give you some insight. If you have ANY questions about a particular term that is not listed or suggestions for new ones please contact Joseph. You can find the list here Pre Approval Forum allows future Troopers the opportunity to submit photos of their completed build to be reviewed by the Staff, Imperial Attaches and others in preparation for forwarding it to their GML for approval. Any and all advice/suggestions given will be specific, constructive, helpful and respectful. Please note that this program will NOT take the place of your local GML, as Detachments are not chartered for costume approval and can not override a GMLs decision, but is instead a peer review program designed to help you look your best and offer guidance and positive feedback. For more information on this program, please visit the link here Don't forget to visit our 3D section when next surfing the FISD forums, there is plenty of useful information to potentially help you on your next TK adventure. You might be feeling may generous and share with our community a new TK related 3D file and maybe win yourself a 3D contributors award so check out the details below and be part of the in house 3D community. Here is a link to the FISD 3D Contributor program. Don't forget to create a troop log here on FISD and get awarded for your adventures The list of accomplished troopers keeps growing, so get on board and register your troops today Simply start (or update!) your troop log, keep the running total in the title, and post (at least!) a date and name for the official 501st event where you wore your TK! Once you've hit a milestone count, go over to the "Field Exercise Awards -- Post your milestones here" thread to request your profile be updated! Simple, right? Award Recipients April - May TK27777 "tarok" Rudi - Are you an approved TK that spends more time on the boards than the average Trooper? Do you enjoy using your knowledge to help out future and existing Troopers? If so, we would like to invite you to join the Imperial Attaché program! Members of the I.A. team are chosen to help out not only those here on the boards, but on a local level as well. Our aim is to have at least one in each and every Garrison, Squad and Outpost in the entire legion to be the eyes and ears of the FISD on a local level. For a complete list of Imperial Attaches, go here Some of the benefits: Access to exclusive Attaché merch., including patches, IA patch , IA Rocker For a complete list of Imperial Attaches, go here You may also be in the running for an Imperial Attaché Award Imperial Attaché Award for those attaché's who have gone above and beyond [minimum 1 year of service]. You can find a list of prior recipients here Attaché Ambassador It's time for another attaché check in, could everyone active please check in on this thread With Unquestioned Loyalty Frank Peranteau TK75139 "Frank75139" Attaché Ambassador Want to setup a "Fire Team? the Fire Team program is completely optional, and is intended to help form a common identity and spirit of camaraderie among 501st Legion stormtroopers in the same geographic area/garrison that troop together. Fire Teams are not officially recognized by the 501st Legion nor the FISD, although they will be able to access a Fire Team sub-forum on the detachment website. You can find more information here So what exactly are and levels? These programs were designed for those who choose to take their armor above and beyond the minimum requirements for basic 501st Legion approval. It gives you the chance to show a level of dedication and pride that takes your armor closer to being as "screen accurate" as possible, without as much extra work as you may realize! You can find more information on the programs here This area lists all those who have gone above and beyond basic approval toward screen accuracy and obtained EIB or Centurion or both. FOR April - May the 1st Imperial Stormtrooper Detachment would like to congratulate: Expert Infantry Badge Award: John "semperfi108" TK91882 EIB 1021 GREAT job on your approval, now on to Level 3! Request your free EIB certificate here --------------------------------------------------------------- Centurion Badge Award: Jonathan "Lord_Potato" TK89054 Centurion 501 Outstanding job on reaching Centurion, Troopers! Request your free Centurion certificate here If you see any of these Troopers around your Garrison or Squad, be sure to congratulate them! Newsletter If you have any interesting stories or photos or something you think newsworthy please send them to me via pm. For anyone interested in having a look through any of the older newsletter they have now been moved to a new archive sub forum which you can find Here With Unquestioned Loyalty Glen "Q" Rhodes TK-85421 "gmrhodes13" PRO Newsletter Staff List 2021 Detachment Leader (DL): Andrew Franke (Sly11) TK11469 Executive Officer (DXO): Tim Waychoff (Dark CMF) Chief Deployment Officer (DCA): Joseph Pedigo (justjoseph63) TK-10963 Deployment Officer: (DCA): Mario (TKSpartan) TK-48117 Lead Provost Marshal (DCOG): Steven Sheades (starsaber25) TK-10466 Provost Marshal (DCOG): Chris Pearson (themaninthesuitcase) TK-10911 Provost Marshal (DCOG): Dan Branton (CableGuy) TK-42911 Personnel Officer (PER): AC (Novatie) TK-5597 Fire Team Relations (PRO): Mark Ryner (Captsafe66) TK-4584 Content Editor At Large (PRO): Christoph (Danny) Lauber (Ripper_L) TK-55550 Content Editor Support (PRO): Tony Jobe (ukswrath) TK-10116 Content Editor Awards (PRO): This will be handled by the XO Newsletter Publisher Forum Clean up Director (PRO): Glen Rhodes (gmrhodes13) TK-85421 HOF Director (PRO): Aaron (Bronx) Gibson (Pyrates) TK-99725 Attaché Ambassador (PRO) Frank Peranteau (Frank75139) TK-75139 Social Media Relations (PRO): Teresa Nuthall (Soulart) TK-41307 Social Media Relations (PRO): Jim Ferrell (Rat) TK-95970 Systems Administrator (DWM): Eric Brager (Darth Aloha) TK-9674 Systems Administrator (DWM): Mathias (Locitus) TK-2959 Detachment Founder (DF): Paul (Daetrin) TK-8020 Trading Cards Content Support (IPM): Eric Ho (Hoda) TK 77520 Imperial Propaganda Machine (IPM): Brien Edick (Harbinger) TK 92802 Imperial Propaganda Machine (IPM): Jeff Salt (wingnut) TK 50297 Facebook: www.facebook.com/whitearmor Facebook Group: 1st Imperial Stormtrooper Detachment (FISD) Official Twitter: www.twitter.com/FISD501st or @FISD501st Instagram: www.instagram.com/fisd501st On behalf of the 1st Imperial Stormtrooper Detachment Command Staff and the Imperial Propaganda Department

 4 points
 -
Hey folks, Drawing closer to finishing this blaster. In this little update, I have; Added D-ring Added lock/free screw (actually just a resin cast) Added hex bolt on bottom of grip Added spring Prepared charging/cocking handle This certainly doesn’t look pretty, however, it looks okay once in the barrel. I used a child’s garden hoe as the correct diameter to coil my spring. And now some photos of where it’s up to.3 points
-
And finally the rear. I'm working on the shoulder bells and bridges now. I will get some pics taken of it taped up on me to see how things sit. So more to come.2 points
-
Hello everyone! I took a few weeks off from the build and worked on some other spring projects. But I have been working on the torso and I think I've made good progress. So here is what I have completed over the last month or so. The ab buttons cut and painted. I tried the TrooperBay stencils, but they just didn't work with these buttons. I ended up using the stencils to trace out the circle and just hand painted them. Here they are glued on.2 points
-
I just found the greatest set of Stirling SMG scratch build templates I've ever seen. They are leagues ahead of the BBC ones and produce an exact 1:1 scale replica. Best of all they don't just rely on you to print the sheets out correctly, they include all the measurements taken from a real Sterling right down to the length and diameter of the cocking handle, as you can see in these preview shots: These things are so detailed, they also include the full interior parts and you can actually build a functioning Airsoft gun from them if you are so inclined. I purchased them from an Airsoft replica site, but since $8 (while cheap) is a bit of a rip to have a PDF file emailed to you, what's a fella to do except post them up here for all my TK brothers to download for free. Attached here: SterlingSMGPlansApr09.zip1 point
-
I had this as part of my full build last fall, but after wearing it a few times, and trooping for over 5 hours yesterday, I can now call it a successful method with confidence: Magnetic calf-closure system: Okay, I decided to try something new for my shin closures. This first set of photos is from my initial test, followed by the successful implementation of it. Many people have used Cricket's magnet closure system. Having trooped with some Velcro on my clone, I know that Velcro is not the most trustworthy. While I wanted to use magnets, I came up with a different approach. The good part with this method is that if it is a terrible failure, it is more removable than the disk magnets with holes method. My primary reason for trying a new approach is that we all know that magnets are strongest pole to pole, and have their most strength in that direction. If you have a stack of disk magnets, you slide them to detach them because it is way easier than pulling straight up. The issue with Cricket's design is that we are trying to resist the calf armor from opening side to side, and yet that is how the magnets are weakest. Update: @Scimitar points out in the comments below, that Cricket's system actually has the magnets recessed, so that the cover strip magnets lock in before connecting, which would mean they only open by pulling away against their strongest pull. So my method's only advantage is that it is all internal, and could be more removable (no drilled holes), but is not necessarily a better use of magnets. Thanks! I had some strong cylinder magnets, 1/4" N-52 that are magnetically aligned along the length. I would put them on either side of the opening on the inside, so that they have their strong pull directed at each other. They are nearly 5 lbs of strength each, so I needed to cut that down a little, and I also didn't want them snapping directly together which would chip them over time (some of mine are already chipped). So I needed to create a sort of case around them that I could glue down. Because there will be plastic on the face, they will be a little easier to separate with that material, and protected. Here are the magnets from K&J Magnetics, and I believe I will use 24 total for the two calves: To make the magnet pockets, I made a slot in a scrap piece of thicker aluminum by drilling two holes and filing it out. This could be made of wood as well, just something that you can press hard on, and doesn't mind some heat or pressure. For these magnets, the hole needed to be larger on all sides to accommodate the plastic, and I ended up with a 9mm x 16mm opening. It helps to have one edge bent up, so you can press it flush, sort of like a spatula. For the plastic, the cover-strip sheet that came with the kit was too thick, about 2mm, so I found some scraps I trimmed off my clone arms, and my thigh scraps from this suit will have plenty as well. That trimmed plastic is between 1mm and 1.5mm, and the thicker 1.5mm was more difficult to stretch, so the thinner is better in this case. I put a piece of sheet mild steel down on a scrap of plywood. This was both a non-stick surface, a heat sink, and the magnet holds itself in place on the steel. First I heated the plastic on low, until it just started to go floppy. Pressed down my aluminum guide, and got it halfway down. Then I hit it, while on the magnet, with the high heat until it just starts really shriveling (this is about 5 seconds of high heat, and rapidly gets too hot, so act fast), and pressed the guide slot down over it until totally flush with the metal base. Sometimes it took a few re-heatings to get it flush, and it needs to be so that when mounted, it glues flat to the inside of the armor, with the magnet contained. Then I clipped it to have side tabs for gluing (though a few will need a different shape, at the top and bottom channel shapes in the shin), and then trim one edge really close. The magnet needs to be as close to the edge as possible, so I sanded it more flush on a sanding belt (and rounded the corners). Now for my initial test. I clamped them onto the edges of some strips, and they seem to work well enough. So I made then more pockets, so I could test it on the shin halves. I was most worried that they might be too strong, so I did five on each side, taped in place, right up to the edge of the plastic. I marked my stack of magnets that were all stuck end to end with two colored sharpies, red on one and blue on the other, so I could make sure one whole side was mounted with red ends at the edge and the other side all blue ends at the edge (When I do this on the armor, I will glue the magnets into the ABS pockets and mark them on the underside). I taped them all in, and tried it out, and it works really well. In fact, I think I will do six pairs on each calf instead of five, because it was not too difficult to open, but it really wanted to stay in place. If this doesn't work, I can still remove the pockets, and go with a different closure, because the armor will be un-affected. Installing the system: After my initial test of my butted-magnet system, I finally got to completing the shin armor so I could try it out. A note about magnets: they are only really at full strength when exactly touching. Even 1mm apart, and they are at about half strength. So for this to work, the pairs of magnets need to be as close to each other as possible. Because of that, I tried one method on one, and through that process came up with a better method for the second that ensured optimal placement. To begin with, I created a bunch more of my heat-formed "pockets", including a different type for the top and bottom edges (longer rather than wider shape because of how close to the top and bottom edges it would be). I have my 25mm cover strips all ready to use, but because of the nature of mounting these, save the cover strips for after the closure is complete. Even though my armor was pretty close to butted, it needed to be a lot closer for this to work. I started by fine sanding the edges, and a little mild heating to get the edges to meet more flush. The tops will get the mobility cuts, but I waited until after the closures were complete to know what the true edge would look like. Once I had it flush, I taped it closed matched up, and drew my marks. These marks would be on-center for each magnet pair. I started with the top and bottom, and then divided the distance between by 5 (giving me four marks between, for a total of six magnetic closures, 12 magnets in all, per shin). My number was about 63mm between each line. Once marked, I removed the tape. I used some coarse 60-grit sandpaper to roughen the back side behind each mark, where the pockets would be glued. In the right photo, you can see what my pockets would look like. I paired them up to ensure they were similar. A note on glue. I know the Stormtrooper lives and breathes E6000, and for most of the armor, that glue is a great choice. For this process, you will really need speed, and quick results, so CA glue with an accelerator spray is ideal. Because I once was unsure, CA glues (Cyanoacrylate adhesives) are often called "Super Glue" and it's a clear glue that sticks really well to things like plastic, fabric, and... skin. Many people call this "Gorilla Glue" but the problem with that (or any brand) is that Gorilla glue makes about ten products, including wood glue, and an expanding glue, all called "Gorilla Glue". CA glue is the preferred name to ensure people know what to use. Now, for the accelerator spray. Zap-A-Gap makes one, but there are many types. What it is is a spray that you can spritz on a wet bond, and it sets the glue (at least on the edges) in about 3 seconds. No kidding. Like you could take a quarter, glue it to the side of your work bench, spritz the edges, and then let go. In my experience, if you quickly pried it up, the CA glue would be wet underneath for some time, but it would be "clamped" by the already cured edges while the remainder dries. This closure method relies a lot on that rapid dry time. Gluing magnets into the pockets. It is fairly important to keep track of polarity for the magnets, so put them ALL in a line, and use two different colored sharpies to mark each end, so that you have (for example) a blue and red end on each, and every red wants to stick to a blue. On the pockets, mark the "center line" that is where the center of the magnet would be on the seam edge, so you can line it up from the outside. Sand the bottom of each pocket to prep for gluing. Then set out your pockets bottom-side-up (if possible, on a piece of sheet steel like I have, or some other magnetic surface to keep them from sliding or trying to attach each other. Mark them red and blue as well to keep track of what goes where. Drop some CA glue in the bottom of each, and set a magnet in each pocket, aligned toward each other by color, so you have a red side and a blue side (or whatever colors you use). If you have accelerator, you can spritz these and be ready to move to the next step: Note: the following process was what I tried on one calf, and then improved on it, so be sure and read ahead for a much better process for gluing. Start on one side and in order down one "color" set, take each pocket, and add CA glue to the bottom edge, filling in more around the magnet. Mount it in place lined up with the edge line on-center for each magnet, and as perfectly close to flush with the seam edge as you can. This works best when the magnets are just touching. As each is set in place, spritz with CA glue accelerator, and then add a line of glue around the back edge and sides of the pocket, and spritz again. Move up one side, and then down the other, taking care to keep it from shutting before everything is truly cured (I would give it at least 30 minutes to an hour). These magnets are quite powerful, and could likely pop free from un-cured glue. Here is where I found a problem, and a new solution: Once I finally put the sides together, they clicked nicely with a satisfying click. The trouble was, you can see in the first photo, is there were gaps where various pockets were too close together, which then kept the better positioned ones from touching. So I had to go to each joint, and with a small piece of sandpaper wrapped on a bit of plastic, sand them until they met flush. I eventually got it much closer, but it took a lot of fine sanding and trouble to get them to match: My solution for a more precise alignment of the magnets: I realized that the magnets want to be close and perfectly aligned. That's their purpose. So I should use that. So I did as before, and glued one side (like the "red" side), again, as close to the edge as possible. Full CA glue on each, and spritzed with accelerator to lock them in, and then I let that side sit for an hour to fully cure. First, I taped the calf closed as perfectly as I could, with the edges tight together. Then I took the other set of pockets with the magnets glued in, the "blue" side, and put glue on just the back half, away from the seam edge. I didn't want to risk getting any glue on the seam or opposing magnets, and it does spread out a bit. So for now, just glue the back side (pictured). Then I carefully, in order, set the magnets down the side across from their "mates" and the magnets themselves snapped into the perfect spot, touching exactly. If the other side was a little over the line, they would lock in back a little. It aligned them perfectly. As I went, I would place a pocket, then do some CA glue along the back and back corners, a little on the edges (remember, nowhere close to the seam edge), and then spritz with the CA accelerator, locking them in. Once that side was done, I set it aside for a half hour to more fully cure before removing the tape, popping it open, and then gluing the remaining spots, including around the edges up to the seam edge. That one went together much more quickly, and it was nearly perfect. One of the pockets had pried up a little, so had to be clamped and re-glued, but otherwise a much easier method. I then taped the top edge, and now that it was in the final alignment, ground my mobility cuts. And now the moment: Does it work? I tried them on, and they snap right shut around my calves. In the little I have worn them this morning, they seem to work really well. I will say that I expected them to be a little harder to open. I walked around, up and down stairs, and they stay closed, but when I do something extreme with the top edge, like crouching in a kneeling position, the top can spring open. I tried them on before the mobility cuts, and they sprung open more often when bending my knees past 90 degrees. Because of this, I am adding a "fail-safe snap" (popper for the UK folks) on a 1" black nylon strap inside that crosses the top of the seam on either side of the top magnet snapping on one side. The strap will be connected by reaching in from the top after the armor magnetically closes around my calf, that should ensure it never opens without me doing it. I will add pics of that in my next post, but for now it is on E-6000 time. Also I will finally add my rear cover strips, which should help finish these out!1 point
-
Hey -- yeah, I'm using Doopydoos with the T-Jay completion kit. Got started this past weekend and was taking pics the whole time. Build thread incoming : )1 point
-
Looks great, Greg1 point
-
Mounted all the boxes, tube and siphon using double sided tape and sheet metal screws. Added some 1/4 foam in the rear cut out for a buffer between the back armor and pack. Just need to give it some weathering. Next up is to build the ammo belt with the magazine pouches.1 point
-
My prefered method for every armor build I make is usually about the same: 1- Triming and Sanding All 2- Painters Tape pre asemble, test fit 3- Measure, Adjust and Glue, test fit 4- Assemble , Test fit 4-Add details (Rivets, Greeblies etc.) test fit 5- Final Test Fit TRIMMING Ready to start, Reference Gallery, Build threads from others fellow troopers, a Imperial Cup of Tea and of course Scissors and tons of plastic ahead Note: I'll try to be the more simple an clear as I can Lets start form Top. This sections has some excess of plastic both sides and I'll trim the low front section in a conservative way till the moment I start assembling. ABDOMEN Trimmed and Sanded CHEST Trimmed and Sanded CHEST COVER Trimmed and Sanded BACK SECTION Trimmed and Sanded KIDNEY SECTION. Trimmed and Sanded I'll make the middle cut later when assembling. BUTT SECTION. Anovos like Trimming. Trimmed and Sanded COD SECTION. Trimmed and Sanded Return to Index1 point
-
Most of us use an online image host like Imgur, upload your images there then copy and paste directly into your thread. I don't know of anyone currently supplying a kit with snaps (RS do a kit with brackets) A nice thread on strapping here RS strapping video1 point
-
Awesome design! Congrats! There were some other amazing designs too so great job on all of them!1 point
-
Great job!1 point
-
Cannot wait for these to be made!1 point
-
Very nice design and execution! Always love seeing new techniques to deal with the shins. I hope this doesn't come across as trying to detract from your method, but I feel it's worthwhile to note that in Cricket's method the magnets attached to the outer cover strip snap down into a matched recess inside the leg armor/inner cover strip, so any side to side movement of the magnets isn't possible which maintains their pole/pole strength. Image for clarity:1 point
-
Now, if there’s a consistency among owners of AM armor it’s that they love their armor and consider it the best around. However, AM owners admit that the armor does have a couple quirks and the bottom edge of the Back Plate is one of them. For some armor, the bottom edge of the Back Plate has a nice, flat return edge that mates flat on the top edge of the Kidney Plate. AM armor is different: That bottom edge isn't anywhere near flat, and the outer tips bend down and out like little "wings." The end result is that no matter what you do, those wings will overlap the Kidney, which is a no-no in general, and a roadblock to attaining Centurion. This detail from the back photo from my EIB submission shows the problem: Notice in the above photo that the actual bottom of the Back Plate is right on top of the Kidney where it's supposed to be (red arrow), but those wings overhang at the sides (green arrows). What's worse, with those wings overhanging they tend to pull the Back Plate out and down over the Kidney pretty much every time you move. Here's a look at it from the side with the armor on my worktable. How bad the overlap is varies from Trooper to Trooper, depending on body characteristics. If your upper back/shoulders arch out at an angle, it's a bit easier to get the bottom of the Back Plate to rest atop the Kidney. In the photo below, I'm holding the Back Plate out at an angle, and you can see that it almost works. If your back arches out, great, but even if the Back Plate is resting in the right place along its width at this angle, good luck getting it to stay there -- your strapping is likely pull the Back Plate down over the Kidney every time you bend forward. I had brought up this issue way back during my build and got a number of suggestions, most of which dealt with heating those wings and bending them up to make them level. But I could tell that heating and bending would really warp the side edges of the Back Plate because of the amount of return edge I'd retained there, so I balked on heating. I corresponded with JustJoseph -- who also has AM armor and knows exactly what this issue is like -- and he agreed that just trying to reshape them with heat could badly mis-shape the side edges, and suggested that the only real way around it is to start cutting off return edges to reshape those pesky wings. Again, I put it off because I wanted those edges to stay (my shoulder blades tend to push the Back Plate out, creating gaps at the side that I wanted to minimize with as much return edge as possible). You may feel the same way, but if you want to reach Centurion level those edges have to be dealt with. After giving it a lot of thought, I determined that a combination of return-edge trimming and heat would be the best way to go and that’s the fix that worked for me. I started by outlining the cuts I planned to make, and here you can see my proposed cut on the sides... ... and, rotating the Back Plate, you can see how that proposed cut moves along the outer tips of the bottom. My proposed cut line ends short of the center of the Back Plate, leaving most of the return edge along the bottom/center in place. It took a while to pencil in these cut lines, as I kept redoing them to ensure I started with the minimum amount needed -- I didn't want to cut too much. I wanted to do this in extreme baby steps: Do some cuts, then do some heat and see what I got. Then trim some more and heat some more, and check it out. By the way, remember that last photo above. You'll see it again a bit later. So, first I used Lexan scissors to cut off most of the waste up to my lines. After that, I used a cutter drum on my drill press to shave the Back Plate smoothly down to my lines. Don’t have a drill press? A sanding drum in a Dremel-type rotary tool won’t be as fast, but it'll get the job done. Then, I heated those trimmed wings up using a hair dryer and did some bending, starting with the right side wing. In the photo above, you can see the result after several cycles of trim/heat, trim/heat, trim/heat. I was indeed taking it slow. Satisfied that I had the right side as good as I could get it, I did the same trim/heat, trim/heat, trim/heat routine on the left wing. OK, both sides are looking pretty good, and you can see how the bottom edge is now more or less straight across with no corner wings dipping down. Lastly, I heated both sides a bit more to curve the outer edges inward to more closely match the curve of the top of the Kidney to help the Back Plate rest more firmly in place. This whole process may take several hours, but it’s best to go slowly. You don’t want to trim any more than you have too or, worse, ruin the Back Plate and have to buy another one and start over. Hey, remember earlier when I said you'd see that photo of my proposed cut lines again? Well, here's that same photo, but I've superimposed red lines where I ended up making my actual final trims. Yeah, I ended up taking a lot of plastic off, and as time-consuming as it was it was worth it when I reassembled all the straps and hung the torso on my mannequin to see how it came together. As they say, your mileage may vary -- you may not need to take off as much; you may need to take off more. The amount I cut and reshaped ended up looking like this: That's about as perfect as I think it can be. I still don't like the way the AM armor isn't flat along that bottom edge -- that bottom return edge is angled, not flat. I may address that somewhere down the road and you may want to, as well. But this fix will eliminate the issue with the overhanging Back Plate. A.J.1 point
-
Christian, can you take a measurement of the width and length of the strips that wrap around the bolt?1 point
-
here you go..... Not sure why the trigger pic has the red square but you get the idea.....1 point