Leaderboard


Popular Content
Showing content with the highest reputation on 04/26/2021 in Posts
-
I finally managed to print off all the SE-14R pieces. Thanks to Glenn again for the files. Was printed a while ago but we're in the middle of selling our home for a big move cross country (again...), so the pics had to wait. I also had an issue with the print of the main barrel/ body, so had to reprint that main piece. Overall pieces: I have a smaller resin printer (Elegoo Mars 2 Pro) so I had to split the main barrel/body in half, as well as the grip frame where it meets the trigger guard. The grey stuff is model putty. Until I had the settings correct on my printer I had some minor surface flaws that needed filling. I'm still debating the colours to use, but may go the same route as my DLT-19 build: Tire rubber / charcoal black (more of a sooty grey colour) for the main body, with semi gloss/satin black for the grips and scope. This will provide some visual interest. Will only do minor weathering and scratching. Grips. Barrel opening. The knurling is amazing! Close up of some parts. That's all for now. Hopefully it won't take long for assembly and painting. Cheers!2 points
-
Wiped lens down with this anti fog Fans added in just trying to figure out where to put this power bank.2 points
-
Ordered the Troopacoola 2 fan unit, but I imagine it'll be a while with the Covid shipping to Ohio. Next up is the final piece. The E-11 Prop. Which is better? The Troopacoola or RS? What say you CableGuy?2 points
-
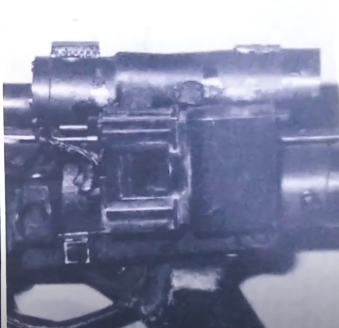
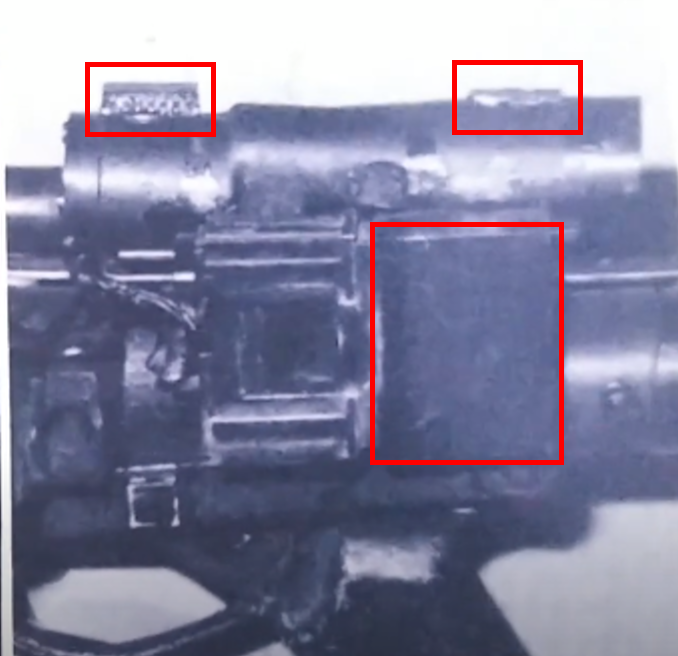
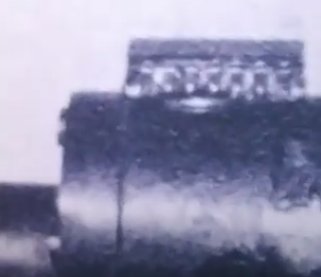
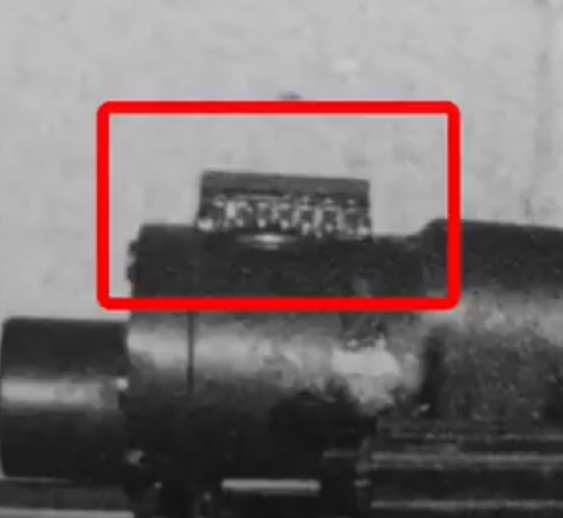
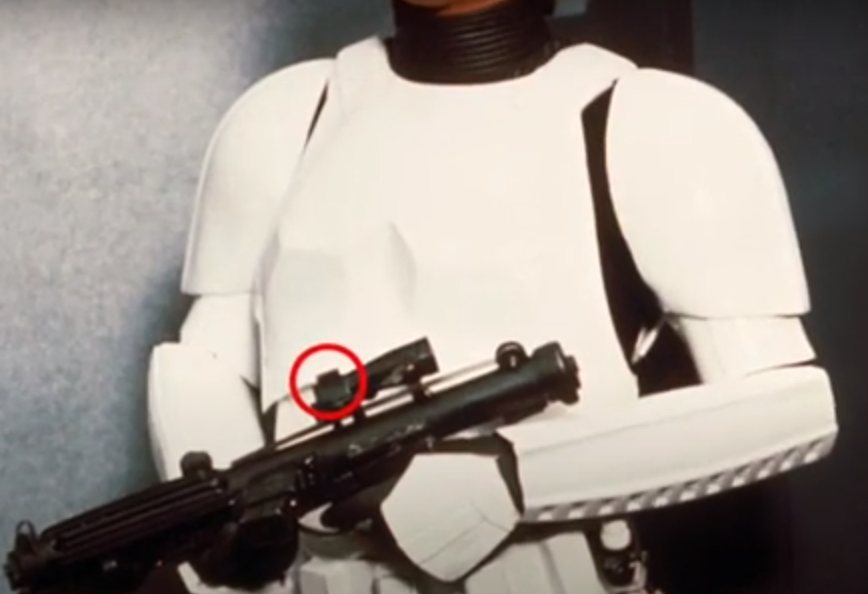
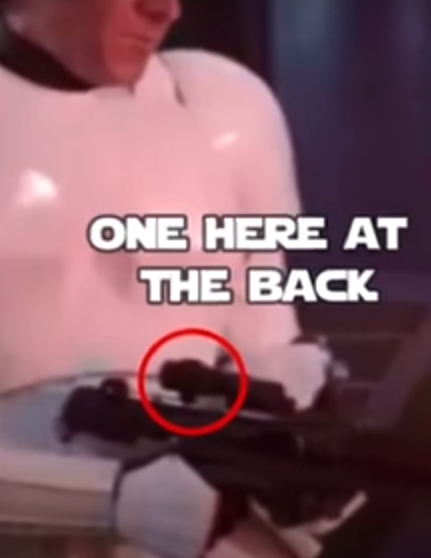
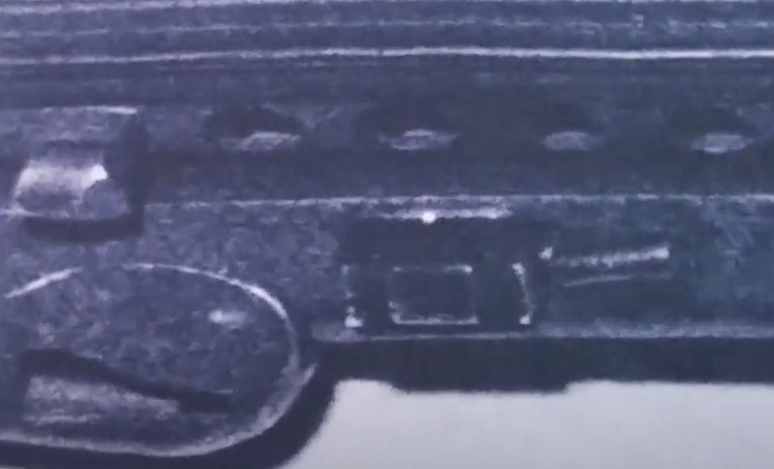
E-11 Previously Unknown Prop Details Ran across this video and was amazed, I must have looked at these images 1,000's of times but yet missed these. "This video will be about a hidden detail on the E-11 Stormtrooper Rifle, hitherto unknown for some 44 years(?). I came across these photos during my career in prop hire and I want to share this detail with you all" Joe's Props and Artifacts Tour
 1 point
 -
--EDIT-- Future Jason here... So for those who have followed my rather sporadic build down below, well, actually over in the ROTK section, you'll know that I've been kind of all over the place. However, one reason I've been slow-rolling this build is because I've kind of been pestering people about the possible inclusion of a Remnant Stormtrooper CRL. The thought first occurred to me after watching a few episodes of The Mandalorian season 1, but my thoughts really ramped up after the season 2 trailer dropped. My comment/ question in the 3D ROTK build thread was (referring to my 3D kit): "My original plans for this armor were to eventually weather it and turn it into a Jeddah trooper kit. But, if I wanted to do a Remnant Stormtrooper instead, what's the process for approval? Does this require a new CRL? Would it basically say "refer to ROTK and weather it?" [September 15, 2020] With that said, I'm not using the 3D Armor for this build. There's other plans for that. So, yeah. I've wanted to make a remnant for almost a year, but haven't really felt the push until now. With that said, I do reference another post later on in this thread because there's been a few of us discussing the Remnant and Anthology TKs for a while. If you haven't done so yet, please view the conversation here: https://www.whitearmor.net/forum/topic/48305-new-anthology-tk-crl/ So, how did my ROTK build thread end up over here in the new Remnant/ Anthology section of the forum? Well, future Jason (page2 of this WIP) posted that he will be turning this build into a Remnant Stormtrooper and then went on to post pics of a cool OT helmet that will become part of this costume. I also requested that this thread be moved over to this section so I can officially begin transitioning this to a Remnant. Here are my goals: 1. The original title of this build was "Centurion from the Start." The idea behind that is to build to the highest standard from the beginning, that way you don't have to make major modifications to the costume to take it from basic to tier 3 approval. So far I'm on the right track, so I'm going to continue going down that path. 2. Finish this as a ROTK/ Anthology build, then make the transition to Remnant towards the end. I've already got a good plan for this build and don't want to deviate too much. Additionally, I still think value will be added to the build community by carrying on the way I've been going. In the end, this WIP should be a good example for others traveling down either the Anthology or Remnant paths. 3. You'll see later on that I've done a lot of things that are different than other builds, but more accurate. Since I started this build, I've gotten another costume approved that has some of these modified characteristics, i.e. the shoulder/ bicep 'j-hook' bungee connection. By the way, I can't emphasize how good this works, nor can I imagine doing my arms any other way now. For this build, I'll pull out a few things that haven't been tried previously, but make the costume a) more accurate, b) more comfortable, and c) more functional. I'll try to explain each as I go along. 4. There have been questions about whether this is a different costume or not. I think we laid out a good case in the aforementioned thread, but as I start transitioning from anthology to Remnant, I'll explain the differences in better detail. So, you've heard my musings and now understand why my build thread has moved over here. Please enjoy the build and I promise to keep on it, even if I'm doing it from a little apartment, which I'll talk about later. So with that all laid out, future Jason is now turning back over to the past. Please enjoy my build thread as I now send you back to December 4th, 2020. So, this just happened: For those who observed my insanity for the last few months as I did the 3D printed ROTK build, bear with me as I photo dump, type extremely long posts, and showcase what @TheRascalKing called in his own build thread, a "descent into madness." Ultimately, I enjoy doing these and hopefully later down the road, others can learn from my success and failures. First, I want to thank @11b30b4, @gmrhodes13, @Sly11, @TheRascalKing, @tarok, and all the others who I've previously bothered with questions, and who have been more than gracious in helping me out. I know there's others, this community has been great. Additionally, I really want to thank @jimmiroquai for the exceptional service over the last few weeks. I'll get to the product in a minute, but what really needs to be showcased is how well Jim answered all my questions, went above and beyond in his customer service, and really just showed pride in his work. If I could write him up for an award, I would. Thanks. So it begins... I titled this build thread Centurion from the Start. Now, some may look at that and think it's kind of cocky, but that's not the intent. Over the last 9 or so months, I've been fairly active in all the 501st forums and everywhere I look, people keep advising others to build to the higher level standards from the beginning. While this seems like sound advise, or even common sense, I've also followed up on these threads and observed less than half going there. That's a rough number which is probably even smaller, but it's similar to what I observed with the 3D printed armor build; plenty of people started, but then... Honestly, I think it has something to do with just getting worn out after doing a build. Sometimes after dedicating so much time to something, a person just wants to rest. I've seen this at work, with sports, and in life in general. That's what I did after Halloween, but that soon turned to restlessness. It just didn't seem right not hearing my 3d printer at all hours of the day and night. So, while I waited for this to happen, I printed off an entire scout trooper and finally figured out my Simplify3D PETG settings. I will say this; of all the forums I'm active in, FISD members seem to listen to the higher level advise more-so than others. I think the Pathfinders comes next, but really this idea seems to be a mantra in the FISD. Because of that, this is the direction I'm taking this build. Additionally, for those who saw the 3D print build, you saw that I attempted to build things to the higher standards, but ultimately I decided to hold back at basic approval. Though I reigned myself back, every one of those little things I learned about the 3d print build, I can apply here. This includes the eye bump I'm so proud of. So, that's enough rambling for now. I'm getting ready to go for a run, because a huge portion of this build, for me, is to get my body looking screen accurate. This is going to take a lot more work than the armor. Here's what I got: First, Jim sent me this pic and a tracking number last Friday. Knowing that it was coming from the Philippines, I actually wasn't expecting it for a while. However, just seeing the pic got me excited. Then this happened: This has to be highlighted. I saw when the BBB was dropped off, but once FedEx actually processed it, the BBB's journey across the globe happened in a freaking blur. Keep in mind, this is during a world-wide pandemic. Much kudos to Jim for the service and for keeping me updated. Wow! Unfortunately, a box just can't travel across the world in three days without it's Fragile sticker being disregarded. At first I got a little freaked out, but honestly after seeing the video Jim posted about his flexible fiberglass I wasn't worried. Also, with all the bubble wrap and great packing job, I knew it would be fine. After laying it all out, everything checked good. So here we go. This should be a lot of fun. Thanks for looking and I'll start updating soon.1 point
-
I could ask if they would allow me to purchase one, however when I ordered I seem to remember they only would sell them if you did the full commission. I went the route of self build. I will email them anyhow as you are right, it couldn't hurt to ask.1 point
-
Jason, That should work for you. Also, if you want to take a look at Paul's video to understand how the bungee system works, it can be found here: https://fb.watch/56G5h8Wcd_/1 point
-
Do yours have padding on the forehead part? I know some Anovos helmets are missing it, I have it in mine. And yes I have trooped for hours, mayby you haven’t secured it in place enough? Try tightening the screws and see If it helps, mine stays put just fine. Hope you find a way that works for you1 point
-
Thanks Glen! Unfortunately, there won't be electronics in this gun. Maybe the next one? Some quick progress. Glued some parts on barrel halves and joined main frame front and back with trigger. Front barrel with magazine housing: Main frame halves joined, with stock adapter (?) attached at rear bottom frame: There is some minor warping and a bit of an unsightly seam at the front / rear join area due to my printing inexperience, Easy enough to fill and sand: Those little dimples are left over from removing the support trees. Not sure how to minimize this in the future, but I'm learning. These are easy enough to fill and sand smooth. Separate barrel assemblies temporarily placed on the frame so I can say "Pew pew".... Will be filling seams with putty and leaving to dry for a couple days. Stay tuned!1 point
-
After discovering new greeblies we didn't know existed for 43 years I added them to my blaster. Such a neat and cool add on from justjoseph63 that will likely be overlooked by most but still worth it.1 point
-
Very nearly at the finish line. Painted the tubestripes today, using masking tape for the outer edges, then a pencil line for my to follow to try and get a good curve. (Not that easy, painting a curve onto a curved surface). I went with around 8mm gap from the cheek to the stripes (this is what I believe to be about a “pencil width”, as we normally all aim for). Personally, I like Frog Tape - it is sticky enough to stick nicely, yet not too sticky to damage the paint. Side by side with its inspiration. Lenses next to be added, then a little weathering. Then, off to its new home. :-)1 point
-
That's what I have been doing, that's a lot to read but there is plenty of stuff I learned already Yup that's why I documented times and cost so far, so that people would know what they are getting into. I plan on documenting the materials cost as much as I can because it's often quite expensive in the end, but rarely documented I don't really mind being first or second, as long as my armor looks good and feels good to wear I'll be a happy camper. It just so happens that Steve gave me the incinerator virus ^^1 point
-
This is an awesome design- my favorite one1 point
-
My design has 2 variations - a regular solid coin and a coin with a cutout - of course the cutout would require a different back. Both feature enamel with glitter in it - something with a celebratory feel. I loved the fact that this is the one time where the number 15 can be found in FISD (with the right font of course) so that was really the basis of the idea, as well as including both OT and FO TK's. One that note I focused on the 3 colors found in the respective FISD logos - Clasic FISD Blue and Yellow, First order Red and Yellow - with Yellow being the unifying elements between the red and blue. Ive updated to include the word ANNIVERSARY. Here is the first version of the coin Here is the alternate design featuring cutouts around the troopers.1 point
-
The strapping pack should come with all the required hardware for centurion. I don't recall all E-11 makers, but I've seen good things about Hellhounds blasters. It's a rubber/foam blaster, so it'll stand up to trooping and won't break easily. It seems he sells them on etsy. https://www.etsy.com/listing/755159316/high-end-rubberfoam-stormtrooper-e-11?ga_order=most_relevant&ga_search_type=all&ga_view_type=gallery&ga_search_query=e-11&ref=sr_gallery-1-19&organic_search_click=1 Also another maker is praetorian blasters: https://m.facebook.com/BlasterMaker/ Here's a thread of someone asking about rubber E-11 makers. I've just skimmed it quickly, but it should be helpful. https://www.therpf.com/forums/threads/who-is-making-rubber-hyperfirm-blasters-these-days.334768/1 point
-
Jason, Best indications are that the cordage used by the costume designers was Framilon. Framilon as it is used here is a stretchy cord made of Thermoplastic Polyurethane or TPU for short; it's commonly used in the states as elastic seam tape for sewing and is difficult to find in its corded variant... well, unless you shop around for 3D print supplies. TPU is the filament I used on the 3D print shoulder straps but for this application, I just cut some off my spool and wind it through the boxes and J hooks. I outlined this back in January when I was experimenting with the forearms, but here's a pic of the TPU and "boxes" I made for the project. I used Inland TPU from Microcenter for my trial straps and for the cords in the biceps, but it's a little pricey. Additionally, I bought this spool before TPU really started gaining popularity, so now you can buy a full kg for what I paid for 500g of the stuff last time. You can't paint it though, so if I do decide to print any more parts with it, I'll likely buy a spool of white filament and print it very, very slow and at a high resolution with my .2mm nozzle. I'm talking like .1 or less layer height. I also printed a larger version of the box for the shoulders, but I made them way too big. To answer the question of "tab with a hole through it," that's probably the easiest way to explain it. Here's the pics: Again, I made the boxes too big, but that's an easy fix.1 point
-
Hey Jason, I'm an approved ROTK in Garrison Tyranus and am currently building another kit; I've just been slacking on updating my WIP. If you need assistance, please hit me up. I've got a ton of resources and can point you in the direction of others who can help. Sneak peek on what I'm working on Whaaaaatttt????? Jason C1 point
-
It’s a very good design... I prefer that Roman Empire style, but this design for the annual coin run or for the EIB would be fantastic... You are making real art works. It's going to be hard to choose with this level of masterpieces.1 point
-
This may be a little too abstract for most people (I know a lot of people usually want to see pics of helmets, characters, weapons and whatnot), but I liked how it turned out, so I figured I'd at least sub it. The first side takes some elements and colors from the FISD logo(s) as well as the back plate of the TK's. The second side has all the info. All using the colors and typefaces from the OP.1 point
-
Another option in case you need more: I made a little bracket from ABS which I bent on both sides and glued inside the ab section. The speaker then clips onto the middle section. There is also room in there for the extra cabling. When I had an icomm, it was velcroed onto a part of the bracket that was glued down.1 point
-
I had seen the parts on the scopes but never the other parts. Thanks for sharing this Glen. Rob, I want to check out the RPF thread in this. Interested to know what all the identified parts are.1 point
-
Wow. So it's been a while since I've even thought about updating my build thread. I have a bunch of reasons, but ultimately they're all excuses. Long story short is I haven't really been working on anything significant. In the end however, I have a feeling all this "down time" is going to pay off huge. I have been doing a lot of 3D printing for myself and others, but a lot of the stuff I've been doing kind of revolves around this build. Yes, I'm using Jimi's kit, but does that mean things can't be modified to make the costume more accurate? Of course not; I've seen others do the same. Additionally, a lot of the work I'm now doing involves resin printing and finally learning Fusion 360. Yes, I'm going to start modeling my own stuff. Let's get started. So, while watching season 2 of The Mandalorian, it was quickly apparent that Lucasfilm has gone all in on this costume. So, do we keep ROTK as the name, or is there a point where we just refer to this costume as "Anthology" or my personal favorite, "New Generation Stormtrooper?" Should there be different CRLs? I think I've broached this subject with the Remnant Stormtrooper discussion, but that was an entirely different costume. The Mandalorian has made the ROTK costume a former one-off and has established this as the version going forward... this is the way. However, I still have plans to build an ANH (Stunt)... someday. Here's the thing... many of the costumes seen in The Mandalorian have seen better days. The ones in use today were clearly used in Rogue One. As such, uniform items keep popping up such as this: Now, initially I kind of laughed at the white trap, but it led me on a long trip where I started researching the screen used costumes and really how it's all put together. This led me to the New Generation Stormtrooper Builders group on FB. This is where I started piecing together a plan for my kit. Back to my kit. This is where I started. These were my first attempts at modeling parts with Fusion. Overall, I'm pretty happy with how these turned out. If anyone remembers from my 3D build, painting the black lines around the traps actually destroyed my first helmet. Well, the oil based paint mixed with Rustoleum clear killed it. After I started digging into the "trap pieces," and asking questions on the FB group, Paul Prentice of Mr. Paul's Shoretrooper fame explained to me that the screen used traps consisted of a gray plastic piece secured to a slightly larger black backer. He suggested printing the top parts out in resin and the backers at .5mm. The picture above was not done in resin; this was my trial run. I'll discuss the white stretchy thing later. Setting one on top of the other, I was amazed at how good this looks. I need to adjust the size slightly, and print the final pieces in resin which will smooth things out a bit, but overall, I'm sold. The other thing that's good about actually learning how to model these things is that I can determine the exact size I need to fit in each area. The Jimmiroquai helmet is great, but there's still some asymmetry due to the fiberglass casting process. Regardless, these fit like a glove and look a lot better than the cloth backing I used last time. Essentially, all I did was stick the backer in there (a little crooked) and then place the gray pieces on top. When I do this during the final helmet build, I'll assemble the pieces on my workbench first. Gluing them in place skewed the traps a bit. Now, I do have to say that this is not how the helmet was intended to be finished, but once I actually do this for real, I'm pretty confident that it's going to look awesome. Additionally, as was the case in the picture earlier, these pop off if you want them to. So, if I decide later on that I want the cut look with fabric backer, it's no problem. Also, the tubes and teeth get cut regardless. So back to this piece: A few days ago, Paul Prentice posted this video of his Shoretrooper forearm armor on FB. https://fb.watch/3hH-ZWTuvW/ Video courtesy of Mr Pauls Shoretrooper Build; @totalgrunt; https://www.facebook.com/totalgrunt Mr. Paul claims that what he did is most representative of the screen used armor. I also remember speaking to a few people about the bungee cord used to secure arm pieces on the set of Rogue One. Additionally, I couldn't figure out the proper application of bungee cord as stated in the CRL. So, after that video went up, it sent off a flurry of comments with one asking what the stretchy string was called. Someone answered with Framilon, which got me Googling. Apparently, Framilon is also known as Thermoplastic Polyurethane... my old buddy TPU. So, I got to modeling in Fusion 360 and came up with these: My wife thought I made Legos, which gave me other ideas about snapping the forearms together... but I digress. Here's my simple steps using my 3D print forearm as the Guinea Pig: Forearm pieces, loop blocks, TPU, CA glue, and accelerator. I already had Velcro on one side, but will be replacing everything with the ultra thin stuff @TheRascalKing spoke about in another thread. Glue blocks in. Thread TPU through Tie it off Stretch open. So, this got me wondering if the same application could be used with the shin armor. And that's a big Yup. Also, don't judge, I don't typically walk around in sweat pants and white boots. Also, this was a very quick test, so the leg armor is nowhere close to a finished product. I did discover that the CA glue sticks a lot better to the fiberglass than the 3D plastic, so when I do this "for real" that's a permanent fixture. So that's my first update in quite a while. All I've been doing for the last two months is printing stuff off, "war gaming" this build, and trying to come up with practical solutions that'll be easier, movie accurate, and consistent with the Centurion standards. This weekend I'll tackle the foundation of the costume... the abdominal armor. Thanks for viewing.1 point
-
@TheRascalKing and @11b30b4 thanks a ton for your insight. I think you guys confirmed a lot of my suspicions, so I'm probably going to get cracking on this thing this weekend. First, regarding the paint, I've heard tons of good stuff about the Eastwood's 2K, but I'd probably break the bank if I went for it. This was the result of that CT Bucket I mentioned a few days ago: Ok, I'll try not to put non-TK pics in this build thread, but I wanted to try that High Performance Enamel on something before I started spraying the good kit. This is a semi gloss finish, but earlier today before I sprayed the Husqvarna Orange, I was second guessing whether I grabbed the wrong stuff. You can't tell too much from the pics but the white came out almost as glossy as my last TK, so I think I'll go with it especially if I hit it with the clear. The way the High Performance played nicely with the Rustoleum Farm and Implement paint was pretty impressive. I haven't had too many issues if I stick to the same name brand, but the issues I did have previously were catastrophic. If the TK paint behaves similar to the CT, this will be a good build. Regarding the temp, this was somewhat tricky. Since it's so stinking cold in Virginia right now, and only going to get colder, my can felt like I pulled it out of the fridge. I sprayed it regardless and it splattered like crazy on the first coat. For the second coat, I gave the can a nice hot bath which caused it to come out super smooth and a little too fast. This is why I used a "doner helmet" for this test. In the end, I got it pretty good, but I also bought a bunch of plastic to build a pseudo booth in my garage; that should help. Regarding humidity, I learned that lesson during the Mando build. I still need to re-paint my armor. Last time I painted the ab details, the paint just kind of flowed into the recessed "buttons," so that should work fine. For the helmet, now that I know that the High Performance works well with other Rustoleums, I'll probably stick with the smoke grey, but I definitely need an airbrush for future builds. Too bad I've got my eyes set on the resin printer and Anycubic Wash and Cure Machine. I'll hit up the Praetorian guys again. I didn't realize they're on the gulf, I think I reached out during one of their hurricane evacuations. So when I unwrapped the green lens material (acrylic I think), I realized that it's actually convex and shaped for the eye sockets, so Jim already hooked us all up. Maybe a little trimming, but it's all good. Also, since I'm going to start this weekend, like any good build, I'll do the helmet first. Since I'm building to the new CRL, I get to make an eye bump again... Yay. Jeff, I looked through your build again last night and I don't know why I didn't notice how you did your helmet tubes, traps, and tears fabric. You kind of made little frames for each cut portion. How did this work out for you? I've got some left over HIPS from my belt build and will try to copy what you did. How did you keep them from pulling away/ moving around inside the bucket? Also, when I test fit everything (and got real itchy) it didn't appear that I was going to have to do any major alterations. Honestly, I think cutting the thigh armor in order to close it with Velcro will be the biggest thing and that's not bad at all. Thank God the lower leg armor fits around my calves. I was worried about that the whole time I was waiting for my kit to arrive. Finally, I saw on FB that some guys already designed a 3D file for the Mortar and Backpack, so yeah, I'm probably going to end up painting my 3d print ROTK. Regarding future spoilers, I'll give everyone two days from now on... but no more.1 point
-
Found this while trying to set it to 24 hours. Seems like it was excluded feature in the version I had. The funcion is still there, but they didn't connect the button. You can still do it, but need to reach the circuit board, not to hard actually. Pull (yes, pull hard) off the head. Unscrew to two screws for his "collar" and four screws for his torso and open up Short circuit (connect with a wire) the positive terminal (3V+) and the hole not used being labeled I5. You are now switching between 24h and am/pm. This seems to reset each time you replace batteries. Shouldn't take more than 5 minutes.1 point
-
I think it was left off in production, tried for a while this afternoon, I give up lol1 point