Leaderboard


Popular Content
Showing content with the highest reputation on 04/12/2021 in Posts
-
After applying the fossil green, it’s time to start adding the liquid latex mask. I was asked to copy the Set for Stun trooper, so that’s what I aimed for. After this has dried, time to add a white undercoat (same brand as the gloss white the mat will be applied later): Then, Ford Diamond White gloss spray paint. The first coat was a little too satin... So, another can of spray paint purchased and a slightly thicker coat applied to get more sheen... Ooo, lovely. :-) (here’s a little peak at the spray painting) https://youtube.com/shorts/2cSwSZJOIOg?feature=share Once that has fully cured, you can begin to remove the liquid latex, revealing the fossil green undercoat (used to represent HDPE of the original Stunt helmets). Now it’s time to start applying the hand painted details. First up, Humbrol Grey #5: And now we get to today - I spent around 1 hr applying the Humbrol #85 Satin Black for the pinstripes and vocoder: Well, thats all for now. More to come soon.4 points
-
Hello my fellow star wars lovers, im luke and im from Australia. I've been costuming for awhile and I've had a TK kit for some time but when I made it I wasn't that bright nor had much help. But friends have pointed me to this side and I've meet and talked to some of the local 501st members. Super keen to get this kit repaired and finally be able to do a proper troop in it.3 points
-
Hi folks, So, I’m part way through a rather interesting project. When I saw a trooper asking about ways to fix a part-finished RS Prop Masters helmet that he’d purchased on eBay, I offered some suggestions. As the conversation continued, the trooper asked if I’d like to take a look at it in person to see what could be done. I agreed and he sent the helmet over to me. Well, opening the box revealed that it was already spray painted and the weathering had begun: When you look at the famous “lump” on the front of the RS helmet (part of the original helmet that this is cast from), you’ll see that the renovation helmet’s brow has been trimmed quite a lot more than it should have been: At this stage, this didn’t seem too bad. However, I hadn’t seen what was inside at this stage! ;-) After removing the ears, it was clear that the back and cap had been over trimmed: Also, the faceplate had been, once more, over trimmed.. The inside of the helmet had been sprayed black and, bizarrely, had lots of Velcro pads inside. I’ll explain these a little later... The only way this paint was coming off was sanding. So, the sanding begun... Taking apart the faceplate and back&cap, the faceplate was also over trimmed, as well as having various extra holes in unusual places. Although I didn’t know at the time, the Velcro pads inside had been stuck on to cover additional holes, all with ABS paste over the top(!!!); So, to add to the “fun”, I had to knock up some ABS paste and fill the various cracks and holes. After a long, long time trying to align this helmet “correctly”, it just was not possible with the way this was trimmed and the amount of holes in the helmet already. I did the best I could, also having to trim abs apply a new set of ears. Once aligned and assembled, on to the painting. As I’m going for a original look, the first coat was a Fossil Green; More to come in the next post. :-)2 points
-
In case you're interested, I used t-nuts found at my local Ace Hardware, but those linked standoffs also look good. Having the base on the nuts I used enabled me to (I think) mount them well to my bucket.2 points
-
Great and awesome build Dan .1 point
-
Well um.... Holy Crap! that is outstanding. I am curious to see how the TPU holds up over time. I planned on doing something similar but using 1/8" like this: https://sgtknots.com/products/marine-grade-dacron-polyester-shock-cord-1-8-inch?variant=33429745205334&utm_term=&utm_campaign=&utm_source=adwords&utm_medium=ppc&hsa_acc=3264755776&hsa_net=adwords&hsa_grp=116536717349&hsa_ver=3&hsa_kw=&hsa_tgt=pla-393927913855&hsa_mt=&hsa_ad=494912717198&hsa_src=u&hsa_cam=12189948699&gclid=Cj0KCQjw38-DBhDpARIsADJ3kjmvW2i6LSaYmsyetQpFWDAvjMWso2vNMsMSB6VGCi5L1I3HfR4CbE0aAugREALw_wcB One suggestion is to beef up the cut out areas of the bicep. I am concerned (given the cracking issues) that the fiberglass of Jims kit may not hold up over time where the cut outs are. I would think backing the area with "actual" fiberglass and using the glass fiber material would strengthen it enough. Another option may be to rough up the inside and back it with a thick layer of PC-7. Regardless, this is looking Awesome brother.1 point
-
Real life has to come first, you know the build and all of us will still be there when you are ready to continue.1 point
-
Hey Paul, that's perfect, and yes, I get it that it's way more than needed but not bad for just $12. I'm ordering today. (PS: my build is going a bit slow as well, just plugging along, fitting in where I can).1 point
-
Great project, Dan. Maybe the eye brow was over-trimmed as the first owner aimed for the 'move along' helmet. Don't know. Good restoration result so far. Interesting to see you painting the Humbrol grey first and then the black outlines. You seem to have a steady hand.1 point
-
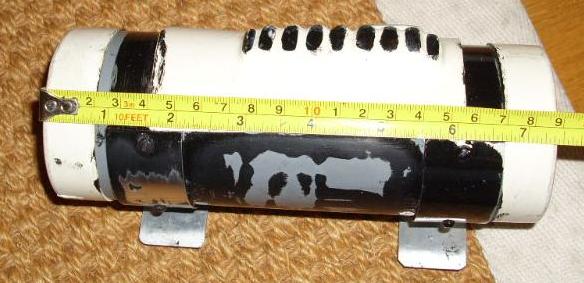
Nice work, just check your dimensions on the detonator as you don't seem to have much of a gap between the endcaps and panel Teeth area looks much better Using a hot water bath should help to flatten the rear strip, a common issue on most kits Cod reference, I left mine slightly pointy

 1 point
 -
So I figured it was way past time to do an update. I know it's been a while. To be truthful, I work in IT and most days the last thing I want to do is sit down at a computer posting on forums about my kit as opposed to just working on it. Shortly after I began cutting, trimming, and dremeling, I had to relocate my work area to my under-construction bar room where the plastic mess that was beginning to accumulate would blend in with the sawdust. But regardless I have been hard at work nibbling away return edges, mating pairs of parts, sizing them up, and cover stripping them together. I'm not much of a visual storyteller like some other builders here, but regardless, here's a few pics of my progress. Gluing up more cover strips and snap plates. It had been pointed out that my painting of the frown could use some cleaning up as I'd went beyond the teeth area. I'm hoping my touchups are now acceptable. Painting is far from my favorite part of this build. I haven't addressed anything about the tube stripes yet. Here's a question I have. What should, if anything be done about this misalignment on the rear shin cover strips? It doesn't lay flat when closed flush. Is this an issue? Should I heat up the plastic and attempt to flatten it out? And finally a simple one... I've seen rounded cod pieces and squared ones, and I'm unsure if I should keep this round or square it off. I'm not quite sure which is more screen accurate. Any thoughts?1 point
-
Thank you CableGuy! I appreciate those call outs, as I've started those changes to approximate those reference photos and others I've seen posted. Today I tightened my belt, pulled up the bootstraps, and jumped into the hot water. Bathing that is. I knew that I was going to have to adjust my calves/shins. So along with the shoulder straps that had to be curved, I grabbed the legs and also the ab buttons that I wanted to flatten out just a bit. My neighbor kindly lent his stockpot to do the boiling in. I heated up the water until it was boiling and began doing test pieces of scrap ABS. TESTING MADE THE WORLD OF DIFFERENCE WITH THIS. I can't reiterate that enough. The first few scraps I completed destroyed and warped. Okay, so I adjusted my timing. About 10 Mississippi's in the hot water, and then quickly into the cold sink water worked, while holding the new shape with my hands in between. The legs would prove more tricky, due to their size. I taped them up and submerged them one side at a time, flipping and rolling to get them even. Bath, sink. Bath, sink. Over and over until I felt the plastic no longer "stressing." (This step should have been done BEFORE I attached the sniper plate. Hindsight yo.) Then I removed the tape to assess. They were pretty darn close with tape alone. I continued just to fine mold them to clasp together naturally. Below is the before and after. Left: Right: The left leg has some wonky curved cut still I forgot to remove first. I'll need to tackle that before I get to the cover strip and possible second bath. Woo hoo! Hot water bath complete.1 point
-
So we all know that the Anovos belt is a floppy mess. The popular fix seems to be to strip the hard parts and move them over to a Tkittle belt. However, this comes with some risk of damaging the hard parts in the process. So I thought there must be a good way to reinforce the Anovos canvas. My idea was to slip some flexible reinforcement material into the belt from each end. Hence the "For Rent" sign. So I cut it like this to get the largest strips of white. Got lucky that the width I needed I was able to fit 2 in the large white section. I did a test fit and I could see the color a little bit through the canvas so I sanded it off. So then I ended up with two pieces like this To be able to slip them in all the way in behind the ammo belt I had to slot the ends to fit around the rivets and snaps behind I unstitched the end of the belt and slid it down inside With both sides in it looked like this Not too shabby I think. Then I needed to re-stitch the ends and the velcro pads. For the latter I had to poke holes through the plastic to be able to stich it. Here is one of the ends all done Then I had to punch holes for the belt bolts Here it is with all the stitching done. Next up was to glue the drop boxes in place Last my patches for the upper holes of the holster attachment. I cut a small piece from one end of the belt when I had it apart for inserting the plastic to make the small circles. All done! I know it is not perfect and for the amount of work I could have done it the popular way but I wanted to give this a try and see how it worked. One question for the forum. The Anovos belt has a velcro loop pad on the left inside area near the holster. What is it for?? Cheers1 point
-
Yeah Mate, we're around...although I'm in the US these days ( originally from Adelaide) but should be back around November...all here to help..1 point
-
Hello and welcome to the forums, from the other side of down under, I'm sure you'll get a lot of help from local guys of SCG, good luck with the build1 point
-
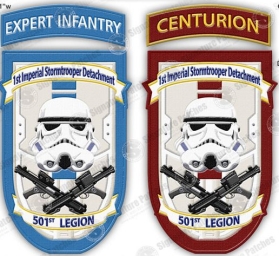
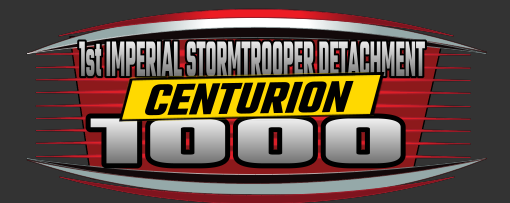
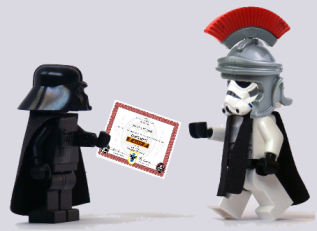
CONGRATULATIONS WE HAVE OUR 500th CENTURION Coming out of hyperdrive and crossing the finish line in first place, congratulations Trina "Architect18112" TK18112 our 500th Centurion and also congratulations to each and everyone one of our 500 approved Centurions, without you we would never have won this race. From some of the staff Congratulations trooper, welcome to Centurion It's been my honor and pleasure since 2015 to encourage troopers like yourself to shoot for the higher levels of accuracy. That said you're the FISD's 500th applicant and it brings me great joy to welcome you to this very unique group that strives for excellence. Job well done Tony UKSWRATH ---------------------------------------------- Congratulations trooper! Thank you for your hard work and dedication to making your armor just that much closer to screen accurate. Cheers and welcome to Centurion! #500 Jim Rat ---------------------------------------------- Congratulations #500 Centurion !!! Thank you for your effort and for being part of this new FISD milestone . Mario TKSpartan ---------------------------------------------- Congratulations #500 and welcome to the rank of Centurion! Thank you for your effort and being a part of the FISD community! Chris themaninthesuitecase ---------------------------------------------- It has certainly been an exciting journey that I have had here at the FISD, and that journey has included my own Centurion application and approval experiences. I remember very well, my excitement, and that of other members who had encouraged me along the way. Well, this is a very exciting day for all of us, but especially for you! This is like a surprise birthday party at the office, as truly, the entire Detachment is joining to celebrate your achievement in having earned the title of Centurion at FISD. Congratulations, on having done so. Thank you, for having done so - your achievement will inspire future generations of FISD Stormtroopers and future Stormtroopers alike, to follow in your footsteps. So yes, thank you for your commitment, your hard work, your diligence in making this happen. We are all proud of you,, #500! Now, let's reflect on how awesome an achievement this is, and let the celebrations begin! Tim Dark CMF ---------------------------------------------- Congratulations on being Centurion 500!!! This is such an amazing milestone! You have done an awesome job on your build. Another proud moment for this detachment and all of its members. Welcome to the ranks of Centurion and enjoy every second of it! Steve starsaber25 ---------------------------------------------- Trina, this is a proud moment for the Detachment, and one I'm sure you will remember for a lifetime. You have taken the steps to become a member of our highest accuracy level and can be proud to stand alongside your Centurion brothers and sisters. Thank you for taking this journey, and becoming part of a detachment milestone, to not only join one of the 500, but to become the 500th centurion. Stand by for your deployment order Trooper Andrew Sly11 DL Taking a look back at the history of the Centurion program Like the march to 1000 EIB I went through the forum looking for information on how the Centurion program first came about. First time I believe it was mentioned was in the Paul's election Q & A back in February 2009 (thread can be found here) There was next a poll in March 2009 to decide whether to keep the name Elite or change to Centurion (thread can be found here) Lots of names came up in the discussion and in the end the poll was closed with Paul commenting a new poll would be posted. Next came a conversation in February 2011 with the program named Centurion (thread can be found here) And another mention end of February 2011 in staff area with goals in 2011 for creation of the program, also conversation about artwork and discussion of the name either Legion Centurion or just Centurion. March 2011 and Paul posted in the announcement area the creation of the Centurion program (thread can be found here) and also the Centurion program overview (thread can be found here) First Centurion standards are added to ANH CRL in April 2011 and announced in April's Newsletter (thread can be found here) Some of the early artwork, variants in color and font Unfortunately I can't find any record of the final design of the Centurion logo that we see today, It was added to the draft Centurion certificate design in May 2011 FIRST patch run of the red FISD detachment logo May 2012 (thread can be found here) It was thought that there had only ever been one run of the red version detachment patch BUT after doing some research for another newsletter piece I discovered there was also a run in 2014 and also 2015 which makes three runs total. 12" Version was produced in both blue and red 2016 (thread can be found here) If you are one of the lucky ones you may have purchased a 12" version which was produced in 2016 which also had an option of a larger centurion rocker, the 12" version and rocker where only produced once. Please Note: the images below have never been produced as merchandise, the designs where only used in conjunction with the Centurion500 promotion Centurion Milestones FISD's first Centurion April 2011 #1 Mathias "Locitus" TK2959 ANH TM armor https://www.whitearmor.net/forum/topic/15377-tk-2959-requesting-anh-centurion-status1tm/ FISD's first female Centurion was not that far behind August 2011 #16 Olga "Bereu99" TK9061 ANH ATA armor https://www.whitearmor.net/forum/topic/16624-tk-9061-requesting-anh-stunt-centurion-status16ata/ #100 Jordan "stormsfx" TK23776 ANH TM armor https://www.whitearmor.net/forum/topic/25515-tk-23776-requesting-anh-stunt-centurion-status-tm-100/ #200 Brad "68Brick" TK21814 ANH AP armor https://www.whitearmor.net/forum/topic/33758-tk-21814-requesting-anh-stunt-centurion-status-ap200/ #300 Chris "bmth chris" TK10488 ANH TM armor https://www.whitearmor.net/forum/topic/40303-tk-10488-requesting-anh-stunt-centurion-status-300/ #400 David "hollowbodies" TK41123 ANH AP armor https://www.whitearmor.net/forum/topic/44880-tk-41123-requesting-anh-stunt-centurion-status-ap-400/ #500 Trina "Architect18112" TK18112 ANH AP armor https://www.whitearmor.net/forum/topic/50759-tk-18112-requesting-anh-stunt-centurion-status-ap/ #501 Jonathan "Lord_Potato" TK89054 WTF AP armor https://www.whitearmor.net/forum/topic/50954-tk-89054-requesting-anh-stunt-centurion-status-wtf-501/ #10th Centurion Approved Glen "gmrhodes13" TK85421 ATA / RS https://www.whitearmor.net/forum/topic/51541-tk-85421-requesting-death-trooper centurion status-ata-approved-10/?tab=comments#comment-729018 Multiple Centurion award recipients There are a total of 19 multiple Centurion awards recipients, this was quite interesting to see after all we had 73 multiple EIB award recipients so I presumed most would have also applied to Centurion but that is not the case. Unlike EIB where you are issued with a star for each additional award received, for Centurion you only receive the one award any other additional Centurion awarded costumes have [APPRVOED] 2nd, 3rd, 4th and so on added to the title but nothing added to your forum profile. Forgive me if I have missed anyone, here are those multiple reward recipients, congratulations to you all. 2nd Centurion Award Recipients - 12 Luis "Rietzer" TK31513 Randy "magni" TK16127 Dennis "NINJAMOVE" TK16112 Robert "RLJ2515" TK10596 Sarah "Alay" TK20466 Dave "PBTrooper" TK10737 Mike "TK1636" TK1636 Michael "TK-Sharp" TK12169 Joey "vecspeed12" TK9512 Jacob"Pistolsheets" TK86267 Brett "Cleantropoer" TK9593 Aizensoso "Aizenoso" TK14292 3rd Centurion Award Recipients - 3 Daniel "TheSwede" TK99665 Tony "ukswrath" TK10116 Joseph "justjoseph63" TK10963 4th Centurion Award Recipients - 2 Arthur "giskard8" TK39093 Justin "TheRascalKing" TK61490 5th Centurion Award Recipients - 0 - 6th Centurion Award Recipients - 0 - 7th Centurion Award Recipients - 1 Ardeshir "equuspolo" TK42128 8th Centurion Award Recipients - 0 - 9th Centurion Award Recipients - 0 - 10th Centurion Award Recipients - 1 Glen "gmrhodes13" TK85421 Once again congratulations and thank you to all who have taken part in the Centurion500, now on to 1,000

.png.79239ba7894d1a26436c9b01dbdd1780.png.cd09e459f78499f0356cbb4b988b1691.png)
.jpg.626ea2ed6e018baa39748959dc767362.jpg)


 1 point
 -
Im sanding the eyes as I type. I'm doing regular lenses. I'm planning on spraying the whole thing in plastidip so it matches the armor, and painting on the details. thanks! I cut out the two front teeth that where filled in for whatever reason. I first used my exacto knife. I spun it so make holes so it would be easier to cut. then i just cut them out, and did some more cleaning up.1 point
-
Congratulations to all our Centurions. 500 strong and hopefully plenty more to come in the near and distant future. Sent from my iPhone using Tapatalk1 point
-
This girl is a goal-getter and finally the most coveted badge is now under my name. I am deeply honored to join the elite ranks and even more the 500th Centurion! But this would not be possible without the support, advices and suggestions of you guys… FISD, Detachment staff and DOs. (Special thanks to Sly11, TKSpartan, TheSwede, justjoseph63, ShaSha) Thank You Very Much Everyone! (in Filipino: Maraming Salamat!) Slow clap to all the men and women before me… the Strong Centurion 500. We all did it! Congratulations FISD! Cheers! Well, it seems...I’m not too short to troop after all. - TK181121 point
-
Congratulations KC, fantastic job. Welcome to Centurion1 point
-
Welcome to the ranks!!!! Congratulations trooper!!!!1 point
-
So this is my torso so far. I don't have a belt yet. I'm hoping that will close the gaps between the kidney and ab sections. After wearing this around the house for a couple days I feel like I might need lengthen the shoulder connections. The whole back feels like it might need to come down. However I'm not sure how low I can make the back plate. To me it doesn't feel like I can really lower it anymore. Where should the butt plate sit? My butt kind of peeks out of the bottom of it. Thanks in advance for the feedback. I can get different pics if that helps elaborate my questions.1 point