

paradoxb3
-
Posts
20 -
Joined
-
Last visited
1 Follower

About paradoxb3

-
Minor dressing issue before you submit photos: Looks like you're wearing your biceps backwards. The bicep with the "thumbprint" goes on the left. Check your forearms too. Should be 11 divots on the left, 12 on the right. You may have just swapped up your arms when kitting up. Look forward to meeting you here in GA!
-
 paradoxb3 changed their profile photo
 -
Requesting 501st access! https://www.501st.com/members/displaymemberdetails.php?userID=33715 TK-47501
-
Approved! TK-47501 Checking in! gmrhodes13 was correct in that my TD clips needed to be shortened, but that was the only correction that was requested. A quick snip snip and sand and I was done. I want to thank everyone here for your time, your experience, your knowledge, and your invaluable input. I couldn't have got this far without you. "If I have seen further, it is by standing upon the shoulders of giants." - Sir Isaac Newton
-
Yes and thank you very much for your help and input. Your vast knowledge and resources were invaluable and made this first build so much easier! I look forward to trooping alongside you in the not too distant future. Sent from my SM-G975U using Tapatalk
-
That will definitely be on my to-do list. I was afraid my belt might have been sitting low. I was walking that fine line between getting everything perfect and not annoying my SO photographer. Hah Sent from my SM-G975U using Tapatalk
-
Thanks! I certainly plan on it in the near future. Sent from my SM-G975U using Tapatalk
-
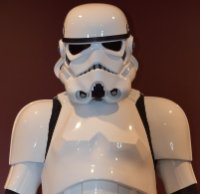
Name: Devin Padgett Future Garrison: Georgia Garrison (USA) Armor Maker: AM 4.5 Helmet Aaker: AM 4.5 Cloth Belt: Imperial Issue Neck Seal: Trooper Bay Holster: Trooper Bay Boot Maker: Crowprops Blaster: (none presently) Height: 6' 0" Weight: 215 lbs Type: ANH Stunt I've not been very active at all on my build thread for my own personal reasons, however that doesn't mean I haven't been active on my construction process. I submit for your pre-approval review my ANH Stunt OT TK! Front: Back: Left: Right: Helmet Front: Helmet Left: Helmet Right: Helmet Back: Helmet Lens Color: Hetlmet S-Trim: Ab Detail: TD: Shoulders: Right "Han snap": Left Rivets: Rubber Gloves: Hand Guard Flex: Right Thigh: Thanks! -Devin
-
paradoxb3's ANH Stunt TK build thread (AM 4.5)
paradoxb3 replied to paradoxb3's topic in ANH Build Threads
Thanks so much for the clarification. I was still a little lost on the meaning of the "fall of the tube stripes" considering the decals that came with Dave's AM kit are symmetrical. There's been at least a couple of times that the wording of the CRLs has tripped me up, and I don't think I'm the only one. I also recall "Frown is painted gray and does not leave the teeth area. A total of 8 cut outs in the teeth area of the frown are present." confused me, as I thought "does not leave the teeth area" referred to the 8 holes being cut out and not that the paint shouldn't extend beyond the teeth. Anyway, I may attempt to use masking tape to lift and readjust my tube stripes so I don't have to move them one at a time, or order more. For now I've moved on from the helmet to armor assembly and strapping. I glued up my last 2 cover strips last night. Things are hopefully about to start coming together. -
paradoxb3's ANH Stunt TK build thread (AM 4.5)
paradoxb3 replied to paradoxb3's topic in ANH Build Threads
So I figured it was way past time to do an update. I know it's been a while. To be truthful, I work in IT and most days the last thing I want to do is sit down at a computer posting on forums about my kit as opposed to just working on it. Shortly after I began cutting, trimming, and dremeling, I had to relocate my work area to my under-construction bar room where the plastic mess that was beginning to accumulate would blend in with the sawdust. But regardless I have been hard at work nibbling away return edges, mating pairs of parts, sizing them up, and cover stripping them together. I'm not much of a visual storyteller like some other builders here, but regardless, here's a few pics of my progress. Gluing up more cover strips and snap plates. It had been pointed out that my painting of the frown could use some cleaning up as I'd went beyond the teeth area. I'm hoping my touchups are now acceptable. Painting is far from my favorite part of this build. I haven't addressed anything about the tube stripes yet. Here's a question I have. What should, if anything be done about this misalignment on the rear shin cover strips? It doesn't lay flat when closed flush. Is this an issue? Should I heat up the plastic and attempt to flatten it out? And finally a simple one... I've seen rounded cod pieces and squared ones, and I'm unsure if I should keep this round or square it off. I'm not quite sure which is more screen accurate. Any thoughts? -
paradoxb3's ANH Stunt TK build thread (AM 4.5)
paradoxb3 replied to paradoxb3's topic in ANH Build Threads
Thanks guys. I picked up a couple tubes of e6000 already and some clamps and magnets, though I may end up needing more. -
paradoxb3's ANH Stunt TK build thread (AM 4.5)
paradoxb3 replied to paradoxb3's topic in ANH Build Threads
@TKSpartan Thanks for your input! Yeah I'm not quite finished with the paint, so I plan on touching up some of the lines. I'm not entirely sure how clean they need to be, as "hand painted" implies a lack of perfection to me, so I suppose it's a thin line, pardon the pun. Shucks on the tube stripes, though. As I read the CRL it said they are ideally a pencil width from the cheek and fall towards the front if I'm understanding that correctly. I actually used a pencil at the rear as a spacer but maybe my fall was too aggressive (or I'm misunderstanding the wording of the CRL). I'll keep tweaking on it, but all this tedious fine tip painting is nerve-racking, and I'm about ready to start working on some other parts! -
paradoxb3's ANH Stunt TK build thread (AM 4.5)
paradoxb3 replied to paradoxb3's topic in ANH Build Threads
I still have some painting and touchups to do, but while I wait on ear paints to dry, anyone care to let me know how the helmet is looking so far? I don't know if I'm satisfied with the mouth and vocoder, but freehand painting is NOT one of my strong suits. I tried to get the ear gaps as minimal as possible, but there's still a little present: Interior: -
paradoxb3's ANH Stunt TK build thread (AM 4.5)
paradoxb3 replied to paradoxb3's topic in ANH Build Threads
So I drove to a Michaels a town over and found semi-gloss #1139, so I'm back in business! -
paradoxb3's ANH Stunt TK build thread (AM 4.5)
paradoxb3 replied to paradoxb3's topic in ANH Build Threads
After a trip to Hobby Lobby for some paints and accessories, I have questions! I have picked up the following paints: Testors Model Masters French Blue Testors #1147 gloss black (the 1/4oz bottle of #1747) Testors #1138 gloss gray Testors #1145 gloss white I've read some varying discussion whether or not to use gloss or semi-gloss black for the vocoder, outlines, etc. They were out of #1139 semi-gloss black, so is it acceptable to go ahead and use #1147 gloss, or should I wait until I can get ahold of some #1139? Also, as many of you probably already know, the AM 4.5 kit comes with unpainted cast aluminum replica HOVI tips. I had a difficult time finding anywhere which talks about the color of the HOVI's, I suspect assuming that most come already black and don't need painting (except for white interior/tip). From another project, I have two cans of Testors spray enamel, #1247T Gloss Black, and #1249 Flat Black, if either would be acceptable. I assume spraying the HOVI's may produce a cleaner appearance than brush painting. Your thoughts? For now I've started by beginning helmet rough assembly, masking, and spraying the interior with plasti-dip, as I prefer the black interior. -
paradoxb3's ANH Stunt TK build thread (AM 4.5)
paradoxb3 replied to paradoxb3's topic in ANH Build Threads
The Scout (TB) is an old project that was never really built with the intentions of joining the 501st, so it's not currently approvable. Maybe someday, but for now I intend to put all my effort into building my OT TK to L3 out of the box. Just spreading things out, taking inventory of parts, and mentally trying to absorb the whole thing. Of course I couldn't help but jump right to playing around with the helmet. Isn't that like an unspoken rule?
