Leaderboard


Popular Content
Showing content with the highest reputation on 03/28/2021 in all areas
-
FISD 15th Anniversary Coin Design Contest Closed and Winner announced Design entries Close May 1st Attention all members with serious design skills, here is your opportunity to step up to the plate and exercise your talent. This is FISD's 15th anniversary year come July, and your design could be the one chosen to commemorate this fantastic occasion. The winning entry will be made into the detachments celebratory coin marking the milestone in true FISD fashion. The coin design is first and foremost but we are also considering running a patch if the design translates well or is a good accompaniment the coin. So how do you enter? Glad you asked! Here is the low-down 1. The contest will be open to all approved members. If you can see this post, you can enter! 2. The competition will begin officially TODAY 28th March and will run until Sat 1st May. The winner will be chosen by your command staff through a Poll and the results will be made available after the vote closes. 3. The number of designs you can enter is only limited by your imagination. 4. You are welcome to use any FISD logos but we are really looking for a unique design that embodies FISD and what we stand for. Due to current Legion merch regulations there are specific things that need to be included. 5. Standard 1.75 inch size and you must design both sides of the coin so two designs, heads and tails can be submitted as a single entry. 6. Design MUST include full Detachment name (1st Imperial Stormtrooper Detachment), 501st Legion, Must contain the words Anniversary and the year 2021 plus the number 15 (we had Roman numerals on our 10th anniversary so they are definitely fine to use. Also must have the LFL C and this can appear on the edge as it can be laser etched on the final product. 7. All entries become property of the FISD/501st Legion. The winner will be announced in this competition thread and their design promoted in the following newsletter. The winner will also receive two coins free and a patch if we can make that run happen. Not only this but the kudos for a fabulous design and become part of detachment history. Oh yeah, and some serious bragging rights! The finished products will have their own sales thread(s) once the designs are approved and ready to order. Here is our Font and color guide used for official merch, if you require logo files, they will need to be requested via PM to myself with what you need.
 6 points
 -
Ok, I guess I'll go first. Something I had laying around... Black - raised black metal Dark grey - recessed black or matte black Light grey - recessed metal or metal paint EIB blue Centurion Red2 points
-
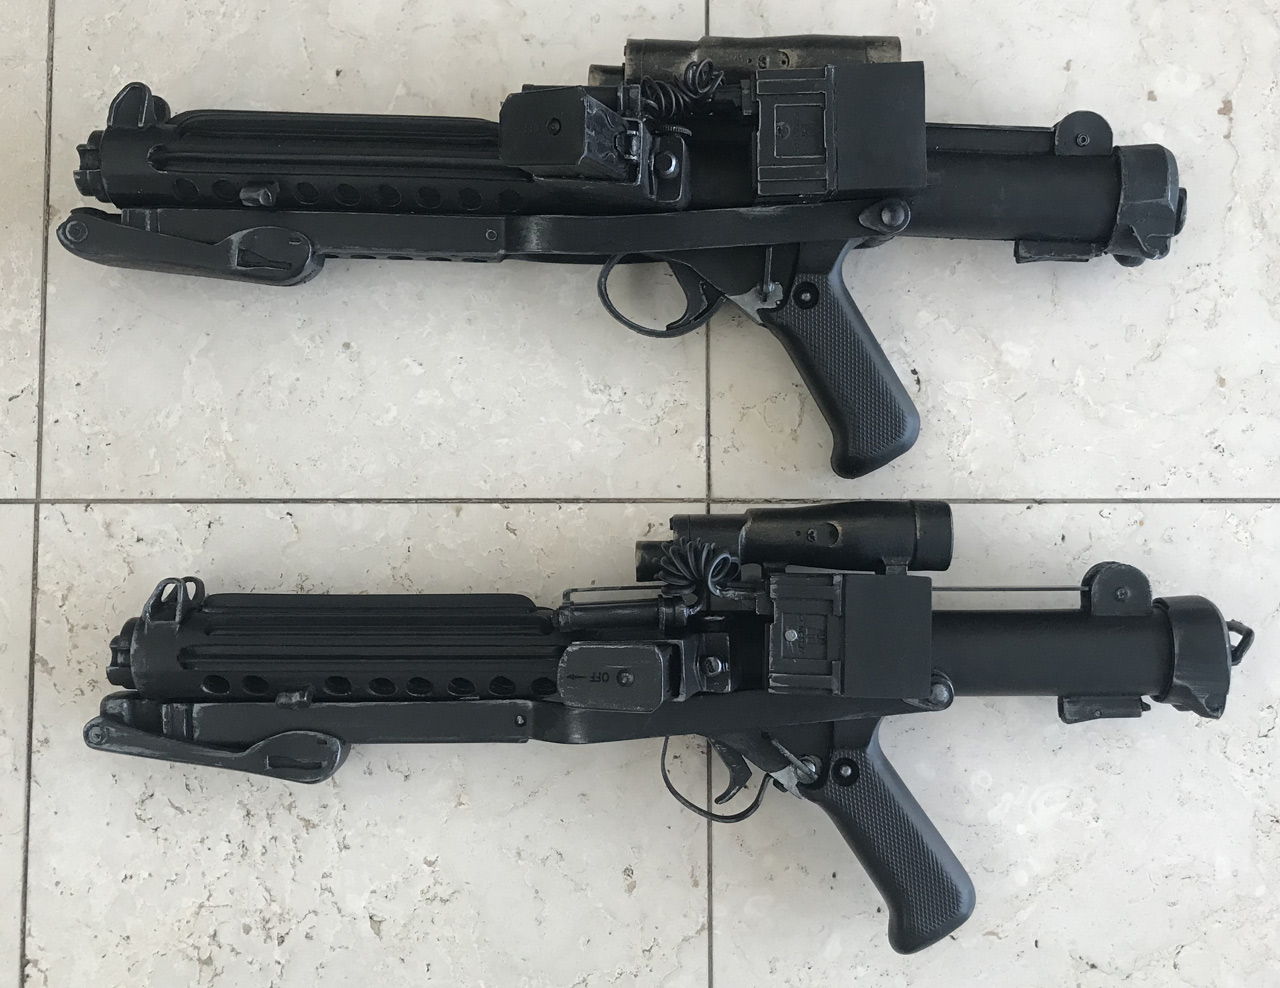
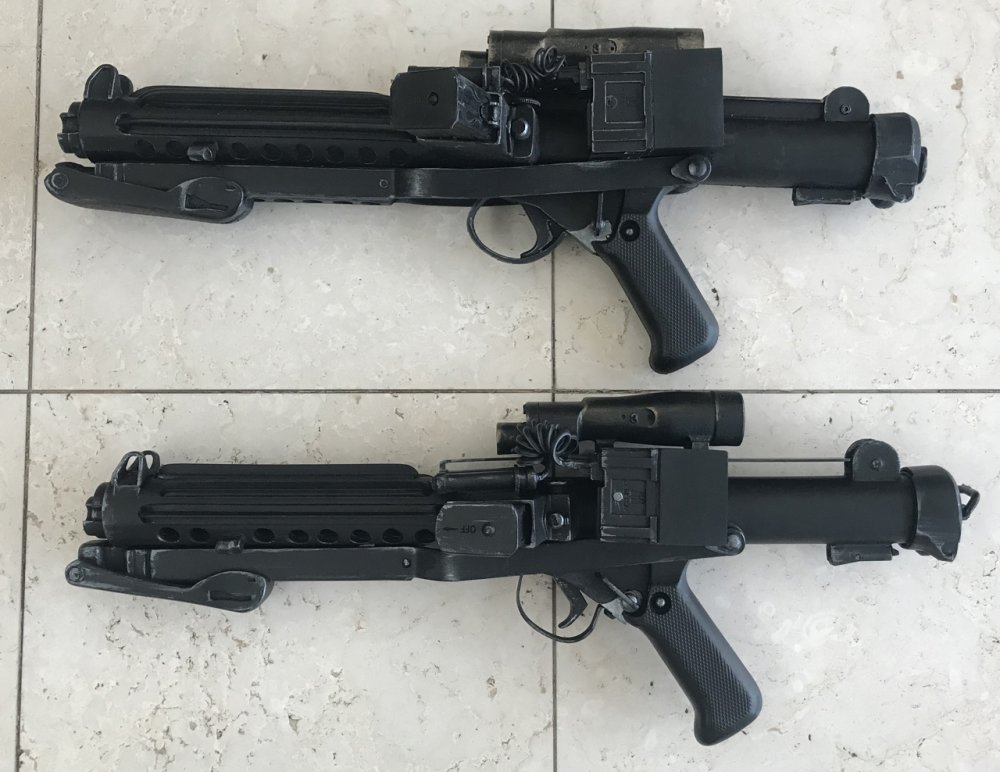
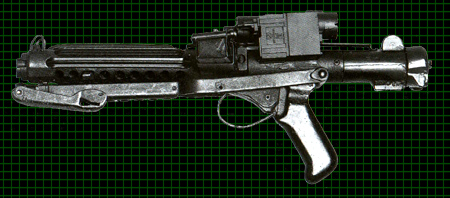
Hi folks, It’s been a few years since my last blaster build, ( https://www.whitearmor.net/forum/topic/42658-cableguys-doopydoos-feat-t-jay-kit-anh-e-11-wip/ ) but I’m BACK!! This time, I’m building a new kit to the market from Marc at TroopaCoola. Marc has sourced most of the original parts from the Sterling L2A3 and is now making high quality resin moulds. As per the following video, the barrel is a nicely machined metal barrel, with the other parts made from resin. Unboxing video; Making the unboxing video: As the video explains, the parts included were very well presented and relevant parts were bagged together. For example, the mag, mag well, mag release button etc were all in a small bag. The various parts of the Hengstler counter were in a separate bag, etc etc. Compared with “another” popular resin kit, many parts are much better presented, meaning that there are more separated parts and many that are already hollowed out, for example. I’ve now started with sanding and preparing the parts. Here’s an update on the progress so far; Here’s a random selection of photos that accompanied the videos; More to come soon. :-)1 point
-
I saw someone recommend this seller before. I just want to make sure this is passable for Centurion level. http://etsy.me/1v4vzr5 TIA. Sent from my iPhone using Tapatalk1 point
-
Thanks. Yeah, I remember seeing that but it made me nervous to get on them with enough heat to get them down. I think I tried one and I didn't like how it turned out. I was able to get them pretty flat so I am happy with them for now. Cheers1 point
-
Ah, gotcha, I really need to learn to read good [emoji23][emoji23]1 point
-
You can just use a cotton swab also dip it in a small dab of white paint and do the hovi tips. Your bucket looks nice and clean.1 point
-
That was it, thanks. I didn't know the option was available.1 point
-
So I drove to a Michaels a town over and found semi-gloss #1139, so I'm back in business!1 point
-
Here's a new template I created for the T-21 blaster. I created it by gathering multiple pictures and diagrams of Lewis guns and overlaying them in Photoshop to create a template. It's not uber accurate by any means, but it should be helpful in creating a "trooping" version of a T-21. I'd love to own a Sci-Fire / Hyperfirm, but they don't ship to Canada and it would be dicey to import one due to customs regulations. But nothing says you can't make a PVC / wood replica for trooping! I've sourced most of the parts (still need a few more) for the build and I'll be creating a tutorial in the coming weeks. Stay tuned! If you're antsy, here's a preliminary parts / supplies list: - 3/4" thick wood for main body - 1/2" thick wood / MDF for stock & receiver details - 1/4" thick wood / MDF for grips - 3" black ABS pipe (it's larger than 3") or 3.5" white PVC for main shroud - 2.5" PVC for the barrel - Large diameter to small diameter reducer, or a long tapered funnel - 2" PVC for the receiver - 4" drain piping or half round adhesive foam - more details to come! Here's the full size version (if you can print this large like Kinkos or something, print it at 72 DPI full size). Or you can crop and print just the sections you need (eg: the stock, receiver, feed cover, etc..)1 point
-
You’re the man!!1 point
-
Someone posted about them here A trooper has received centurion approval The only thing is the counter appears a little low.
 1 point
 -
Thanks! Really good to know I'm heading in the right direction. Will get the hovi-mix tips touched up this weekend, and post a sanity-check pic. Should be getting some better padding for inside the bucket today too. Would love to paint the inside black as I've seen some others have done, but nervous about ruining a helmet from the outside is pretty much perfect (hmm [emoji848]). Sent from my SM-A715F using Tapatalk1 point
-
Hi Richard! Great to hear that you are aiming for the higher levels, and everything is looking good so far. Instead of removing the Hovi tips to paint the rims, I would suggest just (carefully) dabbing a bit of white paint on them. Looking forward to following your build thread, and keep the questions and photos coming!1 point
-
Almost forgot!!!! My e-11 blaster arrived this week [emoji16] Ordered the Sheartech rubber esb blaster, and (again) looking over the crl and pics online it looks to me like its good for level 3 clearance as the promo blaster. Looks like a replica of the Pugman promo. If there's any issues please let me know.1 point
-
Because I'm tall (6'4", 193cm) I needed to look at armour that was going to fit properly. RWA was suggested in a lot of UK posts as having XL armour being suitable for big and tall guys (you can order a full XL set, or just the specific pieces you need in the bigger size). I messaged Ross (Mr RWA) a fair bit before ordering (really nice guy), and we agreed on a full set of XL armour. He makes his armour in 1.5mm ABS, 2mm ABS and 2mm acrylic capped ABS. Ross recommended 2mm ABS for the XL kit, as it has to stretch a bit further over the molds (therefore gets a bit thinner), so it's a good balance between strength and detail in the molding. I chickened out and paid extra to get Ross to build and finish the helmet. I know that is 'cheating', but having the helmet ready to wear right from the start was pretty cool. From reading the CRL the helmet is fine all the way up to level 3 (s trim, stickers not paint, etc), but the hovi-mix tips were all black. I've painted the insides white already, but I need to take them off again to paint to rim white as well. Sent from my SM-A715F using Tapatalk1 point
-
First thing I tackled was the boots. I don't wear leather, and finding suitable boots was a challenge. Got some synthetic ones eventually which my UK armourer was happy with. https://www.asos.com/asos-design/asos-design-chelsea-boots-in-black-faux-leather-with-black-sole/prd/21328697 I think I maybe rubbed down (with nail polish remover) a bit too hard. It took A LOT of coats of dye to cover them, but maybe that'll be a good thing in the long run. Got good coverage, even on the elastic, and just had to tidy up where the top meets the sole with some gloss white and matt black enamel paint. I know that'll chip off quite quickly as it doesn't flex, but I can keep touching up if needed. Sent from my SM-A715F using Tapatalk1 point
-
They most likely had the wrinkle (or crinkle) paint. In case you go for it: VHT 201 Just make sure to exactly follow the instructions and allow about half a year for the intensive smell to fade away. If the result turns out a bit glossy, just dull it down with a thin layer of matte black spray paint.1 point
-
Hi troopers, The painting process has begun. A grey primer for pretty much all parts, to start. Then, on parts that were originally made of metal, a metallic silver undercoat: Below, a mixture of grey primed parts and the silver bolt. The scope also had a grey primer, then a coat of Humbrol Brass 54 More parts with metallic silver applied. I’m still trying to decide on Crinkle black paint for the barrel and stock or not?? I’m told that the screen used blasters would have had a crinkled texture - very hard to see good enough quality reference photos. More to come soon. :-)1 point
-
Hello troopers, Some more work done before the paint process. I decided to make the mag release a bit more realistic. So, rather than just sand the part down and glue it to the top surface of the mag well, I drilled out a suitable hole to mount the real ease button into; I fitted the magazine end can to the mag. For the little “release button” on the end, I decided to use the fat end of a rivet. This was just the right size and looks good in situ; A bit like this example below; Then moved on to adding the resin, but very detailed, hex bolts to the front muzzle. These don’t have the knurling pattern to them, so not 100% accurate, but still rather nice; I started drilling the relevant holes for the selector switch, free/lock screw (also resin) and the hex bolt underneath. I won’t fully affix these until the different paint types are done (gloss black for main grip, metallic finish for the other parts). And finally, here’s a look at the folding stock in action. :-)1 point
-
Hey troopers, Another update on the build. In this video, and the ensuing photos, we take a closer look at the following; Power cylinders Hengstler Counter Folding stock Scope Power cylinders. They came in a few parts with minimal cleaning up required. I simply sanded off some excess resin from the moulds, then used a file to open up the two main holes on the central section to fit the cylinders. The Hengstler counter; This comes in two main parts - very useful for the spray painting process due to the original parts being half metal and half plastic. Great detailing and very sharp. The Magazine; This is a nice sized mag. The end cap does not have the “OFF—>” markings (but I might add these myself. Update from TroopaCoola - due to the fragility of the folding stock and the slight damage in transport, Marc at TroopaCoola has already said that future orders will ship with the folding stock barrel attached moulded as one. This is very quick action and should avoid the same thing happening to others. Nice work, Marc [emoji1303] More to come. Any questions, don’t hesitate to ask. :-)1 point
-
It's a 10 year old thread so I'm not surprised. I used the following image, I placed in publisher and made the page size 50 1/4" to match the size of the blaster then when printing it overlaps on standard pages, tape together then cut out. Here is a link to my thread: https://www.whitearmor.net/forum/topic/21392-t-21-build-im-bored/#comments1 point