Leaderboard


Popular Content
Showing content with the highest reputation on 11/15/2020 in all areas
-
Hi Mario, I attach new images after a few modifications realized. I hope I'm in the correct way... Thank you.2 points
-
It’s definitely slow and you’ll make a bunch of mistakes. All part of learning though! Your build is looking great so far, and I’m getting some ideas for stuff to change on my armor too!2 points
-
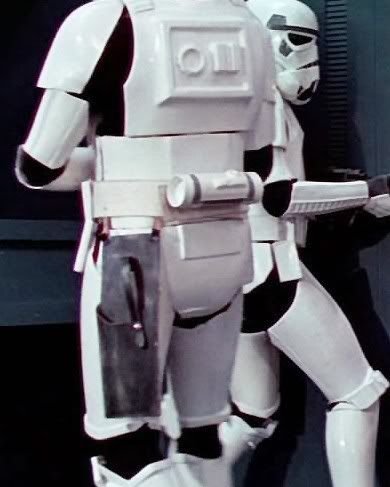
@gmrhodes13 That makes sense now. The scope and the counter are mounted through the same bolts. Maybe I could do something similar if I do end up stripping it apart. Mine is mounted by brackets to the counter back section, not the front section, so perhaps I could re-mount it more like that.2 points
-
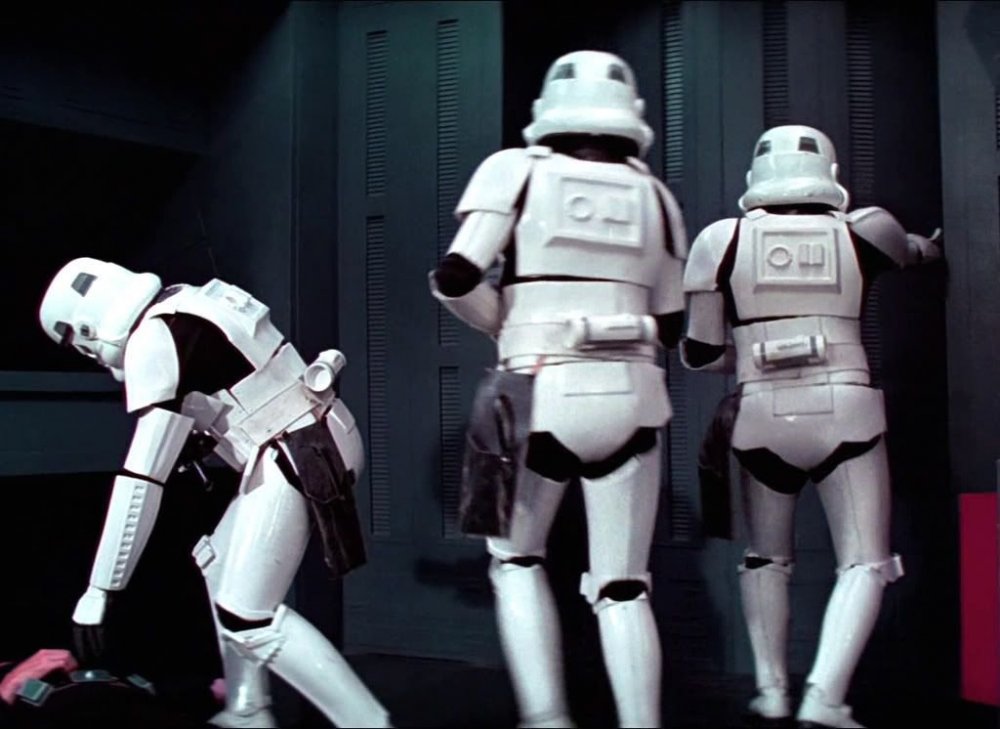
Just a quick update of the latest activities. Last night I disassembled my bucket and taped/masked the face and cap/back for plastic-dip rattle canning the interior today. I'd seen mentioned in other threads (I believe RascalKing?) to basically use a garbage bag taped to the edges of the bucket halves to protect the exterior from overspray, with the interior still exposed for paint. So I employed that method and also masked off the eyes and teeth, and proceeded to spray away, 3 coats, roughly 1/2 hour between coats per instructions on the can. Photos taken between coats 2 and 3. Looks ok to me so far, will let sit overnight and check again tomorrow. I used the time between coats to make some simple templates for the eye lenses and frown mesh. Tomorrow when the bucket interior is good to go, I'll do some test fitting. I have a ton more mesh and enough lens material for a couple more sets, so if things are off, I have some wiggle room if I need to adjust. (In the photo of the lens material below, those are reflections, they're not beat up the way it appears.) QUESTION: I plan on using Joseph's sugru method for mounting the eye lenses. I also picked up some extra sugru, so I was planning on using sugru to also mount the frown mesh. Basically, rolling a sugru strip fully around the frown and pressing the mesh down into it and letting it cure. But I hadn't read about anyone else using sugru for this. Just wondered if it would work, or if I should use a different method. Thanks! As always, please let me know if anything looks out of whack or if I did something laser brained.2 points
-
one thing i learned building this kit so far slow is the way.and there is no easy way.haha.2 points
-
Hey there everyone! So glad to finally be a member of this fantastic group. Looking at my armor on its stand still makes me giddy. I started this journey about three years ago, but the past two months is when things really kicked off. I binged the Clone Wars while waiting for my armor to arrive, which only fueled my excitement to be involved in the 501st. Like everyone else, I’ve had to make a few quality of life changes to the armor; shortening/lengthening strapping, wrangling those pesky shoulder bells, making the helmet into less of a plastic coffin and more of a trooper’s friend with some fans and speakers. If I had any advice for any aspiring members, it’s to come to terms with the fact that TK armor is not the most comfortable thing in the world, but you can definitely work to make it bearable! I still have a ways to go but I’m confident in my fellow troopers and their wisdom to guide me. Again, thank you for all your help and support and I hope to see you on the field! -Ian
 1 point
 -
I was able to fix it! Here's the new pictures for you!1 point
-
Not a larger belly but a bad back, I use a compression belt, this may help1 point
-
Nice work trooper, a few suggestions before the DO's get here. You may want to give your side rivets another coat of paint Belt cut corners should meet the with of the belt, your corners are inside the belt width (but this is for L3) Just double check your TD width, there does not appear to be big enough gap between your caps and control panel Thigh ammo strips rivets are too close to the corners, also needs another coat of paint Good luck with approval trooper1 point
-
sorry it took so long! been busy with work! here are the photos you wanted!1 point
-
Perfecto Lluis... Buen trabajo... Perfect Lluis ... Very good job ...1 point
-
Funny thing happened on my way to the Death Star.... I started down this path over three years ago, and its been a long, weird journey. Full disclosure, ever since I was a tween, I repeatedly and annoyingly told my parents that the only thing I wanted for any type of present for my birthday/holiday/whatever was a Stormtrooper suit. I continued to do this into my adolescent adulthood with no success, and eventually I gave up on the idea. But, for some reason, when I saw the trailer for Inferno Squadron in the Battlefront II, I was taken right back to being 10. I researched everything I could find, thinking there was a way to hand build this myself. The further I dug, I suddenly came to realize that my original desire to be a character from my childhood was not only possible, but semi-affordable. So I took the plunge. There were several issues I chose to ignore. 1) I'm 6'3-6'4" not 5'10" as the original troopers were; 2) I'd never worked with plastics in this manner; 3) I didn't know a soul who'd built one before; 4) finding someone who made taller trooper armor at that time was very, very difficult. Finally settling on a kit from the UK (DA Props) which had a strong following and a host of taller troopers in the UK garrison advising me the kit would work, I purchased. The fact that I'd never done anything like this did not dissuade me from convincing myself I could assemble my armor in record time and be ready to trick or treat with my kids two months away. Obviously, this did not go as I optimistically planned. From the outset I made error after error, miss-cut after miss-cut and eventually convinced myself that I'd flushed too much money down the armor rabbit hole. There were starts and stops as work and family put the kit on the back burner. But I kept at it and the wonderful folks on this board kept giving advice and support for my build. When Celebration finally came to my hometown of Chicago, that finally pushed my to complete my armor. Now I'm fearless with a heat gun, aggressive with CA glue, unafraid of ABS paste, and don't even blink at the prospect of too much sanding. In short, I'm still as dumb as I was at the outset, but now I've got "experience" on my side. While it's not yet perfect, and I've got mods I need to accomplish to satisfy my own OCD, my Stunt TK was approved for trooping by the Midwest Garrison and I was approved a TK number. As an aside, I still can't believe "Bullseye" wasn't ironically taken as a handle. My thanks to everyone for their help. Look forward to trooping with you soon. Dave TK 84098 "Bullseye" (Troopin' with my boys this Halloween)1 point
-
I would however make sure you cut all of your cover strips before using excess material for side shims, you don't want to end up with a piece too small1 point
-
All is looking good1 point
-
Nice work, looking good, slow is the way1 point
-
Very hard to find sources for stitching and width, these are probably the best images, you could also check out this thread
 1 point
 -
Standard blasters don't have that permanent mount This is what is normally used for the counter and scope Here's an all in one version With some 3D print stripped holes I've used some wood (dowel) from paint brushes and glued into the print then re-drilled and retap the thread, may be an option.1 point
-
Seems I had a screw loose. I got help, it's all better now. Sent from my sorrosuub C1 comm link device using Tapatalk1 point
-
So I've been working on my left ear. Maybe it was beginner's luck, but the right ear I did first seemed a little easier. I definitely found the left to be trickier. But I think I finally got the left to an acceptable fit. Please let me know what y'all think. If I'm good to go, next step will be disassembling, prepping and painting...woohoo! My plan is hand painting all the bucket details, but if I find it not working out, I have a set of Dave M. decals as a backup. And of course, now that the bucket's fully mocked up for the most part...how could I not try it on?!1 point
-
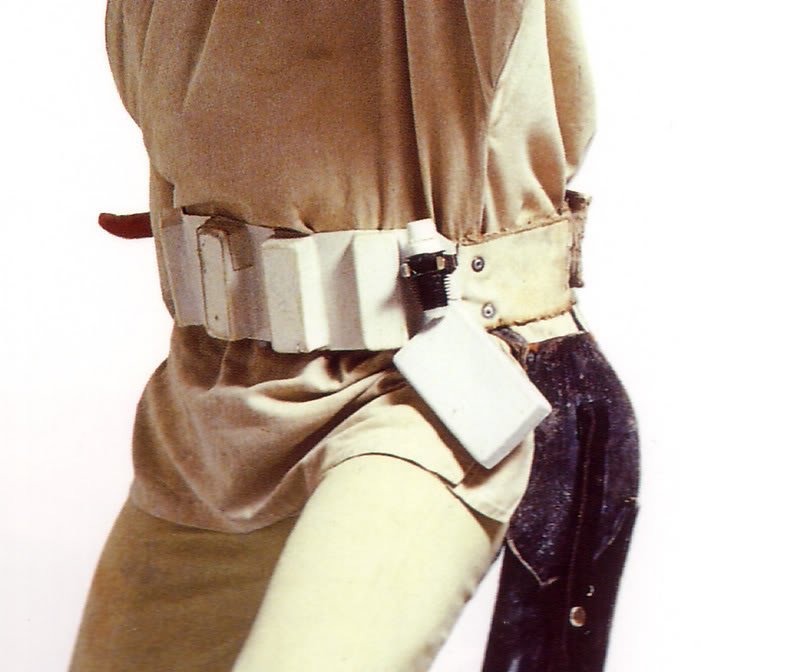
Original strapping Right arm, notice strapping is on the top Example1 point
-
If you do need to adjust the angle of the hovi, it is easy to cut a piece of rubber tube on an angle so you get a thin wedge, place the rubber wedge behind the mic tip, you can then rotate this wedge and it will adjust the angle of the mic tip. Si usted necesita ajustar es fácil cortar un pedazo de tubo de goma en un ángulo para obtener una cuña delgada, colocar la cuña de goma detrás de la punta del micrófono, a continuación, puede girar esta cuña y se ajustará el ángulo de la punta del micrófono.
 1 point
 -
So I moved the scope. The final straw was that when holstered in my Darman's Props holster, the scope prevented blaster from seating down where the magazine would be in the notch. So broke the glued front piece, and removed the rail and counter: Because I would now be able to glue the scope down onto the bolts, I could glue the front piece to the main scope and keep it all as one unit. I added a third bolt, threaded into the rail, that would help secure the front part of the scope, so that all three "pieces" would have a bolt mount to help keep it all attached. I drilled new rail holes for the new scope location, threaded the bolts in, and then mounted the whole rail and Hengstler bracket mounts back on to the blaster. For the three holes in the scope, I widened them to 1/8", so that it could slide down onto the bolts. I filled the holes with glue (using a small nail to push it in, and add more), and the scope just slid on to the ribbed bolts with some pressure, a snug fit: So it looks great, and it is now secure in the more accurate scope location, with the rear lens just peeking out beyond the Hengstler counter: Fits the holster like a dream now: All told, it was only about a 30 minute fix. Thanks for keeping me striving for accuracy!1 point
-
NOTICE- see my 10-1-2020 comments. This thread will not continue to update, you can follow Kyle's WIP thread to see how we are strapping his ROTK. Because I have been asked numerous questions about how I did my strapping, I am making this tutorial on how I strapped my ROTK. First, you need to decide on two things before you do anything with your kit. 1. Do you plan on lining the inside of the armor? I chose to line the inside of my armor with flex seal liquid white that was applied with a paint brush. The decision to line the inside of the armor was made for two reasons. One was that the armor is fiberglass and was very abrasive on the inside. The second reason was because I paid for the under-suit and wanted to prolong it wearing out. 2. How do you plan on attaching the strapping? In most places I adhered the straps to the armor with PC-7 putty. Normal TKs adhere their strapping with Velcro. I was not comfortable with how well this would work so I went with a permanent PC-7. The Velcro may work just fine; however, I cannot attest to this. So, if you plan on lining the inside of the armor, you will want to mask any area you plan on applying Velcro because the Velcro will not stick to the flex seal and removing the flex seal is damn hard. It embeds into the fiberglass and even after sanding and using chemicals, it still was not receptive to apply Velcro. This should also be considered when you are planning out the Velcro to hold the leg and arms pieces closed. While I am talking about this, I would like to suggest that you attempt to use Velcro on the front and back of the lower leg armor. I did not do this, instead I permanently closed the front side of the leg armor and used Velcro for the back and this has caused stress on the leg armor when putting it on and taking it off. This has led to cracks. If I get around to ordering another set of RO armor, I will try to close the legs on the front and back with Velcro, so just a suggestion. I digress… so once you know if you are lining the armor and what attachment method you will go with you will need the following: Note: everything is black unless noted and all Velcro is 3M industrial sticky back Velcro except the drop box Velcro, its 1” “sewn on” Velcro with no backing. Quantity Length Width Use 2 31” 1.5” Nylon Webbing Abdominal Shoulder Straps 2 #24 4 part snaps Abdominal Shoulder Straps 2 1.5” Plastic loop Abdominal Shoulder Straps 2 4” 1.5” Velcro (both sides) Abdominal Shoulder Straps 2 5” 1.5” Nylon Webbing Abdominal Shoulder Straps 2 7” 5/8” Nylon Webbing Abdominal Back Closure 2 5” 5/8” Nylon Webbing Abdominal Back Closure 2 5/8” Plastic side release buckles 2 6” 1” Nylon Webbing Abdominal connecting Posterior Armor 4 #24 4 part snaps Abdominal connecting Posterior Armor 2 5” 1” Nylon Webbing Abdominal connecting Posterior Armor 2 1.5” 1” Velcro both sides Abdominal connecting Posterior Armor 3 5” 1” Nylon Webbing Abdominal connecting Cod Armor 6 #24 4 part snaps Abdominal connecting Cod Armor 1 5” 1” Nylon Webbing Connecting Cod to Posterior 1 11” 1” Elastic Webbing Connecting Cod to Posterior 1 #24 4 part snaps Connecting Cod to Posterior 2 12” 1” Nylon Webbing Abdominal to Legs 2 6” 1” Nylon Webbing Abdominal to Legs 2 1” Plastic side release buckles Abdominal to Legs 2 2.5” 1” Elastic Webbing retention loops Abdominal to Legs 2 15” 2” Elastic Webbing Shoulder straps for chest to back armor 2 10” 2” Velcro hard side Shoulder straps for chest to back armor 4 #24 4 part snaps Shoulder straps for chest to back armor 2 3” 1” Elastic Webbing shoulder armor to shoulder straps 2 #24 4 part snaps shoulder armor to shoulder straps 2 5” 1” Elastic Webbing Shoulder Armor to Bicep Armor 4 #24 4 part snaps shoulder armor to bicep armor 2 6” 1” “Sewn on” soft Velcro drop boxes to box belt 2 6” 2” Velcro hard side drop boxes to box belt So all of these parts considered, this is your shopping list: Quantity Length Width Description 1 72” 1.5” Black Nylon Webbing 1 24” 5/8” Black Nylon Webbing 1 78” 1” Black Nylon Webbing 1 32” 1” Black Elastic Webbing 1 30” 2” Heavy Duty Black Elastic Webbing 23 #24 4 part snaps 2 5/8” Black plastic side release buckles 2 1” Black plastic side release buckles 2 1” Black plastic loops 1 box 15’ 2” Black Industrial Strength sticky back Velcro 1 12” 1” Sew on black Velcro In addition to these materials you will also need the following: Sewing machine (preferably an industrial machine but most of this stuff can be sewn with a standard sewing machine). Black bonded nylon thread, I use #69 bonded nylon thread, but I also have an industrial machine, if you are using a standard sewing machine just get some black nylon thread general purpose. Webbing hot knife/ cutter. You can just cut the webbing with a box cutter or scissors and the melt the end with a lighter but this can be tedious if you are cutting a lot of webbing. I use a hot cutter like this one for $74.99 https://www.ebay.com/itm/Electric-Rope-Cutter-For-Paracord-Cord-Webbing-Belting-and-Blade-/293128089661 Snap setting tool and a hammer. You will need the anvil and the punch set. The anvil should be double sided to accommodate the cap and the eyelet. I recommend this tool set found on Amazon. https://www.amazon.com/Snap-Setting-Snaps-Vaughan-Bros/dp/B074HKBBW1 Most of these materials can be found at Joann’s or a similar craft stores but I would suggest that you purchase these materials from Amazon or webbing supply stores. On amazon you can order smaller rolls of webbing like 10’ in length; however, most webbing supply stores will require you to purchase full rolls which are often 1,000 yards and quite costly. Additionally, you can use polypropylene webbing instead of nylon webbing which is often cheaper but does not have the abrasion and strength of nylon webbing. Ok so that is the list of materials and tools needed. In my next update, I will cut and assemble the straps and show where they go and what they do. Thanks for the interest.1 point