Leaderboard


Popular Content
Showing content with the highest reputation on 11/14/2020 in Posts
-
Seems I had a screw loose. I got help, it's all better now. Sent from my sorrosuub C1 comm link device using Tapatalk3 points
-
Hey there everyone! So glad to finally be a member of this fantastic group. Looking at my armor on its stand still makes me giddy. I started this journey about three years ago, but the past two months is when things really kicked off. I binged the Clone Wars while waiting for my armor to arrive, which only fueled my excitement to be involved in the 501st. Like everyone else, I’ve had to make a few quality of life changes to the armor; shortening/lengthening strapping, wrangling those pesky shoulder bells, making the helmet into less of a plastic coffin and more of a trooper’s friend with some fans and speakers. If I had any advice for any aspiring members, it’s to come to terms with the fact that TK armor is not the most comfortable thing in the world, but you can definitely work to make it bearable! I still have a ways to go but I’m confident in my fellow troopers and their wisdom to guide me. Again, thank you for all your help and support and I hope to see you on the field! -Ian
 2 points
 -
While today's share consists of the ab piece and kidney plate I'd first like to thank you guys for your suggestions regarding the shoulder bridges. Thanks Mario for your insight pertaining to the amount of ridges overlapping the chest piece. I do plan on moving the shoulder bridge forward slightly to have three ridges and tab over the chest area. Ideally, I do plan on removing that rear tab but I won't commit to that until I see a perfect fit. Of course, another fitting will determine how well everything looks. Thank you Caleb for your suggestion to don the ab and kidney pieces to ensure a more proper fit-I plan on doing just that when I check for my next shoulder bridge fitting. Last but certainly not least, Glen, I also appreciate your echoed recommendation to arrange a more thorough fitting that includes more adjacent parts. In the meantime, let's take a gander at what I've worked on... First, I have sanded the abdominal piece to reflect the more angular edges apparent towards the groin area. For the top portion of the ab piece I have kept one centimetre of space from the corner to the edge of the plastic to allow for harness hardware. Next, for the bottom area of the kidney piece I've merely cut along the area where the return edge meets the flash. If there are any other insights regarding the "ideal" or more effective cut for this area I will most certainly consider any suggestions. The top area of the kidney piece has a full centimetre of space between the corner and edge of the plastic. This is to hopefully, prevent the kidney or chest piece from riding over each other. If this is not correct I will make the proper adjustment depending on any suggestions. Soooo as my wife and I were fitting everything last session we noticed a nice inch and a half gap where the kidney plate edge should meet the ab plate corner. Thanks to my big, fat gut I am one of the lucky ones that gets to shim along the kidney plate! Yaaayyyy! Check a look at the proposed shim attachment and the first round of ABS paste applied to the inner and outer shim pieces. Alright, so I'm going to apply another layer of paste and hopefully that'll do it before I sand that mess to a velvety smooth finish. I'll post my results before attaching to the kidney plate. Once I receive the blessing of this community I'll attach the shims to the kidney plate and proceed with paste applications and sanding. Yuck. I'm not looking forward to this haha. Lastly, it's butt plate time! Looking at the CRL and the trim outlines of the butt piece I see that the corners are distinctly more angular. Hence, this is why I plan on retaining those sharp angular corners when I trim and sand. What say you? That's it for now fellas! On our next visit I plan on sharing some more fitting pix and hopefully get a little closer to solving the riddle of the shoulder bridges. In the meantime I await your always helpful advice and suggestions. Thank you so much guys!2 points
-
I got back home after a while, so here is a quick update on my TK :-) I've gotten some trooper stuff to unbox, specificly velcro & padding for the helmet. Along with some white undergloves to not get the actual TK-gloves sweaty. I'm currently charging the ANKER, to see how long it can run my new cooling system. Cheers to StrmTRPR85 for making those fans with a speed control function for me! So far I've sprayed the helmet interior with 4 layers of plasti-dip, at least one more will follow. (picture shows 2 layers) This all brings the helmet interior a lot further. Once the padding and fans are in place I'll check wheather I need Ukswrath's hearing assist system. Meanwhile the German Garrison has noted me that they recieved my application, but they haven't yet got to review my armor. Fingers crossed2 points
-
Hi KC Could you please add a close photo of : 1-your helmet's Frown? jus to be sure that you have the correct shape and it's just a light effect. 2- Close photo of your thigh ammo pack inside, both sides, to check the rivets type. Thank you Trooper !!2 points
-
Funny thing happened on my way to the Death Star.... I started down this path over three years ago, and its been a long, weird journey. Full disclosure, ever since I was a tween, I repeatedly and annoyingly told my parents that the only thing I wanted for any type of present for my birthday/holiday/whatever was a Stormtrooper suit. I continued to do this into my adolescent adulthood with no success, and eventually I gave up on the idea. But, for some reason, when I saw the trailer for Inferno Squadron in the Battlefront II, I was taken right back to being 10. I researched everything I could find, thinking there was a way to hand build this myself. The further I dug, I suddenly came to realize that my original desire to be a character from my childhood was not only possible, but semi-affordable. So I took the plunge. There were several issues I chose to ignore. 1) I'm 6'3-6'4" not 5'10" as the original troopers were; 2) I'd never worked with plastics in this manner; 3) I didn't know a soul who'd built one before; 4) finding someone who made taller trooper armor at that time was very, very difficult. Finally settling on a kit from the UK (DA Props) which had a strong following and a host of taller troopers in the UK garrison advising me the kit would work, I purchased. The fact that I'd never done anything like this did not dissuade me from convincing myself I could assemble my armor in record time and be ready to trick or treat with my kids two months away. Obviously, this did not go as I optimistically planned. From the outset I made error after error, miss-cut after miss-cut and eventually convinced myself that I'd flushed too much money down the armor rabbit hole. There were starts and stops as work and family put the kit on the back burner. But I kept at it and the wonderful folks on this board kept giving advice and support for my build. When Celebration finally came to my hometown of Chicago, that finally pushed my to complete my armor. Now I'm fearless with a heat gun, aggressive with CA glue, unafraid of ABS paste, and don't even blink at the prospect of too much sanding. In short, I'm still as dumb as I was at the outset, but now I've got "experience" on my side. While it's not yet perfect, and I've got mods I need to accomplish to satisfy my own OCD, my Stunt TK was approved for trooping by the Midwest Garrison and I was approved a TK number. As an aside, I still can't believe "Bullseye" wasn't ironically taken as a handle. My thanks to everyone for their help. Look forward to trooping with you soon. Dave TK 84098 "Bullseye" (Troopin' with my boys this Halloween)1 point
-
You could use ABS paste or a small round piece of plastic (would have to fit under button cover) or even glue on some washers. Instead of using rivets you could use snaps as they have a larger area1 point
-
well i can see that the leather is not smooth on the upper part, it seems to be very rigid, most likely it was a thick leather, but is hard to tell how thick. In regards to the stitches... I think that's gonna be impossible. Thanks for the images, it helps Sent from my GM1900 using Tapatalk
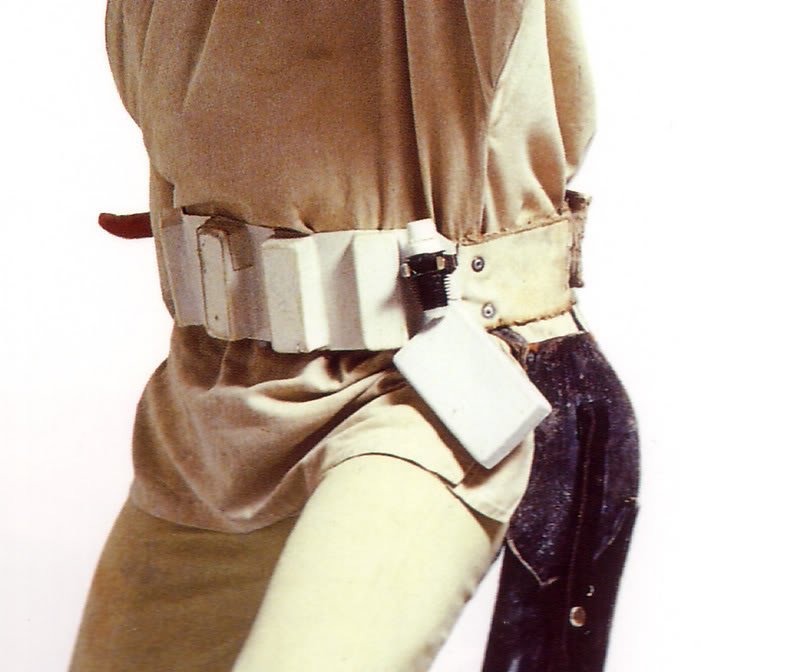
 1 point
 -
Yeah that right shim has me a little worried as well. I think I'm gonna cut that top section out and replace it with a much flatter piece I think. Thanks Glen.1 point
-
i actually have that same back brace.1 point
-
thanks for that info.1 point
-
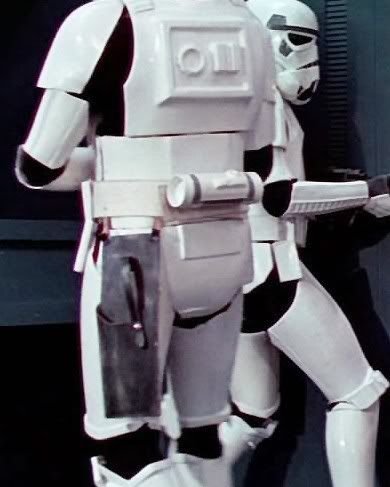
A belt harness similar to this one, I have back issues so the strapping helps . Some just use a belt and add the two straps You can fill or leave, you don't want any paint to be on the gums Frown is painted gray and does not leave the teeth area. Unfortunately not, that is the largest screen reference but here are some from Centurion apps1 point
-
Here you go... (was on set yesterday so I couldn't take more pics till today)1 point
-
This was a long time coming. I have wanted to build my own set of TK armor and join the 501st since not long after its inception. After many conversations with my son about it, we decided to move forward. It has been and continues to be an amazing experience as I am already working on finishing his TK. A cool story is that another couple that we are good friends with were over for a small celebration of their daughter's birthday on the same day that I got my email from my GML about being approved. I had wanted to take a few new pictures for my EIB submission later in the evening when they were gone, but we got to talking about the 501st and the process of building armor around the table ( in the absence of the kids ) and I suggested, off the cuff, that I could put on my armor and present her with a special birthday cupcake from the Empire. When they began to sing Happy Birthday, I emerged from the room, cupcake in hand, and got to watch her eyes light up. She's a big fan of the bad guys...lol. Later on that evening after they had made it home, they messaged my wife and told her that was one of the best birthday suprises she had ever had! It really made me feel good to bring that kind of joy to a youngster and I'm looking forward to many more opportunities ahead.1 point
-
Great news!!!! I just received my 501st HWT Trooper approval. TK31564 reporting as ordered to add to my ANH TK Stunt.1 point
-
Hello all, Biker Scout who recently got his TK armor approved and am ready to mix it up with the F.I.S.D...... Looking forward to not sitting at troops. TK-578991 point
-
Congratulations Trooper and welcome to the FISD. Sent from my SM-G981B using Tapatalk1 point
-
thanks I will get my homework completed.1 point
-
End of the week update: Pictures taken and submitted to GMLs. Helmet is finished. While I wait, I am working on the E11 to clean it up and give a far more realistic look. I want it to look like worn steel. I am going to cut out and replace the "D" ring in the back with an actual metal "D" ring. I am also going to cut a small pocket out of the battery chamber and add a ammo meter. (I saw this in another post I cant find right now), and I am going to shine the grip and handle areas where a glove would be holding this for a long time. I'd also like to put a plastic lens in the scope area., as well as drill out some of the features that look like a pin should be in there, and replace them with actual pins. While I don't want to go for a worn look, I think the armor should shine, and the most used item should reflect some ware.1 point
-
now that looks good.1 point
-
Many use elastic doubled over. Note the rivets don't need to function, you can add snaps behind or elastic to the rivets it's entirely up to you. I eventually added snaps to the rivets so I can separate the front and back so it packs smaller for air travel A few options Mine before converting to snaps1 point
-
The paint on the TD has finished drying so I began reshaping the clips included in the AP kit. I used paint sticks to keep from pinching them closed and my vise with plastic inserts to bend the clips. Then I used the vise to make a small bend 6mm from the end and then rounded the ends. I attached the clips to position the control panel And glued it on. I added a before and after comparison and the final products. I am thinking of using loctite on the screws so they don’t back out after I glue on the end caps. I don’t want the clips to come off and have to cut the end cap off in the future.1 point
-
Hi James. Before one of us can process your EIB app, there are some fixes we need you to address. 1- CRL for Basic level : Frown is painted gray and does not leave the teeth area. .. As Glen pointed out above, you'll need to remove a bit of the grey paint from your teeth, as they're leaving out onto the gums area and paint the edges corners. A paint remover (Non Acetone) can be used, in my case I have used a pointed or sharp tool like cutter or knife to do it also) Reference images 2- CRL foe Level 2 : Correct Aerators/Hovi-MIX tips are present. Screens used shall be of a wide type mesh, with the rim of the mic and the inside white or painted white. This is a common issue of the Anovos Helmets. Reference Images Personally what I have done several times to fix this is as follows. A- Remove the mesh from tips . I have used knife, screwdriver and plier. B- look for a strainer with the proper mesh C- Use a permanent marker top and a rubber hammer to give the shape to the mesh. D- Paint the hovi tips inside and rim with white acrylic and cut the mesh with a minimal edge. E- Place the mesh into the tip carefully and reassemble to the helmet. 3- CRL for Basic Level : ... The cover strip edge shall be facing the inside of the leg. Finally , it looks like you right shim cover strip is closing facing outside of the leg. You will need to disassemble and re-glue it to the correct position. This could be a bit challenging and take more time but we are confident you can achieve it . Reference Images We'll be ready when you're ready.1 point
-
Hi Kaden, thank you for your EIB app. I have added to the processing line. In order to continue with your review, a couple of easy fixes are necessary : 1- CRL for Basic level : Frown is painted gray and does not leave the teeth area. .. As Glen pointed out above, you'll need to remove a bit of the grey paint from your teeth, as they're leaving out onto the gums area and paint the edges corners. Reference Images 2- Crl for Basic Level: The abdomen armor has a button area that matches the color pattern shown (3 blue + 6 gray)... Your Ab Buttons looks more into the Shade of Black and dark gray, we are asking to change to the correct paint that best matches the Blue and gray showed in the references. Reference Images And finally, could you please add the following : Close up of sniper plate front and left side. Looking forward for your updates. Cheers.1 point
-
Take that! You unauthorized weathering on the grip! I repainted the E-11 grip with a couple new coats of paint. I'm going to try to let this cure a bit more before I touch it. Some days I just can't help myself but to pick it up, flip it on, and imagine blasting some rebels. But for now I really want this new coat to stick.1 point
-
Just saw your other thread re: ear placement, David. Although we prefer them to lay completely flat against the contours of the sides, as seen in the reference images below that just wasn't the case for many seen in the OT (Original Trilogy). ANH was made on a budget, and apparently the prop masters were not too picky, lol. Having some kind of gap is not the end of the world and actually sort of adds to their charm.1 point