Leaderboard


Popular Content
Showing content with the highest reputation on 10/27/2020 in Posts
-
I adjusted to 9mm down and 13mm on from the edge. Looks about right to me.4 points
-
Awesome sauce, not long now and you will be finished basic approved and applying for higher levels, I have foreseen it3 points
-
It's only very recently that some have been printing full armor, mainly Rogue One styled, I don't know of anyone that has original trilogy 3D files which are approvable. There are a lot of helpful guides on youtube about sizing armor to a persons size Here's one based on clonetroopers which may give you some hints Pretty much all original trilogy Stormtrooper armor is vac formed plastic, which can be trimmed to a persons size, even those of smaller height.3 points
-
The final piece: the E-11 blaster. [This thread duplicates the blaster part of my build thread over in the ANH stunt armor section] UPDATE May 2021: Imperial Arms 3D just released their V4 blaster today, which, based on this feedback on my build, has addressed all of the placement and accuracy issues (keyhole, knurled sights, some missing screw spots, and most notably, the scope and hengstler counter locations). Imperial Arms V4 E-11 blaster I submitted for basic approval already, without the blaster, as I wanted to get the ball rolling, and the blaster isn't required. But of course, I can't wait to have it for trooping. For my clone, I used a really nice 3D printed kit from Imperial Arms 3D. I know many scoff at 3D parts, but I have experience finishing them, and as his kit looked really nice (his new Version 3 of the E-11) I was curious to see how it would work. His prints are very finely textured. It has a metal spring, sliding bolt, folding stock, and magazine that comes out with magnets. In the past too, he was responsive over Instagram and has adapted the clone blaster based on my feedback. I already have found two minor accuracy improvements, so I will see if he can add those to future kits. He does offer "finished kits" but I don't know for certain if they would be as finished as 501st people like. I prefer to complete it myself, and swap out printed screws for the real ones, and other modifications. Here is what the full kit looks like (so many pieces!): Instead of my usual dance with coat after coat of Bondo glazing putty and filler primer, I am trying a new product, XTC 3D. It is a sort of two part epoxy like mix that you brush on, and it "self-levels" on the prints. It is sandable, but doesn't need as much as other processes do. Once I figured out the best application process, it actually is going to be my new go-to method of finishing a 3D print. The key is to mix very little, 5 ml of the one, and 2.5 ml of the other part. You have about five minutes of good glazing time where it really spreads out nicely. After that, it begins to thicken, and while it is good for filling the backs of parts, or less-detailed areas, it no longer will nicely level out. I found it also works best when the side up is all you do, so to do a "box" shape like the magazine takes about four passes. In about two hours, it is cured, and you can do another side. Here is what it looks like when it is working perfectly: All told, I have probably mixed about ten "batches" and done light coats on parts, second coats on some, and third coats on trickier surfaces like the t-tracks that need to be really smooth. It sounds like a lot, but I just do one or two passes a day, and it is ready to go in a few days. Adjustments to his model: I found so far two inaccurate little pieces, for some reason he has a second muzzle flash guard on the other side. I used epoxy putty to fill that slot, and will sand it smooth. The other is the kit is missing the bayonet lug. I thought maybe I had lost it, but looking at his site and the pictures of finished blasters, they are all missing it. So I decided it was simple enough a piece, I would just find a dowel that fit in the hole, and cut my own. Once coated with filler primer, it looks like a metal part: Finally, I plan to hit my old drawer of antique flat head screws and bolts to replace any printed ones, including those five on the front of the scope. Also, while the kit comes with a flat disk of clear plexiglass for the scope lens, I wanted a more domed one. One benefit of having a 6-year old boy is that a lot of toys have lenses or little magnifiers, so I save all of them for things like this. Two worked, and I had to grind them down a little, but the fit nicely now. Also, by coincidence, there was this shard of plastic that found my foot a few days ago, and it is slightly curved, perfect for the Hengstler window. Cut down and set it, it should work well. His print has raised numbers, so I will paint those white, and then glue the window on top:2 points
-
thank you - this is what I am looking for - great I have already bookmarked the site2 points
-
For the glory of the Empire! Sent from my Imperial Communicator2 points
-
Sure do! Tested it last night. I shopped around and found the highest quality snaps I could; they're as strong as I could find. Sent from my Imperial Communicator2 points
-
As per advice given to me in the above posts, I made two new holes and to lower the holster a little to yield a 2.5cm gap. I've also used a rivet and snap combination to attach the holster, so I can remove it when/if needed (which also means I could use it on another TK build in the future and swap back, etc). Thanks to everyone who chimed in with advice!2 points
-
Hello all, Biker Scout who recently got his TK armor approved and am ready to mix it up with the F.I.S.D...... Looking forward to not sitting at troops. TK-578991 point
-
Thanks to Authenticpros in Canada especially to Mr. Mark Harrison for the Stormtrooper suit is a masterpiece. Recommended
 1 point
 -
Hello, I am the newbie here - my name is Marc. Actually I am waiting for my first armor - a Stormtrooper ANH form moviefx. Now I am looking for the colorcodes for the helmet painting. The grey, black and blue(?) for the cheeks. I used the search option, but could not find something. Can some of you help me pls? Thanks a lot Marc1 point
-
Hello and welcome to the forum, if you are an approved Stormtrooper you can request higher access here Hola y bienvenido al foro, si eres un Stormtrooper aprobado puedes solicitar un mayor acceso aquí1 point
-
Hello and welcome aboard, looking forward to seeing your BBB. You will find a lot of useful info in this thread1 point
-
The AP kits come with 8mm rivets Mark (AP)1 point
-
Check out my All-in-one reference thread linked in my signature. I have included a paint color guide on it as well as many other resources. Sent via Imperial Tapatalk Comms1 point
-
Blaster continued: This kit does have some nice details, and many of the fasteners are functional or real, but not all of them. I usually modify most kits, replacing any printed "screws" with real ones, or any other round details I can swap out. Like on the rear sight, I sanded off the round detail, and sliced two pieces of a wall anchor to glue on for that perfect round shape. I also added in that 5mm LED for the domed detail on the end of the magazine. Reading the threads on here, I also added the rear sight notches, and added the knurled texture to the front sights. I used epoxy putty, the first time I laid it on and rolled the tool, and it rolled it off the piece. Second attempt worked, I put the putty on, waited five minutes, and then tried the knurled texture. Success! The parts all primed, I moved to assemble some pieces before black painting. Parts that were smooth and nice already got standard flat black primer, Parts that needed a final smoothing got filler primer (grey). Some nice things I discovered about this Imperial Arms 3D kit: In the upper right, you can see some of the things like the flash guard and the sights actually go through a slot, and down to the barrel, for strength (flash guard piece marked in magenta). Many parts use functional fasteners, aesthetic on the muzzle end here, but many pieces like the handle and the scope rail, and the magazine all get "bolted on" which should make for a stronger prop than one that is all glued: A note on filler primer. It works well as it is as a matte surface, but to get an even nicer surface, you can use fine steel wool to quickly rub the rough surface off (30 seconds), and the "burnish" it with a dry paper towel (30 seconds) and it literally shines. I have used this to prep a master for casting, but now I do it on everything if a shiny surface is what I am after. Painting and gluing more today, so I should have this in my holster by Halloween!1 point
-
I've now applyed with the garrison, and ordered some fans from StrmTRPR85. Next up will be getting a transport bin for the whole thing and turning towards the helmet interior. For coating the helmet I've now settled to use Plasti-dip.1 point
-
Thanks for the hints. I've brought the forearms down a bit, and the right thigh up a little, and now I'll see how approval goes.1 point
-
Congrats on your AM helmet, Bryan! Strangely enough, I received my latest kit from Dave as well last week and am also doing an ESB as my next build. Don't forget that the holster is a lot different than ones used in A New Hope. I got mine from Darman (a tried and true seller here on the FISD). Link here. Dave normally includes the correct hand plates for ESB as well so you should be good to go. You will be more than pleased with AM armor. I have been trooping in it for years with no cracking, splitting or yellowing. Looking forward to seeing that bucket completed!1 point
-
Looks great, Mark. Will the snaps hold a weighted holster? I.e. a holstered blaster? Sent from my iPhone using Tapatalk1 point
-
Good work Trooper!!1 point
-
Nice work1 point
-
It seems there are different levels of access to different accounts, could be because of when they where created, or even how many folders or images they have, I keep getting messages "you are over your account limit" but I can still access my images. When the fiasco first started I could download all of my folders and images but now can no longer do so, clicking on the download does nothing, although I'm 4,500 images over my 250 limit They are definitely making it hard for people, some are just lucky to still be able to access their images.
 1 point
 -
Glad you like the thread. I've been drafting my next update for over a month now, hoping to have it up by this weekend.1 point
-
I found my other soldering iron, and finished tying the 2 pairs of front and rear barrel LEDS together, then trimmed the LED holder to fit where I had melted some internal structure to accommodate the sound driver board. All 4 LEDs work together in pairs red/blue as they should. Marked the plugs so I can plug them into the sound board correctly when the time comes. Will likely need to wrap the battery in something insulated and black to hide it inside the bolt spring, and drill a hole through the bolt to feed the battery lead into the magazine area through. Probably will leave the charge port loose but insulated inside the removable magazine area for charging when needed.1 point
-
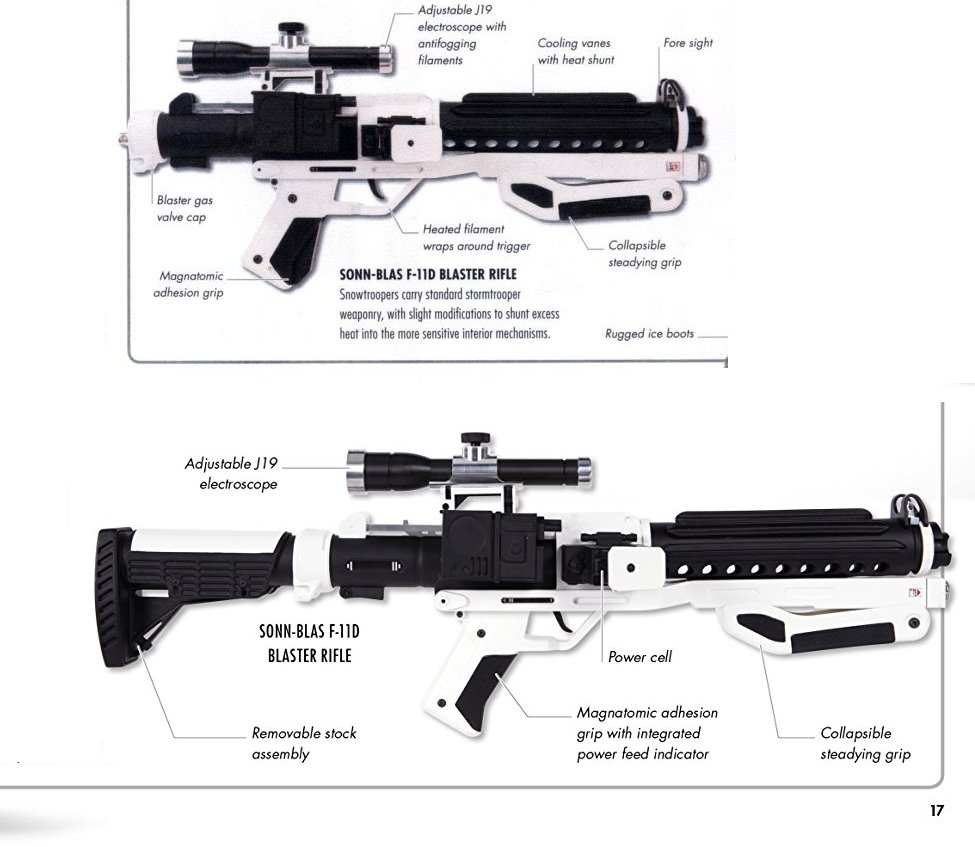
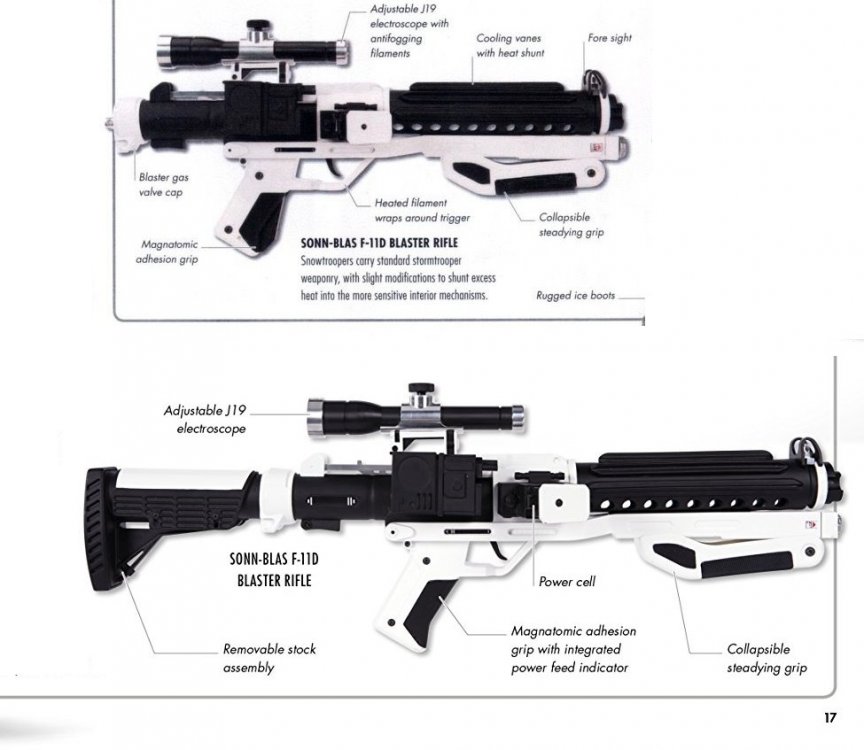
Standard F-11D is black but the stock "heavy" F-11D is white (CRL image is incorrect) it's something that was discussed a while ago and should be updated to the CRL If you have any issues when seeking approval just forward your references to your GML
 1 point
 -
I got up once again at 5:30am, and suited up, set up some lights in the driveway, and took some turnaround pics. Submitted to my GML for basic approval today, wish me luck!1 point
-
1 point
-
Beautiful Sergio, congratulations and welcome to Centurion1 point
-
Congratulations on receiving your helmet and good luck on your build. You may find Eric Dyke's video series on assembling the AM 4.5 helmet helpful. I know I did.1 point