

OddViking327
-
Posts
138 -
Joined
-
Last visited
-
Days Won
1
Content Type
Profiles
Forums
Gallery
Articles
Everything posted by OddViking327
-
Donated!
-

A sad day for FISD - Dan Branton
OddViking327 replied to themaninthesuitcase's topic in Announcements
What a sad thing to find today. He was really helpful to everyone, and had such a passion for the details of this costume. Rest in peace, Daniel. -
Modifying a Black Series helmet for accuracy
OddViking327 replied to OddViking327's topic in Rogue One Build Threads
Okay, I added them to the repository! -
Modifying a Black Series helmet for accuracy
OddViking327 replied to OddViking327's topic in Rogue One Build Threads
No, I already have my ANH TK, and that is what I troop in. This was just a way to make my second yellowing Black Series helmet into something more accurate, and now it is back on display. I loved the challenge, and also have a new-found love for the ROTK details in the helmet. That Vocoder and the tube vents, along with my discovery of the actual vents in the tears and traps, have made me love it all the more. -
Modifying a Black Series helmet for accuracy
OddViking327 replied to OddViking327's topic in Rogue One Build Threads
Finished! It was difficult to figure out this weathering technique, but it worked in the end. I wanted to replicate the weathering of the troopers in the Kenobi show on Mapuzo, the ones in that truck/transport scene on the mining planet. They had this great dusty-wiped-clean-to-white look. Some were more heavily dusted, and others less (see reference pics). The trick would be to make a permanent paint look. I had some detailed close up pics from a stunt performer on the show, who said I can identify him here on these forums: fellow 501st Legion member Ardeshir Radpour @equuspolo (again, sorry but they are not able to be shared here). The photos showed some of the “dust” effect was beading up, like acrylic from an airbrush would on glossy paint. After a test, my hunch was right. I used some Vallejo acrylic airbrush paint (black and US earth brown), diluted with some Liquitex acrylic airbrush medium. Sprayed from a distance, at 10 PSI, this got the faint dusty look. I tried quickly wiping it with a soft rag with alcohol, but that smeared it. I had to remove a lot of that first coat with rubbing alcohol, which left a patchy residue (but that added to the overall grime texture). Next I tried the same mist. Let it dry a few minutes. This time used water and a coarser rag (a piece of khaki twill pants), and wet the area and scrubbed the acrylic paint off. Acrylic, though dry in a few minutes, on a glossy surface is still sort of removable with water and light scrubbing for a few hours. Using my fingernail behind the wet fabric I could make a line or scrape area. Bit by bit, I hit the high points and any other areas, removing brown. This technique was not easy, a little frustrating, because if you scrub too hard, you remove it all in a patchy way, but you want to just get some of it. It is a fine balance. Finally, some brushed on acrylic black marks on high points here and there like it looks on the references, and a few patches, which is done much like movie clone armor has. To weather the black parts, I used some grey Fuller’s earth dust on the corners of the lenses, in the cracks on the vocoder, and hovi tips to give those black areas some dust in the recesses. Wiped it off with a rag, and because these are going to be hard to contact, they are not permanently bound to the surface (they should just stay like real dust would). Finished! Here are the results, shot in sunlight to compare to the sun-lit scenes on Mapuzo: -
Modifying a Black Series helmet for accuracy
OddViking327 replied to OddViking327's topic in Rogue One Build Threads
This helmet is nearing completion! I kept the helmet in three pieces for as long as possible, to make installing the elements easier. I installed my Vocoder tubes I built in a previous post. I had to trim down the smaller rods to only about 1cm long after the bend (or else the bottom of the rod showed as a slight kink), and discovered that I could bend it at the full 90° and use some graphite powder squirted into the tube to help get the tube slid over the bend. No need to hammer them in the tube, which ruined the tube a few times. Once these were inserted and carefully aligned, I glued them in place with CA glue, and then trimmed them. I carefully put a tiny bit of CA glue behind the three longer tubes to fuse them to each other to make them one stronger unit like the originals are. I installed frown screen and used blue self adhesive craft foam for the blue tube stripe vents (and added CA glue to ensure they stayed). The green lenses in the original helmet are way too transparent, so I cut some Hobart welding shield pieces to add behind, glued them at the edges with CA glue and accelerant (careful with CA glue and transparent pieces, it will fog them in a permanent way, so accelerant can speed up the cure and avoid it), and installed the lens piece. The brow strip was from Trooper Bay (exact right length, with just a little stretch to get it the last few mm to the end). Because the brow was lowered, a thin strip of white was visible. I taped off and airbrushed that top edge black. The brow was glued on with E6000, with a dot of CA glue on the ends to help keep it in place while that cured. Face finished, I glued the helmet back together. I had removed most of the internal liner pieces, keeping only the top ring ledge that screwed into the top, and cut it in places to allow the vent backer plates to fit. I added some overlapping seam strips to help secure it those butted joints in places (not pictured). I glued in my black backer plates (some have the mesh, and are more like frames). There were two light-leak gaps at the top traps, so I fabricated a fitted piece of plastic to glue in as a backer (I had thrown out the original inside plate, a perfect piece probably could have been cut from that). Lower black gasket: I tried a pressure cooker gasket that someone recommended, but at least on the one I ordered from Amazon, the edges curled away from the edge rather than toward it. It was just looking like it would catch on everything, and I would also have to glue it somehow. I remembered I had some black truck edge trim from another project, which was self gluing, and it looked perfect. I had just enough, with just a few centimeters cut off at the end. Once this is on, the helmet lower edge also feels much more sturdy. I glued in the grey vent pieces, carefully aligning them before spritzing with my CA glue accelerant. This helmet now has airflow through the vents! I discarded the old inaccurate Hovi tips, and ordered New Hovi tips from Trooper Bay. Compare the new to the old, as well as the updated vocoder piece: Here you can see my standard Black Series helmet, and the updated one. I put a light inside, showing the newly tinted lenses, and also how the old one sort of glowed compared to the painted one. Here you can see the extended "jaw" line: Final step is weathering to match the Kenobi troopers. I did a test this morning with some airbrush paint, rubbed off with an alcohol rag. I have some very close up images from my contact (apologies, I was asked not to share), which show a mix of fine airbrush color, and some spattered droplets like happen when liquid paint is on gloss, so I will be replicating that. These helmets also have what look like a few dark dry brush marks in spots like Movie Clone Trooper armor has. I was glad to learn a few things on these test pieces, so I can try and do it all in one go on the helmet. Nearly done!! -
Modifying a Black Series helmet for accuracy
OddViking327 replied to OddViking327's topic in Rogue One Build Threads
Continued: I had seen someone posting a FB build group this photo, wondering about why you can maybe see some light coming through the tear/cheek vents in this behind the scenes photo: I guessed that they were likely some kind of mesh fabric. I asked my contact who has intimate knowledge of the helmets, and they confirmed my suspicion. While I cannot share the photos or reveal my source [my source has said I can identify him here on these forums: fellow 501st Legion member Ardeshir Radpour @equuspolo ], they showed me detailed pictures of the inside, including the black breathable fabric that is glued behind these vents (and they are also behind the top vents, but were covered with helmet padding which blocked airflow in this helmet). They also showed me more details of the grey helmet details which confirmed they appear to be a separate piece. So I cut some "frames" to give my inserts something to hold on to, and then used CA glue to attach some mesh fabric (from one of my wife's socks) stretched taught behind it. (According to my source, what my black frames are doing in this build was instead integral to the helmet as a recessed ledge, and painted black, and then the mesh fabric was simply glued to the inside of the helmet over the hole, but the result is the same and looks identical): I cut the backer plates for the other vents and traps as well: Meanwhile, I did a final wet sand at 600 grit to the repairs, and painted the frown teeth and attached ear button with primer grey, and taped them off. I primed the whole helmet with white primer, and then gloss white the next day. I had a few minor rough spots, and sanded those in preparation for a gloss coat. It appears some of my paint, despite warm dry days, did not fully cure. According to Rustoleum, it should have at least 48 hours (not 20) before applying a gloss coat, and it instantly crazed up. Back to sanding... Vocoder tubes: I needed the vocoder to make a harder angle right out of the top holes, without kinking, and I had an idea to insert a piece of rod with a right angle bent into it. It looked like it would work, but the lower end of the rod (2.25" for the long ones) showed a bulge where it ended, so I would need to curve it back and grind it away so there is no hard corner at the end of the rod. The irrigation line can't easily make the 90 degree bend [UPDATE: it was hard to get the irrigation line to make the 90 degree bend, but I used a simple graphite bottle to squirt some graphite down the tube, lubricating the rod so that it more easily could make the bend, eliminating the hammer part which mashed up the tubes. Graphite bottles can be found at any hardware store, and are used to lubricate old locks and things], so I hammer the bend, and then hammer it back to 45 (bent to 90 first to sort of weaken it, making the second time easier), insert the rods over the tubes, and then re-hammer the 90 degree bend. It chews up the end of the tube a little, so this has to be done with the least amount of hammering (thus the pre-weakening of the bend). Using the graphite makes the second hammering not necessary. It might work with lubricating oil too, but that oil may make gluing it more difficult. After waiting two full days, wet sanding with 600 grit and then 1,000 grit, my helmet was ready for painting... again. I warmed my paint in the sun, shook it for over 5 minutes, set up the parts in the shade but on a warm dry morning, and tried again. Success! No need for a gloss clear coat, this white is glossy enough: Next steps over the next few days are assembly... -
Modifying a Black Series helmet for accuracy
OddViking327 replied to OddViking327's topic in Rogue One Build Threads
more work on my Black Series Stormtrooper helmet accuracy modifications: Looking at the close up photos of the Rogue One style helmets (the modern Stormtrooper suits used in The Mandalorian, Kenobi, any current shows), the gray traps and vents all appear to be a separate piece of grey, placed into a cutout in the helmet, with a black backer. [UPDATE: I was able to verify from someone who has had personal knowledge of these helmet props that not only are the grey pieces seperate, with a recessed area rather than a painted border, the vent ones actually go through the helmet and are backed with black mesh fabric, to allow for air flow. I have seen photos, but am unable to publicly share that reference]. The Black Series helmet is more like the original trilogy helmets, painted with a black border (and some slight texture). I searched for a file for these, but I couldn’t find those pieces alone. So I built them! Took photos of the Black Series helmet vents, and then made those precise shapes in vector. I imported those into Blender and scaled them to the exact size, and then extruded them. I added them to Thingiverse for the next builder doing this. Thingiverse stl files for the vents and traps Printed in resin, and then I cut out the helmet vents (cutting just inside the grey with a Dremel, to leave room to file out the final precise shape). I used those cutouts as shape bucks, and slowly heated each vent with a heat gun, and held them to the curve so they would fit. The cheek vents have almost a propeller twist, so keeping by those cutouts as a guide was vital. I slowly filed the cutouts until they just fit the new pieces [UPDATE: Based on some new reference, I plan to sand my grey inserts a bit more so that there is a bit more of a gap between them and the helmet) I also cut out the tube vents like the modern helmets have: I also "lowered" the brow base by adding to the bottom with Magic Sculpt. I did a few more filling and sanding passes on the back battery cover, which took five total treatments to eliminate those lines. Finally, for the Vocoder, I found what I thought was some ideal material, satellite cable, but my satellite cable was 1/32” too wide, when I added it up, 7 of them side by side would be about 1/4” too wide overall. Luckily I had some 1/4” irrigation tubing, which appears to be a perfect match to the screen used props. Next up: Adding some steel rod inside the vocoder tubes to help make that sharp curve at the top (without kinking), priming and painting the helmet, fabric covered backer plates for the grey plates. -
Hello there! I am modifying a Black Series “Rogue One style” Stormtrooper helmet to make it more like the screen props. This originally was a few Instagram Build posts, but posting here because the FISD is a better place for tutorials, as well as expert feedback. I have two of these helmets, but I had let this one sun-yellow (and treated it back to white a few times with the Trooper Bay peroxide treatment) and was ready to just paint it gloss white, but since I was already going to paint it… why not do all of the work to move it from a toy to a replica prop? When it’s complete, I plan to paint it and weather it like the troopers on the truck in Kenobi, I love that dusty grey weathering look! There are a few threads on the modifications you have to do, involving: filling in the speaker and battery case lines, replacing the Vocoder with actual solid tubes (with a gap behind), extending the lower “jaw” edge, lowering the brow, darkening the lenses, replacing the Hovi tips and rubber gaskets, and a few other minor adjustments. I ended up doing a few more as I went. But here are some of the things I planned to change: Reference: I took it all apart, removing all electronics (the “voice changer” feature on this helmet is renowned for how useless it is), remove all of the inner walls and screw posts, and separate it into the three parts to work on it. I removed the rubber edge "gaskets" and the rubber Vocoder, and cut out the Vocoder spot. In the vocoder place and along the lower front "jaw" area, I made a Sintra “backer plate” to help the other plates have something to glue to. Patterning was tricky, involving several cardboard mock-ups to get the shapes, and some heat forming to get the plastic to all fit in place, but it worked out. Filled initially with Plastic Weld epoxy putty, then sanded, Bondo Glazing and Spot Putty, and sanding again. There is more filling and sanding to get this flush. There are some minor seam lines I also sanded and filled, and I added the base for the “eye bump” that the modern helmets have as a nod to the more pronounced one on the Original Trilogy helmets. I will sand it down a little more to keep it subtle. Continued below...
-
The 501st group pic says "you don't have permission" when I click the link. It may be posted in an area only for certain staff to view. The FISD photo opens fine.
-
Does anyone have our official detachment photo? I was in it, and would love to see it.
-
revlimiter's Armor Bin Build
OddViking327 replied to revlimiter's topic in Boots, Soft Parts, and other Accessories
What an awesome bin! You did some great work there, and I am honored that I inspired this. Great work on the vents, the stickers, the wheel covers... it is all so amazing. Well done! -
Imperial Arms 3D E-11 (version 3) kit
OddViking327 replied to OddViking327's topic in ANH BlasTech E11
UPDATE May 2021: Imperial Arms 3D just released their V4 blaster today, which, based on this feedback on my build, has addressed all of the placement and accuracy issues (keyhole, knurled sights, some missing screw spots, and most notably, the scope and hengstler counter locations). Imperial Arms V4 E-11 blaster The only thing people might consider modding is to make an aluminum rail like I did, but his kit is now much easier to build "off the rack" now. Just be sure to do the work, and finish those print lines! -
@justjoseph63 Thanks, the one behind the lug is easy enough, and the scope one does look fairly consistent, but do you have a photo of the square detail with more of the blaster showing? I am not certain where that is on the blaster, or which side, or which way is toward the barrel?
-
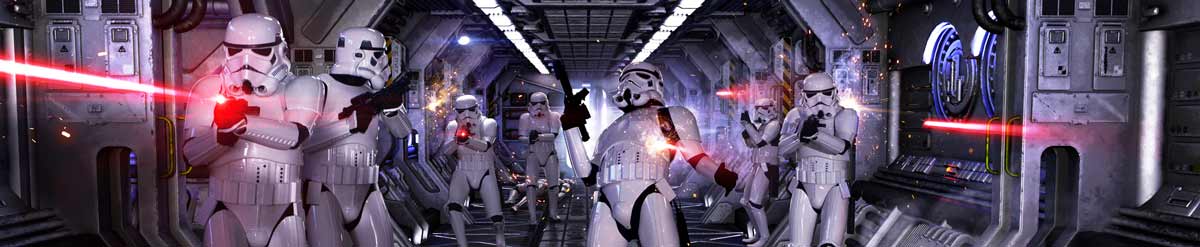
Stormtroopers in a ship corridor (photo edit)
OddViking327 replied to OddViking327's topic in Off Topic
Behind the scenes shot. Corridor is a 3D image purchased from Shutterstock. The key is finding a background with similar lighting, at the exact same angle for the perspective to work (and having the trooper move in the physical space, so the feet are all at the right angles on the floor): -
I took some photos in a warehouse with a photographer a few months ago, and had this idea for a photo edit. Pics are by Jeff Cox, and the troopers are all me in my AM 4.5 armor (except the laying down one in the back, that is a Black Series figure, haha): I do edits like these from time to time, I am on Instagram as "Oddviking". I have done a lot with my Clone Trooper, but I love how glossy the classic TK is!
-
Where are we on final positioning on these? I am ready to glue some on that I got from @justjoseph63, but I want to get it right. Also, do we have a guess as to how many have it on the front of the scope versus the back? Should I wait for a final CRL decision?
-
@Scimitar Ah, that is good to know. I had thought they were also inset into the strip. So that would help maintain that strength. Good to know, so mine is just an alternate version. I will correct that assumption above.
-
This design looks great! I agree with thinner walls at the contact point, but having some thin walls at the contact point is important. These snap together, and are magnets often chip when that happens to harshly. But also, the closer the can get, the better, as magnet strength diminishes greatly over distance, so even a minimum print thickness will work. Finally, they should probably be encased on top, but then, I suppose they can get glued in before mounting. for glue, I know E6000 is preferred for the rest of the build, but in this case, you need the speed of CA (with accelerator) to lock them in place one by one, as you can’t afford drift on the first row, or squeezing out on the second set that meets it.
-
I mounted my fail-safe snap at the top, and it works. I just made a single snap mount and strap, roughened the spots next to the pockets to prep them and glued them in with E6000. First the bottom mount, and let dry for 24 hours, and then snapped the strap on, and glued and clamped the end down taught. Once the second part was cured the next day, I tried it out, and it can be easily reached to snap shut, and extreme bending my leg never opens the top. To pop it open is even easier, just slide a finger down under the strap and it pops off. Finally to finish them off, I added the 25mm cover strips once it was all finished. Because the seam needs to click flush, the excess E-6000 glue needs to be removed from the inside along the cover strip (by lightly cutting with a blade, and then scraping and sometimes pulling it off in long, glorious strips when it works). So far, especially with my snap failsafe, they seem very secure. I had to pad the front of the inside to try and push that sniper plate further out from my knee, and so that top magnet is more strained and needs the snap on that side to maintain closure: Update after a few months: The top "failsafe strap" feels like a vital piece, I never worry about them with that on. So I would highly recommend it. Second, someone, I can't recall who, was planning to make a 3D printed "magnet pocket" instead of heat forming ABS. I don't have a printer, but I totally think that approach would be easier. If someone does create that file, hopefully they can share it so others can make a superior version of this. The key is, it needs a fairly thin wall on the side that meets the opposing magnet for optimal magnetic strength.
-
I had this as part of my full build last fall, but after wearing it a few times, and trooping for over 5 hours yesterday, I can now call it a successful method with confidence: Magnetic calf-closure system: Okay, I decided to try something new for my shin closures. This first set of photos is from my initial test, followed by the successful implementation of it. Many people have used Cricket's magnet closure system. Having trooped with some Velcro on my clone, I know that Velcro is not the most trustworthy. While I wanted to use magnets, I came up with a different approach. The good part with this method is that if it is a terrible failure, it is more removable than the disk magnets with holes method. My primary reason for trying a new approach is that we all know that magnets are strongest pole to pole, and have their most strength in that direction. If you have a stack of disk magnets, you slide them to detach them because it is way easier than pulling straight up. The issue with Cricket's design is that we are trying to resist the calf armor from opening side to side, and yet that is how the magnets are weakest. Update: @Scimitar points out in the comments below, that Cricket's system actually has the magnets recessed, so that the cover strip magnets lock in before connecting, which would mean they only open by pulling away against their strongest pull. So my method's only advantage is that it is all internal, and could be more removable (no drilled holes), but is not necessarily a better use of magnets. Thanks! I had some strong cylinder magnets, 1/4" N-52 that are magnetically aligned along the length. I would put them on either side of the opening on the inside, so that they have their strong pull directed at each other. They are nearly 5 lbs of strength each, so I needed to cut that down a little, and I also didn't want them snapping directly together which would chip them over time (some of mine are already chipped). So I needed to create a sort of case around them that I could glue down. Because there will be plastic on the face, they will be a little easier to separate with that material, and protected. Here are the magnets from K&J Magnetics, and I believe I will use 24 total for the two calves: To make the magnet pockets, I made a slot in a scrap piece of thicker aluminum by drilling two holes and filing it out. This could be made of wood as well, just something that you can press hard on, and doesn't mind some heat or pressure. For these magnets, the hole needed to be larger on all sides to accommodate the plastic, and I ended up with a 9mm x 16mm opening. It helps to have one edge bent up, so you can press it flush, sort of like a spatula. For the plastic, the cover-strip sheet that came with the kit was too thick, about 2mm, so I found some scraps I trimmed off my clone arms, and my thigh scraps from this suit will have plenty as well. That trimmed plastic is between 1mm and 1.5mm, and the thicker 1.5mm was more difficult to stretch, so the thinner is better in this case. I put a piece of sheet mild steel down on a scrap of plywood. This was both a non-stick surface, a heat sink, and the magnet holds itself in place on the steel. First I heated the plastic on low, until it just started to go floppy. Pressed down my aluminum guide, and got it halfway down. Then I hit it, while on the magnet, with the high heat until it just starts really shriveling (this is about 5 seconds of high heat, and rapidly gets too hot, so act fast), and pressed the guide slot down over it until totally flush with the metal base. Sometimes it took a few re-heatings to get it flush, and it needs to be so that when mounted, it glues flat to the inside of the armor, with the magnet contained. Then I clipped it to have side tabs for gluing (though a few will need a different shape, at the top and bottom channel shapes in the shin), and then trim one edge really close. The magnet needs to be as close to the edge as possible, so I sanded it more flush on a sanding belt (and rounded the corners). Now for my initial test. I clamped them onto the edges of some strips, and they seem to work well enough. So I made then more pockets, so I could test it on the shin halves. I was most worried that they might be too strong, so I did five on each side, taped in place, right up to the edge of the plastic. I marked my stack of magnets that were all stuck end to end with two colored sharpies, red on one and blue on the other, so I could make sure one whole side was mounted with red ends at the edge and the other side all blue ends at the edge (When I do this on the armor, I will glue the magnets into the ABS pockets and mark them on the underside). I taped them all in, and tried it out, and it works really well. In fact, I think I will do six pairs on each calf instead of five, because it was not too difficult to open, but it really wanted to stay in place. If this doesn't work, I can still remove the pockets, and go with a different closure, because the armor will be un-affected. Installing the system: After my initial test of my butted-magnet system, I finally got to completing the shin armor so I could try it out. A note about magnets: they are only really at full strength when exactly touching. Even 1mm apart, and they are at about half strength. So for this to work, the pairs of magnets need to be as close to each other as possible. Because of that, I tried one method on one, and through that process came up with a better method for the second that ensured optimal placement. To begin with, I created a bunch more of my heat-formed "pockets", including a different type for the top and bottom edges (longer rather than wider shape because of how close to the top and bottom edges it would be). I have my 25mm cover strips all ready to use, but because of the nature of mounting these, save the cover strips for after the closure is complete. Even though my armor was pretty close to butted, it needed to be a lot closer for this to work. I started by fine sanding the edges, and a little mild heating to get the edges to meet more flush. The tops will get the mobility cuts, but I waited until after the closures were complete to know what the true edge would look like. Once I had it flush, I taped it closed matched up, and drew my marks. These marks would be on-center for each magnet pair. I started with the top and bottom, and then divided the distance between by 5 (giving me four marks between, for a total of six magnetic closures, 12 magnets in all, per shin). My number was about 63mm between each line. Once marked, I removed the tape. I used some coarse 60-grit sandpaper to roughen the back side behind each mark, where the pockets would be glued. In the right photo, you can see what my pockets would look like. I paired them up to ensure they were similar. A note on glue. I know the Stormtrooper lives and breathes E6000, and for most of the armor, that glue is a great choice. For this process, you will really need speed, and quick results, so CA glue with an accelerator spray is ideal. Because I once was unsure, CA glues (Cyanoacrylate adhesives) are often called "Super Glue" and it's a clear glue that sticks really well to things like plastic, fabric, and... skin. Many people call this "Gorilla Glue" but the problem with that (or any brand) is that Gorilla glue makes about ten products, including wood glue, and an expanding glue, all called "Gorilla Glue". CA glue is the preferred name to ensure people know what to use. Now, for the accelerator spray. Zap-A-Gap makes one, but there are many types. What it is is a spray that you can spritz on a wet bond, and it sets the glue (at least on the edges) in about 3 seconds. No kidding. Like you could take a quarter, glue it to the side of your work bench, spritz the edges, and then let go. In my experience, if you quickly pried it up, the CA glue would be wet underneath for some time, but it would be "clamped" by the already cured edges while the remainder dries. This closure method relies a lot on that rapid dry time. Gluing magnets into the pockets. It is fairly important to keep track of polarity for the magnets, so put them ALL in a line, and use two different colored sharpies to mark each end, so that you have (for example) a blue and red end on each, and every red wants to stick to a blue. On the pockets, mark the "center line" that is where the center of the magnet would be on the seam edge, so you can line it up from the outside. Sand the bottom of each pocket to prep for gluing. Then set out your pockets bottom-side-up (if possible, on a piece of sheet steel like I have, or some other magnetic surface to keep them from sliding or trying to attach each other. Mark them red and blue as well to keep track of what goes where. Drop some CA glue in the bottom of each, and set a magnet in each pocket, aligned toward each other by color, so you have a red side and a blue side (or whatever colors you use). If you have accelerator, you can spritz these and be ready to move to the next step: Note: the following process was what I tried on one calf, and then improved on it, so be sure and read ahead for a much better process for gluing. Start on one side and in order down one "color" set, take each pocket, and add CA glue to the bottom edge, filling in more around the magnet. Mount it in place lined up with the edge line on-center for each magnet, and as perfectly close to flush with the seam edge as you can. This works best when the magnets are just touching. As each is set in place, spritz with CA glue accelerator, and then add a line of glue around the back edge and sides of the pocket, and spritz again. Move up one side, and then down the other, taking care to keep it from shutting before everything is truly cured (I would give it at least 30 minutes to an hour). These magnets are quite powerful, and could likely pop free from un-cured glue. Here is where I found a problem, and a new solution: Once I finally put the sides together, they clicked nicely with a satisfying click. The trouble was, you can see in the first photo, is there were gaps where various pockets were too close together, which then kept the better positioned ones from touching. So I had to go to each joint, and with a small piece of sandpaper wrapped on a bit of plastic, sand them until they met flush. I eventually got it much closer, but it took a lot of fine sanding and trouble to get them to match: My solution for a more precise alignment of the magnets: I realized that the magnets want to be close and perfectly aligned. That's their purpose. So I should use that. So I did as before, and glued one side (like the "red" side), again, as close to the edge as possible. Full CA glue on each, and spritzed with accelerator to lock them in, and then I let that side sit for an hour to fully cure. First, I taped the calf closed as perfectly as I could, with the edges tight together. Then I took the other set of pockets with the magnets glued in, the "blue" side, and put glue on just the back half, away from the seam edge. I didn't want to risk getting any glue on the seam or opposing magnets, and it does spread out a bit. So for now, just glue the back side (pictured). Then I carefully, in order, set the magnets down the side across from their "mates" and the magnets themselves snapped into the perfect spot, touching exactly. If the other side was a little over the line, they would lock in back a little. It aligned them perfectly. As I went, I would place a pocket, then do some CA glue along the back and back corners, a little on the edges (remember, nowhere close to the seam edge), and then spritz with the CA accelerator, locking them in. Once that side was done, I set it aside for a half hour to more fully cure before removing the tape, popping it open, and then gluing the remaining spots, including around the edges up to the seam edge. That one went together much more quickly, and it was nearly perfect. One of the pockets had pried up a little, so had to be clamped and re-glued, but otherwise a much easier method. I then taped the top edge, and now that it was in the final alignment, ground my mobility cuts. And now the moment: Does it work? I tried them on, and they snap right shut around my calves. In the little I have worn them this morning, they seem to work really well. I will say that I expected them to be a little harder to open. I walked around, up and down stairs, and they stay closed, but when I do something extreme with the top edge, like crouching in a kneeling position, the top can spring open. I tried them on before the mobility cuts, and they sprung open more often when bending my knees past 90 degrees. Because of this, I am adding a "fail-safe snap" (popper for the UK folks) on a 1" black nylon strap inside that crosses the top of the seam on either side of the top magnet snapping on one side. The strap will be connected by reaching in from the top after the armor magnetically closes around my calf, that should ensure it never opens without me doing it. I will add pics of that in my next post, but for now it is on E-6000 time. Also I will finally add my rear cover strips, which should help finish these out!
-
As fun as this was for April Fool's Day, it probably should be archived so it doesn't confuse future members @Dark CMF.
-
Great work, Jakob! We are so close now!
-
Saberforge E-12 Blaster
OddViking327 replied to LordSunder's topic in Electronics for Helmets / Blasters
Having had to move it on mine for Centurion, I also notice right away that the scope and counter are too far back. The scope back foot/mount should be more above the swivel point for the folding stock. His scope front is also upside-down, it should be low down instead of at the top. He is also missing a T-track on the right side, but probably left it off to match the left (where the bayonet lug means there wasn't one on the original E-11's) and to show off the light more. So strange to get most of the details looking great, but to miss a few key details. -
True @Sly11 I left the blaster for last, got approved without, and finished it for EIB and Centurion.
