Leaderboard


Popular Content
Showing content with the highest reputation on 08/19/2019 in Posts
-
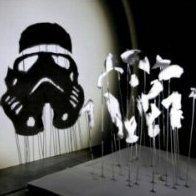
So we had one of those guys that hits neighborhoods this week come through and try to paint house numbers on the curbs. Ours was looking pretty faded and my wife was interested in having it done. Hold the phone! I am self admitted cheap so I said I’ll do it myself. Now the guy did good work and it was pretty cool. Here’s our neighbors. So not to be outdone I got to thinking.... and found an image on google and a StarWars font and made a template. And ultimately had to represent my fellow TK’s.2 points
-
We did a little troop down the street to see how it all flows and he loves it! Sent from my SM-G955F using Tapatalk2 points
-
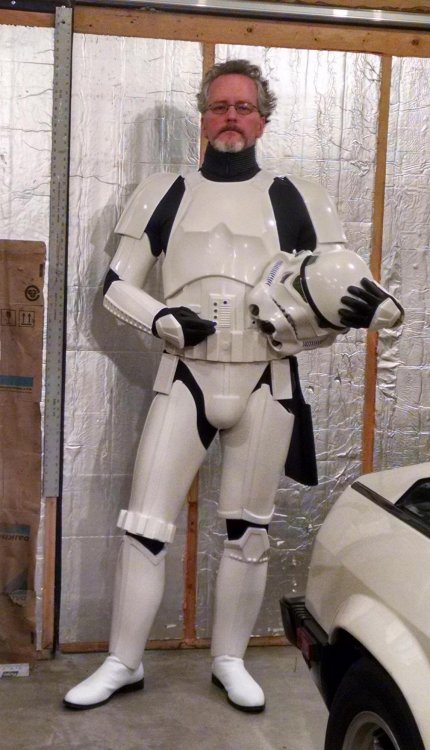
Some updates! This may be a long one... Realized that I don't think I ever posted my helmet... but here it is! Arrived safe and sound. The detail is impressive and while it is decently sturdy and very lightweight, I will definitely be reinforcing it - I don't think it would take impact or a fall from any height well. I also mentioned having had my undersuit tailored... well, here's some pics of that too! It fits much better now that a lot of the slack was taken out. It's still a bit loose so I have good mobility, but we'll see if I end up needing to have it taken in more once there's armor on top. I'm wearing a black t-shirt underneath so you can't see where the mesh is that well, but the internet didn't need to see my back and stomach lol I also went and dug around until I found the velcro-based strapping kit that I pulled out of my Anovos suit when I switched to snaps. I will likely use it to help start mocking up fitment for the suit. Sure, I'll waste some Velcro, but I think it'll be worth it to learn and size the kit properly. I will also likely let any of the other group build members try mine on so they can adjust and mark theirs for trimming, if needed. Mine may need some off the top of the barrel, and I will likely be splitting the back of the thighs at the cover strip to overlap them and size them down a bit. The kitten's name is Zero and at 10 weeks old, he was terribly curious about what was going on. I also started playing around with coatings and ended up spraying the back of one of my handguards with Flex Seal to test it out. I was pretty pleased with the finish and it stopped the itchiness that the armor still caused, even after a thorough washing with a red Brillo pad. I'll probably be spraying the entire inside of my kit with this stuff after I have reinforced it (still figuring out how to do so). I was also pleased to see that industrial Velcro still stuck to the finish and was able to attach the handguard to my Endor Finders gloves securely. The gloves are awesome and the lining is very comfortable, if likely a bit warm for us out here in CA. Finally, I started trying to mock up and assemble the forearms and biceps - it's been a topic of much debate how we want to end up attaching the pieces together, but I decided to give 1", regular (non-industrial) Velcro a try. I wasn't super stoked on how it came out - it's pretty visible, though mostly from the back. I may try to reposition it further from the edge and see if that does anything. The thickness is also somewhat concerning, but we need to be able to get these apart, as I confirmed that there's no way my hand will fit through the hole at the wrist without opening them up. I'm hesitant to use glue pretty much anywhere on the suit as a result. There's some discussion of Boba-gauntlet-style magnets, but we'll get to that. Can anyone also confirm that this is how the pieces are supposed to sit? Feels kind of awkward for sure. From the elbow down: And from the wrist down: I also realized that when we distributing all the pieces after the bulk shipping, I ended up with two of the same outside bicep, when I need with a cover strip on each side for it to assemble properly. Gotta figure out which of the 7 other guys has the same problem and switch with them! D'oh! Anyways, more test fitting with some assistance coming soon. I mocked up the chest how it should assemble (except the shoulder straps will go UNDER the chest plate - I just couldn't get it to sit like that for the photo), but I think I'm going to hang the cod, then use that to help position the barrel, then fit the chest OVER that. Gonna need some extra hands though, so not today. Aaaand finally, I was able to take the kit to my paint guy Andrew "Bondo" Babish with Paint by Bondo - he quoted $500 flat to surface prep, prime, and paint the whole kit with flexible automotive quality paint, handpainted color details on the helmet and ab, and clear coat on top. Not too shabby and this is likely the route I'll go. Just for fun, he sent me a pic of a helmet he painted for the big 501st TK Helmet art exhibit they had a while back. At the time, he was painting for West Coast Choppers, so there's Jesse James next to him if anyone remembers that guy. Pretty cool. Plain white paint and a couple helmet details should be no problem for him, I daresay. More updates soon, but things are moving and we're problem solving as we go!2 points
-
No issues at all. Currently we have three deployment officers and one just went on Holiday. All applications have a second person briefly go over them to make sure nothing was missed or offer up different suggestions. This should be wrapped up shortly.2 points
-
Here you have them Daniel. Sorry, I didn't understand you well.2 points
-
After being introduced to the 501st at a comic-con last summer, it’s taken me just over a year to get everything in order and finally be a part of this legion; and I am so proud to be here! Can’t wait to start trooping and work towards EIB!1 point
-
This evening i spent about 45 minutes to cover all the parts that should not be painted silver... the paintjob itself took about 5 minutes in total... Tomorrow i will reveal the finish... Have a great evening guys...!1 point
-
Custom made belt! During this build I'm learning that things I thought might be challenging for me are challenging but doable. I also like the fact that i can say that I made that stuff myself. I hope you like it. Sent from my SM-N960U using Tapatalk1 point
-
Thanks Mario. I'm searching for that darn post where I SWEAR I read the person was told to paint the tips black. LOL I actually prefer the black look, and from what I can tell, Han's helmet has the Hovi's painted black. I know we have to go by a generic "basic" reference to keep uniformity, but I wish something like this could be an either / or situation in the CRL, considering I am building a Hero armor.1 point
-
Thank you Mario1 point
-
That snap you have in the Cod should actually be a Split Rivet. Doesn’t need to be functional. You can use the same hole, just drill out the inside (not seen) part of the snap, it’ll split apart. Then glue a snap plate over top, or just in front of the split rivet.1 point
-
Update, used Lepage 2 part super glue for the handguard sand it seems to have worked great.1 point
-
What a Great build Ivaylo, Good luck with your application Trooper!!!1 point
-
thanks, got my mistake, should be ok now1 point
-
Your images don't seem to be appearing, if using Imgur you want the "direct link" or you can select copy and paste into your post if using computer.1 point
-
I’m like 98% VELCRO FREE on my armor ... only Velcro I have is on my belt... Sent from my iPhone using Tapatalk1 point
-
Well Apparently I'm terrible at build threads. I found out this morning that after a couple of minor corrections I was approved. Thanks for everyone else's helpful posts and threads.
 1 point
 -
You may have better luck over at Spec Ops, their detachment look after the Death Trooper, BTW it's not a TK, it's a TX Spec Ops forum: https://forum.specops501st.com/1 point
-
Sorry, I'm going velcro, but screen accurate is what we're going for. Sent from my SM-N960U using Tapatalk1 point
-
Time to paint. It's the most difficult part of the build for me. I not very clever with painting .... After masking some parts and cleaning the other with alcohol, I've applied a flat black primer ( MOTIP MTP-M04052). I'll have to sand a little bit the scope rail because I applied to much paint (too close). I don't think I'll apply a second layer of primer. I will spay a grey hammered paint (MOTIP MTP-M04017) on the scope and after that a flat black (MOTIP MTP-M04006). Will decide after that if I use the hammered paint on the main tube or not. Haven't decided yet if I'll paint the magazine or not.1 point
-
Is a kit ever really completed? After having recently completed this TK and Mr. Cricket's TK, I went about doing a full cleaning of my nerd room. When I have a clean space to work in, I end up with some serious bursts of creative inspiration. Today was the day I had a serious "A-HA!" moment. This lightbulb moment was about my voice amplifier. Many of you put your amp in your chest plate, and that's fine for a lot of you. I found that (like a lot of you have reported) I ended up with feedback when I would try to increase the volume of the amp. The mic is just too close to the amp when it's placed in the chest if you want to be heard easily in a crowded troop. Being on the thinner side, I relocated my amp to my belly- namely, it's velcroed inside the recessed ab button box of the ab plate. Relocating the amp to the ab helped a lot, so I could turn up my amp even louder. But I still had some issues with being heard by Imperial Citizens. When I made my amp even louder, I'd get feedback. I figured that the placement of the amp into the ab was about as good as I could get. One of the Biker Scouts in my Garrison has a white cotton duck pouch that houses his amp, and WOW... he can be easily heard anywhere! I sewed one of these for my TK- figuring that if I had an extra box on my belt, it would blend anyhow (and certainly not as conspicuous as those non-canon binders I see everywhere). I thought that this would be the solution for my Hero! Nope. This solution will work on a Stunt, but not a Hero with a grappling hook box. Sigh. The grappling hook box is positioned where the cloth amp box needs to go. I don't want it on my back plate because that would look very odd. And I can't swap it over to my left side because I like to holster my blaster, and the cloth amp box would get in the way of the blaster while holstered. Ugh. I will be able to use the cloth amp box for my Sandtrooper, but I need something for my Hero. Back to the drawing board. I was looking at my super-clean nerd room today, and began looking at my Hero kit (currently displayed on a mannequin). I examined everywhere I could place the cloth amp box... then inspiration struck. "Why not hide the amp inside the grappling hook box?" Whaaaa???!!! OMG! Would it work? I have a brand new extra Aker amp (happily discovered when cleaning up the nerd room), so I first eyeballed if the amp could even fit. Yep. Size-wize, it's a go. After this, I'm sure you can imagine what happened next. Dremel. Lexan scissors. Pliers. Glue. Velcro. And in less than an hour, I had a secure and fully functioning grappling hook amp! Okay, I know that the center hole isn't exactly canon, but it's a small enough mod that it works. I could even make it less visible with a white grommet- maybe I'll hit it with some paint? I kind of like the black grommet, though. The mic cord routes behind the back of the belt, under the kidney notch, under my shirt, up through my neckseal, and to the mic taped to my cheek. The cord won't really be visible at all. And I can really make this thing LOUD now! The benefit of having the amp in the box is that the box amplifies the amp itself. I can't wait to use this at DragonCon!!!1 point
-
1 point