
Leaderboard


Popular Content
Showing content with the highest reputation on 05/29/2019 in Posts
-
Okay Troopers (and future Troopers), If you have kept up on recent events here, you are aware that the updated changes in the CRLs for ANH Stunt, ANH Hero, ESB and ROTJ will take effect on June 1st. We understand that many of you may have started your build before that date, and in order to avoid confusion and possibly causing you to have to make changes, we are allowing those in that scenario to adhere to the existing CRL guidelines. There are some conditions, though: 1. You must have started (and documented) your build here on the FISD prior to June 1st. 2. You will have until September 1st (approximately 90 days) of this year to submit for Expert Infantry and then Centurion if you opt to go for higher levels with that particular set of armor. 3. We took into consideration that an average set of armor takes approximately 3 months (or less) to build and that "life happens", but if you find that it will be taking longer than the 90 days, you will be required to contact the D.O. staff if you are aiming for EI or Centurion and explain your situation. After that date, you will be required to follow the requirements as per the updated CRL. If you have already started your build and would like to include the new updates, you are more than welcome (and encouraged) to do so. If you have met the above guidelines and would like to use the existing CRL, we suggest that you print a copy before June 1st, as these will not be available to view on the 501st site after that.2 points
-
I did some more painting on my bucket. I have it loosely assembled to see what it looks like, but I don't want to mess with it too much for a couple of days to make sure the paint has cured completely.2 points
-
The moment of truth! I wonder if they sent the right colour? [emoji1787] Sent from my iPhone using Tapatalk Pro2 points
-
No need for that, Larry. The more pictures the merrier! It is important to keep all your build questions/photos in one area, that way not only can you keep track, but others who may be following it and have similar issues can learn from it.1 point
-
"Now for the front I know it's low but, even at this height it's against my unmentionables and rubbing my inner thighs". You can (and should) trim all the return edges off of the cod. Once that is done, use some fine grit sandpaper to smooth out the edges.1 point
-
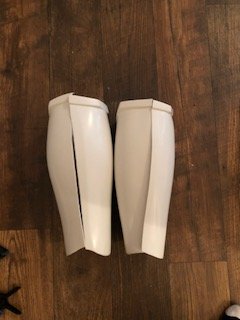
Awesome! I am very happy to hear that. I am 6'2" and nothing ever fits me right so I think I will have to play with it a little. I plan to do the hot water bath on the back shoulder straps to bend them so it will fit my back more I let everything dry over night and this is where I am at. The Front of the shins The back of the shins The back on the right is overlapping a lot so I was thinking that a hot water bath would help. What do you think?
 1 point
 -
Good luck. You'll join the ranks soon.1 point
-
Found it! Haha sorry for the noise.1 point
-
I agree they should be ok for basic approval but it’s always a good idea to check with your GML (garrison membership liaison) just to make sure. No go for higher levels.1 point
-
The CRL says nothing about the seam for basic so in my opinion they are good for basic, but for the higher levels it specifically says no seam. I’d ask your GML to make sure. Sent from my iPhone using Tapatalk1 point
-
Heads up David. Things like that can always happen - to everyone. I am sure Chris will be able to help with a new screw. In the end, the only bad thing will be the waiting time to get it shipped. But you have enough other work to do on this beautiful blaster, so keep the pictures coming.1 point
-
Not a fan of the Velcro but otherwise good quality. Sent from my iPhone using Tapatalk Pro1 point
-
It might be the angle of the photo, seemed more lined up when I worked on it last night. No worries if I need to cut a little off because top has extra to be removed later.1 point
-
Hi Robert. The left thigh cover strip might need to be moved up a bit so the bottom of the strip lines up with the very top of the lower ridge section. The right side thigh cover strip has the correct placement. This pic might help: http://i1133.photobucket.com/albums/m587/RS_Prop_Masters/RS Upper Leg Build/IMG_0861.jpg The RS Props left thigh shows the cover strip position (left- original thigh/ right side-new RS thigh ) You might be able to delicately trim it down in its glued position but its risky.1 point
-
It’s an AEG E-11 airsoft with a sound board in it. Totally inaccurate, needed tons of mod to get approve for EIB (rails, scope and counter positions, power cylinders...) Good base only if you plan to mod one for Rogue One TK costume. But for $350 there are better E-11 blaster out there. Just my personal opinion.1 point
-
Finished the front strip on thighs, leaving all trimming till later after a fit test. Starting to work on the back strips. Will put in V shape gap and fill like I did on the forearms.1 point
-
Hey Ukswrath! I love your build and the final photos look amazing. I am right now working on my build and I have been having some difficulties with a couple parts. I have a thread for my build here If you ever get the chance to look it over, mostly my last 3 post I would really appreciate some feedback and help. If you need me to be more specific versus going to my thread I do not mind at all. Thank you!1 point
-
Frown paint fix1 point
-
Awesome. Thank you. Sent from my iPhone using Tapatalk1 point
-
Resources thread One you want here Works great and it's just a matter of adding a couple of screws to the side of the blaster/s1 point
-
The rivets are mentioned in the Centurion requirements in the red text for the belt and abdomen armor. [emoji846] Sent from my SM-G965U using Tapatalk1 point
-
Today I’ve worked on the handle. First challenge was to reconstruct the puzzle. Then assembling was easy. I’ve glued the selector to prevent it from rotate when moving the lever. After that, I’ve had some difficulties to assemble the two parts of the handle (left and right). So I’ve to trim a little the right part and the trigger guard (in red). Everything went fine and I was to finish by fixing the plastic cross to the aluminum part with the transverse screw. My mistake was not to clean the screw thread. May be some little aluminum parts were lying here : my screw was jam and I’ve destroyed in when removing it. Fotunately it didn't broke in the thread ! The thread wasn’t in a good shape but I’ve rebuilt it. Will ask Chris to send me a new transverse screw. So, one advice : clean the thread before screwing !1 point
-
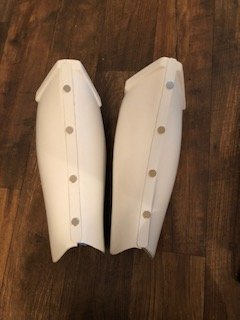
Shins are looking good and on the correct legs (noting the inside halves have the longer ankle piece). I'd also suggest if you have your boots to test fit with them on as the shins will sit highers as well as the top of the boot adds width to your leg. (Amended and apologies for any confusion, pieces are matched up correctly, just on the wrong legs) Sent from my SM-G960F using Tapatalk1 point
-
In a perfect scenario, the cover strips on the front of the thighs should extend all the way from the top down to the top of the bottom ridge. Since you may not have extra ABS strips to replace those, you should be able to fill in the gap(s) with ABS paste, which would give you a cleaner look. "I also have noticed a gap on the thigh pieces, I figured all I would need to do is use the abs paste to fill those up, sand, and buff it out. Would this look bad? Is there another way I should approach it"? Unless they are loose, I would leave them as is. Keep the questions coming!1 point
-
Ya head over to Pathfinders, it's that costume's home and there's quite a few resources there for you Sent from my Pixel 3 using Tapatalk1 point
-
I was SO PROUD when I got my CENTURION BADGE..... but i still find Im PERFECTING my Level 3 armor .... ( even my bin NEEDED PERFECTION !!! ) since DAY ONE I hated by bells and chest piece ... I always felt they were TO SMALL .... Then like a month ago WALT @ WTF comes out making LARGER BELLS & LARGER CHEST .... well I FINALLY made the plunge and ordered BOTH OF THEM... I feel this is a MAJOR UPGRADE to my OVERALL LOOK [emoji102] !!! Ps. I could have ordered bigger bells/chest piece from other makers but i felt it would have DISTORTED my overall look ! Well I’m glad I didn’t invest elsewhere ! Ty Walt it was worth the wait !!! Sent from my iPhone using Tapatalk1 point


