Leaderboard


Popular Content
Showing content with the highest reputation on 01/27/2019 in Posts
-
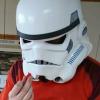
I am covered in white dust and plastic bits. I am weary. I am not finished my build, but I practically am. There are a few things gluing (shoulder straps, hand plates) and tube stripes to be cleaned up and shoulder strap snaps to be sewn in and that is - Lord willing - all. Here's one random photo of midway through today when I first put my leg armor on and realized that I'm getting to look kinda like a stormtrooper. More later!4 points
-
Gluing in some buttons and making straps today. Suspenders for the torso to keep the weight off my hips a little. and some straps to keep it closed in the back. The suspenders kept sliding off my shoulders so I sewed in a cross bar to keep them together. I noticed some straps coming from the waist to the cod piece in a reference photo and it gave me an idea. made a crotch strapping that goes from my belt like a jock strap and then magnet the cod piece to the straps. This way I have lots of movement and if I need the space it will break free and stick back in place after. I noticed a few reference pics from the movie have the cod piece dislodging quite a bit so it should be realistic. Plus I can snap it away to go to the bathroom. Here is the reference photo zoomed up on the straps. Also I can see down the side of the thy to connect the upper leg armor like a garter. It also looks like it's sheathed in some black material. So I made this The magnets are in a slotted pouch so they have some movement to adjust to meet the magnets on the cod piece and give some room to move around. Only 4 magnets so far I may need to add another big one to hold it down better It all goes together well and I'm planning on doing the same thing to but plate.2 points
-
Trooper Info Name: Siu Kau Au-Yeung FISD Forum Name: baysk Legion ID: 71814 Garrison: Hong Kong Garrison Legion Profile: http://www.501st.com/members/displaymemberdetails.php?userID=21657 Height: 170cm Weight: 60kg Costume Information Armor Maker: Anovos (kit) Helmet Maker: Anovos (completed) Neck seal: East Asia Supply Hand Guards: Anovos (hard) Belt: Mrs. Linguini's Crafts Boots: Imperial Boots Holster: Imperial Boots Blaster: Trooperbay Electronics: 2x 12V helmet fans1 point
-
Name: Sven Müller Forum name: HSM76 Legion ID: 24576 Armor maker: RS Prop Masters Helmet maker: RS Prop Prop MastersArmour Maker: RS Prop Masters Helmet Maker RS Prop Masters Blaster: Real Sterling, real Scope, real Henstler, PlayfullWolfCub cylinders. Height: 185cm (roughly 6‘1“) Weight: 75kg (165 pound) Boots: imperial Boots Belt: RS Prop Masters Electronics: Ukswraths Hearing aid, Troopacoola Fan system. Neck seal: Burbench Designs Holster: Imperial Supply Depot Build thread: http://i.imgur.com/aO5W0j2.jpg[/IMG In the pictures above the is tape on the outside of the Chicago Screws holding the holster, please disregard this, it is off as you see here:1 point
-
After looking extensively online for reference photos I stumbled across this. This was from the space port on Corellia. Now, I know there is no CRL for this yet but I would imagine it would be under FISD and not MEPD because he are clean. I'm not going to lie, its pretty boss that he is carrying an E-22.1 point
-
I checked my build thread and I used a bulldog clip for the spring plate. The metal was strong enough to keep its spring tension and easy enough to cut & drill through. I believe I used the large type of clips as the metal is a bit thinner and easier to work with.1 point
-
Clip release, end cap and end cap clip look great. Nice work on these parts. For the end cap clip I think I used a piece of scrap metal from something I had. Sorry my memory on that is fuzzy. But I do remember having to punch a hole through the metal and it took a few attempts. I will have a look at my old build and see what I used. Aluminum is too soft as you mentioned and won’t be great long term.1 point
-
Hey were two of the same mind! Nice job ridding of the doopydoos toilet effect on the end cap [emoji106] And also wow! Magazine clip latch, I believe it's called, looks spot-on Keep up the great work! Following with interest Sent from my SM-G390W using Tapatalk1 point
-
Oh that rear shot of the black plate really shows nice angles superb! Resisters are another option to consider if not done so...cheers! Sent from my SM-G390W using Tapatalk1 point
-
Looks great! Did you find a solution for your space problem ? Gesendet von iPhone mit Tapatalk1 point
-
Today I worked on some small details again. New end cap clip Made a new end cap clip with a smaller axle diameter to ensure sufficient strength around the drill hole. Since the 3D printed part did not come with the knurling pattern, I applied some green stuff and pressed the pattern into that. I initially tried to use a clip from a pen as spring mechanism, but my metal drills just wouldn’t go through. So I used some aluminum instead, but that bends back too easily. Any suggestions..? 20190127_214058 Thou shalt not look like a toilet After reading Jesse’s build thread I had to agree that the DoopyDoo’s end cap looks a bit like a mini-toilet. Tried to replicate his reshaping of the bottom side of the cap: 20190127_220553 Magazine clip release lever At least I think that’s what this part that is completely missing from the DoopyDoo’s magazine is called. Feel free to correct me on that if needed! I used some leftover aluminum parts to recreate this based on pictures I found on the web. Due to the small size of the magazine I could only fit this “cut-off” version: 20190127_204609 Cheers!1 point
-
That looks much more accurate than the resin piece from the DoopyDoo's kit. Are you going to add the wing stubs on the outsides?1 point
-
Nice job, Siu Kau, and thanks for your submission (GREAT photos, btw)!! One of us will be with you shortly.1 point
-
Only 19 pages up to this point. I am so proud. It's looking very good at this point, so just don't screw anything up between now and approval! Also, for the sake of Matt and Frank, just give us a nice extremely close up image of that knee. I'm talking through a microscope levels of close, macrobinoculars levels of close, so they can be certain if it's straight or not.1 point
-
ROFL to whoever changed my post to read "slave Leia". Nicely done! FYI original was a stolen quote from Patrick Rothfuss "The Name of the Wind" when Kvothe enters the archives for the first time after having his ban lifted.1 point
-
I flop back and forward a lot. I was trying to finish off the holster positioning. I did end up going with the Chicago screws. Same ones as on the holster itself. The size is similar (although slightly larger) than that of the rivets used for the belt. I figure matching the sizes works out ok based on what I can see in the movie. Lurking in Diana's build thread, she has a diagram of the holster placement: But I did a little measuring myself. I paused the movie on a trooper just before the scanning crew boards the Millennium Falcon. I put a piece of paper on the TV and traced over the important bits. I measured the box width, the distance between the end of the belt and the rivet, and from the bottom edge of the belt to the top of the holster. Then, using the actual size of the ammo belt box width as a rough base measurement (about 3cm), I scaled up the measurements to actual size. Going by this, the distance from the edge of the belt looks right (~2cm), but the distance between the belt and the holster is a little short. I tested out this by measuring it out and taping it in place, then clam-shelling the ab and kidney plates (to get the belt level around my waist) so that I could get a relative idea of how far down the holster goes. The height of the holster varies from trooper to trooper, but it doesn't seem to go below the knee, usually staying above the lower ridge on the thigh, and sometimes quite a bit higher. I think I'll wait till I get the body and the thighs, at least, closer to final sizing before I make the final holster placement. I think I'd rather go a little short on the straps than have to cut the holster. But we shall see!1 point
-
Hi Mathijs, and thank you for your submission. Unfortunately you are missing quite a lot of required photos. A complete list of them can be found here: https://www.whitearmor.net/forum/topic/22604-expert-infantry-application-photo-checklist/ Please post those up so that we can get started. Thanks!!1 point
-
Something went wrong with my pictures I guess. I uploaded 60....1 point
-
I guess they deleted the scenes where he took the time to remove the return edges from the bottoms of the chest and back plate. Before anyone says it, yes, I have entirely too much time on my hands this morning.1 point
-
Thank you sir! I hadn't seen firm on the thighs other than to have them match up vertically with the strips on the lower legs.1 point
-
Arms front and back 15mm Thighs front and back 20mm Shins front 20mm, rear 25mm1 point
-
1 point
-
Nice work, a couple of things you could address next time you are kitting up is you have a large area of glove showing, you may want to drop those forearms a little to reduce this. There is some overlap of your ab over the back plate on the side photos, also on the other side your rivets aren't aligning. You could also drop your thighs a little, they appear to be just touching on the back photo, will help when walking to have a little more of a gap there, will also reduce the large area of black at the back of your knees. The bottom blue button on the large ab plate seems to have a lot more paint on it comparted to others, I'd suggest removing a little of the paint. Nice work, good luck with approval1 point
-
A couple more images. Well the Jedha trooper ended up over at MEPD but this guy is completely clean, I'm sure it will be discussed by the DL's1 point
-
Looking pretty good overall, Devon. Even though you are not aiming for the higher levels, moving your shoulder bells up would improve the look a lot. Ideally, the tops of the bells should touch (or nearly touch) the shoulder straps. This is a pretty simple adjustment and will bring them closer to your chest plate which would reduce the gaps. If you do decide to do this, I would switch the shoulder bells. No biggie, but they are on the wrong sides.1 point
-
1 point
-
Exactly the answer I was looking for! Thanks!1 point
-
OMG! Sorry so much. I took off the plate to make it smaller and able to make the notch in the piece. When I pasted it, I did it the other way around. What a stupid thing!!! Now I will have to take it off and re-paste it correctly to send you the correct photos. Please, apologize for the mistake. I'm sorry to waste your time. Thanks again.1 point
-
The main body of the M38 is painted.1 point
-
A couple interim relocations... After my life imploding a little and a house move, I was getting ready to do some trimming and cover strip cuts. Trimming the biceps. Used the woodshop pencil technique to draw a line and cut with some hobby scissors (similar to lexan, but different brand). (Following the suggestions from Panda Props & Costuming Stormtrooper build on Youtube) Outer: Inner: ... So tempted to put the helmet together, but I know I should save it for last, so it sits in wait After trimming the outer biceps and attempting to match them up to their inner counterparts, I realized that both were identical... I didn't take care of it right away because I wanted to double check all the other parts before sending out an email... I did a video unboxing in February of 2018 and went through all the parts to make sure everything was there: This is basically just raw video of me rambling on. Here's another thing I didn't notice, for whatever reason: The shins are identical for both legs. They are labeled as left and right, but they're exactly the same. After I got all that all sorted out, I finally sent an email to [email protected] that same day (Feb 22, 2018). I didn't get any response initially and I was worried I had sent it to the wrong address, so I sent another email on Feb 27 to [email protected]. Still no response, so I sent the email again to the same address on March 7th. Finally got a response on March 9 requesting pictures of the pieces, so I sent the pictures below on the 10th. I got a response again on the 15th saying they would send me out a new piece. No request for payment or to cover shipping. I gave them my new address and it showed up on March 28th. It's a good colour match and it is indeed a proper Right outer bicep.1 point