Leaderboard


Popular Content
Showing content with the highest reputation on 07/22/2018 in Posts
-
Thanks again to everyone for the advice. My application was approved. With some additional research, advice, and time permitting it's time to work towards the next level.3 points
-
Ukswrath, Thank you and I am happy with the kit overall. I just hate the imperfections but I will fix them or learn to live with them. Update… Today has felt like a horrific Chevy Chase comedy. Well let me back up. Yesterday I finished masking off the helmet and then painted it. Masking those teeth was a real pain but I got it all done. After that I pulled all the masking off and went back in with a small brush and did the outline of the tears and the boxes above the eyes. I didn’t see score lines around the two boxes on the back so I guess they don’t get the outline. Next I put all the stuff that needed another layer of clear in the paint booth and took all the other parts out. Then I shot the clear on these parts. At this point I realized that I could go for GML approval on Saturday and I may actually make the 11pm Sunday racing shirt cut off. I would hold off on doing the flex seal on the inside of the parts until after approval. So, while the newly coated parts were curing I started to assemble the other parts and putting Velcro on them. So Saturday I got up and took my dog for a walk and got my Starbucks on. I came home expecting to finish the helmet and when I pulled the cured clear coated parts out I discovered that the clear coat did not like the black airbrush paint I used. Here you can see the side plates are heavily pitted. The brim on the helmet was just as bad. OK, Don’t panic… Just mask off the black areas, sand them with some 600 grit and recoat. Yes this will push your timetable back but you can do it. So I did just that and it did help somewhat but the pitting is still there so I had to run with what I had. Luckly, the clear coat is dry to the touch at 90 minutes and cured after 8 hours of air drying. So when the helmet was dry enough to handle, I put the screens inside and secured them with tape. I cut up a construction helmet and used the harness inside my helmet. I attached the Hovi mics and the lenses. Lastly, I superglued front pipes thing and the helmet was done “for approval”. Next, I emailed my GML and let him know to expect pictures by 9pm “ish”. I put on my kit and tried to take some pics but the damn reverse “selfie” camera kept washing all the detail out. Here is an example. Up close it works fine. So once again the universe was doing everything it could to prevent me from getting that damn racing shirt. I stopped working on this crap and got something to eat. Then I ask my wife to take the pics for me and they came our great. So I sent the pics to the GML and we will see if I get approval and a racing shirt tomorrow. As for the kit. I will re-think the inside of the helmet and start applying flex seal to the inside of everything. If I still have time before DragonCon, I will fix the back plate and possibly redo the black helmet brim and side plates. I wish I had time to build the T-21 and the Jedah pack but I just don’t thing I will have time to complete them. Well that is it for the update. As always, thanks for the interest.2 points
-
Name: Robert Rabey Future Garrison: Canadian Garrison Armor Maker: AP Helmet Maker: AP Cloth Belt Maker: AP Neck Seal Maker: Darmans Props Boot Maker: Imperial Boots Height: 5’ 10” Weight: 175 lbs TK Type: (ANH Stunt) I had no direct help (in person) with this build, but would like to gratefully acknowledge the support, encouragement, and helpful build threads of the following members (to name but a few): Willeywonka, Wook1138, Neb Sgird, gmrhodes13, TheSwede, Lucnak, Hollow-bodies, FencingCorvetteTrooper, CableGuy, Pretzel, CoatHanger, JenEcho, Suspend, ABS80, Ukswrath. Thank you for for your time and consideration! Rob1 point
-
As Ted mentioned, drop box placement. Reference photo
 1 point
 -
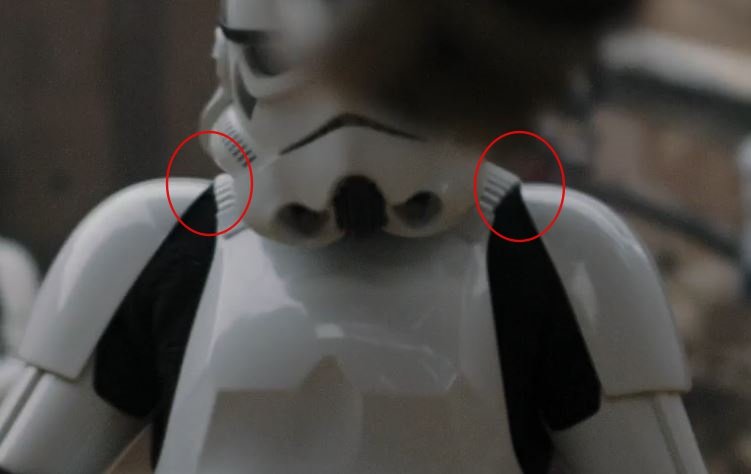
Great job Jeff. An area of concern for me are the shoulder bell gaps. They should be very close if not touching the shoulder covers. Your GML may or may not mention this. Here's a reference photo
 1 point
 -
This is the build guide from BSP:s FB page, a mix of trimmed/untrimmed parts so looked around a bit and found a pic showing most parts trimmed and basicly it looked like all you remove is the lip around each piece. So that`s what I started doing but first here`s the guide. Looks easy enough I will show the parts as untrimmed/trimmed After I had all the parts trimmed I started testing how they should go together and altough the guide says to start with the front pieces I ended ut starting with the back, to me that was the only piece that were set in how it should be so I taped it with the side pieces and one can see how the top part sticks out, looked really odd but after consulting the CRL all was good. Next up was the front parts and after some testing I removed a section from the top part, you can see were I removed in this pic but will show more clear below. They go together like this Taped them up as per CRL, lining those small tabs that goes across the top plate in line with the top part of the back piece. I coulden`t get it to fit properly with just overlapping so it became clear that more cutting is needed, atleast I had to, so I removed a section from the top piece, to the right of the pencil mark, a bit hard to see with all that tape but that did the trick. Bottom piece: this shape made me think it would overlapp the back piece No that didn`t seem right.... Perhaps the back should overlap the bottom, sure looks like it and then you would have a gap at the bottom as well as the top, some sort of filtration system perhaps….checking CRL to confirm. Nope no gap, which means the bottom overlaps the back as originally thought. More cutting was needed so marked the overlap traced the mark to section to get removed, X marks the spot only remove the lower lip. Still didn`t fit well….found the reason, the bottom piece has a lip so neded to remove a section from the back piece as well. Marked were the overlap ends Measured the lip, 6mm, also showing the section removed Drew a line 5mm in from the overlap to ensure I remove enough Then cut Checking I didn`t mess up - nope all good, tape can`t hold it together completely Ready to be glued but that`s for another day. The top cover is going to be functional with some sort of a hinge so that won`t be glued though, have to come up with a way to do that, has some ideas but some more thinking is needed. When compairing to the CRL the cover is closer to the bottom but the CRL cover is bigger overall so not much I can do but possibly lower it to even it out a bit.1 point
-
U could glue the front and Velcro the back Sent from my SAMSUNG-SM-N915A using Tapatalk1 point
-
That’s my plan. To keep improving until I can get Centurion. We will be keeping our “workshop” set up while my husband finishes his R1 DeathTrooper, so I’ll keep making adjustments most nights! Sent from my iPhone using Tapatalk1 point
-
Hi Ron, Exciting to hear that your armour is coming on well. The helmet is really rewarding when it’s done so try to enjoy the journey. Q1. I am doing an ANH TK Stunt. From what I know, all of the markings need to be hand painted, correct? I have a stencil set already, but I thought I saw somewhere that the mouth can be cut every other piece with a black grill put in behind it - to allow for a little ventilation. Is this correct, or does the mouth have to be completely kept on and painted? Hand painted better suits the originals so it is generally the preferred method. The teeth are opened/cut - for ANH Stunt, this is 4 per side to comply with the CRL. (Some screen used helmets had more or less but most had 4 holes per side). I found that Mike from TrooperBay gave a superb set of painting tutorials. 2. I am looking for the best tutorials that even the dumbest, least skilled builder can follow... ok, this isn't a question - it's more of a plea for help! This is the tutorial that I personally followed. This is my armour maker, Ross of RWA), making one of his lids. I found this incredibly clear and helpful. *Be advised that this suits his helmet, so check out other builds of your armour maker if you can. 3. Who can put me on to the best place to buy the liner for fitting on the inside of the helmet? Don’t really have a liner for mine. Went for tactical helmet pads and blacked mine out with self adhesive sheets of EVA (craft foam). Feel free to post any more questions. :-) Dan1 point
-
Yesterday night i was able to work on the End Cap Clip and on the T-Racks of the Barrel. I like the T-Rack details of some Threads here in the forum, so i decided to give it a try to do the details as well. For the T-Racks i used the Dremel Metal Cutting Wheel, to remove the unneeded resin of the Racks. For the little holes of the racks itself i used a very tiny molding cutter. I am very pleased with the result. When i saw the results that can be achieved when working focused on the pieces, i decided to go on with the end clip as well. I used E6000 adhesive to glue the pieces together. After this was done Green Stuff was used to fill in the gaps. Now everything is smooth :-).
.JPG.97ebec192381d98094c1f119c231f818.JPG)
.JPG.cfc3ab0e81c93d1a9cd1c4ff81711f5b.JPG)
.JPG.41555785e20abc272e191dddf596f5ee.JPG) 1 point
1 point -
Simple one for the GML. easy basic. like the others have said, small issues here and there but we will tackle them and get you to Centurion! Cant wait to call you TK. Now get those photos submitted!!!!1 point
-
Hovi Mic with the detail1 point
-
Well...I just have this to say: APPROVED (So I won’t mention that the smaller ab button plate could do with some trimming)1 point
-
Very nice. Lovely, neat job. Can’t see any clearance issues of note. Just watch those pesky drop boxes! Lol (Don’t worry - mine do the same now and again). [emoji1303] All I might add is that you could extend the frown paint a little more, beyond the undrilled 5th hole for that extra bit of Stunt, if you wanted to. :-) Best wishes Dan1 point
-
Just switched them all to Direct Link. For some reason from my Tapatalk the HTML image works better, but from computer its Direct Link. Can't ever seem to get it right the first time.1 point
-
Hey Brendan. Got some solid advice from the troopers above me. I would suggest practice using the Dremel on some spare ABS plastic if you never used one before as it can get a little tricky if you are not careful. An Exacto knife and some Curved lexan scissors can go a long long way for your build but does take a little longer to complete the cutting/trimming. Both methods are great. It will come down to you and your skills with a dremel. Good Luck!1 point
-
Thanks! For the airbrush, yeah - mostly a light dusting and to help blend in the hard edges of the base layer (acrylic rubs). The first layer of airbrush is put on a bit thicker and is used to build up the darker areas and it gets partly wiped away with mineral spirits. The last layer is the sand coloured layer - this is strictly for the purpose of light dusting.1 point
-
Yes Tino - key part of the phrase is 'one day' [emoji16] I'm pretty elated to abort my initial conviction about the speaker in the scope - In retrospect, it was kind of a hokey idea. It will be sweet to get going on prop master add-ons like the scope and counter. For now, it is SMG parts and getting the electronics good. Will follow through with painting, hopefully before summers end, especially as I plan to use wrinkle paint which require higher ambient temperature to wrinkle well. I am having a ton of fun even as the blaster is now...using the 100 yard rear sight against the pin on the front sight and getting major sound with the speaker even just temporarily installed in the back of the tube. Chasing my toddlers around during the summer nights with a lit-up barrel is so much fun too!! [emoji4] Maybe after its all said and done, my thread will be known for what's possible, certainly not for what's recommended [emoji6] Cheers friend! Sent from my SM-G390W using Tapatalk1 point
-
Hi Brendan, Personally, my armour was 1.5mm ABS so I used curved Lexan scissors for the whole build, with the exception of cutting the eyes. I did a small amount of sanding with the dremel, once the parts were glued, but even most sanding was done by hand for more control. I found the dremel essential for my blaster build but not really required for my armour. Best wishes Dan1 point
-
Hi ukswrath, not sure I understand the question: you mean why is the ab section split in two? That is how Denis made it. I figure as long as it doesn't have a visible seam per the CRL, it will be okay. It's a 3D printed suit, so the armor is very thick compared to a lot of armor I've seen on this site, so that might be why it's created differently. The armor itself is very difficult to alter and bend by hand. However, it can bend with very careful, even application of a hair dryer's heat.1 point
-
I use a dremel for the larger pieces and then clean up the cuts with a pair of lexan scissors. It doesn't seem to matter what I do, I seem to at least partly melt the plastic as I cut - I have no patience I guess. I only use the utility knife on straight cuts and always away from inside corners (use a drill to drill a small hole in the corner and cut away from the corner). I use lexan scissors a lot. Here is the dremel wheel I use. I recently trimmed my kit and documented most of the process. you can find it here if you are interested: https://www.whitearmor.net/forum/topic/44468-wooks-totally-dirty-td-build-ap/?do=findComment&comment=6108601 point
-
I was gonna try it for my scout but the pleats scared me. Spent over $100 and ordered one and it’s awful. Too long top to bottom and it’s too small to even fit around me. Debating on trying to make one or order from a better maker. Sent from my iPhone using Tapatalk1 point
-
Have made a few for TB's lots of info and pattern can be found on the Pathfinders forum1 point
-
Assembled some more limbs! I am starting to see a hint of a stormtrooper.. Also made the elastic shin-closure hook thingymajigs: Hit the hooks with some white spraypaint Also went out and got the last part that I need, gloves! Would the knurling on the topside (on fingers) of the gloves be a problem?1 point
-
Oh, and on the topic of belt...I just use a black leather dress belt. It's strong, it stays in place, and once I got the thighs straps in place the best I could, I was still able to micro adjust the position according to how tight or loose I made the belt--what notch I chose.1 point
-
Wetsanding is the best1 point
-
LTM, great meeting you last night at the Armor Party and I love that E-11. Brian, thanks buddy. I think I will end up fixing the back plate after approval if it doesn’t become an issue for approval. Other than that, the rest of the armor will stay as is since I will be weathering all of it at some point to make the TD for Rogue One Jedah Patrol. Besides, coming from the Mando side of things, I prefer weathered and used look anyway. Devolver, thanks and I agree, unless you really got up close, you would not notice it. One thing I learned a few years ago is that a costume really only needs to be accurate at 3 feet distance. Anything more is just for your own interests. Regardless, I do know the issues are there and that bugs my OCD. Ok just a quick update. Yesterday, before the Armor Party I knocked out the Thermal Detonator and tube front face thing. I also took a pic of the sides of the back plate. I have started to mask the helmet and should get it painted tonight then clear coat all these parts once more and get to work on the Velcro and straps. Hopefully, I can submit for approval by Sunday. Thanks for the interest.1 point
-
Big Deal, thank you for the compliment on the paint guide. I will have more to say about it below. As for the airbrushed sections you bring up a good point that I must have forgot to mention in my previous update. Once all the airbrush is done I will apply two more layers of clear coat to the parts that were airbrushed. This will make everything glossy and uniform. I am not sure if these areas were glossy on the actual props but since I have no other reference that can closely detail if they were in fact gloss or flat, I will go with glossy and can always buff them with some sandpaper later to dull them if needed. Update….a big one Ok so I love it when a plan goes well and hate it when it does not. The painting is the latter but not a total disaster. I have already stated that I only have one previous experience with automotive paint so that factored into this issue. As I write this, it is Thursday and a lot of stuff happened on Sunday and Monday so I will try to keep this coherent. So some of the issues I ran into may have been caused by using the non-automotive primer on the armor during my sanding phase but I do not think this is the case. Another option is that the automotive primer may have had a reaction with the flexible fiberglass and I think this is more likely. I will detail what problem I ran into further along. Sunday 08:00 my buddy arrived and everything was ready to go. We mixed the primer and tested it in the smaller spray gun but it was too thick to flow in that gun so we went with the larger gun and it flowed well. We test sprayed some paper and got good color and flow and assumed all was well, it was not. After my buddy had sprayed several parts he notified me we had a problem. Apparently we had the air mixture on the gun too high or the paint flow too low. The air pressure from the compressor was good at 39 PSI. The primer went on these parts like it was powder coat. Here you can see the back plate and how rough the primer was. So me being more familiar with my spray guns, I went into the booth and got the mixture rate correct but the damage was already done. These parts would need to be sanded and this pushed everything back. We pulled these parts and I started sanding them while my buddy sprayed all the other parts. Sometime later all the parts had been primed. After the messed up parts were sanded, washed and dried, they were re-sprayed. We used all the primer so, a note to anyone else doing this, get more than 1 qt of primer. I will include this in my list of lessons learned at the end of this post. Next we inspected all the parts and I must admit that I did a piss poor job of this, there are a lot of things I should have observed and corrected but I didn’t and these became issues later. SOOOO if you are doing this, make sure you inspect everything after primer and correct all the mistakes before you move to apply the paint. One thing for sure that I should have done but did not was to sand everything with 800 or 1000 grit sandpaper. Why didn’t I do this? Well first, I was concerned with all the instructions for the paint and primer and the specified times between primer and paint to ensure adhesion. That time window was closing quickly. Also, that is a lot of armor and most likely two days of sanding, two days that I didn’t have. However, if I had sanded I would noticed a lot of issue and could have saved myself some time and trouble in the end. My other concern is if I sanded the primer to 800 or 1000, I was concerned that the paint would not stick to the primer. I should have considered using 400 or 600 grit and I would have been ok I think. Regardless, I didn’t do any of this and went straight to painting. The paint and also the clear coat are much thinner than the primer so the flowed out of the smaller and more controllable gun just fin but this also meant that we mixed smaller batches of the product and we had to do this more often. I do not know if the larger gun would apply the paint and clear as well, I suspect we it would have come out heavier and would have been more likely to run. Anyway, we sprayed at least one layer of paint on most of the parts before we ran out of paint. I only had a pint of the paint and that went fast. Again buy more than you think you will need. So we ran out of paint and these parts did not get any paint. Sooo Monday I hit the automotive paint supply store again and dropped another $150 on more paint, and I decided to double down on the clear coat just to be sure I had enough. This time I got a whole quart of paint instead of another pint. I wanted to apply another layer to all the parts and that was a good idea. The instructions for the paint stated that the clear coat must be applied between 45 minutes and up to 24 hours after the paint. Any longer I would be required to sand everything. However, I figured out a way to extend this. I would just apply the second coat of paint just before the 24 hours and that would give me another 24 hours. This was good because I found all the issues I had eluded to previously. So let’s talk about the helmet. Painted with compressed air is a tricky thing. You must maintain the proper distance from the item being painted or you will get too thick and end up with runs. But if you get too far from the part you will end up with a powder effect similar to what we experienced with the primer. On the helmet we had these issues with the primer and the paint did not cover them up. First, in these pictures you can see all the yellow circles identify what I found. The area around the teeth was very rough and would need to be sanded. The seam between the front of the face and the mouth was very powdery and would need to be sanded. There were rough areas inside the openings where Hovi mics go and the inside edges of the tears were rough. We had a run under the left eye. I also noticed wherever I had masked an opening such as the eyes, the primer and/or the paint got very rough. I assume from blowback of the product hitting the masking. So all of this (other than the run) would have been apparat if I had inspected better after the primer. Anyway, I had more paint so I could fix all of this with sanding and removing the masking, then repaint everything. The only thing I would not be able to do is re-prime but as long as my sanding was not too rough, I could take the roughness down with some 600 and 800 grit and not remove the primer. I ended up sanding the whole helmet with 800 grit and got everything nice and smooth then re-painted it. The other two issues I found after painting was an insane number of pin holes on a lot of the parts and some of the detail lines along the cover strips were filled in or not deep enough. In this picture you can see what I am talking about. Notice the detail lines along the cover strip and also all the small pin holes. The weird thing is that none of these pin holes were evident when I had primed with spray paint primer and sanded everything two week ago. I can only assume that this is the reaction with the fiberglass that I mentioned previously. As you can see from earlier pictures, most of the spray paint primer was sanded away so I do not think it is a reaction between the two primers. This leads me to believe that the automotive primer reacted with the fiberglass. Again, if I had done a better inspection after the primer, I would have seen these issues and corrected them. Instead I raced to paint and now I was stuck with them. So how to address at least some of these issues. First I applied very small amounts of glazing putty in the largest of the pin holes. I would not be able to prime over the putty so I hoped that the paint would stick to it and it did. I also took a razor blade and rescored some of the detail lines on some of the parts and re-painted them as well. After everything was repainted and I waited the obligatory 45 minutes, it was time to clear coat. The clear went on thin just like the paint. Everything got to layers of clear and that was 1 whole quart of clear. Luckily I have another quart so applying more clear after the airbrush won’t be an issue. It was at this paint that I found a few areas where the paint had separated from the primer or cracked. Most of these areas are very small and not noticeable unless you really looked for them but one area that was noticeable was the back plate. In this picture you can see the paint had cracked on the sides of the cog wheel. I think this occurred because the paint was so thick here as I tried to get the sides of the cog wheel. Again this is an issue with me not properly inspecting after the primer and noticing how rough the primer was on the sides of the cog wheel in all those recesses. I have decided to let this stay for now and I can come back later and mask this whole area off and sand and redo everything inside the square. So Wednesday, after 24 hours of letting the clear coat cure, it was time to mask and airbrush. I started with the back plate by masking most of it and lightly dry sanding the side plates with 220 grit to ensure the airbrush paint would stick. I removed the sanding dust with a damp tac cloth. Sorry, I forgot to get a pic after the black was applied. Next, I masked off the abdominal armor on the sides and sanded them with 220 grit. I measured the circle on the front of the abdominal armor and came up with a diameter of 9/16” so I made some vinyl masks on my vinyl cutter and applied them. I lined them up as best as I could. I also masked the small square area as well. Then I masked the rest of the part off but its not in the picture below. Lastly, I sanded the areas to be painted and hit them with the tac cloth. I also masked off the thermal detonator and sanded it then set aside. Here is the painted abdominal armor. It still needs another layer or two of clear but otherwise it’s good to go. Lastly I started sanding the helmet in the areas that need to be masked and painted. There are a lot of them since the brown trim and neck trim are molded into the helmet. The teeth, tears side ears, back square things, and the separate tube things. I will mask it off tonight but I do not think I will get to paint it until Friday. So you may be wondering just what were the ramifications of the pin holes that I did not fill in? Here is a thigh plate and in the reflection you can see the unevenness of the clear coat. Here is a closer picture. As you can see, it is noticeable but not the end of the world. If I really want to fix it, I can sand the clear coat smooth with some 800 or 1000 grit then apply another layer of clear but I am going to let this go since my end goal will be TD and there will be considerable weathering later on. Ok so for everyone who decides to go with the automotive paint process, I will share my lessons learned. I do not know if you could avoid a lot of this stuff but just using rattle can spray paint but I have had mixed results with spray paint and seen a ton of issue with spray paint clear coats cracking and orange peel. My other concern was the flexibility of spray paint and spray paint clear coat on the parts that need to flex just to be put on such as the lower leg armor. At a minimum you will need to following amounts of primer, paint, and clear. Keep in mind the listed mixture rations for the products I used. You may need more or less of a product if the mixture if different. Primer 4:1 mixture- you will need at least 1qt, I recommend 1.5 quarts. Paint 1:1 mixture- you will need at least 1qt, I recommend 1.5 quarts. Clear 4:1 mixture- you will need at least 1qt, I recommend 1.5 quarts. You will also need a ton of mixing cups, like 20-30 depending on the size of your spray guns, otherwise you will be cleaning mixing cups to re-use. You will need a ton of screen, like 30+. You will need a ton of mixing sticks, like 50+. The color I used was the Ford Frozen White and I thinks a great choice. Lessons learned: Prep is the second most important part of painting. Inspections and correction after primer is the most important part of painting. Test your spay materials every time you refill the gun on plastic not paper to make sure you have a clean and good flow. Unfortunately, the pot life of most of these products is fairly short (30 min – 1 hr) so only mix what you use each time. If you are spraying primer for more than a few hours, you need to stop and clean the gun or it will clog. DO NOT LET PRIMER SIT IN THE GUN, it will become a solid mess and you will need to toss the gun in the trash. Watch lots of videos on YouTube on how to paint cars to understand the process and how the layers would be sprayed and what the “wet look” should look like. When things go wrong, and they will, don’t get pissed, fix them then if you can but also understand that you need to keep your momentum going or you will get more frustrated. This is the main reason I did not fix the back plate cracking when I noticed it. I can fix it later and I kept my momentum up to get to the end of the tunnel. Ok so that is the update, more to come soon. Thanks for the interest.1 point
-
With KB's thighs I had to sculpt the top to look more correct as well since the CRL photos and the Anovos thighs aren't exactly flat across the top.1 point