Leaderboard


Popular Content
Showing content with the highest reputation on 01/29/2018 in all areas
-
These parts are put to one side for now, I may fit the scope with an internal LED. Working my way through this in sub assemblies for now. Next was the front sight, I never liked the front sight on the doopydoos, just looks like its waiting to get a slight bang and get broken, also trying to make them more accurate by carving them out is tricky so I decided to fabricate new ones from aluminium as I have done with the blasters I have made previously. Sights are made by drilling and filing mostly, then the knurled pattern is made but hammering the handle of my centre punch over the aluminium so the patten is embossed into the metal, same as a sterling!. The piece is the bent into shape, I use the soft jaws of the vice, a round bar and a pair of pliers that have been ground smooth for this. Sent from my SM-A310F using Tapatalk3 points
-
My repairs are complete and I’m pretty pleased with the results. One thing for sure, my bracket system is way stronger now. Here are a few overview photos of the major repair areas. At this point all I lack is abdominal button paint, and my replacement knee ammo pouch from rocky. As soon at that arrives, I’ll submit for pre approval. Cheers! Sent from my iPhone using Tapatalk3 points
-
Hello guys, just a quick message from me to state that I'm still alive. Just really busy with uni at the moment, exam phase coming up However in the couple of days that I'm not gonna spend with revision I am planning to carry on the work on the scope; I found somebody who has a drilling press at home (one of those things that do the drilling for you in a really precise way, all you need is a precise starting hole and some patience). However, as I have already hollowed out some bits (in a really, really crappy way) Im gonna have to fill it up with some car surfacer - it's gonna be a pain but the experience I'll gain from it will probably be worth it, especially when it comes to building the armour.. That's me for today, mainly wanted to check in again, and it's actually not just a faulty mic2 points
-
Hi Joe thanks for your patience thank you for your EIB application. Let's do this shall we. CRL and EIB Application Requirements: All the required submission photos have been posted. Beautiful job on your ROTJ build. We don't see too many of these applying for the higher levels, nice work . With that Andrew and I have confirmedyour armor displays all necessary elements as set out in the level 2 CRL. Welcome to EI trooper, congratulations. Other-Armor Fit/Assembly: In this section we review observations made by your fellow troopers and ourselves. Some observations may lead to suggestions to improve the overall look of your armor. If any suggestion affects any application, it will be listed separately in the above or below sections. We have nothing to add here. Centurion Suggestions: In this section we prepare you the best we can for Centurion. If there are any areas of concern they will be discussed here. At this time we see nothing from holding you back for a clean Centurion application if you so choose to apply. Excellent job Joe, time to get out make the Empire proud2 points
-
Took a few pictures earlier of the weathering, used the deac sterling for reference but slightly toned down. The paint shows up more on camera, it's actually more subtle than shown. Sent from my SM-A310F using Tapatalk2 points
-
Integrated a power switch into the magazine release button, rounded the mag well edges and added greeblies Sent from my SM-A310F using Tapatalk2 points
-
There are many steps necessary to build magnetic shins, so today I begin with making a critical component for them: ABS buttons. The buttons are necessary to hold one half of the magnet assembly in place on the inside of the shin. I'm using 12mm x 3mm n50 magnets. You'll need a total of 20 magnets for the shins (10 on each shin). I strongly suggest buying more than 20, though. I've found that they can easily break, and you'll want backups on hand! You can find them in bulk- and cheap!- on eBay. First, I begin by making a template with a hole in it that is slightly larger than the magnets I will be using. I trace the magnet on a sheet of ABS. Here's what it looks like when done. Yeah, I know my hole isn't perfectly round. It's not terribly important for it to be perfect. I used two magnets to make each button. One on top to help me see where my hole template needed to go, and one underneath to form the button shape. Heat up one section of the ABS sheet using a heat gun on LOW until it gets slightly warpy. You can even leave the magnets attached to the ABS while you heat it up. Once the plastic is soft, quickly press it onto a flat surface, pressing the hole template around the exposed magnet. This is what it looks like on the top and underneath when you're done. And here's how it looks from the side so you can see how the magnets attach to the plastic. See how the bottom magnet sits flush in the new ABS button? I spent about forty minutes repeating the process until I ended up with 10 buttons. I will cut down and shape the buttons to fit each shin later. There will be five buttons installed on each shin. Still lots of work to do, but it's a pretty good start!2 points
-
More carving out for the trigger, fabricated a trigger from 6mm acrylic, pivots on a steel pin and tension created using a spring from a pen, engages with a micro switch (used on microwave doors), very happy with the result, the trigger makes a satisfying 'click' when it engages with the switch[emoji4][emoji16] Sent from my SM-A310F using Tapatalk2 points
-
Ammo counter tested and test fitted to barrel, had to drill a slot for the wires to pass through Sent from my SM-A310F using Tapatalk2 points
-
This is probably going to come out of nowhere, as I haven't mentioned it until now, but over the last few weeks I've been quietly working on some new hand guard patterns in the background while I build the rest of my armor. These patterns are hard copies to make molds from and cast some white silicone copies. I've been working on the right hand just to figure everything out. The left hand is in the sanding phase. After a lot of work, I'm happy with how it came out. Here's some different angles of the right hand guard: This is my own interpretation of the hand guards seen in the film. I was using this particular stormtrooper as my target: Some notes on what I was going for: I took a screen shot from the film and traced it to get the proportions of the shapes/features as spot on as possible. The whole hand plate has a very subtle curve to it. It's still pretty flat feeling, but just not as much as if it had been created out of flat layers stacked on top of each other. I tried something a bit different to achieve the look of that pesky crease that transitions from the back of the hand toward the thumb taper. So, I gave mine a slight offset/step down at the crease that smoothly transitions into a slope that thins at the thumb edge. The thumb taper is a true slope/angle change. I know that the angle change becomes more pronounced once the guard is glued to the glove and curves with the hand so I tried to keep this pretty shallow but noticeable. I tried to achieve a surface finish that looked similar to the ABS armor. Anyway, I'll keep plugging away at the left hand guard while I wait E6000 to dry. -Dana2 points
-
No problem, it's very easy to cut, grind fill etc and has a small amount of flex, just take your time and make sure you have a good respirator/dust mask, the dust is epic! [emoji849] Sent from my SM-A310F using Tapatalk2 points
-
Not all the holes need to be drilled on the receiver tube as they will be covered by the T-track The three tubes are all cut drilled and debured End cap retaining collars made from 42mm waste pipe sections. Sent from my SM-A310F using Tapatalk2 points
-
Next is making the lenses, I use CD covers and a former, in this case a brass door handle for the large lense that has the perfect shape. Clamp handle in the vice, heat up the plastic with a heat gun and (using gloves) pull the plastic over the former. When cool can mark out a circle and cut out with a cutting disc using the dremel. At this point I prime the parts and paint them black before sticking the lenses in with two part 5min epoxy (very carefully) using a cocktail stick Sent from my SM-A310F using Tapatalk2 points
-
Same issues. Can only post through Tapatalk. On website when I click submit a reply, nothing happens. Sent from my iPhone using Tapatalk2 points
-
Hey guys, until I`m waiting for BBB day I`m starting with building the rest of the accessories and want to share some pictures with you. If you have any ideas to improve something, please let me know, because this is my first Trooper and I never did anything similar before Today I painted my shoes: I was not so happy with the surface after painting it but with the help of nail polish remover I could get a really nice finish with no damages! Now I just need to clean them a little bit and paint the rubber parts1 point
-
I have just finished this project and have a build thread on the Ireland Garrison but thought I would post it here also to help other who may be doing something similar. First off I need to thank and give credit to TK8177 for his amazing circuit and code he created for his own project on which this is partially based. My main reason for building this blaster was to enhance my trooping to another level by having light and sound in my blaster. I wanted to retain the look of a screen used deac sterling so have kept the spring and managed to squeeze all the electronics into the counter and barrel. Here is a transcript of my build thread!:- Earlier in the year I decided to build a new E11 blaster, my old one looked fine but would love one with lights and sound. Did alot of research on the electronics elements which I will get back to but the whole project got put on hold while working on other things. Anyway recently I have picked up again on this. doopydoos is a great kit but they can be quite heavy and due to the inside diameter of the receiver there is not enough room for all the electronics, the other option is to do it as a pipe build, this has its own set of problems, pvc pipe would be great but for the life of me I couldn't find anything locally or online that was 38mm outside diameter[emoji21] , what I did find in the correct diameter is Aluminium Tube, its nice and light but obviously harder to work with than plastic. So my plan is to use an aluminium tube for the receiver and butcher a doopydoos for some of the parts. I have also ordered T-track from John 'Marv the Martian', same accurate track I used for the sterling conversion. I will try to document as much of the build as I can if other wish to follow it. I also plan on building three of these blasters, one for myself and the other two to possibly sell to offset some of the cost. So on with the show! Sent from my SM-A310F using Tapatalk1 point
-
Thanks bro!1 point
-
Thanks for sharing a video Chris, nicely done by the way You have an impressive collection of E-11s and very happy for you. Have a terrific day!1 point
-
Thanks for the heads up, Sir! Good of you! :-) Sent from my iPhone using Tapatalk1 point
-
Made a YouTube video https://www.youtube.com/watch?v=mNtlV2cNaLA1 point
-
Hang tight as there is a backlog since the festive season break and our DO's are trying to get through as fast as they can1 point
-
Congratulations trooper1 point
-
Congrats trooper and welcome to the EI ranks1 point
-
Looks great good luck. Just be aware there is a bit of a backlog from the festive season, the DO's are getting through them and should be with you soon1 point
-
Yeah the three LED regulators and Arduino nano run directly off the battery, everything else is run from the Arduino's 5v output, looks fairly simple in a diagram but can get logistically tricky trying to fit everything in, 15 wires needed to be joined at the ejection port, that doesn't include all the ground and power cables that were spliced together at various points before the port1 point
-
Exactly my feeling. I'm pretty much a forum stalker and didn't realise how much so until not being able to post since Friday, I got to get a life, oh wait no I don't, I love what I do, Troopers Helping Troopers1 point
-
Superb work Chris! - I can imagine the feel of cold steel and smelly rust from your completed Blasters - bravo!1 point
-
didn't need too Jesse, its super bright and can be seen from a very wide angle and in daylight, looks great in the dark too!, these leds are so bright!1 point
-
Was my first time working with plasticard, its a pleasure to work with, easy to cut, sand, glue etc, worked out way better than using the original piece as was much easier to fit around the battery holder and installing the on/off button in the mag release1 point
-
Congrats Glen! You're well on your way to six-time Centurion, thanks for making all of us look bad.1 point
-
Thanks Jesse, the trigger would work without the spring as the micro switch itself is slightly sprung but the spring helps to relieve tension on the switch and pull the trigger back to the open position, that's the idea anyway!1 point
-
Welcome Glen, and thank you for another application Let's do this again! CRL and EIB Application Requirements: All required submission photos are present, your armor displays all the necessary elements to qualify for Expert Infantry, Congratulations! and work as always mate Other-Armor Fit/Assembly: In this section we review observations made by your fellow troopers and ourselves. Some observations may lead to suggestions to improve the overall look of your armor. Unsurprisingly, we have nothing to add here Centurion Suggestions: Because Centurion photos show much more detail than EIB, items pertaining to Centurion might be seen there and not here. We try to point out all we can from what is seen but the final accuracy is the responsibility of the trooper. Great work, we hope to see you in Centurion review shortly.1 point
-
Well this experience has made me realize what Hell is going to be like for me. It will be a nice beautiful home office with a massively powerful computer sitting in front of me. The computer won't freakin work on the internet and instead I'll have to spend eternity typing on a tiny smartphone screen to people.1 point
-
You'll do fine trooper! Good luck.1 point
-
This is outstanding, Jesse. Not sure if anybody will ever attempt to recreate this, but I have never before seen a builder putting so many love and detail to a section, that later can not be seen in the finished blaster. Hats off. To install the rotary switch into the resin grip, it makes sense to reduce its thickness so you have less to hollow. I bent the four connector pins (1, 2, 3 & 10) by 90 degrees and removed that ring, which is actually a part of the housing but it does not affect the operation of the switch.1 point
-
Good luck buddy. Not that you’ll need it.1 point
-
Congrats Tony!1 point
-
Wired the RGB Led then arranged the three led regulators into a pyramid shape, superglue them together using the capacitors as anchor points and soldered all the connecting led and control cables, also arranged the speaker into this assembly using a strip of plasticard for the wires to pass through. Immediately after the speaker I wired the micro controller (can't find pics) Sent from my SM-A310F using Tapatalk1 point
-
Allen key head screws fitted to the muzzle, made a carrier plate for the LED from abs using a 28mm hole cutter laster lightly sanded and prepped for primer Sent from my SM-A310F using Tapatalk1 point
-
FWIW, the paldron thing is really up to you. Sometimes we all wore orange, sometimes not. Look at ANH and Lucas just put in whatever made a neat shot, which is why you see more orange that there in theory would be.1 point
-
Made a functioning bolt from pvc pipe, used a small strip of 0.29mm plasticard for the detail. Sent from my SM-A310F using Tapatalk1 point
-
Hollowing out the magazine well for a battery compartment but disaster struck and it broke up[emoji21][emoji21][emoji21] Thought to myself that the mag well is not that complicated a shape so went to work on fabricating one out of plasticard, also means I don't have to do more resin carving, whatever resin doopydoos use creates an ungodly amount of dust! Sent from my SM-A310F using Tapatalk1 point
-
You're so Humble! [emoji12] Sent from my LGMS631 using Tapatalk1 point
-
Working on the grip and trigger assembly. Drilled and carved out the retraining pins from both sides for a micro switch. Sent from my SM-A310F using Tapatalk1 point
-
Glued the front sights on but something looked off with them, measured an original on the sterling and realised the ones I had made were 5mm too high[emoji21][emoji21][emoji21] Ripped them off and went back to the drawing board redesigning them to scale, made the new sights and fitted them, this time used epoxy as superglue doesn't work great with aluminium Sent from my SM-A310F using Tapatalk1 point
-
Chopped up the resin counter and hollowed out the front section with a 16mm spade bit. The front section will house the mp3 player and amplifier. Sent from my SM-A310F using Tapatalk1 point
-
Got some work done on the hengstler counter, very time consuming and intricate to work on as it has to fit a lot of electronics inside. Started by rebuilding the rear section from 2mm plasticard. Sent from my SM-A310F using Tapatalk1 point
-
To make the muzzle I modified the doopydoos, a lot of drilling and sanding involved! Sent from my SM-A310F using Tapatalk1 point
-
Sent from my iPhone using Tapatalk1 point
-
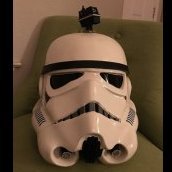
Hi Everyone! I am finally getting back to work on my TK! This week I was able to finish up the biceps and shoulder bells. The helmet was next on my list, with the help of Walt's helmet build video. I have to admit, the initial construction was much easier that I anticipated. I'll start trimming ears tonight.
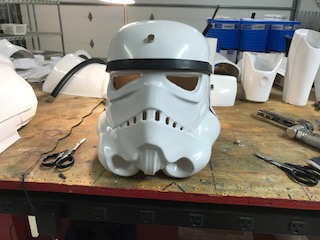
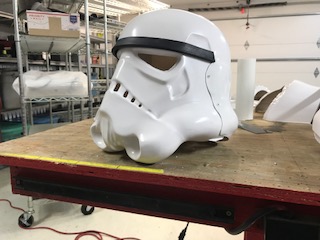 1 point