Leaderboard


Popular Content
Showing content with the highest reputation on 12/07/2017 in Posts
-
That’s the final resoult of my TM, with the longer shins, and the thigs at the maximun on top, no black on front, and a new happy trooper[emoji51][emoji51][emoji51] Inviato dal mio iPhone utilizzando Tapatalk4 points
-
Cheers Shane. :-) Thanks Q Cheers Jesse. If your blaster skills are anything to go by, you’ll sail through EIB and Centurion. :-) Cheers Brien. Looks like we’re both well on the way. :-) Cheers Stephen. Very kind of you. It’s been a good couple of weeks for us new recruits. :-)2 points
-
Woo hoo! EIB awarded today. I’m a very happy Trooper. :-) Sent from my iPhone using Tapatalk2 points
-
Whoop!! Thank you, Andrew. I am a one happy trooper!! Many thanks for your compliments and suggested improvements. I'll get those done and be back for Centurion before you know it. :-) Hats off to you and Tony for the effort that you put in to reviewing these, btw. The quality and consistency of cleared troopers is clear proof that EIB and Centurion status is working a treat. :-) Best wishes, Dan2 points
-
Welcome to FISD. You're flying along. Any spouse who'll put on a bucket is a keeper.2 points
-
In this tutorial I'll be building the ANOVOS TK armor as ANH Stunt. Though the kit appears to have all the necessary components for 501st basic approval I'll be changing a few things in hopes of making it Centurion (L3) level acceptable. Materials, Strapping & Other used in this build will be highlighted in BLUE Areas that will be changed: NOTE: These changes are NOT required for 501st basic approval A. The kit includes velcro and snaps for the internal strapping which I'll be switching out for brackets and straps provided by Mr. No Stripes. My choice to use brackets is just a matter of preference. Note: The included velcro and snaps appear to be Centurion acceptable except for the chest to back connections which are required to be white. B. The kit includes black elastic for the chest to back connection which I'll be switching out for white, a Centurion requirement. C. The kit includes velcro to connect the shoulder bell strap to the chest to back strap. I'll be using a Dritz #10 sew in snap. Accuracy update but NOT a Centurion requirement D. The kit includes philips head screws for the TD brackets which I'll be replacing with slotted pan head screws, Accuracy update but NOT a Centurion requirement but recommended E. The kit includes velcro for the rear calf connection which I'll be replacing with the elastic and bra hooks set up, Accuracy update but NOT a Centurion requirement F. The kit includes ABS hand guards which will be switched out for Latex style, a Centurion requirement G. Waist belt accuracy modifications - Remove upper holster mounting screws, Repair holes to fabric, Replace line 24 snaps with "Popper" snaps, Correct elastic to drop box connection, Glue drop box elastic to belt. I'm sure this list will build, stay tuned Tools: Pencil Exacto knives, large & small Scissors Steel straight ruler (metric) Dremel with sanding wheel or sand paper. Small carbide bit for helmet teeth or small file. 3M scotch brite pad (any color, gradient) Drill 5/32" & 1/8" drill bits Hammer Screwdriver (blade) Spring clamps (set or 12 or more in various sizes) Earth magnets 1/2" x 1/8" (12.7mm x 3.1mm), 20 to 40 magnets Painters tape PPE (Personal Protective Equipment): I can't stress enough how important it is to wear PPE, especially when working with some of the tools listed above. Wear it! Safety glasses - Hardware store Cut resistant gloves - Hardware store 1/2 Respirator. Sanding releases small carcinogens into the air. Protect your lungs. - Hardware store or http://www.amazon.co...ailpage_o05_s00 Materials: E6000 - two to three+ 2oz tubes, or two+ 3oz tubes Zap-A-Gap & Zip Kicker Elastic (Chest to Back plate) - White 2" x 2' in length recommended) Elastic (Drop Boxes) - White 3/4" x 20" Elastic (Bells to Shoulder Strapping) - Black 1" x 12", ANOVOS supplied Elastic (Bicep to Bicep around arm) - Black 1" x 20" Elastic (Bicep to Forearm) - Black, 2" x 6", ANOVOS supplied Elastic (Thigh to waist belt) - Black, 3" x 24" Elastic (Kidney to Ab right side) - Black, 1" x 8" Elastic (Posterior to Cod) - Black, 1" x 12" Nylon Webbing (Kidney to Ab, left side 6 rivets) - 1" x 6", ANOVOS supplied Single cap rivets (Waist belt drop boxes and thigh ammo belt) 7.4mm or 5/16" Paint: Gloss White: Testers Gloss black: Humbrol #21 Testors # 1747 Gray (Ab plate), Humbrol #5 Testors # 1138 -http://www.humbrol.com/us-en/shop/paints/enamel-paints/5-dark-admiralty-grey-gloss-14ml-enamel-paint.html French Blue (Ab plate & Tube stripes), Humbrol #14 Testors # 2715 - http://www.humbrol.com/us-en/shop/paints/enamel-paints/14-french-blue-gloss-14ml-enamel-paint.html Gunship Grey (TD tube), Testor #1923 (spray paint) NOTE: Painting the TD tube is NOT required for any level of approval Internal Strapping: A. ANOVOS supplied B. Internal Strapping Brackets - http://www.whitearmor.net/forum/topic/20859-accurate-anh-stormtrooper-strapping-brackets-v-20-now-available/. Alternative lock nuts to replace the nuts that come with the bracket kit - http://www.amazon.com/gp/product/B000NBKLOQ C. Snaps: 1) Ab - "S" snaps "poppers" (Used on the following locations: Ab to belt, Ab to Kidney right side, Cod to Posterior, Shoulder to Back plate strapping right/front) 15mm, (bag of 15 is the smallest)- http://www.ebay.com/...=STRK:MEBIDX:IT 2) Ab - "S" Snap die punch and set tool 15-17mm, (1x) - http://www.ebay.com/...=item5413a405e2 NOTE: For the "S" snaps and set tool kit you may need to contact the seller who is in the UK and have him set up a auction with US shipping. The original sales did not have a ship to US option at the time I purchased the items. 3) Thigh Ammo Belt - Single Cap Rivets - 7.4mm or 5/16", Ebay - https://www.ebay.com/itm/Solid-brass-nickel-plated-single-cap-rapid-rivets-7-mm-cap-100-pair/222251554883?hash=item33bf399843:g:zTsAAOSwLnBX2zzO:sc:USPSPriorityFlatRateEnvelope!94513!US!-1 4) Thigh Ammo Belt - Double Cap rivet tool (1x) - http://www.ebay.com/...=item463922315d, or Hobby/Craft store 5) Ab/Kidney - Split rivets (bag) - ANOVOS supplied 7) Inner strapping - Line 24 snaps, nickle, 100ct (recommended), Tandy - https://www.tandylea...ts/1263-12.aspx. Fasnap - http://fasteners.fas...nap-fasteners? 7a) Inner strapping (canon brackets) Not illustrated in this build. For informational purposes only - http://www.whitearmo...-now-available/ 8) Shoulder to Bicep - Dritz Sew in Snaps, Nickle, Size #10 -http://www.amazon.co...YH1DNAAPPP1R3H1 9) COD split rivet - ANOVOS supplied D. Calf closure 1) Elastic - http://www.amazon.com/Dritz-9506W-Non-Roll-Elastic-4-Inch/dp/B004ALO9CK/ref=sr_1_2?ie=UTF8&qid=1454439839&sr=8-2&keywords=3%2F4%22+white+elastic 2) Bra hooks - http://www.amazon.com/Dritz-Hooks-Eyes-Nickel-Size/dp/B005S7FA28/ref=sr_1_10?ie=UTF8&qid=1454440102&sr=8-10&keywords=dritz+bra+hooks 3) Velcro - ANOVOS supplied Other: Thigh Garter belt - http://www.whitearmor.net/forum/topic/29991-thigh-garter-system/ Gloves (ANOVOS supplied) or - https://trooperbay.com/flexible-hand-guards-in-white-black-or-plain.html Rubber hand guards (Joseph) - http://www.whitearmor.net/forum/topic/35702-latex-hand-guards-for-centurion-level-anh/ Boots - Totally killer Boots - http://www.tkboots.com/, Imperial Boots - http://www.imperialboots.com/ Undersuit (ANOVOS supplied) or - Shirt, Pant Waist Belt - ANOVOS modified Waist Belt other - Kittle's belts) - http://www.whitearmor.net/forum/topic/19803-fs-white-canvas-belts/ ANOVOS assembly instructions (if anyone wants them) - https://cdn.shopify.com/s/files/1/0346/5761/files/SWTROOPER001-KIT_V1.pdf?18334450603693831912 UKS Assembly instructions - PDF - https://drive.google.com/file/d/0B-d8yBFyd0CgWGtmSWx6ZHRjbFE/view Sections, Navigation & Check List: 1. Forearms: 1a. Forearm trimming 1b. Forearms Pre- assembly 1c. Assembly (front) 1d. Assembly cont (rear) 2. Biceps: 2a. Bicep trimming right 2b. Bicep trimming left 2c. Bicep Pre-assembly 2d. Assembly 3. Calves/Shins (lower leg): 3a. Shins trimming left & right 3b. Shin Sniper Knee trimming 3c. Shin Pre-assembly 3d. Assembly (front) 3e. Sniper knee Pre-assembly 3f. Rear Closure (Straps and Bra hooks) 3g. Sniper knee, rear cover strip and calf closure elastic system installation 4. Ab: 4a Ab trimming 4b. Ab Button Panel trimming 4c. Ab Button Pre-assembly 4d. Ab & Kidney Split Rivet Pre-assembly 4e. Ab Waist Belt Mount assembly 4f. Ab Right side rivet assembly 4g. Ab Cod Rivet Pre-assembly 4h. Ab Button plates - Painting and Installation 5. Posterior: 5a. Posterior trimming 5b. Posterior rivet assembly 5b. Posterior to Cod connecting strap assembly - Under "Strapping" section 5c. Assembly - Under "Strapping" section 6. Strapping: 6a. Bracket System Pre-assembly 6b. Bicep to Forearm strapping 6c. Chest to Back strapping assembly 6d. Ab to Kidney left side strapping 6e. Ab to kidney Right side strapping 6f. Posterior to Cod 6g. Bracket System final assembly 6h. Bracket system support pads 7g. Thigh Support System (part 1) 7h. Thigh Support System (part 2) 7. Thighs: 7a. Thighs trimming left & right 7b. Thigh Ammo Pack trimming 7c. Thigh Pre-assembly 7d. Assembly (front) 7e. Assembly (rear) 7f. Thigh Ammo Pack installation 7g. Thigh Support System (part 1) 7h. Thigh Support System (part 2) 8. Chest and Shoulders: 8a. Chest trimming 8b. Chest Shoulder Covers trimming 8c. Chest strap to Shoulder Bell connection (Shoulder side) 8d. (6c) Chest to Back strapping assembly 8e. Shoulder Cover assembly 8f. Shoulder Cover Retaining Strap 9. Shoulder Bells: 9a. Shoulder Bell trimming 9b. Chest strap to Shoulder Bell connection (Bell side). 9c. Shoulder Bell strap installation cont. 10. Thermal Detonator: 10a. Pre-assembly 10b. Paint (not required) 10c. Assembly Final 11. Waist Belt: 3/3/16 NOTE: New information regarding the Anovos waist belt, PLEASE READ. The official word is the waist belt is accepted at the EIB (L2) with the previously mention belt modifications however, it is NOT acceptable at Centurion (L3) regardless of the modifications. The cloth portion of the belt assembly will need to be replaced for Centurion approval. You can either skip the following belt modification tutorial and replace the cloth portion of the belt all together, or continue on if EIB is as far as you plan on going. A tutorial on how to change out the cloth portion of the belt is in the works. 11a. Waist belt EIB (ONLY) Accuracy update 11b. Waist belt Centurion Update 12. Back Plate: 12a. Back plate trimming 12b. Assembly - Refer to "Bracket system final assembly" 12c. Upper connection point modification 13. Kidney: 13a. Kidney trimming 13b. Kidney to Ab right side connecting strap - Refer to "Strapping" "Ab to kidney strapping right side" 13c. Kidney to Ab left side connection strapping - Refer to "Strapping" Ab to kidney strapping left side" 13d. Assembly - Refer to Bracket System Final Assembly" 14. Hand Guards: 14a Hand Guard trimming 14b. Hand Guard, Centurion Update 15. Helmet Accuracy modifications: 15a. Helmet Modifications for Centurion and accuracy (Part 1) 15b. Helmet Modifications for Centurion and Accuracy (part 2) 15c. Hovi Tip Mod 16. Fitment Alterations (if any): N/A 17. Final Pictures: 17a. 501st Submission and completed armor pictures 18. Additional information: 18a. Making and install support pads for Mr. NoStripes bracket system (Not a requirement) 19. Helmet Electronics: 19a. Installation of Ukswrath's Hovi Audio system, SHA (hearing assist) and Cooling system Out of the Box
 1 point
 -
Hello all, First of all, thanks for having me! I've been lurking around the forum and seen some amazing builds. I grew up watching Star Wars with my Dad and made my first Vader suit when I was 12... from papermaché and cardboard. I couldn't find the picture of it but let me say... I needed some more practice I've been doing props for 4 years now and a while back I decided to go for a 3d printer... find out to model my own stuff. Over a year ago I wanted to make a File for the new Storm Trooper Armor for myself that would be approvable for the 501st. Reference was scarce (for polygonal modeling) and I just made the Helmet back then. It was pretty decent but some details were off and the shape of the dome wasn't 100%. A buddy of mine sent me a low poly game model to look at and it came with textures. That was awesome because that gave me something to start with. A lot of details on the textures were just right and the overall proportions looked correct. I used it as a base reference to make my own model. I have sinced tracked down the origin of the model and I believe that it was JakeGreen163 on DeviantArt who made it available. I've since had help from some dedicated Star Wars Costume Pros who pointed out various mistakes and things to improve at. A lot of hours and dedication have gone into making this a very high quality model, as close to the real thing as possible. 501st, here I come :D Some details on the model: - The hexagonal structure on the Helmet would have been really hard to model and post process, so I came up with two 3d printer-friendly solution. First: A glue-on solution: The hexagonal structure is printed flat and then glued in place. Second: The hexagonal structure can be inserted into a small undercut and is held in place by the "Nose"-section. If you don't understand what I mean, look at the pictures. - Visor-Stencil: I have a vacformer but I figured, since it is not a requirement for the 501st approval to have a bubble lens. I could just as well make a cutout for the visor since that is easier to apply a black tint to. So I made a stencil that would fit just right. I already printed the helmet. I'm prepping the rest of the suit next. Progress on this will not be super fast because I print a lot for customers as well. TFA Helmet: TLJ Helmet: Hexagonal inserts: Rest of the suit: Helmet with undercut that even Anovos was missing until now:1 point
-
Yeah that EIB badge look mighty nice and the Centurion one will fit right in1 point
-
I said you would beat me to Centurion.... mine is going in on Tuesday (hopefully) Good luck mate [emoji3] Sent from my iPhone using Tapatalk Pro1 point
-
Cheers mate. Yeah, I’m so chuffed. I’ll get my Centurion application in tomorrow. :-) Sent from my iPhone using Tapatalk1 point
-
It certainly has mate.... and it’s only going to get better.... centurion next [emoji3].... induction... branding and first troop to look forward to [emoji3] Sent from my iPhone using Tapatalk1 point
-
Congratulations Dan, a well deserved result for an excellent set of armour. I am really pleased for you mate [emoji3] Sent from my iPhone using Tapatalk1 point
-
Congrats! See you at Centurion!1 point
-
Congratulations Dan, I’m really made up for you. Centurion next [emoji3] Sent from my iPhone using Tapatalk1 point
-
Congratulations on reaching EIB Dan! Woah, look at those credentials follow after your name! Happy for ya, one day, I'll follow after you, that's a promise!1 point
-
Congratulations trooper and welcome to the ranks1 point
-
Keep it, it helps keep them in place. Sent from my Pixel 2 XL using Tapatalk1 point
-
Thanks! You too Thanks everyone. Now on to L3.1 point
-
Congrats. We'll probably be going for Centurion at the same time too, eh?1 point
-
Congratulations! Well done1 point
-
Congrats trooper!1 point
-
Thin out the top section. Lightly trim the lower as needed. Reference photos1 point
-
Woo hoo! EIB awarded today. I’m a very happy Trooper. :-) Sent from my iPhone using Tapatalk1 point
-
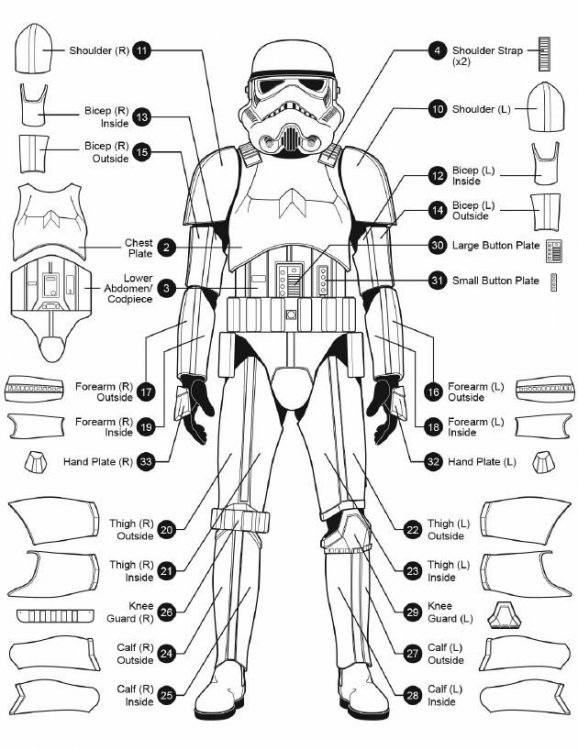
Personal Information Name: Tino Jacobs 501st TK ID: 61276 FISD Name: T-Jay Garrison: German Garrison (White Shadows Squad) Profile Page: 501st Profile TK-61276 Armor Maker: Troopermaster Helmet Maker: Troopermaster Blaster Type: E-11 DoopyDoo's Full Resin Height: 176 cm Weight: 70 kg Boots Maker: TK-Boots Canvas belt: Troopermaster Hand Plates: Sonnenschein Electronics: Aker Voice Amp Neck Seal: Veedox Holster Maker: Troopermaster Link to Armor: Fully finished ANH Stunt TK (1,5mm ABS) from Troopermaster with some modifications Link to Blaster: Full resin E-11 from DoopyDoo's with some modifications Link to EIB App: TK-61276 Requesting [ANH-Stunt] EIB Status [TM] [778] Armor Photos Full Body Front – Arms at side Back – Arms at side Left – Arm raised Right – Arm raised Armor Details Right Side Detail – Arm raised (Ab/Kidney Attachment) Left Side Detail – Arm raised (Ab/Kidney Attachment) Abdomen Details Action Shot Hand Plates Shoulder Bridge Back Shoulder Bridge Front Back/Chest Connection Thigh Pack Attachment Knee Plate Drop Box Back Cod and Butt Plate Attachment Interior Strapping Kidney Plate Notch Wrist side of forearms Helmet Details Front Left Side Right Side Back Hovi Mic Tip Detail Lens Color S-Trim Blaster Details Blaster – Left Blaster – Right Accessory Details Neck Seal Thermal Detonator – Back Holster Attachment Inside Holster Attachment Outside Boots Please state if additional information or photos are required. Thank you.1 point
-
Work of art. Beautiful!1 point
-
Cheers Chris - It's been an exciting couple of weeks, TK wise!1 point
-
Well done Dan, welcome to the EIB ranks!1 point
-
Hi Daniel welcome to your EI review and thank you for your application. CRL and EIB Application Requirements: All submission photos have been posted. Your armor displays all the necessary elements to qualify for Expert Infantry. Welcome trooper, congratulations! Other-Armor Fit/Assembly: In this section we review observations made by your fellow troopers and ourselves. Some observations may lead to suggestions to improve the overall look of your armor. If any suggestion affects any application, it will be listed separately in the above or below sections. Very nice build, excellent work Dan,good attention to detail and great looking E11 as well. We only have a few small items to mention so here they are. The first is simply a dressing issue, just get the gap between the bottom of your bicep and top of the fore arm even on both arms. The second is a very quick trim job on the cover strips on the back of your thighs. These look like they could cause you injury potentially damage your under suit. I would sand those pointy corners off as a preventative measure. This last one is just an accuracy thing, a nice to have but not a necessity. You have slotted screw and yes they are painted black, but the screen used screws are the pan head variety, not the dome.Like we said, not a necessity but another step closer to screen accurate. The reference image shows what a pan head screw looks. Centurion Suggestions: In this section we prepare you for Centurion. If there are any areas of concern this is where they are discussed. You have provided a pretty comprehensive set of images so this makes it easier to see if anything we cant normally see might stand out, and we are happy to report everything is looking good for an easy Centurion application. Congrats once again and hope to see you in Centurion review soon.
 1 point
 -
Awesome, this is the build I was looking for1 point
-
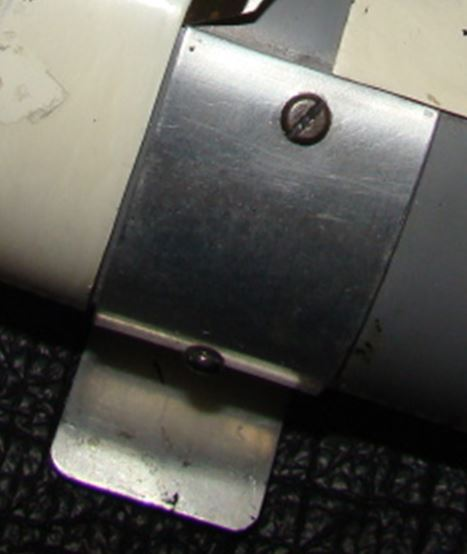
Superb work on the end cap and ring holder. Not sure if that small grub screw in the front sight is always on the right side, as I understood this block to be removable. That being said, I guess you can insert it the other way, too. Maybe someone with a real Sterling chimes in to enlighten us...1 point
-
Hi Dan, very nice application, we shall be with you soon.1 point
-
Hey Brien thank you for your EI application. CRL and EIB Application Requirements: All the required submission photos have been posted. Beautiful job on your build . Your armor meets all EIB requirements, Andrew and myself are delighted to welcome you to Expert Infantry. Congratulations Other-Armor Fit/Assembly: In this section we review observations made by your fellow troopers and ourselves. Some observations may lead to suggestions to improve the overall look of your armor and accuracy. If any suggestion affects any application, it will be listed separately in the above or below sections. Again, these are suggestions and recommendations. The accuracy is ultimately up to you. Your helmet Vcoder lines could use a little more definition as seen in the provided reference photo. We're recommending you touch up the following areas. Reference photo The Hovi tip screens should be a heavier weave. We're recommending you replace these Reference photo Next up is the shoulder bell gap. There should be minimal gap between the shoulder bells and chest/back plates. This may be a simple photo issue, if not do the best you can to bring these in as close as possible. Tightening the straps and removing any lower return edge tends to help the most. Reference phoito And finally, the right side of the sniper knee looks to be protruding out a bit. We're a little concerned it might get snagged on something. Centurion Suggestions: In this section we prepare you for your Centurion application if you choose to apply. If there were any areas of concern they would be discussed here. At this time we have nothing to add. That's it, great job. Hope to see you at Centurion.1 point
-
Sorry to "butt in" but it`s so others can see and get inspiration for their strapping (unless the FOTK EIB is different) - great build and good luck1 point
-
Congratulations , nice looking armour. Welcome to the ranks of EIB [emoji3] Sent from my iPhone using Tapatalk1 point
-
Congratulations trooper1 point
-
Congratulations! All your hard work is showing! See you at Centurion soon!1 point
-
Happy Birthday Tino As you can see, we already looked identically on our last troop. Our composure is the same also. Seems these two Stormtrooper are coming from the same drill academy1 point
-
Thank you guys... there's been a lot of ups and downs on my build but definitely on a high now [emoji5] Sent from my Moto G (5) using Tapatalk1 point
-
Tino Jacobs 61276 EIB A4 Tony Thanks in advance http://www.whitearmor.net/eib/certificates/61276-eib.png1 point
-
Name: Jorge Alegre 501st ID: TK-34727 FISD Forum Name: trooperGonzo Garrison: NEG EIB: http://www.whitearmor.net/forum/topic/40420-tk-34727-requesting-anh-eib-status-rs-prop-masters-680/?hl=34727 501st Member Page: http://www.501st.com...hp?userID=19548 Armor Maker = RS Prop Masters Helmet Maker = RS Prop Masters Blaster Type = E-11 RS Prop Masters Height = 5' 6" Weight = 135 lbs Boots Maker = Imperial Boots Canvas Belt = RS Prop Masters Hand Plates Type = RS Prop Masters Electronics = Aker, Icomm Neck Seal Type = RS Prop Masters Holster Maker = RS Prop Masters Ab and Kidney armor fit around my midsection has been addressed per EIB application. Thank you for your comments and suggestions!1 point


.thumb.jpg.fe734c2874fe147a5789e833ad00772e.jpg)