Leaderboard


Popular Content
Showing content with the highest reputation on 10/24/2017 in Posts
-
Thought I'd get the ball rolling3 points
-
I was out finding out how I could build an ANH E-11 blaster, and created this list. I thought I could share it with everyone. Keep in mind, everyone is free to comment for me to add anything, or take anything down if it is no longer for sale. The tools and materials are not absolutely needed, but recommended. The info I added was what I found to have good amount of info incorporating what is in this list. Resin Kits: DoopyDoos: Completely resin kit. Resin Parts: Bulldog Props: M38 & M19 Resin Scope Kits Hengstler 400 Counter Replica TK-50101 Completion Set: T-Jay: Completion kit. 3D Printed Parts: Suitcase Props Various 3D printed parts for an E11 Blaster. Plastic Parts: swpropman: Various Plastic parts for an E11 Blaster. Electronics: TRamp T-tracks: WannaWanga Marv Gino Todd's Costumes COMPLETED BLASTERS: HFx Productions 3D-Props Praetorian Blasters ---------------------------------------------------------------------------------------- TOOLS/MATERIALS (Thank you to FISD E-11 Reference Team for a majority of info) Green Stuff Bondo Cream Drill Bits Dremel, Or something similar. Sandpaper, Wet and Dry, Various Grits Files (Nail filers, key files, the works.) Super Glue (E-600, Epoxy, etc.) Exacto Knife, Small blade Carving Tools Letter Stamps (If you want to put custom numbers/letters onto your blaster) Weathering palettes ------------------------------------------------------------------------------------ HELPFUL INFO: Did I miss anything? Feel free to send me anything I missed. Thank you guys for the updates and details.2 points
-
Hi all, So, I reduced the girth of the forearms but was displeased with the join around the back. Here’s how they joined: The left arm was the worst one, so I decided to take it apart and move up the back/inner part of the forearm. Although it wasn’t glued at this point, the join at the back would now be nearer, thanks to trimming the wrist end and top end. And here we are. I’ve now been given the green light to go for clearance as soon as my blaster is ready. Much happier with the complete look now. :-) (Only a quick kit up for the arms - no TD, neck seal, butt had come loose etc) Happy trooping, everyone. :-) Sent from my iPhone using Tapatalk2 points
-
Hello my White Clad Brothers and Sisters It's ages since I was active on here but it feels like coming home after a holiday. Been busy building ...... sorry for this , Black Armour!!!! After I got my approval and started trooping my wife saw what it was all about and decided to join the empire. We got hold of ....... again sorry for this, a Tie Pilot kit. We put the helmet and chest box together and Lynn sourced the rest of her costume and after making sure it was all done right she submitted and was cleared. She now troops at my side as TI91810. She has been bitten by the bug now and is now working on a Jawa. Boy how things have changed around here recently Anyway I digress. Like so many on here I had paid my money and (almost) happily waited for Anovos to ship their FO TK kits. With the delay announced I thought STUFF ANOVOS! I'd been gathering the parts for the build hoping against hope that Anovos would deliver. I know, I should have known better but I like to be optimistic. Imperial boots and gloves from a fellow garrison member who was selling. Imperial Boots by brian.mcdavid, on Flickr Imperial Gloves by brian.mcdavid, on Flickr Imperial gloves were a wee bit big but luckily another garrison member was parting with a pair of Endor Finder gloves in a better size. Endor Finders Gloves by brian.mcdavid, on Flickr Looked at a couple of options in ABS and read reviews of several different kits and eventually settled on Jim Tripon's fibreglass kit. Ordered the kit and was surprised how quickly this happened BBB Day by brian.mcdavid, on Flickr TLJ Helmet by brian.mcdavid, on Flickr Armour by brian.mcdavid, on Flickr The chest plate was damaged in transit when it collapsed inwards. I contacted Jim to let him know that the kit had arrived and advise about the damage. Chest collapsed and a couple of cracks in the edges of some pieces. Jim immediatelly offered to replace the chest plate. The cracks are easily fixed but the chest would have been more difficult. New chest arrived less than a week later in perfect condition1 point
-
Okay, Troopers, it's time for another contest! We are asking those of you with mad artistic/design talents to come up with the official FISD "EIB March to 1000" patch design. Here are the details: 1. The competition will begin Oct. 16th and will run until Nov.13th, at which time a poll will be opened so that everyone can vote on the design they like best. 2. There is no limit to the number of designs you can enter, and the shape can be round, chevron, etc. 3. You are welcome (and encouraged) to copy the E.I. logo at the bottom of this post to incorporate into your design. 4. All entries become the property of the FISD. 5. Winner will be announced in the December NL. The winner will receive a free patch of their design and 501st car decal along with some other cool swag, (including a set of Disney Imperial Binders) but most importantly, serious bragging rights! We are also working on an exclusive coin for EIs only to coincide with the patch, so if you are considering taking your armor to the next level now is the time to get those EI submissions in! E.I. logo: ---------1 point
-
Special delivery... :-) Sent from my iPhone using Tapatalk1 point
-
5th coat dry and clean from the protections I can do better, but, not the worst resoult, I’ve put the screw in place, and the next step are all the optionals, I’ve choice fan system from troopacoola https://www.facebook.com/Troopercoola/, a powerbank 6700 really lighthttps://www.amazon.it/dp/B01LVW7YVX/ref=cm_sw_r_cp_api_sN57zbS2Y99GR an aker 1506 https://www.amazon.it/dp/B00898SW78/ref=cm_sw_r_cp_api_UQ57zb6HD5Q6F Softpad Andux https://www.amazon.it/dp/B01DZU4DX6/ref=cm_sw_r_cp_api_rS57zbE56PNV1 Inviato dal mio iPhone utilizzando Tapatalk1 point
-
Hi all, A miniscule of updates, but an update nonetheless. I followed up today with more modifications to the folding stock handle. I applied my dremel tool to take away the resin rivets on either side of the handle. Following, washers had their inner diameters widened by using a round file attached to my drill. This after learning that using a drill bit will just make the washers slip every which way even on Vise-Grips. I ended up mangling the washers quite a bit, even warping them. Heating them up using my heat gun and hammering them flat did the trick. I then glued them into place using E-6000. Hopefully, the mangled look will add to the battle-damaged look I will by going for during the paint phase. I then countersunk the pin using a 3mm drill bit against the 5mm solid aluminum pin. This will help to give it that real rivet look. I may use 'blue tak' as Brian suggested earlier to give a strong but not permanent hold of the pin against the handle. This may very well allow me to disassemble the guts of my folding stock so to get at the pencil, if I need to replace it, as I fear the latch may break away from the wood due to constant use. Haha, I think it looks alright! Thanks for dropping by, have a great day!1 point
-
Congrats Taylor, welcome to the elite1 point
-
I want to add to your ambitious list Toshi: Resin Magazine Doopy Dos replacement E-11 magazine ONGOING RUN! BLACK NOW AVAILABLE! Resin Scope Kits FS: Bulldog Props M38 & M19 Resin Scope Kits Small Eagle Hengstler 400 Counter Replica FS: small eagle Hengstler 400 counter replica Electronics BlastFX / Mini Scope Display (blaster electronics) from TRamp Various Plastic Parts swpropman Good on you to make a list! Always helpful for those starting out to get a handle on things, see the lay of the land - cheers!1 point
-
Congratulations! Looking sharp and well armed!1 point
-
4th coat Inviato dal mio iPhone utilizzando Tapatalk1 point
-
Congratulations trooper and welcome to the ranks1 point
-
Welcome back Taylor and thank you for your Centurion application. CRL and Centurion Application Requirements: All required submission photos are present. Thank you for making the updates suggested during your EIB application. Tony and i are pleased to say your armor displays all the elements as set out in the Centurion CRL. Congratulate and welcome to Centurion rank!! Other-Armor Fit/Assembly: We have nothing to add here. Great job on your build. Time to head on out and make your garrison proud.1 point
-
Thanks for the tip. I found Cubeupload to upload my pics and then post the links to the forum. It works!1 point
-
I wouldn’t trim anything. From the sides it probably looks that way because there is more black showing. Not sure how your torso piece are connected to each other but I would try and connect the butt plate to the kidney plate so they touch and then shim the kidney plate to the abdomen. On you tube look up tk1636 he has complete build videos if you type in “tk1636 shims” you should find it right away. I think that would help you get the desired look you want. Hope this helps! Sent from my iPhone using Tapatalk1 point
-
Hello Again Another installment already. After ordering the kit from Jim started sourcing and ordering more goodies. Undersuit from Strormtrooperundersuit. As everyone has said about this suit, order bigger than you normally take. I ordered an XL and it is a good fit. Undersuit by brian.mcdavid, on Flickr I am excitedly awaiting the arival of my gaskets and neckseal from Teresa ( GEEKY PINK'S PHANTASTIC GASKETS). Hoping they will arrive this week to allow me to start sizing the armour. Ordered a leg holster from R2Dan and waiting on shipping. Contacted Darren (JAFO) about one of his fantastic belts and waiting on his next run. Ordered a machined aluminium Aerator from Vaderpainter, really nice piece of work. Aerator Tip by brian.mcdavid, on Flickr Anyway on with the armour. Sprayed the armour with a filler primer Armour Primed by brian.mcdavid, on Flickr Bit of a shocking look but good as it really shows up any imperfections once you start sanding Sanding Started by brian.mcdavid, on Flickr Test Finish by brian.mcdavid, on Flickr Tested a bit of white paint on one shin to get an idea of the surface finish in that last photo. Need to have more tests to get the finish how I want it. This means more sanding. Just great fun sanding armour. Three hours of sanding and two really sore arms later my helmet turned out nice and smooth Helmet Sanded by brian.mcdavid, on Flickr Made my first cuts to the armour by rough cutting the eyes and vent holes. Very therapeutic after all that sanding. First Cuts by brian.mcdavid, on Flickr Made repairs to the cracked limbs so that I can get started on finish sanding before priming and initial trimming. Got to say that I'm not looking forward to trimming this armour. Never worked with fibreglass before so a bit nervous. Bit like my TK build I suppose but got more confidence now. Repairs Starting by brian.mcdavid, on Flickr That's where we are now my friends. Starting nightshift tomorrow so not expecting much progress over the next 4 days. Oh, before I forget, we bought a 3D printer and it has been getting worked hard over the last 2 weeks. Been printing Germain's F-11D and SE-44C Blasters, Blasters, Blasters by brian.mcdavid, on Flickr With unquestioned loyallty Brian1 point
-
Greedo! Can’t wait to see that one! I’m working on my Death Trooper. I’m hoping to have that one done by The Last Jedi premier troops.1 point
-
Thanks! I haven't started yet because it's a bit overwhelming! And girlfriend gets more priority! I'll start by buying the sandpaper and spot putty! Btw, I've seen your builds! Great job!1 point
-
I have a dream!!!!LOL[emoji23][emoji23][emoji23][emoji23] Inviato dal mio iPhone utilizzando Tapatalk1 point
-
Just a observation/critique on the airsoft gun... They really missed/messed up the little half moon shapes too . I have shared the complexity of that part with you before SLYFOX ... It has been the toughest to recreate and braze on a tube correctly... The airsoft did a terrible job of coping it i think... Too thin and not doesnt have the proper radius on the bottom to get it to line up and lay flat on the tube... caused it to lean forward some.1 point
-
Finished today. Thanks for the patterns. Sent from my iPhone using Tapatalk1 point
-
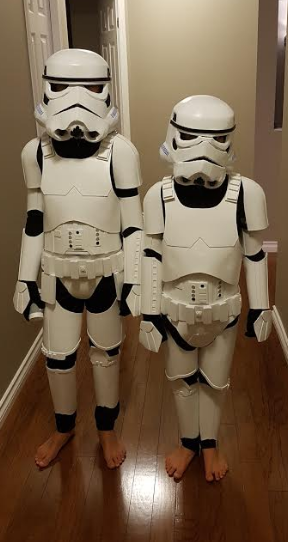
Thanks for much for the tutorial. I just completed two of these costumes for my boys and they LOVE it. So much better looking than the store bought ones. It took more time but so worth the look on the boys' faces. I did not follow the instructions on the helmet rather I made ones out of cardboard using tutorials on youtube.
 1 point
 -
Episode II - Attack of the Caps The second most inaccurate part of this Airsoft gun is the Rear End Cap and then the Muzzle Cap. As I explained in the introduction they both have their inaccuracies and I will be correcting all of them in this chapter. I will be replacing the Airsoft Rear End Cap with a real Sterling Rear End Cap, and I will modifying the Airsoft Muzzle Cap to better replicate a real Sterling Muzzle as the real thing doesn't have a "cap". The rolled edge on a real Sterling muzzle is actually part of the receiver so it is not easily removable. I found a cast of a real Sterling muzzle but it's made of plastic, and I want a steel blaster so I will be modifying the Airsoft Muzzle Cap to make it more accurate. This mod took some time and patience, I've actually seen this exact mod attempted on this exact gun but not successfully. The other option is to alter the original Airsoft End Cap to look more realistic but that one sits too far back I feel, plus this option will be more authentic. You can't beat the real thing so why not use real parts whenever possible. Here is the inside of my modified Rear End Cap from a real Sterling MK4 L2A3 Sub-Machine Gun. Using only the tools below I was able to file out the inside of the Rear End Cap to fit the adapter on the back of the Airsoft Receiver. The Rear End cap nearly fits but the 3 pegs inside are just too tall & wide, so I made them a little shorter and skinnier using some needle files. The edge of the pointed file has one smooth edge and I utilized that to file small detailed edges while preserving adjacent ones. The inside wall of the Rear End Cap has three areas or "rings"; The outermost ring in the front, the middle ring which is where the 3 pegs are located, and the innermost back ring which is the deepest at the bottom of the Rear End Cap. The middle ring between the pegs is actually wide enough to fit around the adapter on the back of the Airsoft receiver, so the 1st outermost ring and the 3rd inner most ring just needed to be filed down with really heavy grain sandpaper until the depth matched that of the middle ring. This took some patience, time and was a little hard on the fingers, I pressed the sandpaper against the inside wall really hard while spinning it. A Dremel or rotary tool with a sanding drum would do the job quicker, I just wanted to go slow to make sure it remained perfectly round. Here are some different angels of the real Sterling Rear End Cap installed on the Airsoft gun. Here you can really see how a real Sterling Rear End Cap tapers toward the front of the gun, I'm so much happier with this now. Here are some profile views of the modified Sterling rear end cap on the Airsoft gun. Here are some Before & After comparison shots of my Airsoft Rear End Cap mod. Before on top, After modification on the bottom. And here are some comparison shots of a real Sterling MK4 L2A3 (top), and my modified Airsoft with real end cap (bottom) The first thing I corrected on the Muzzle Cap was the size of the center hole which was done by simply removing the internal barrel and barrel sleeve, after doing this the center hole is now much more accurate. The next problem with the Airsoft Muzzle Cap was it's lack of a rolled edge, it wasn't that sharp of an edge before but it wasn't nearly as rounded as it should be. To correct this inaccuracy the Muzzle Cap was put into a lathe and very carefully machined to have a rolled edge, this had to be done without making the diameter any smaller whatsoever. Here are some initial shots taken of the Muzzle Cap after being machined in the lathe. As you can see there is still a small ring of paint left around the outer edge, so the outer diameter is still the same size. It is still bolted to it's backing plate here, this was bolted together while being machined in the lathe just so there was more material to work with. Profile View, unbolted from backing plate. To give you a good picture of how it fits here are some photos of the Muzzle Cap installed before paint, this way you can clearly see where the receiver ends and the muzzle cap begins. The front end of the receiver tube comes with a very small taper on it which helps the rolled edge appearance a bit, once I fill this in and sand and paint it you won't see the seam line. The hex bolts in these photos are still the same incorrect ones that came with the gun. The accurate hex bolts with the correct diamond cross-hatch knurling pattern are somewhat difficult to find. Tino (T-Jay) provides a completion kit which includes the correct hex bolts and the threads even fit the Airsoft gun, however they are about 4 threads too long and they bottom out in the threaded hole. No problem at all, I just took them into the shop and grinded them down to size. Before (top) After (bottom) Here are some photos I took with the hex bolts after a prelminary paint test, this is NOT the finish I will be using. Profile Views Here are Before & After comparison photos of my modified Airsoft Muzzle Cap. Before modification on top, After modification on the bottom. And finally here are comparison photos of a real Sterling MK4 L2A3 (top), and my modified Airsoft Muzzle Cap (bottom) I hope you enjoyed this chapter of my blaster build, please feel free to leave any comments or critique my work. I always enjoy reading your all of your feedback. In the next update I will correcting the accuracy issues with the folding stock and the front and rear sight guards. to be continued...1 point
-
If I may, get yourself some acetone,keep your scraps. You may wind up using some needle files to open that tear up a little bit, covering the front with painter's tape to keep the outside of the tear smoothly aligned with the rest of the outside, and fill it from the inside with ABS paste. Then, you can easily wet sand it down to smooth again, and use Novus 1,2,3 polish system to bring the shine back to it. Nothing to lose sleep over, Bryan.1 point