Leaderboard


Popular Content
Showing content with the highest reputation on 08/31/2017 in Posts
-
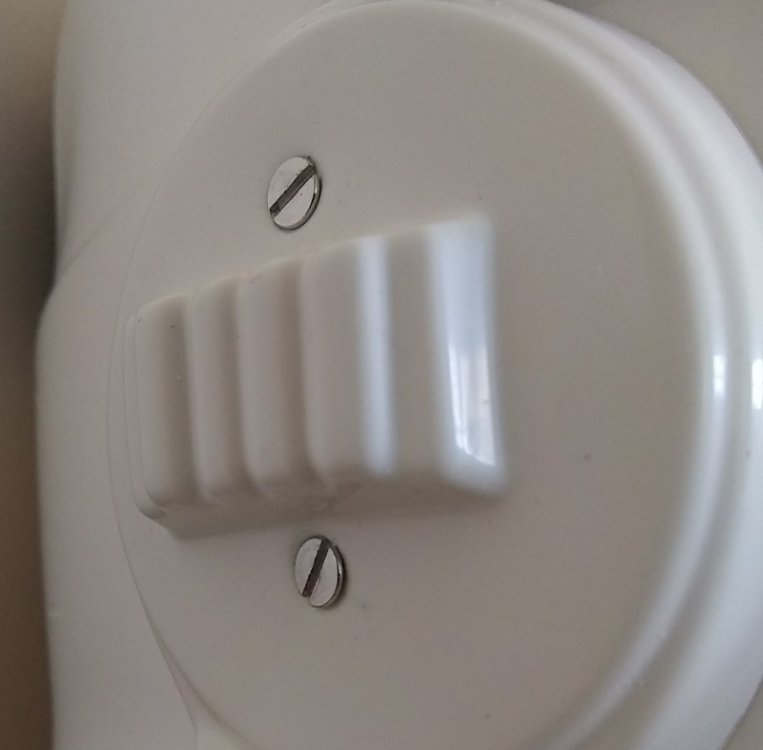
QuartZ, The screws with the kits are the correct type and size now. I don't know if they've made the change on the factory assembled units. Here are the unpainted screws from my kit:
 2 points
 -
Use an online photo host like Imgur, upload your photos there then copy the links into your post. Are you trying your helmet on sideways, they don't go on straight2 points
-
Sorry for the delay - here you go: Hope this helps2 points
-
There was a recent question that asked how to remove split rivets and thought I would share my method, as well as encourage other troopers to post their methods here as well in order to help others that need to tackle this problem. Tools: - Diagonal Cutters "Side Cutters" - Needle Nose pliers or standard pliers depending on the application I prefer using the Diagonal Cutters / "Side Cutters" as the edges of the cutters catch the tails of the rivet without damaging your armor. Using the cutters, squeeze the tails together. Then use pliers to straighten the tails out for removal Good luck Troopers, and many thanks in advance to those who post their methods here. Troopers helping Troopers WHOOO-WAHHH!!! [emoji38][emoji106]1 point
-
Basic Information Name: Jared Snow FISD forum name: BigBadFun 501st Member Page: http://www.501st.com/members/displaymemberdetails.php?userID=23130 501st ID: TK-27970 Garrison: Outpost 42 (New Zealand) Mandatory Information Armor Maker: RS Propmasters (Self build) Helmet Maker: ATA Works (Self build) Blaster Type: RS Propmasters DLT-19 EIB: https://www.whitearmor.net/forum/topic/42565-tk-27970-requesting-anh-stunt-eib-status-rs/ Optional Information Height: 6'0" Weight: 187 pounds Boots Maker: TK Boots Canvas belt: RS Propmasters Hand Plates Type: RS Propmasters Electronics: 10w Aker + Troopertalk App Neck Seal Type: Darman @ FISD Holster Maker: Darman @ FISD Front – Arms at side Back – Arms at side Left – Arm raised (Dropbox positioning fixed) Right – Arm raised (Dropbox positioning fixed) Helmet off Abdomen Details Hand Plates Shoulder Bridge Back Shoulder Bridge Front Back/Chest Connection Thigh Pack Attachment Knee Plate Drop Box Back (Dropbox positioning fixed) Cod and Butt Plate Attachment Interior Strapping (Shows Butt/Kidney Fixture) Kidney Plate Notch Wrist Side of Forearms (Return edge present) Wrist Side of Forearms (Return edge removed) Wrist Side of Forearms (Return edge removed - close up) Helmet Front Helmet Left Helmet Right Helmet Back Helmet Hovi Tip Detail Helmet Lens Color Helmet S-Trim Blaster Neck Seal Thermal Detonator – Back (Previous) Thermal Detonator – Back (Fixed - painted screws black) Holster Attachment (Dropbox positioning fixed) ADDITIONAL SHOTS: Belt Front (Dropbox positioning fixed) Belt Back (Dropbox positioning fixed) Boots1 point
-
Basic Information Name: Jen Ward Legion ID: 70305 Garrison: Midwest Garrison Mandatory Information Armor Maker: Anovos Helmet Maker: Anovos Blaster Type: Hyperfirm Optional Information Height: 5'7" Weight: 155lbs. Boots Maker: TK Boots Canvas Belt: gazmosis Electronics: AKER Neal Seal Type: Darman Holster Maker: Anovos EIB Link Requested Fixes From EIB Full Body Armor Details Helmet Detail Blaster Detail Accessory Detail Action Shot Me1 point
-
You guys have a come a long way with these kits. I think its good that you can all work together, too. Looking great!1 point
-
Hey JawaJoe, Would you mind answering a quick question about the newer helmet kits? Are the screws used for the ears the correct type/size now? Or do they still need to be replaced to be accurate to the screen used helmets? I have a full armor/helmet kit on pre-order and justjoseph63 reminded me that I should look into whether Anovos has improved that aspect at all. Thanks, -Dana1 point
-
Thanks for passing that info along, Sean. Troopers helping troopers!1 point
-
ONE DAY LEFT! Also, just wanted to say a big THANKS to all of you who participated in this. These stories are amazing, and many bring back some of my own memories. The Attaches have quite a job on front of them choosing a winner. Best of luck to all of you!1 point
-
This contest is for any and all new folks who are currently building a TK and looking to head toward Centurion level with their first kit. First prize will be complete set of items that will help get you there, including a set of white silicone hand guards, a complete set of the correct TD screws, a complete set of correct ear screws, and a complete set of split and single cap rivets. Your task will be to answer (in 50 words or less) what it means to you to reach Centurion level. A photo of your build progress will increase your chances. Deadline for entries is September 1st, and the winner will be selected by our Imperial Attaches and announced soon after. Unfortunately, if you are outside the U.S. a $15.00 postage fee will apply. Postage to Canada will be courtesy of Aaron, (Pyrates)! Enter your answer below on this thread, and good luck!! CLOSED. Winner will be notified on Wednesday, Sept. 6th. Thanks!!1 point
-
ONE MORE DAY.. Just a note to say a big THANKS to all of you who participated in this! It's awesome to see so many of you headed toward Centurion, and with all these great entries choosing one is gonna' be one tough task!1 point
-
Last stock part completed,,, spring plate1 point
-
Congrats Jared1 point
-
Awesome news, keep everything crossed1 point
-
Hello FISD! I came across this charity drive that is being hosted by Walts Trooper Factory. They are offering a patch and a sticker which will help support Team Rubicon as they volunteer their time to aid the victims of Hurricane Harvey in Texas. I know many of you have probably already donated time and money to help our brothers and sisters in Texas but in case you haven't and you are looking for a way to help then here is a way to do so. Below are the informational links. www.waltstrooperfactory.com www.teamrubiconusa.org Troopers Helping Troopers1 point
-
Being all of 5'7" in armor, I've heard the "short for a trooper" line many times now. My comebacks depend on the troop, really. I've done the following in response to the line: staring silently until they walk away "Shhhh! (then taking them aside, whispering loudly) I'm with the Rebellion, and you're gonna blow my cover!" (said very, very seriously) "The Empire is an equal opportunity employer and does not discriminate against height." "I was crushed in the trash compactor last week and am still recovering." "But I make Lord Vader look tall. He appreciates that." I'm sure that I'll come up with others the more I troop. I didn't think I'd enjoy being on the short side for trooping, but I've really had fun with it!1 point
-
Great post by Aaron. I second the pliers. I managed to mangle a split rivet within a popper (approx 4mm tall) - left less room to get under the 'arms' of the rivet but it came out okay in the end. :-)1 point
-
lol you all have such different body types lol. Lots of different manipulations needed for each of you, for different reasons. Overall though, it seems like you guys have made HUGE progress and are almost there. So much plastic!!!!!!1 point
-
Good evening all, More work on the belt tonight. My set of tools arrived so I could fit the poppers to the ab. Poppers for belt-ab connection Single cap rivets holding ammo pack to belt Measuring for holster connections E6000 to glue drop boxes and belt tabs. More to come soon. [emoji6] Sent from my iPhone using Tapatalk1 point
-
You can certainly add the brush strokes, which will show up in the final product, but I suggest painting them afterward though with actual exterior latex house paint. The reason being is that (depending on the manufacturer) natural latex (even white) can turn orange after extended UV (sun) exposure. If I could make a few suggestions, I would beef up the area in red (below) a bit, and thin out the area in blue. When creating your clay originals keep in mind that the latex will shrink when drying. The edges will pull away from the mold, but don't try to fill those gaps. The center will also shrink quite a bit, but you can fill that with extra liquid latex (but just to the edge). I have been through this process many times, so if I can be of any help just PM me1 point
-
wow, those power cylinders look great!1 point
-
The responses so far are indeed awesome, and also - just because I want to throw this out there - what a great idea this contest is! We all know what this means to us as individuals, and we all take part in the spirit of giving and sharing of ourselves in some way because we are here. That speaks for itself. How awesome is it to share this with each other? It has already been mentioned a few times, but what is more iconic or awesome than Stormtroopers? Keep them coming everyone!!1 point
-
Bit of a status update: Removed the Anovos visor easily, but I'm having some difficulty getting the visor from VaderPaint to fit in the helmet. Seems a little oversized for the Anovos bucket. Looking into possibly having an optic shop cleaning the original visor to remove the warp effect. Would still prefer the VaderPaint one, as it is much easier to look through, but it's always good to have a backup. I'm also looking into a chin strap that loops through the spots where the hard hat liner was originally. Padding itself is quite easy, but I don't want to make any long term decisions until I can get the visor issue sorted.1 point
.thumb.jpg.d6285220ce90fb152b67f9dc0311a22b.jpg)