Leaderboard


Popular Content
Showing content with the highest reputation on 07/28/2017 in all areas
-
First we have to reach the 10 000 complaints, only then will tapatalk achievement be unlocked. We're not even halfway now, so you guys will have to write some more posts using the mobile-friendly skin to complain, only then can we get it. But we can do it if we work together!!3 points
-
A long hard week on the road was all forgotten when I arrived home to see the BBBs from the Philippines today. It begins.
 1 point
 -
Thanks Q. No other replies, so I just went with it. Bought the smoothest automotive cream polish and went lightly. Came up nice! Job done1 point
-
Jim, I just received my kit and am very impressed with your amazing work! I'm now a believer in flexible fiberglass. I also received the perfectly tailored R1 undersuit and was pleasantly surprised by the quality. One question, would it be possible for you to include pictures of how you did your ab, cod strapping and belt assembly? This kit's a lot different than my Avonos TK and it would be really helpful to learn from your experience. Thanks in advance. I'll keep my build thread updated with progress.1 point
-
My Tshirtguns at celebration,,,, captured by REBEL forces ................................................................. https://www.youtube.com/watch?v=8odorUOSLv4 https://www.youtube.com/watch?v=szQpBockwlQ&feature=share http://www.tshirtgun.com/1 point
-
Well packed and everything accounted for.
 1 point
 -
If you're having problems either drawing or holstering your blaster, do what they in the movie and use a white band fastened to the holster to prevent it from moving1 point
-
I sent him a PM here and then we ironed out the details via email. I was number 5 on the run and I believe he is doing 30 kits.1 point
-
You'll only need a centimeter or so to build the new return. With your height, it shouldn't make that much of a difference. Post some pics with the ab/chest taped to you so we can see how everything is lining up right now.1 point
-
1 point
-
Here we go Used this as a reference....the hooks extend waaaay more...I want THAT one!!...oh well... ...paint the parts Assemble And the accessories are done (..whilst trying to ignore the difference..)1 point
-
This is pretty cool Ross! Going the higher levels in your own armor eh? Pretty cool. Looking good! Good Luck!1 point
-
Awesome, thanks Ross1 point
-
Good luck Ross1 point
-
Hi James thank you for your application, and your patience, adjusting the side gaps and retaking the new shots. lets get rolling. CRL and EIB Application Requirements: All the required submission photos have been posted., your armour displays all necessary element as set out in the level 2 CRL, Congratulations. Other-Armor Fit/Assembly: In this section we review observations made by your fellow troopers and ourselves. Some observations may lead to suggestions to improve the overall look of your armor. If any suggestion affects any application, it will be listed separately in the above or below sections. We have a few areas to go over but these are simple dress issues easily corrected. I have marked all the areas to cover in this one image and supplied reference images bellow. Before we go into those, I must say this is an outstanding build, and you have done the ATA armour great justice James, very nice indeed. 1. Shoulder Bells: You do still have some elastic that looks loose and can be shortened to bring the top of the Bells closer to the shoulder bridges. We can see you have broad shoulders but think the current gap you have could probably be reduces by half. Just shorten those top elastic straps up a bit and you are done. 2. Ammo Belt: This one is very minor. If you could just raise it a touch so the ammo belt is over the bottom edge of the main Ab button plate, it will look just like the screen used armour. 3.Rotating shin/thigh: more than likely, these have just twisted off center while moving around to have your photos taken, but just try and get the cover strips aligned and central as much as you can, this is another very easy adjustment, and to be honest, that is all your build really needs. Shoulder Bells reference. Ammo Belt reference image. 4. Center Thermal Det: Slide that baby across and make sure its sits nice in the middle, also just keep an eye on the back plate as one corner has popped out over the kidney plate. I don't think there is a problem here just happened through moving around. Centurion Suggestions: In this section we prepare you for Centurion. If there were any areas of concern they would be discussed here. Very difficult to really find anything that would hold back a Centurion application James. The extra images seem to cover off on the little extra required so the only things would be getting the side gaps 100% closed. You are virtually there already with that issue which is awesome. Add the D ring photo in your future level 3 app and make sure you also have all relevant images as per the photo check list and the Centurion CRL. Congratulations again, this is very well deserved.1 point
-
Good advice, Michael. I do Civil War reenacting, and that's the same technique I used on the holsters for my 1861 Colt revolvers. Cricket -- You haven't said what your blaster's made of, but no matter what it is be sure to bag it in plastic when inserting it into the wet holster. A.J.1 point
-
Wet it. And I mean really wet it. Then crush it in your hands. Roll it into a tube in both directions. You will be surprised at how soft and malleable it becomes after just a few minutes of working it (don't worry, it'll stiffen back up when it dries). Then put your blaster in it and let it dry overnight. You'll find that it fits really well after that. As far as holstering the weapon while in armor... it still takes some effort and it often takes a second hand to help, either yours or someone else's.1 point
-
Here are some pictures of the new sides. i adjusted the strapping to be tighter. if you need other pictures, I will post them when my wife can take other pictures. Left Side Right side Thank you, please let me know if you need other pictures.1 point
-
adding more pictures using imgur Thank you for reviewing... Front Back Action right side left side helmet front helmet side helmet back helmet side lens color hovi tips s trim belt belt drop box TD blaster blaster neck seal straping cod and butt AB right detail left detail forearms knee knee knee thigh pack thigh pack thigh pack inside thigh pack inside shoulder shoulder bridge bridge bridge hand guards side detail side detail Again thank you for looking...1 point
-
Just recently, most of our photo links broke and we are currently working to bring back all the content. This might take a while and to provide an interim solution, please check chapter #32 (Downloads). There you'll find a printable PDF with most of the information from the thread. We will update you again, when the issue has been fixed. Sorry for any inconveniences.1 point
-
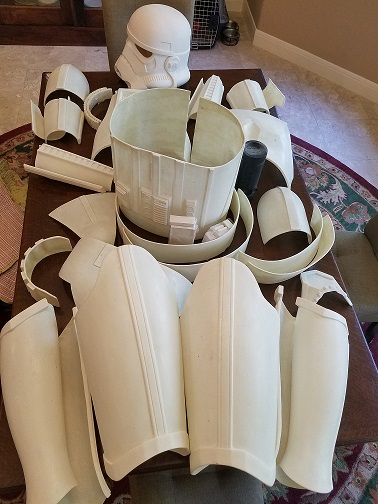
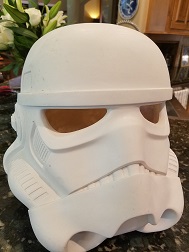
I finally finished the Blaster, here are a set of pics, Thanks everybody for the help!!1 point