Leaderboard


Popular Content
Showing content with the highest reputation on 07/07/2017 in all areas
-
http://whitearmor.net/images/newsletter2015/inthisissue.png From the DL From the XO Notable Troops Advanced Tactics Awards, Imperial Attache Outstanding Achievement Award & Master Armorer Award Follow FISD http://whitearmor.net/images/newsletter2015/fromthedetachmentleader.png Greetings Troopers! Just when you thought that the staff was going on holiday for the summer, think again! The FISD staff continue to keep the ball rolling with a slew of new items and updates for you, our most favorite Stormtrooper. Yes, the dark side has cookies, but we have CRL updates, forum updates, program updates, new merch and more. So take a break with your favorite smoothie and let's see what we have in store for you. Packs are on our minds, lots of packs. - The Spack Pack is now part of the ANH Hero CRL, so regardless of which ANH costume you do, you can rock a pack. - The Shock Trooper can now wear a pack as an accessory. Pictures are on their way, but the text has been approved and you are ready to go. Rogue One The Rogue One TK CRL first draft is complete and off to the LMO for review. Pictures are in progress and it should be ready for approval in July. Oh, and did you want dirt with that? Maybe a nice DLT-19? Yes to both! Keep your eyes peeled, it's going live sooner than you think. Rogue One Sandies to MEPD There has been a lot of chatter regarding if the Rogue One sandtroopers, also known as Jedha or Kyber troopers, the ones with the fabric packs, should stay on FISD. However after much discussion, the decision was that MEPD had a strong desire to create a welcoming experience and support of this costume, and so anyone interested in going full Kyber with their Rogue One trooper should log in to MEPD and see how to take their dirtyness to the next level. I think this is a natural fit both for the costume and for our members, and am highly confident that MEPD will do it justice. Forum Upgrades After many years of being a stick in the mud, our current forum software is no longer supported and we are upgrading. This meant a few days downtime for us, but the end result has been worth it. The UI now looks a lot like MEPD & SpecOps which will make being a dual member much easier, and there are a lot of new, convenient features such as being able to drag and drop photos in to a post. Nice, eh? And yes, there is even more goodness in the pipes. New Shirts, ID Badges, and more! The Evolution of a Trooper shirt is back and on sale after many years absence - you'll want one for sure! Also, we have changed vendors for the Celebration shirts so if you missed out you can now get one on demand. FISD ID badges are also on sale (they are super cool!) and after many iterations, a commemorative First Order version of our logo patch. So, check out the latest shirts on offer and be on the lookout for the next coinage & patch runs. Sounds good, so what's next? The First Order CRL is being updated and will soon have paths for Expert Infantry and Centurion levels. This is also true of Captain Phasma who is quite popular in the ranks. Also, the HWT CRLs will be broken out to include newer variants. Both should be done in July. And in case you missed it... - FISD Hockey Jerseys are still on sale. EDIT: Run ended prior to forum upgrades delayed publication of the Newsletter. - We launched the Master Armorer program. Ever help someone go EI? You can get a "win" for it and start racking up points. Think the EI badge is nifty? Check out what we have for builders. Summer is always a big parade season so I'll leave you with a final reminder to DRINK WATER. No one wants to win the dehydrated trooper award. Have a great month! With unquestioned loyalty, Paul TK-8020 "Daetrin" FISD Founder | DL http://whitearmor.net/images/newsletter2015/fromthexo.png If it seems like we just did this, that's because it wasn't all that long ago that we did this... Even though it was indeed not that long ago, it is always a good time to sit down and read even more stuff about Stormtroopers and what our peers in shiny white armor (and the various other types of TK costumes) are doing across the globe, wouldn't you agree? As always, we have a lot of activity happening and some great events and achievements to highlight. The Staff have been busy with a great many things in the background, and there is never a shortage of EIB and Centurion applications or awards to acknowledge. So as the Summer Season Heats up.. Take advantage of the opportunity to get to know your fellow members. Attend barbecues or get-togethers. Most of our world is entering the nice weather that allows for those things, so don't let an opportunity to get to know someone a little bit better pass you by. Also, be sure that you continue to do all of the things that lead to success when trooping - hydrate, maintain your armor, host or attend armor parties and pass along all that you have learned here. Take a new recruit under your wing and lead them to the FISD - and maybe even further to the rolls of Advanced Tactics Award recipients if you are already one yourself. If you're not, no worries, it isn't that difficult to become one. Take up the battle cry and become a part of the March to 1000! You're a TK, you're inherently awesome. Show the world what you can do, and make memories for them that they'll never forget! Be that Stormtrooper that they saw when they were young, the one that changed their lives forever. We Also Need to Acknowledge the Web Team Perhaps you've noticed that things look a little bit different around the Detachment these days. Well, we were due for a forum upgrade, and the supreme web-knowledge guys (the uber-nerd overlords) dug in deep and did their thing. Looks pretty snazzy now - at least I think it does. This is just another of the continuing efforts being pursued by the Staff to improve the Detachment and the experience for you, the members. Obviously, the timing was a bit rough, as this Newsletter should have been published at the height of the upgrades. A little bit of time lost is well worth the results though. One thing that many will be happy about, I'm sure? Well, see for yourself. Be sure to try out the Search feature at the top of the page. Of course, there are growing pains associated with change. The biggest issue that we are seeing at the moment is purely coincidental, and that is the decision by our formerly favorite photo-hosting site (Photobucket) to charge for third-party hosting. As a result, sadly, most of the photos in build threads, and posts from the past are missing in action. Hopefully members will get those threads repaired, but that will be a lot of work for everyone to tackle so we will see what happens. In the meantime, get comfortable with the new setup, and if you find any bugs/glitches/problems - or if you have any good suggestions for improvement, please share them with the Staff. We will be doing the same! You Know What I Think is One of the Best Things About Being a TK? I say it and post it all the time in Star Garrison, and I'm sure that the non-TKs are really tired of it, but that's alright, they hate us cause they ain't us. Anyway, what I say (to pretty much every single new recruit to the Garrison) is this: When it comes to events and costumes, there are never enough TKs, and there are never too many TKs! Being a Stormtrooper doesn't make you cool, but if you are cool, you're probably already a Stormtrooper! Have Fun and Be Safe Out There, Troopers - Take Lots of Pictures and Share Them Here, Too! With Unquestioned Loyalty, Tim Waychoff TK-51878 "Dark CMF" FISD Executive Officer http://whitearmor.net/images/newsletter2015/notabletroops.png Want Your Troop to be Include? Post your troop report in the Field Training Exercises section here http://www.whitearmo...ning-exercises/. Those with troop logs please post a separate troop report as it is easier to link too. RSPCA Million Paws Walk 21st May 2017 http://imageshack.com/a/img923/9141/FfbIe6.jpg More here: http://www.whitearmo...-21st-may-2017/ By: Glen, gmrhodes13, TK85421 Walk A Mile In Her Shoes More here: http://www.whitearmo...s-solo-journey/ By: Teresa, Soulart, TK41307 May the Fourth Rycroft School More here: http://www.whitearmo...der-candidates/ By: Teresa, Soulart, TK41307 HBF Run for a Reason 2017: Imperial Attache Outstanding Achievement Award In order to recognize those who have gone above and beyond the call of duty as members of this program, the FISD would like to announce a new accolade: The Attache Outstanding Achievement Award ribbon. This distinction will go to those who are not only consistently assisting present Troopers, but helping future Troopers on their white armor journey as well. This includes greeting first-time posters, offering advice and guidance, assisting with EIB and Centurion levels and staying active on the FISD and/or their local boards. Recipients are considered on the basis of a combination of those contributions and been an Attache for at least one full year. For those of you not familiar with the program, the Imperial Attaches are the ones that are on the "front-lines", using their knowledge and experience by helping out in various areas and contributing to the betterment of the FISD and 501st Legion. If you are interested in joining the program or would like more information, I have provided a link below. Below are the Troopers who will be receiving the award : 1. Randy (magni) NEG Attache- Is always in the forefront of providing great information, greeting new folks and assisting future and approved TKs with advice and guidance. 2. Allan (allan1313) ECG Attache- Also a mainstay here and one of our best I.A.s by far, he exemplifies the "Troopers helping Troopers" motto. 3. Tony (ukswrath) GGG Attache- In addition to serving as one of our D.O.s and helping folks on a daily basis, Tony's build threads have been viewed over half a million times! With over 8,000 posts to his credit, his contributions to the FISD are legendary. 4. Andrew (Sly11) Redback Garrison Attache- The "Wonder from Down Under" is also one of our D.O.s, and his knowledge of armor is simply amazing. His white armor wisdom and sage advice have helped countless Troopers become members of the 501st and FISD as well as join the ranks of EIB and Centurion. Please join me in congratulating them, and may you continue to serve the FISD, the 501st Legion and the Empire proudly! Attache Program information: http://www.whitearmo...ttaché-program/ With Unquestioned Loyalty, Joseph Pedigo TK-10963 "justjoseph63" FISD Amabassador http://whitearmor.net/images/newsletter2015/advancedtactics.png This month the 1st Imperial Stormtrooper Detachment would like to congratulate: Expert Infantry Badge Award: Will Humphies "willatfisd" TK 10064 EIB 727 Logan Lange "Logann_Blueline" TK 50911 EIB 728 Telmo Aparicio "Thrawn78" TK 50678 EIB 729 Joshua Hitt "hittman" TK 11051 EIB 730 John Cambra "johnbc21872" EIB 731 We are aiming to hit the 1000 mark for EIBs this year, and thanks to you we are getting close fast! Centurion Award: http://www.whitearmor.net/eib/centurion_badge.png Brian Vetter "vettereddie" TK 75053 (Centurion 334) Stephen Bauchan "GoofySGB" TK 17081 (Centurion 336) Roy Owen "rjowenuk" TK 91055 (Centurion 337) Will Humphries "willatfisd" (Centurion 338) Great job on reaching Centurion! If you see any of these Troopers around your Garrison or Squad, be sure to congratulate them! With Unquestioned Loyalty, Joseph Pedigo TK-10963 "justjoseph63" FISD Amabassador http://whitearmor.net/images/newsletter2015/followfisd.png Don't Forget We're on Facebook and Twitter! Facebook: www.facebook.com/whitearmor If you're on FB, stop by and say hi, ask questions, and share stories! Twitter: www.twitter.com/FISD501st or @FISD501st follow FISD on Twitter! Instagram: www.instagram.com/501stfisd With Unquestioned Loyalty, Tim Waychoff TK-51878 "Dark CMF" FISD Executive Officer On behalf of the 1st Imperial Stormtrooper Detachment Command Staff and the Imperial Propaganda Department, <End Transmission>3 points
-
I'm disappointed Christine... You forgot the cod slicing .gif! About that cod slicing thing, one thing I was a little bummed during your RS build was the way you trimmed the lower section of the abdominal plate to meet with the new lines of the cod. You removed the whole lower section when I think it could have been preserved. Here's a picture from your RS build to show you what I mean: I know you don't get a perfectly continuous curve as with the trim line you used, but I think leaving this area makes the abdominal plate look more accurate than if you trim it.2 points
-
Okay, time to slice up some cod, shall we? If you're short like me, you will most likely need to do this to your armor if you want it to be comfortable (and look good, too!). It's not as scary as it looks. It helps to: 1. bring the cod closer in to your respective bits and pieces 2. reduce the height of the ab Do not, I repeat do NOT cut your ab before cutting your cod! You may end up cutting off too much of the top of the ab, which will result in your ab constantly popping out from beneath your chest (not a good look at all). Cut your cod first, then check how your ab and chest are doing. You may not even need to remove anything from the top of the ab once your cod has been cut down. First, line up your ruler to the width you want and clamp it. For me, the width of the ruler is perfect. Next, trace your line. Line traced should look something like this. Using your cutting implement of choice, slice that cod! I then cover the inside lower part of the ab and top part of the cod with ABS paste, and stick them back together. I made sure to cover the seam with extra ABS paste for strength. It all gets taped up, clamped, and given some quiet recovery time while it heals from surgery. So you can see how much of a difference the cod cut can make, here's a set of before and after shots. I still may end up taking a little off the top of my ab, but it won't be much. The center box on the ab was too high before, and it's now in the correct position relative to my frame. I still have some cutting to do along the hip area, but that'll happen later on while fitting. As you can see, a quick and easy cut can really make a big difference in how the armor will fit you. So to all of you vertically challenged wannabe troopers out there, don't fear the cod cut!2 points
-
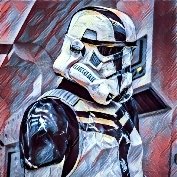
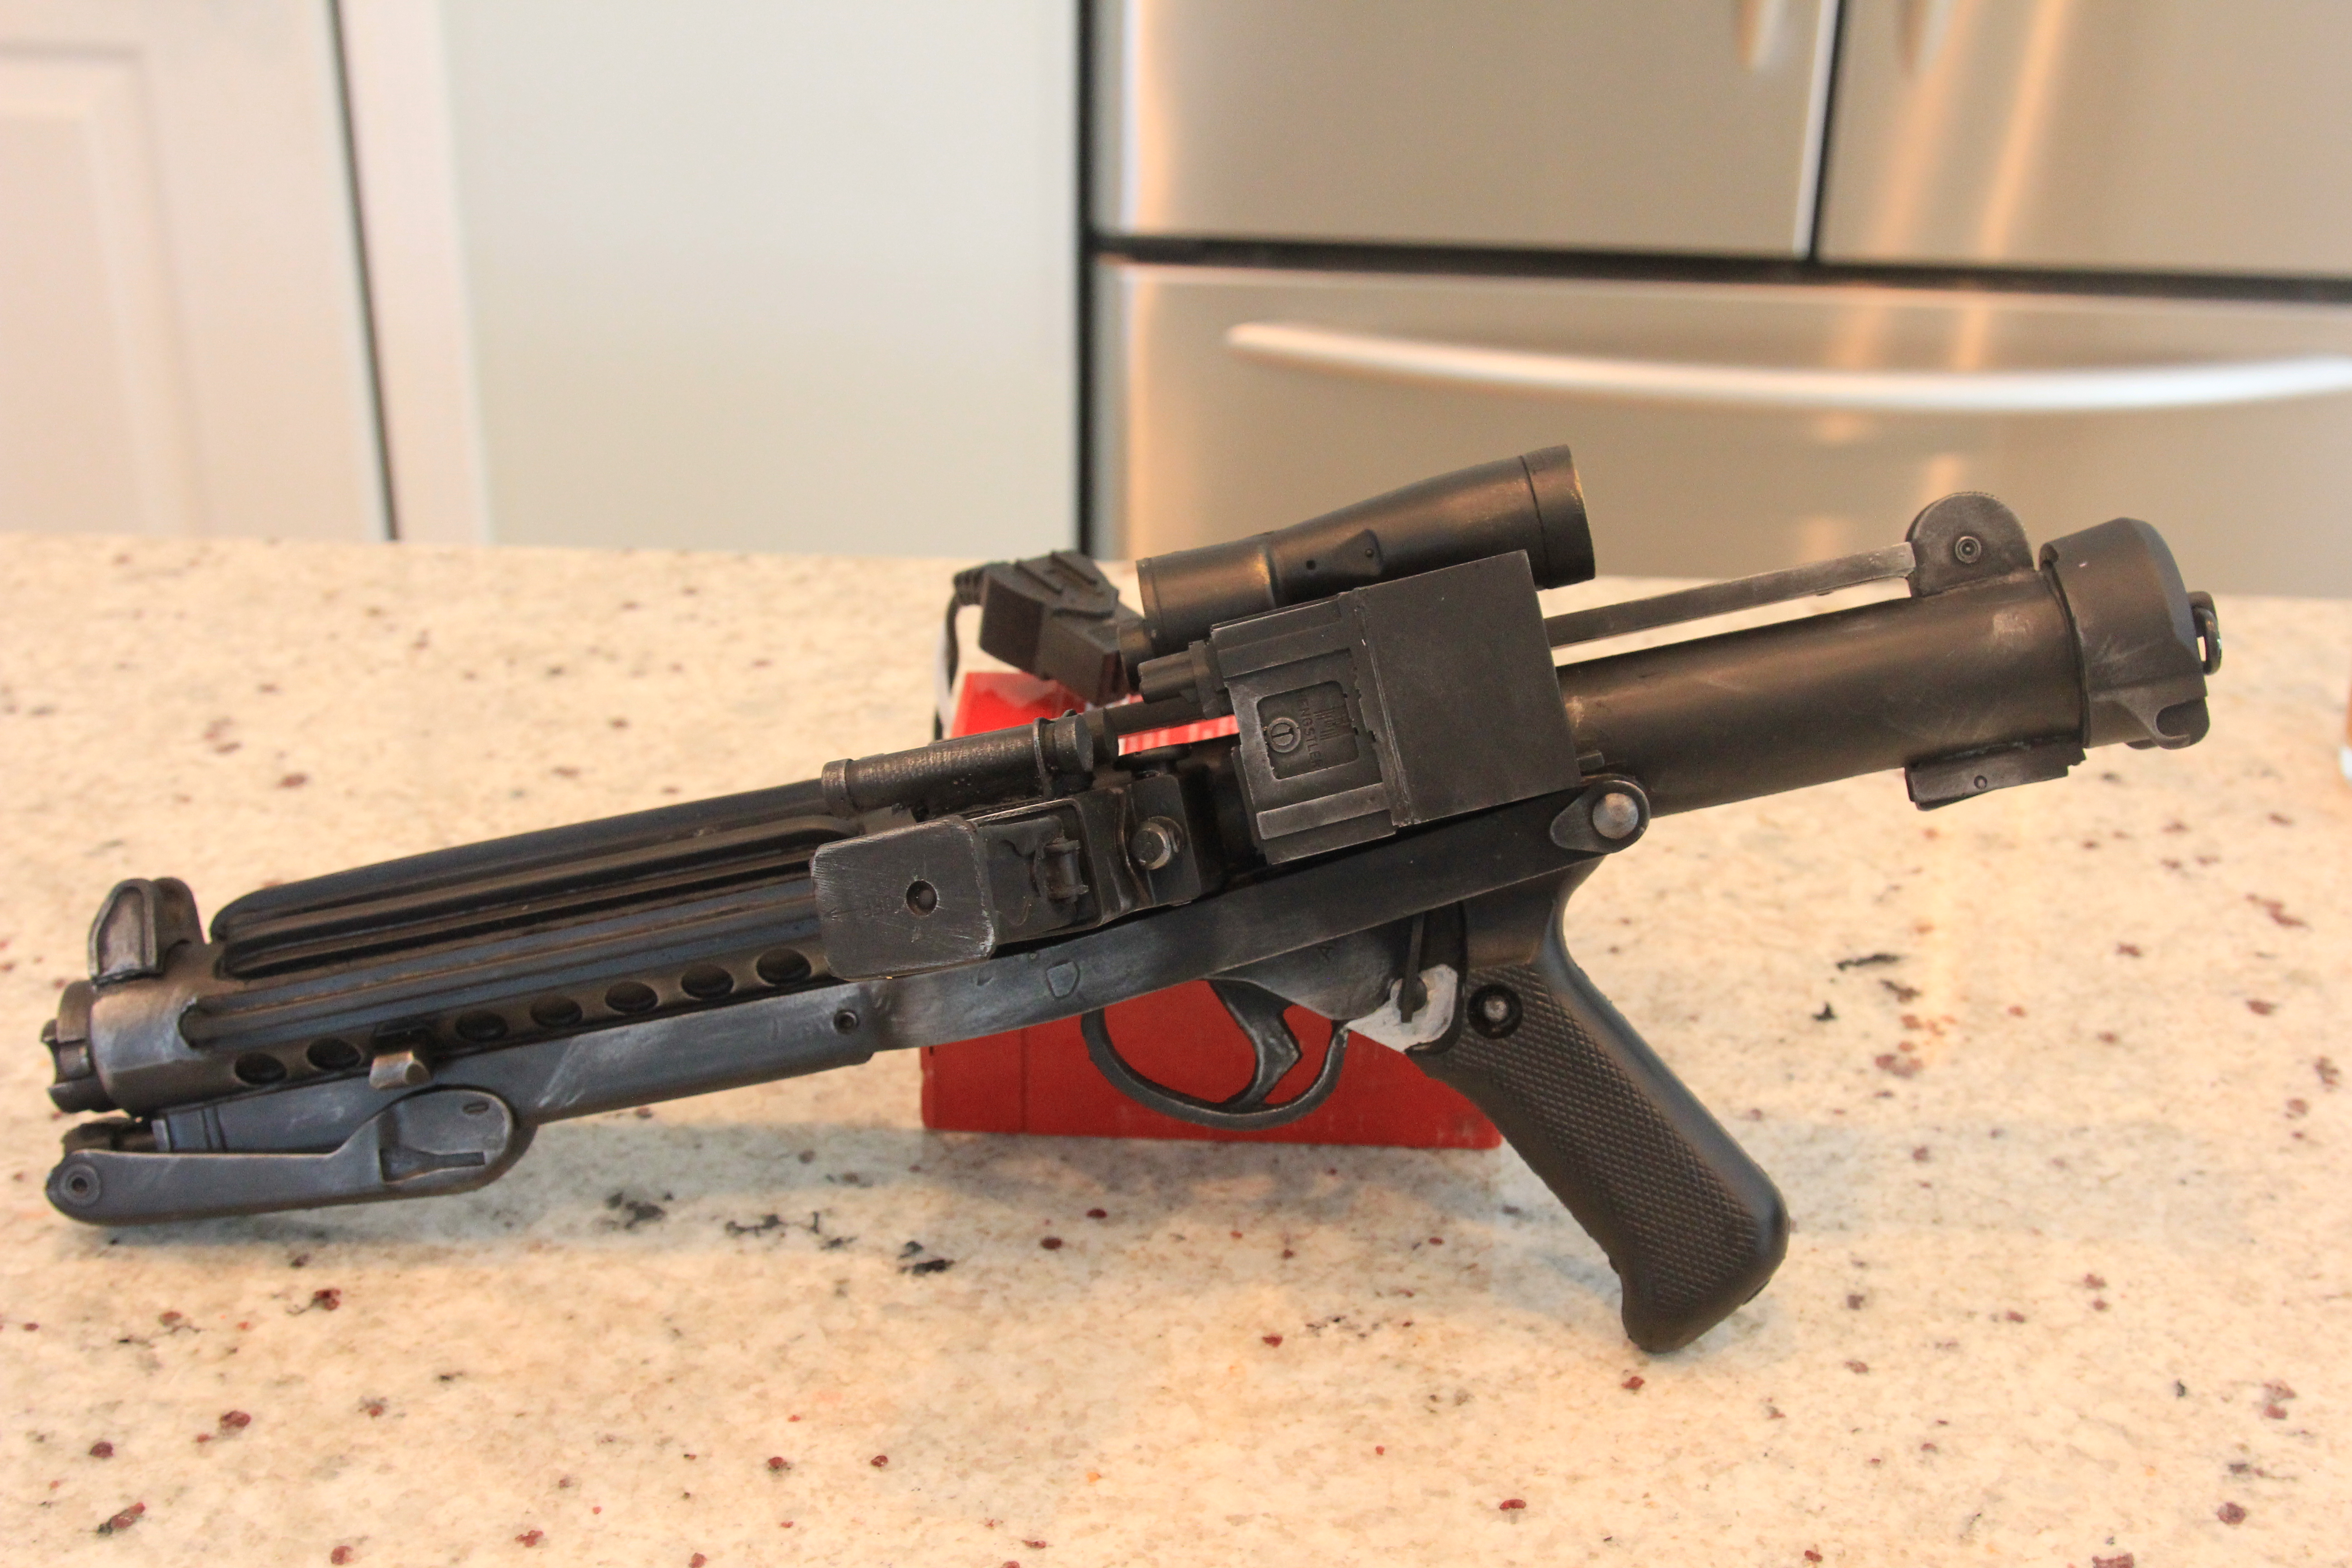
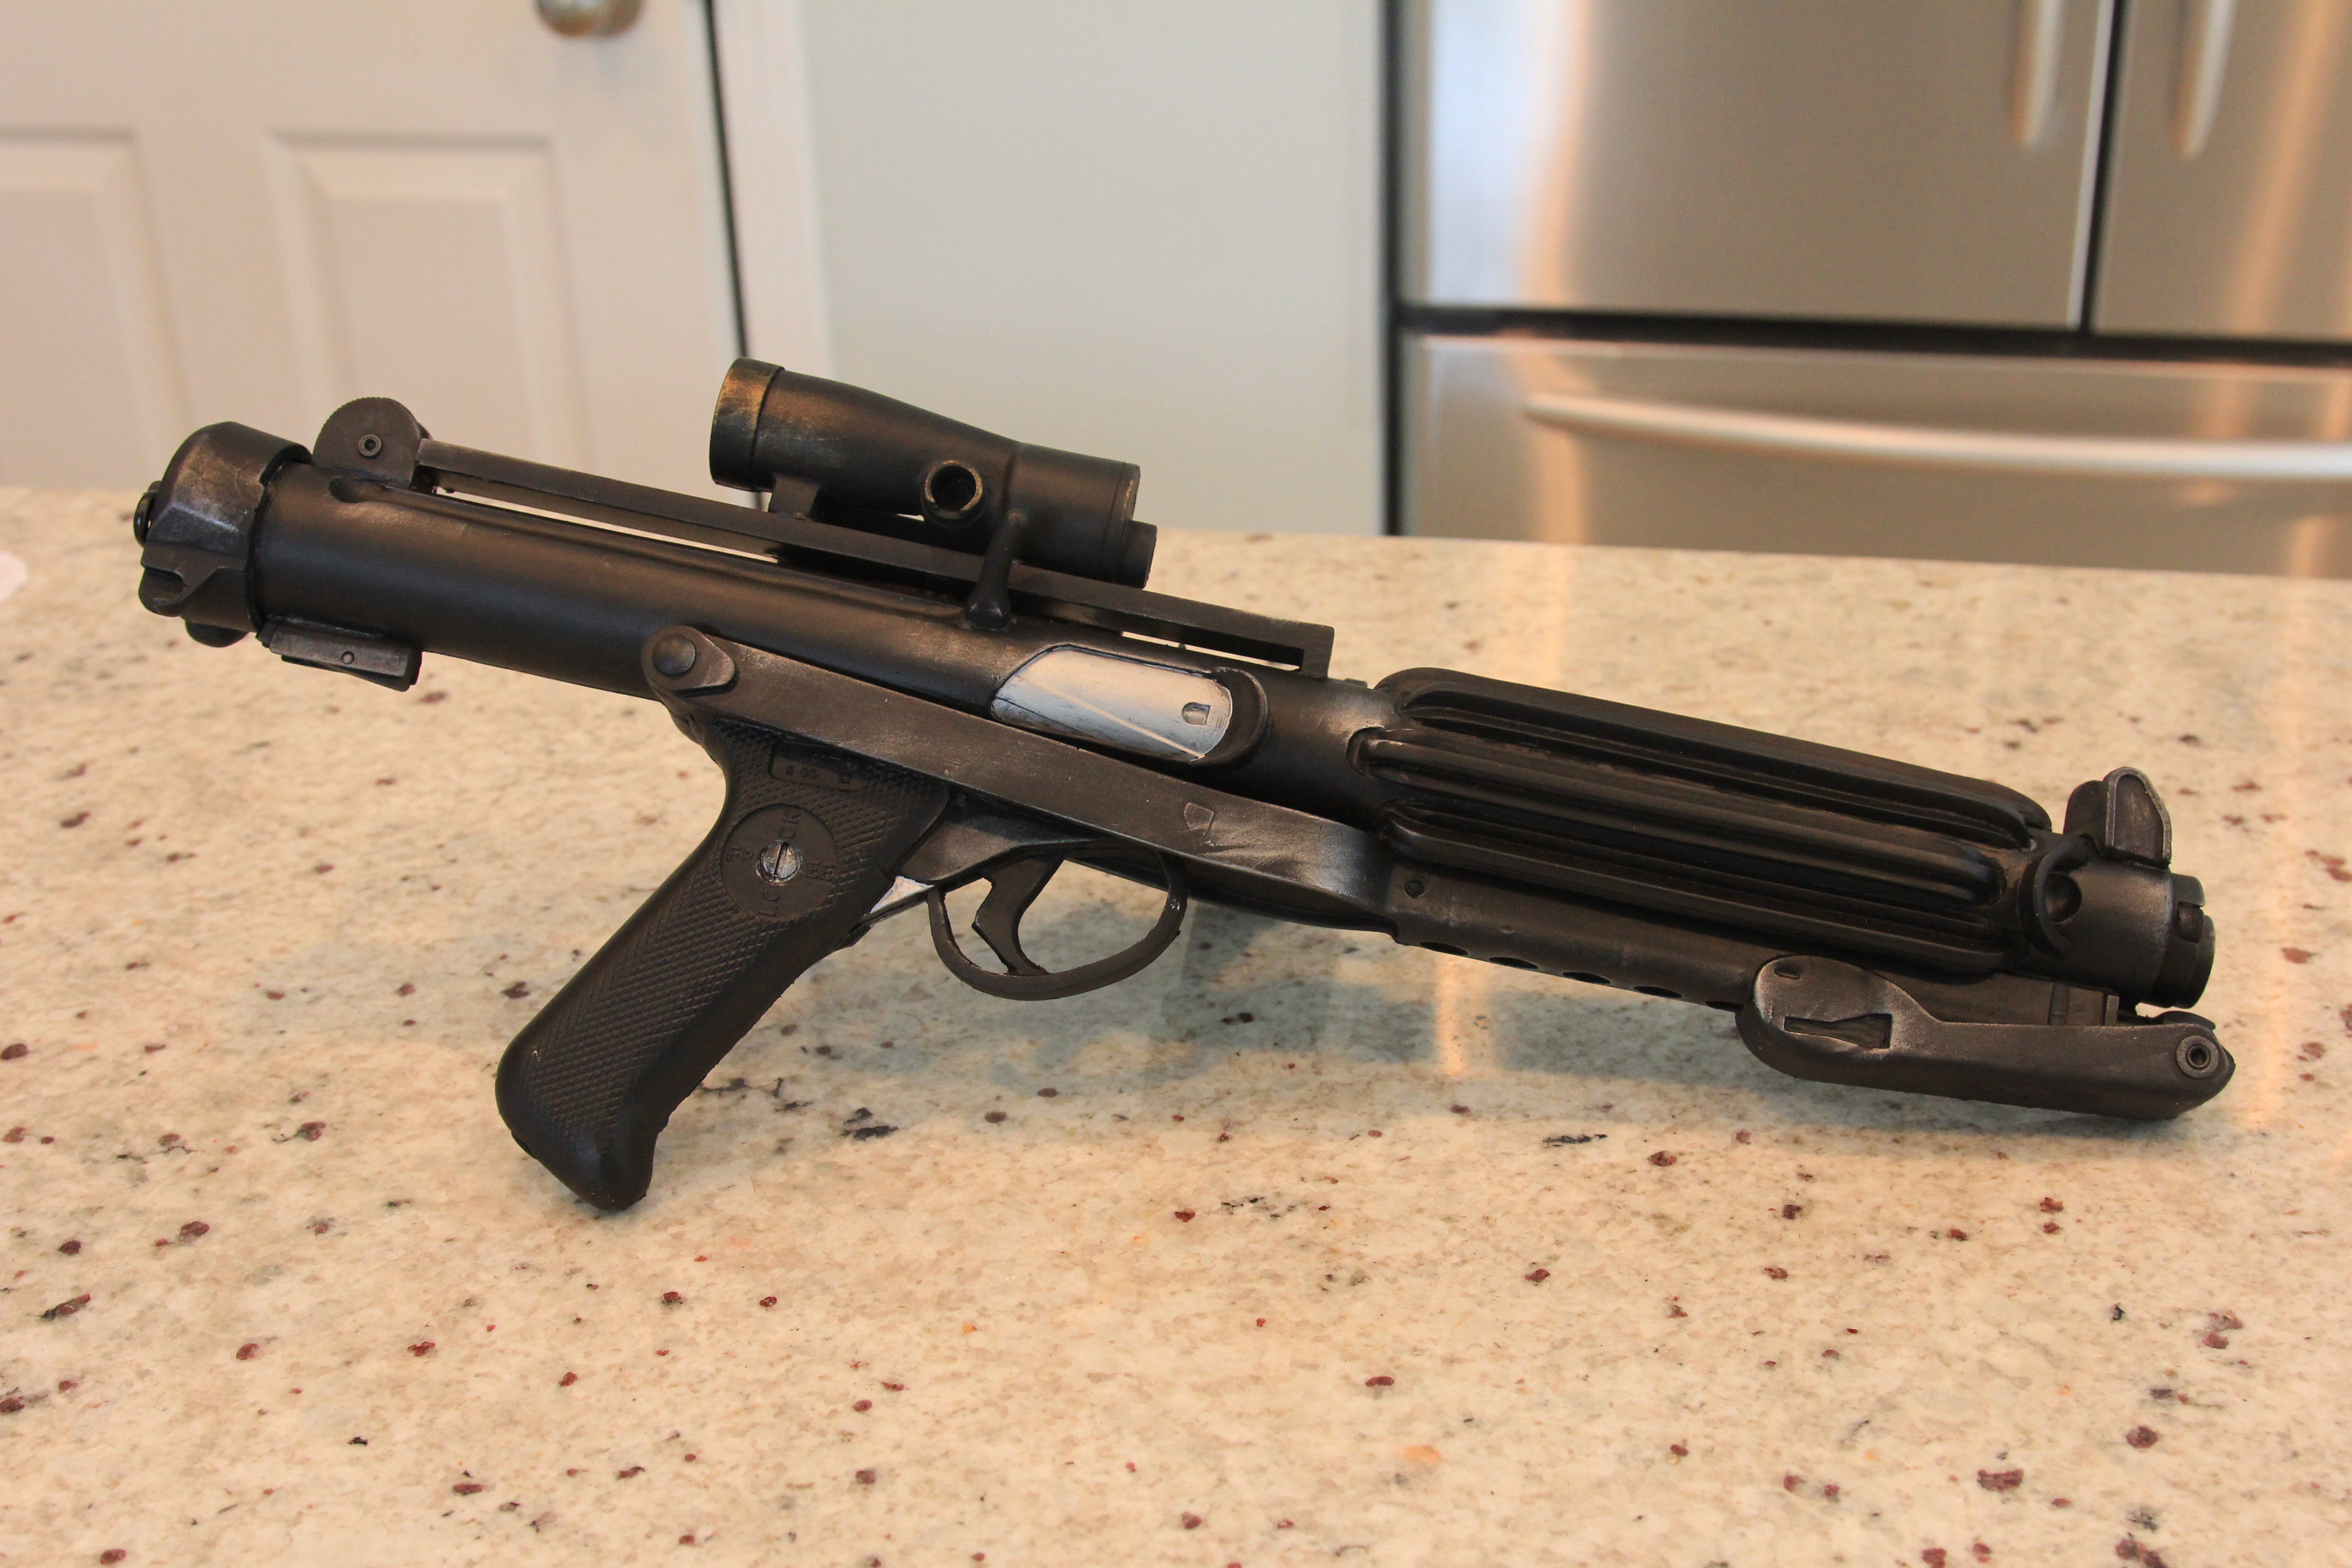
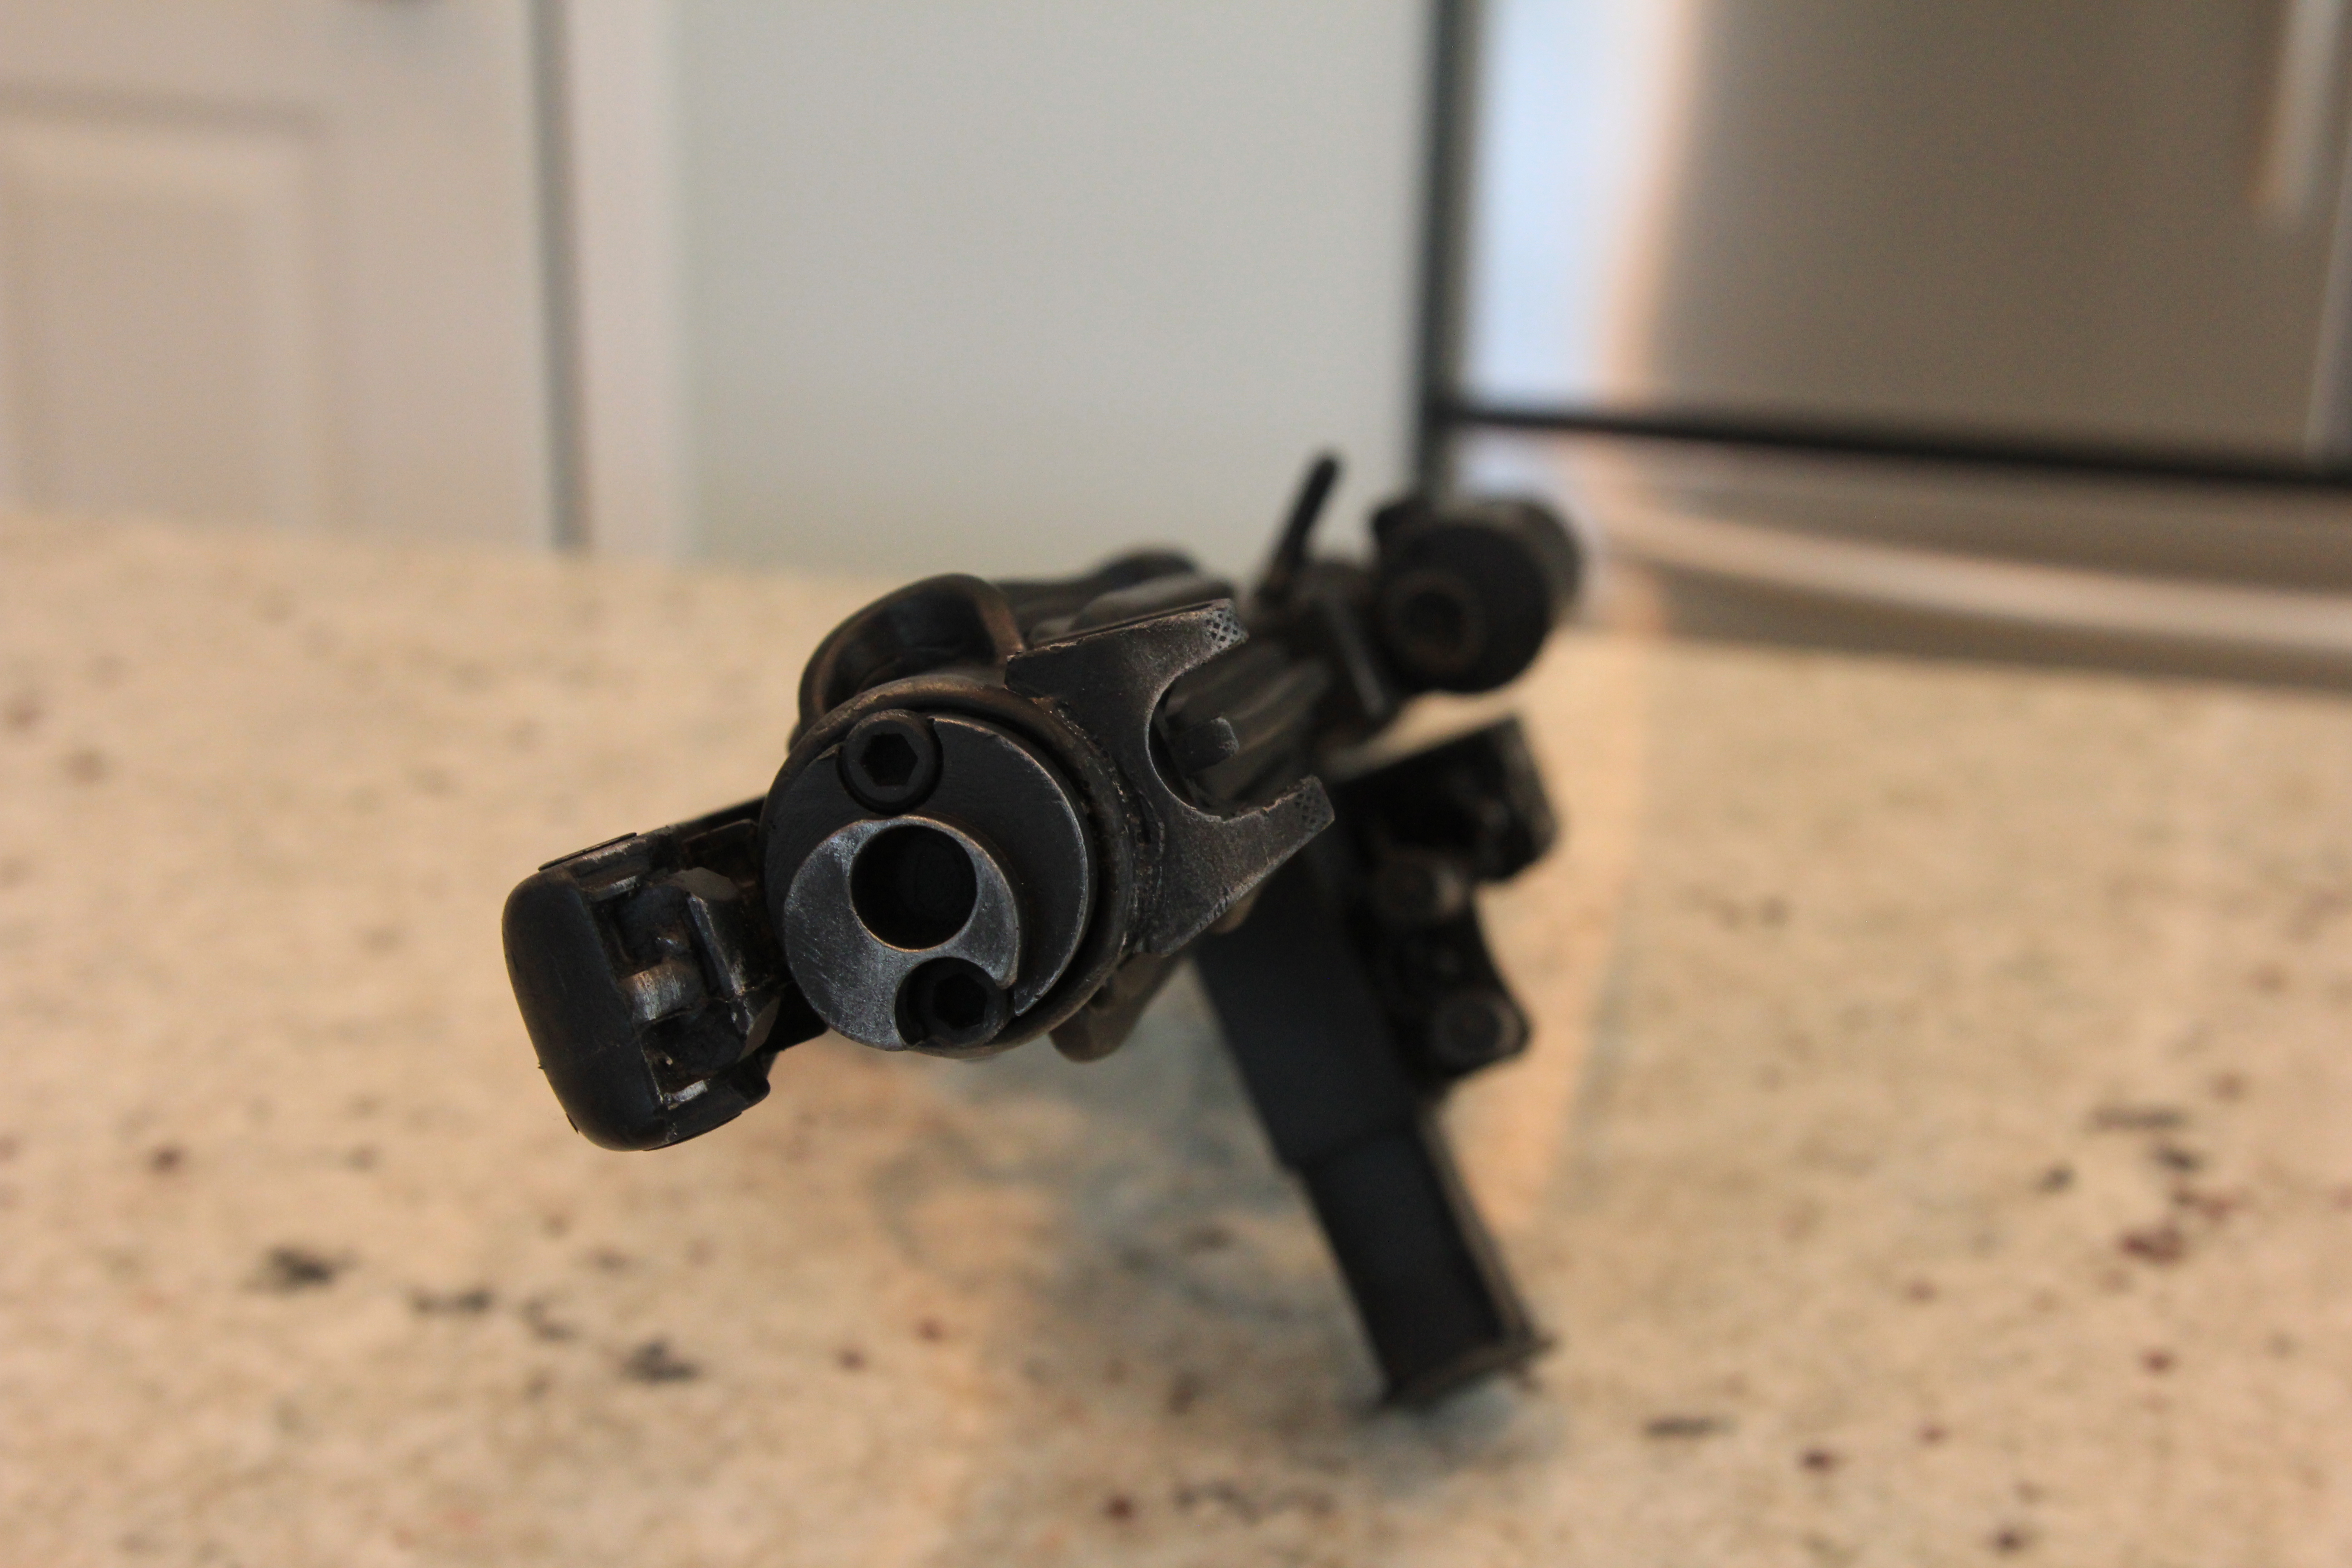
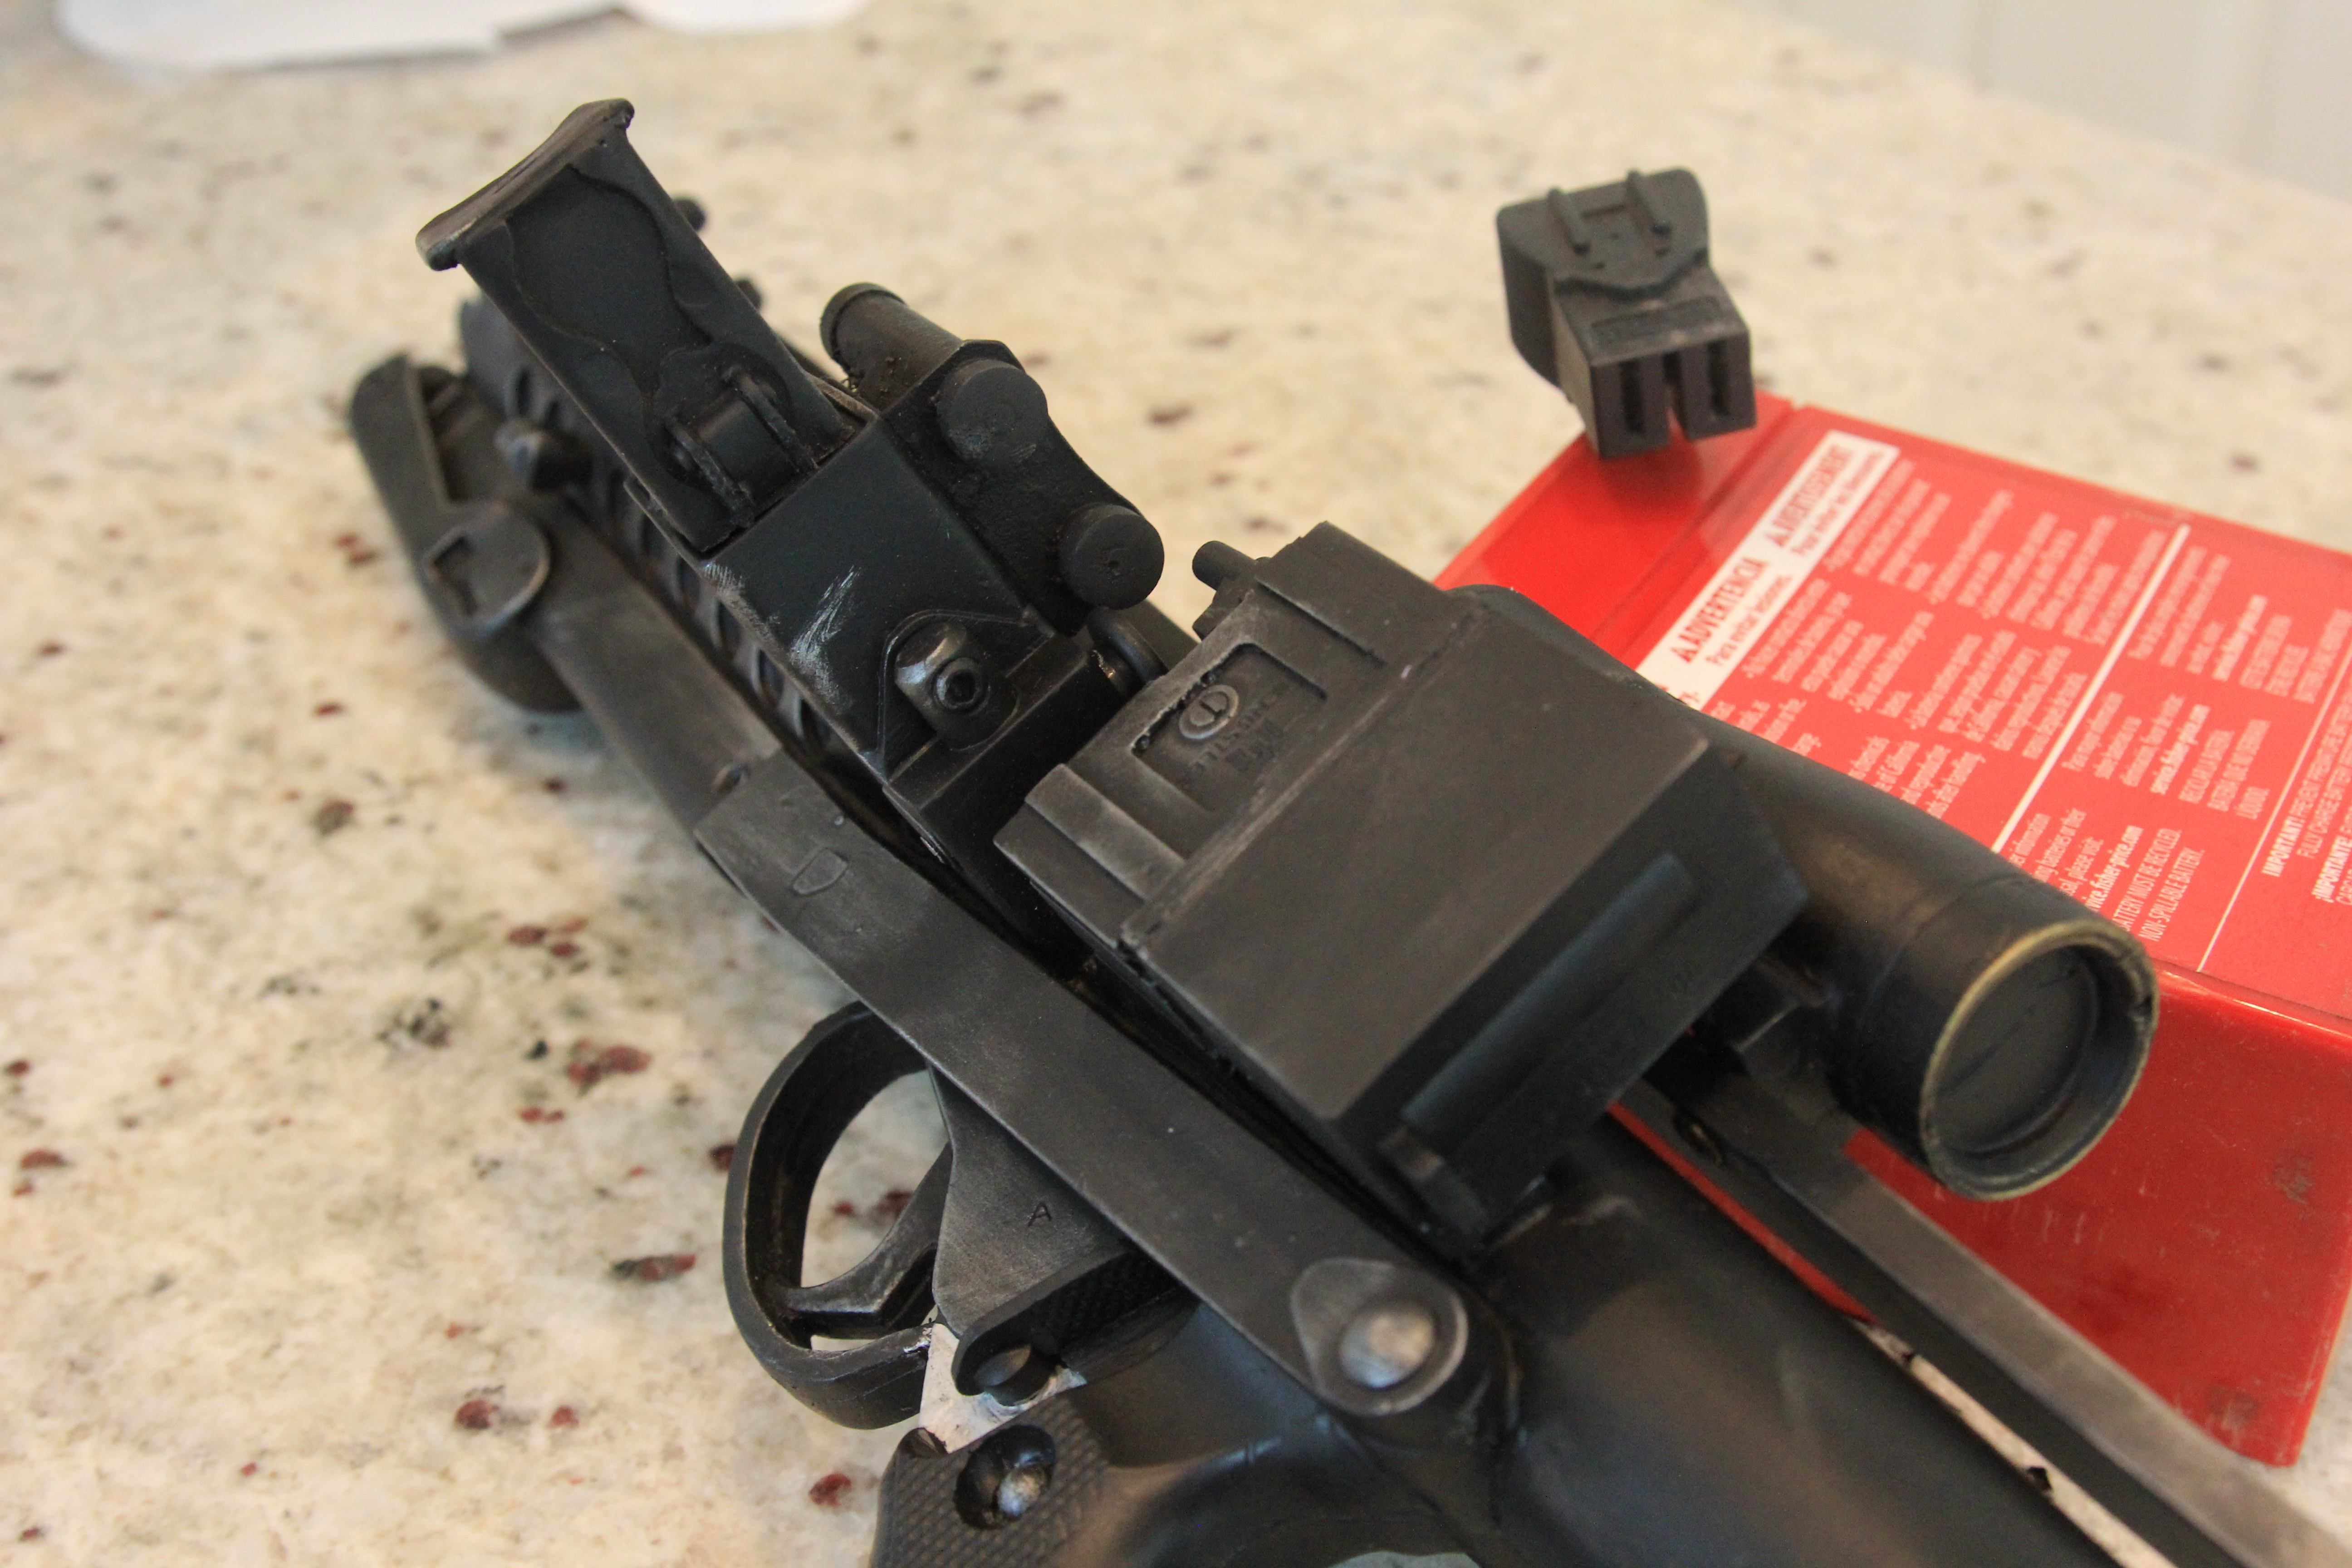
Greetings fellow Troopers, A few months ago, I finished a T-21 scratch build using templates from Pandatrooper. He did an amazing job on both the templates and the instructions. I was looking for something similar for the DLT-19. As many of you know, there are some blueprints available. These schematics do a nice job showing scale and detail, but they didn't provide piece by piece cuts. I guess I was looking to be spoon fed. Using these blueprints, I made my own simplified templates that can be applied to wood and PVC pipe/couplings. My goal was to construct a sturdy DLT-19 using standard hand tools with parts that are readily available. You will notice that there are some details missing, such as a trigger, sights, T-tracks, and other small greeblies. I left the trigger and sights off because I plan to troop with this thing and it will get thrown around. I was afraid those parts would snap off or get caught on something. If you decide to construct a DLT-19 with these templates, perhaps you can improve on the design. I've seen a few other scratch builds on here that are MUCH better than mine. I guess you can consider this a simplified version. If you find ways to improve the build, please share with the class! Before we jump in, I'd like to give a shout-out to Astyanax here on whitearmor.net. I used some of the ideas from his build (found here). Specifically, the mouthwash cap for the endpiece, and shelving brackets for the bipod. The trooper that drew up the MG34 blueprints is also a member here. If you are reading this WizardOfFlight, thank you for the awesome blueprints! Without them, I wouldn't have known where to start. Instead of writing up a bunch of steps with photos, I made an instructional video. It gave me a chance to play dress-up and incorporate some cheezy special effects. It's a DLT-19, there's a lot going on, so the video weighs in at 30+ minutes Here is the video: Here are some pics of the finished product: Here are the ingredients: DLT-19 Wood/PVC/Plastic templates http://wp.me/p6OqN2-1se FREE 1” x 10” x 6’ (actual: ¾” x 9-¾” x 6’ ) premium board http://low.es/2kW8vw5$10 1-¼” PVC pipe (2 feet) http://thd.co/2lCSM43$4 4 x 1-¼” PVC couplings (Home Depot couplings were more uniform on outside) http://thd.co/2kz0yMo$3 1” x ¾” PVC adapter http://low.es/2l3hUnX$1 (Lowe’s has wrong pic on the site...product number in the link is correct) ⅞” wood dowel http://low.es/2kksX7O$4 Plastic sign http://thd.co/2l3qALi$5 Shelving brackets http://thd.co/2kGRszu$6 ½” type LB conduit body http://thd.co/2kki7Pc$3 ¾” corner braces (2 packs) http://low.es/2hID3hB$4 Mouthwash cap (large) local Grocery/Pharmacy ~3$ 1-½” PVC conduit clamp http://low.es/2l8Uj4Z$2 ½” #8-32 flathead machine screws and nuts http://low.es/2iIIyOZ$1 2” #8 wood screws http://low.es/2kksAuj$1 2” #10-24 round machine screws and nuts http://low.es/2kgC3ra$1 ¾” #12 oval-head sheet metal screws http://thd.co/2kH4pJV$1 ¾” #6 oval-head sheet metal screws http://thd.co/2kktXJa$1 #6 finishing washers http://thd.co/2lEocYK$1 ½” mending plates http://low.es/2lCRczh$4 #10-24 rubber well nut http://low.es/2kWn9Dv$1 ⅜” #6-32 round machine screws w/ washers & nuts http://low.es/2kgDxl9$1 ½” #4 pan head sheet metal screws http://thd.co/2h4Ikox$1 ¾” chicago bolts x 4 http://low.es/2kH3EjY$4 ½” chicago bolt x 1 http://low.es/2kkq1Z7$1 ⅝” or ½” #8 oval head sheet metal screws http://low.es/2l7O8yd$1 1” #6 oval head sheet metal screws http://low.es/2lD7zfr$1 ½” #8 machine screws, nuts, and finishing washers used to fill the holes in the shelving brackets $1 Approximate cost of materials: 66$ Finishing Materials Bondo E6000 adhesive Elmer’s Wood Glue Sandpaper (60, 120, 220, 400 grit) Friction tape #0000 steel wool Graphite powder http://amzn.to/2lFq4R7 Rustoleum Painter's Touch gray primer spray Rustoleum Painter's Touch flat black spray Rustoleum Painter's Touch metallic aluminum spray Satin clear spray Polyurethane in satin finish Tools Jigsaw http://amzn.to/2klqxGd Dremel http://amzn.to/2lFpfrB Drill http://amzn.to/2klyStp Drill bits http://amzn.to/2kluKtE Hacksaw http://amzn.to/2l8Vl0R Files & rasps Screwdrivers Lexan scissors http://amzn.to/2klB5Fi Star Wars pencils! http://amzn.to/2l4wHz0 Airbrush (optional) http://amzn.to/2l4x7VV Hope you guys can improve on the design. If I add any additional templates for the build, I'll put them in the zip file in the d/l link. Thanks for looking! This build does take some time and patience. Your hard work will pay off in the end, the DLT-19 is a beautiful weapon!1 point
-
11 years ago today, this forum was cranked up for the first time and users registered and logged in. At the time I wasn't even sure if I'd get 10 people to sign off on the charter, but I figured if I could help at least a few troopers avoid the mistakes and mis-information that were common at the time, I'd be OK. It's been a fun ride - here's to 11 more!1 point
-
Basic Information Name: Jen Ward Legion ID: 70305 Garrison: Midwest Garrison Mandatory Information Armor Maker: Anovos Helmet Maker: Anovos Blaster Type: Hyperfirm Optional Information Height: 5'7" Weight: 155lbs. Boots Maker: TK Boots Canvas Belt: gazmosis Electronics: AKER Neal Seal Type: Darman Holster Maker: Anovos EIB Link Requested Fixes From EIB Full Body Armor Details Helmet Detail Blaster Detail Accessory Detail Action Shot Me1 point
-
Yeah move the brow up 2-4 cm and paint the ear screws white.1 point
-
No. It's ready when it's ready.1 point
-
FYI, I may have started it all, but it was the tireless and unrelenting effort of a whole team of people who helped build and grow this site. Everyone who has ever been on staff is owed the same gratitude.1 point
-
1 point
-
Yes, he needs to join the Florida Garrison forums and ask for local help. Alternatively, he could start a build thread, post his photos here, and we can provide feedback as well.1 point
-
Hey, cool! Yes, very proud. One tip, please don't attempt to install these until you've fitted your shins perfectly to your legs. Once you've made the cuts for the magnets to fit, that's it- future sizing will be super difficult after that point. Before installation, you'll need your shins to not only fit, but to meet together at the back nicely. It took a hot water bath to do it, but here's how mine looked right before adding the magnets: My goal was to make sure the tops lined up and they closed on their own without any assistance, and I think I achieved that. The awkward cuts were not the fault of the RS armor. That was entirely user error. These cuts could have been made much more straight if I had known what I was doing in the first place. I know now to always clamp a ruler to your shins while cutting if you want straight cuts. Good to hear that the greave trimming is coming along! My greaves did not arrive to me in perfect alignment at the back, either. I had to do a lot of fine tuning to get them just right. I ended up cutting them at an angle, kind of like a pie wedge, so that the ankles were tapered in more than the tops. Here's an example of how my cuts went on my shins (it's a thigh, but the same principals apply): Keep up the good work, Stephen! You're on the right track!1 point
-
Cutting the cod seems really scary, but it's not! You'll wonder why you feared doing it once it's done. The most difficult part is trying to figure out how much to bring the cod up. Reading other threads, I learned that the cod should be fairly close in to your nether region. I measured the gap between the cod and my bits, and used that measurement as the amount that I needed to move the cod up. Once it's been moved up, you'll find that it's much easier to walk around without all that extra junk out there. At least it was for me. haha... Yep, inner cover strips on everything for me first. It adds strength and is less prone to shifting on the parts while sizing. (Especially when shaping things in hot water baths!) So for the greaves, I cut them all down when fitting, including the inner cover strips. Here's what one of my shins looked like during fitting of my RS kit with just the inner cover strips installed. (Apologies for the lousy vertical cut on this. Ugh!) Then once the whole kit is sized to fit, I add the outer cover strips as a final step. This way, I can ensure that the cover strips I install are the correct size. I wouldn't want to install the outer cover strips first because I like to include the little corner details to the cover strips. Installing the outer cover strips first would mean that those details would get removed if/when I needed to shorten things during final adjustments. If you're a screen-accurate purist, you could always install inner cover strips first, then once you're done with the build, they could all be removed.1 point
-
He should be able to get help from his local Garrison. Have him post for some assistance. Lot's of TK's and gators in Florida.1 point
-
Hallmark doesn't really make a card for this, so here's a cake!1 point
-
Thank you for creating this wonderful forum Paul.1 point
-
Thanks for the help. Its not just me then.1 point
-
Yup, the team is aware and they are working on it. It will be ready when it's done.1 point
-
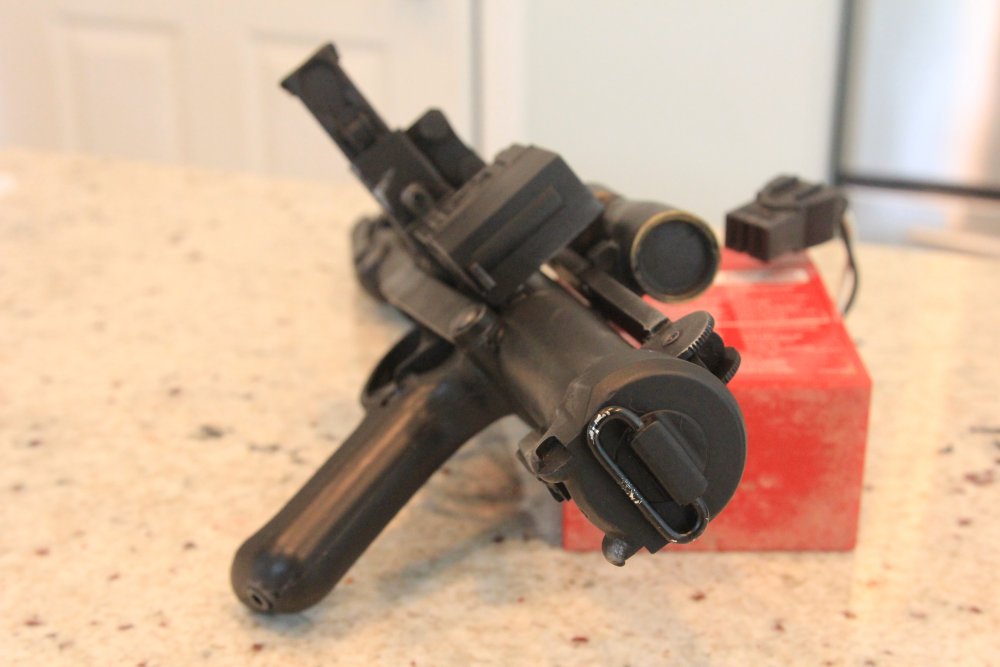
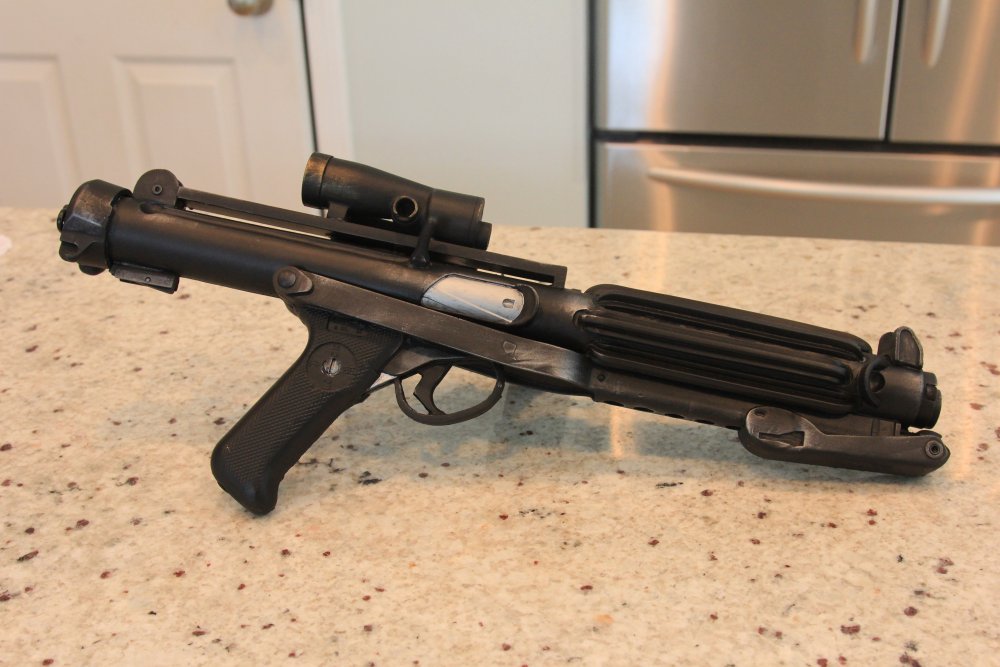
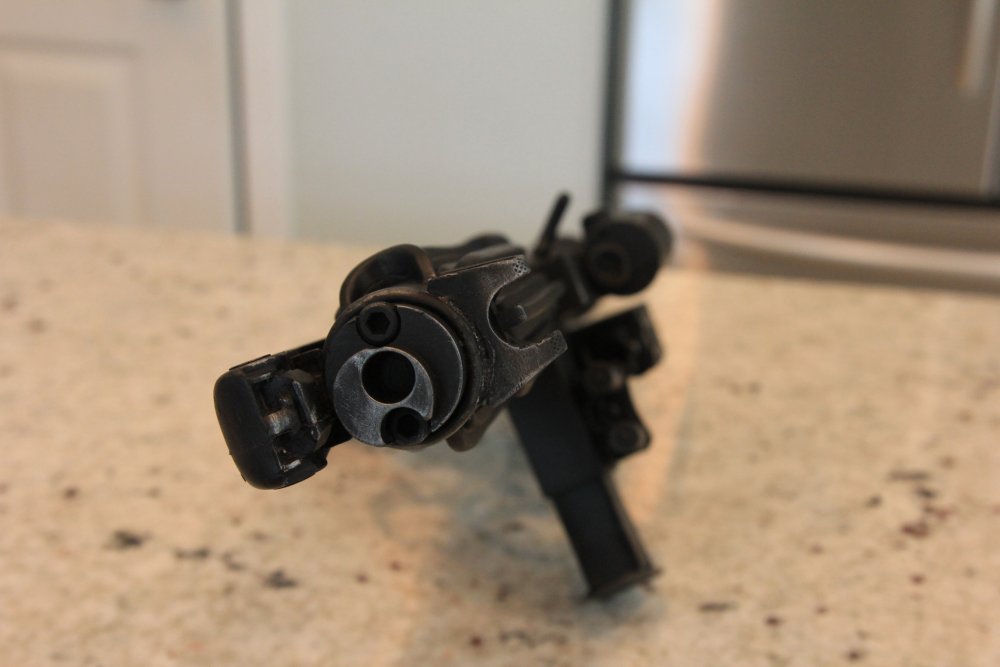
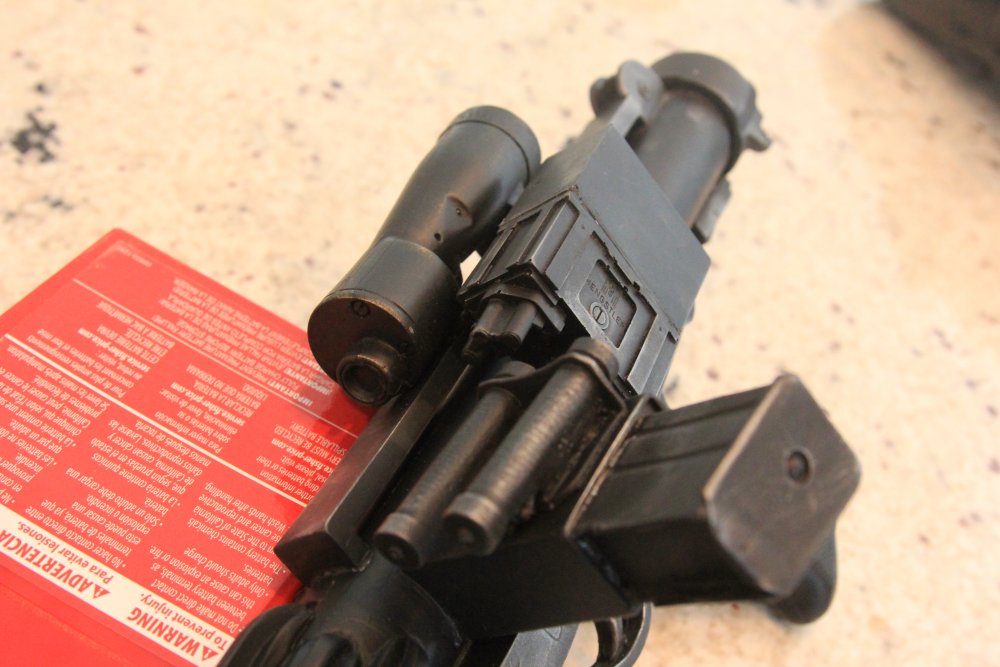
Hi everyone. So I was just fortunate enough to get my hands on one of the new Hyperfirm Elites from Lewis. I'm really excited about it so I just wanted to make a post about just how awesome this blaster is. In my opinion the Hyperfirm is one of the best trooping blasters out there. I used to have one of the older Hyperfirms and I thought that was one of the coolest blasters and never ever had to hesitate taking it out on a troop and letting an attendee touch it or hold it. The kids would love it when you hand them your blaster for photos. Well with his new changes done to the elite it makes it even more nicer. The details are a lot sharper on the elite then the old model. There is now a defined hole in the muzzle where the old one did not really have too much of a hole. Even the greeblies are there and more defined. One of the more interesting aspects of his new blaster is that you can choose which scope you like (M32 or M38) and which size magazine you want. You may also choose not to have either scope put on and ultimately use your own. However, these are all decisions you would need to make before you receive your blaster. That is a cool added extra touch. It also comes with a D Ring so you can go Centurion with it. Take a look for yourselves. Here are some photos:


 1 point
 -
When it's ready.1 point
-
Thanks. Taking my time and learning as I go. Sent from my SM-G935R4 using Tapatalk1 point
-
Trimming begins today. Ugh. I forgot how much trimming needs to be done. That kind of thing is easy to forget about once you finish your first kit. Seems like a really long time ago that I was doing this. So, let's get to it. Yep. Untrimmed chest. I'll be removing the bottom return entirely (yay- one less return to rebuild!) for this build since I'm going for a Luke look. And this is my challenge piece. The kidney/butt all-in-one. I want to keep a return on the top of the butt plate. I'm not concerned about the bottom of the kidney because I'll be trimming about an inch or so off of that to shorten it for my size. So I really had to think about how to dissect these. My solution was to cut a bit above the ridge between the two parts. This would leave some extra ABS on the butt plate where I can create a new return using my handy-dandy heat gun, wood jiggy-ma-jig, and wood stir-stick-flattening-thingy. It's all very scientific, you know. Which leaves my butt plate edge looking like this: Once I heat that edge, I'll simply fold it over, flatten it out, and voila... new return. Shouldn't be too bad. And since I haven't trimmed this kit to my size yet, I thought a comparison should be in order. The untrimmed WTF is on the left in the first photo, and on the right in the second photo. My RS Props kit is next to it so you can see how much I had to modify things. And I'm stopping there for today because my hand hurts from all the trimming. And I've only just started.1 point
-
They're pretty straight forward, elastic loops attached to the wire arms screwed on to the armour. Let me know if you need any close up photos.1 point
-
1 point
-
Yes, they should be as tight fitting as possible. For instance, the racing underwear that some have here are pretty baggy in the elbows. When I was doing the same searching you are now many members directed me (and others) away from those because of that reason. Compression gear is the best choice. The Under Armour stuff is excellent and high quality but for the cost of one shirt you could have both the tops and the bottoms of the East Bay stuff. Also I haven't done a ton of troops in my 8 months of being approved but there isn't any wear so far on my East Bay stuff, it looks great after many washings. No matter which way you choose, Renaissance dance wear, Racing under suit, Under Armour, East Bay, just be sure it is as form fitting as possible, no sags or bunching should be visible anywhere. Also make sure it's the darkest color available with little or no logos. As Ingrid said above, you can always use a magic marker to black out the small logo on the Under Armor or East Bay. I have noticed that I didn't have to do that at all on my East Bays. The logo on the back of the pants gets covered by the shirt (and it's hidden behind armor anyway) and there isn't any obvious marks on the shirt so no problems there. Can't recommend the East Bays enough, affordable and exactly what you need for under your armor. There was a thread talking all about this earlier last year somewhere in the forum if you search a bit more.1 point
-
East Bay all the way baby! Cheap, totally comfortable and absolutely perfect for under your armor. Look no further my friends! Lol! I think I should go to work for those guys! Really though, Lots of folks use these here and everyone likes em. The best part is that if they wear out they're not a pain to replace. I also have some winter versions for the colder troops. I can't recommend these enough and believe me I went through all of the other options when I was doing my build. Save yourself some time and money and just go with these. --------------- They also often have a deal when you buy both!1 point