Leaderboard


Popular Content
Showing content with the highest reputation on 07/04/2017 in Posts
-
I'm currently building my TK so I don't feel qualified to post here, but what I would like to say, and I hope you don't mind, is that the help and support I have received with my TK build has been amazing and that's down to all of you. There are are times when I feel it's one step forward and two back as I progress through the build, or like now I seem to have hit a brick wall, when I see a fellow TK has liked one of my posts it makes me think "yes I am doing something right" and it gives me the encouragement to continue. Without the encouragenebt and support I have received on here and the UKG I think I would have fallen at the first hurdle . The new new look is awesome and I appreciate all the hard work you guys n gals put into this, thank you oh also looking forward for Tapatalk to start working again3 points
-
Chugging right along now... Decided to trim the ammo pack for the thigh. Not totally difficult. Just line up the ruler, clamp it down, then score lightly several times with the exacto knife along the ruler. I cut off just enough to get rid of those bumpy areas on either side of the boxes. Then snap. I like using my clamp to snap off ABS because it's easy to use, and it doesn't leave a mark. One side done. And both sides complete. My ab accessory parts all arrived on one big piece of thick ABS. I used my exacto knife to freehand score around them, and snapped them off. I'll sand down the edges later. Before trimming the drop boxes, this is what they look like. More freehand scoring and snapping, and they were free. Fair enough to say that I have a lot of extra ABS scraps now. I haven't even begun the fitting part of this build yet, but I have plenty to make ABS paste if/when I need it. This is a forearm. Just wanted to remind y'all that the tops of the forearms should match. There is detail at the top that you don't want to cut away when sizing. So when sizing the length of the forearms, match at the tops, cut at the wrists. I'll wait a few days for the e6000 to fully cure on my assembled pieces before getting to the hard work of sizing it all down and rebuilding the returns on the butt plate and bottom of the kidney. But here's the kit as it stands now. For those of you who are eagle-eyed, you may have noticed that I have three forearms in there. That's no mistake. I have an extra left forearm (and extra left shoulder bell) for the Luke version of this kit. I'll wear the right forearm until I earn Centurion on this, but then after, both forearms will be left forearms.2 points
-
Hi Everyone! My name is Brittany and this will be my first 501st build (but not my first experience with costuming). I first saw Star Wars 20 years ago, and always thought the bad guys are armor were the best (forget Barbie, twelve-year-old me wanted Boba Fett instead). After reading all about the 501st community and the wonderful work they do, I immediately began researching options for Stormtrooper armor and placed my order for the Anovos kit in August 2016. I knew the wait would be long, but that it would give me a chance to get all the tools and other little things I would need to build the kit to Centurion specifications right from the start. While waiting on the kit to arrive, I ordered a pair of TK Boots and began breaking them in. I tried out a few undersuits and finally settled on the EastBay Evapor line. I got my neck seal from Darman's Props, ordered the E-11 and DLT-19 from Hyperfirm, and picked up some latex hand guards from TrooperBay. I also spent countless hours reading the Anovos Builders FB page, the FISD forums, and UKSWRATH's Anovos build. After nine months of waiting, the BBB finally arrived this week. So much plastic (and so much trimming that will have to be done to get this to fit m 5' 7" frame). Happy to see Anovos left the belt unassembled for this run--mounting everything on a better canvas belt will be soooo much easier than I anticipated after reading other build threads. No over-spray on the frown (this one seems to have the opposite problem). No hard-hat liner, instead they lined the inside with velcro (seriously, the inside is 90% cheap velcro) and included a set of helmet pads. It looks like they used a different mesh on the hovi tips (not nearly as fine as I had seen included on the kits from last year's Anovos shipments). Now to find the time this week to actually start building1 point
-
Hi all! Thought I'd start posting here about my progress on my build. I've done very little so far, but I'm hoping to amp up the momentum while the weather's nice out. So far I have: Full kit and helmet (Jimmi): initial wet sanding, washed down Harness/Neckseal/gaskets (Geeky Pink) Boots (ordered) Obviously I still have a lot to acquire haha Aaand just a pic to show the initial fit of the top pieces with my gaskets/neck seal!1 point
-
Hi Juan, you have done a great job Bro. Good luck!!! A hug. Juan has hecho un gran trabajo Bro!!! Buena suerte. Un abrazo.1 point
-
Very nice! Maybe just clean up the edges (old paint) a smidgen.1 point
-
It's actually very light, Ted. I have trooped for up to 5 hours with mine with no problems.1 point
-
1 point
-
Looking good now. Just like the vocoder Tony posted.1 point
-
Wearing that RS Well Frank! Good Luck!1 point
-
Thanks again guys. Am hoping with the adjustment below, I'm in better shape? I'll just need to cleanup the pencil lines and sharpen the edges. The two columns on either side of the three center columns can't seem to go much higher (I've seen some where they are just slightly below the level of the three center ones)- I'm following the molding on the helmet and that's where those two columns happen to stop.1 point
-
You've got this, Frank! Good luck!1 point
-
ok thanks. So it seems imperial boots realy my whay...1 point
-
here is photo on the drop boxes how they should be too
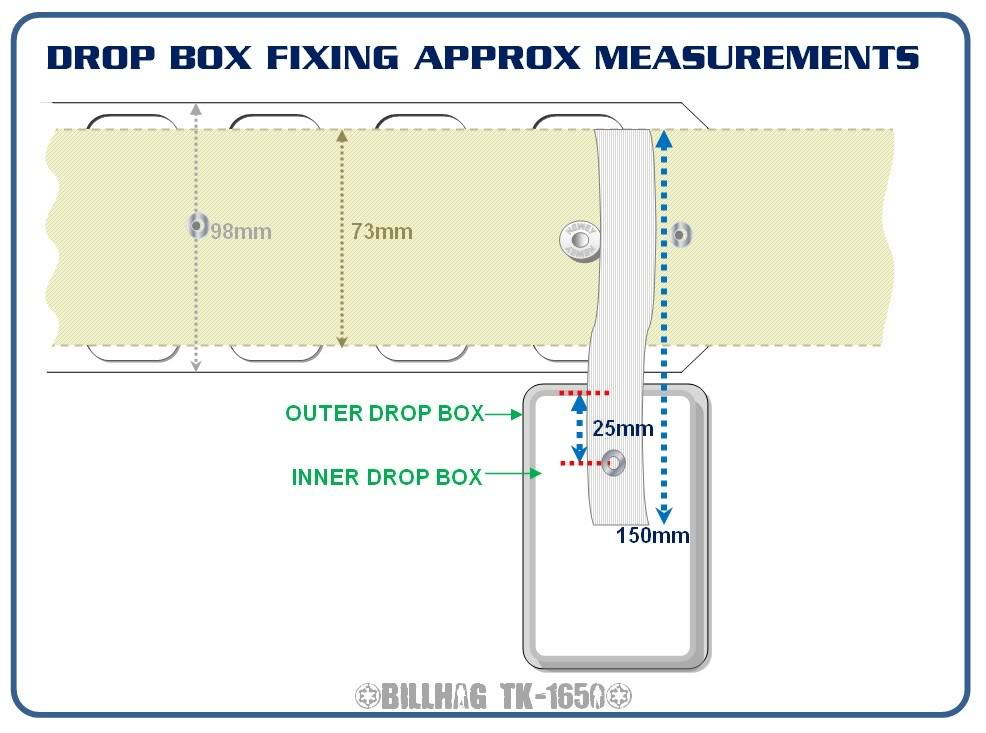 1 point
 -
Yeah, I see that. It's pretty neat, eh? Thanks. This is the first post that I can understand regarding this topic in terms of its utility. I'm convinced, the feature stays1 point
-
When I get notifications that say someone liked my post or I see someone clicked it in my post, I feel good knowing someone read it and liked it. for me, I do recognize when people click it and appreciate they responded to a post. I understand what you mean because I used to not think much of this function but since I post more now and hear back from members following my posts with likes, it feels more interactive than empty posting with no response if they don't write a reply. Just my opinion though.1 point
-
edit: this guide does not work. See later post. So I did a little digging and figured out how to add photos from google photos. I right click on the photo you want to share click on "copy image address" when you paste the image address add "?.jpg? (yes include the actual question mark) That's it. A tiny bit more work, but don't have to deal with photobucket. Hope this helps and pass the word around.1 point
-
I use it a pretty decent amount, sort of "I've read this I agree/like/approve but don't really have anything to add or say further". Beats the bad old days of +1 posts.1 point
-
I would go with a basic gray, satin finish. Be sure to sand it down (220 grit or finer), clean it thoroughly, and hit it with a coat of primer before painting. When you get ready to paint, I recommend doing 3 or 4 light coats instead of 2 heavier ones. Also, allow 10 minutes or so (no more) between coats, otherwise it can cause it not to dry correctly and it will be sticky forever.1 point
-
I do not know if everyone knows this, but you can use Facebook, instead of Photobucket to upload your photos. It is very easy and not nearly as cumbersome as Photobucket and has unlimited storage. This is the process: Go to either your Facebook Home Page or your Profile Page. Select "Photos." Choose "Create Album" At this point you can upload an entire folder of photos. Select your photos and upload. Name the album. When you go to post, you can select "Only Me" for who sees this, if you do not want it to post to your Facebook Timeline. Now, when you go to upload the photo to this site, do the same procedure, except when you select the image to upload, right click on the photo in the album, select "Copy Image Address", paste it into the URL box in your post and your picture will post. Use the same process as Photobucket, just go to your facebook photo album, instead. I have been using this and it has been working great. It has been saving me a lot of time.1 point
-
Darren, I have sent items to Australia many times before. I think if we keep it in kit form, It will just look like a ton of model parts. We'll cross that bridge when we get there.1 point
-
I only ask mate because i have my 1mm Tm on a bendy manaquin its the nuts plus i got it from ebay dirt cheap shop used normaly retail at £350 , if i remember i paid £ 85 shot me a pm and i will give you the details of the make etc .1 point