

Chemi
-
Posts
1,887 -
Joined
-
Last visited
-
Days Won
5
Content Type
Profiles
Forums
Gallery
Articles
Everything posted by Chemi
-
UK Garrison - TK19984 - New to the FISD
Chemi replied to Ebio Amisi's topic in New Member Introductions
Hi Ben, welcome to the FISD !!! You can ask as many questions as you want...Of course, as Glen mentioned in the previous post, you can submit as many pictures as you want too. It will be a pleasure to help you reach EIB and Centurion levels. -
That means everything is OK Very nice job Craig!!!
-
Hi Chris Welcome to the FISD!
-
Jeffnmar requesting pre approval ANH Stunt (AM 4.5)
Chemi replied to Jeffnmar's topic in Request TK Pre-Approval
Great!!! Congratulations TK-70921! -
Jeffnmar requesting pre approval ANH Stunt (AM 4.5)
Chemi replied to Jeffnmar's topic in Request TK Pre-Approval
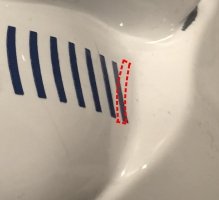
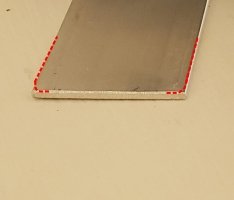
Hi Jeff. Great work!!! About the tube stripes(helmet), something that strikes me (and that we see often), is that the tops in the front section should lean forward. I am just telling you this for your information. If you can fix it, that would be great. CRL-Fall of tube stripe tops ideally lean toward the front. Reference images
-
Congratulations Dan!!!
-
They saw it!!! The armor looks great!!!.... Congratulations!!!
-
Hi Brian. Welcome to FISD...I think you can order the kit while you lose weight. You can start(while you lose weight) with the TD, button plates, helmet, gloves, blaster... And also, while your kit arrives, you can research on the forum...There are millions of terabytes of information.
-
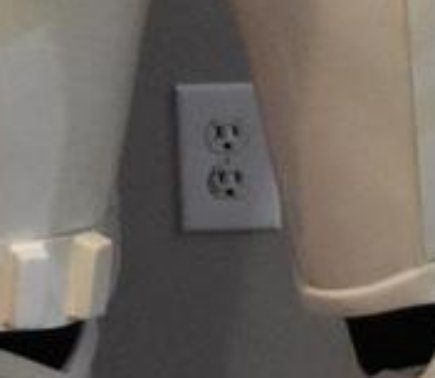
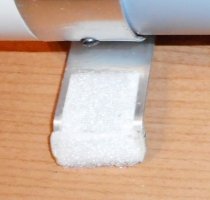
You're right L3- Ab button paint shall not extend beyond the bottom of the actual raised button. If you have any doubts, you can look at the CRL and the reference images (CRL - Reference Image Depository). Something that strikes me (may be the angle of the pic)....It looks like the clips are sitting above the control panel. You can round the corners of the clips a little(pic 1), otherwise they will scratch the armor when you put the TD on the belt. Also, you can put some velcro, (the soft side), on the outside of the clips, and this will protect that part of the armor as well (pic 2). 1. Reference image 2. Great job Alex!

-
WOW!!!
-
https://www.facebook.com/501stspanishgarrison/videos/4729296807177669/
-
New Colorado Trooper reporting for duty
Chemi replied to slescoe's topic in New Member Introductions
Hi Sean! Welcome to FISD! -
WOW
-
TK51085 requesting ANH Stunt EIB status [RWA] (1033)
Chemi replied to TrooperSam's topic in Request Expert Infantry Status
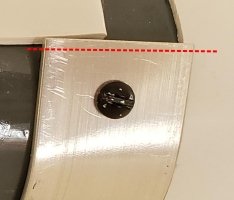
Hi Sam, and thank you for your EIB application! CRL and EIB Application Requirements: All required photos have been submitted, and on behalf of the entire D.O. staff we are pleased to welcome you to the rank of Expert Infantry. Congratulations! Other-Armor Fit/Assembly; In this area we review observations made by your fellow troopers and the DO team. Some observations may lead to suggestions to improve the overall look of your armour. Note that we consider both text (CRL) and pictures (screen caps/reference images) when reviewing submissions. Excellent armor Sam, And as I always say, keep in mind that most things are just minor dressing issues. -Well, let's start from the top. This is a very common problem. In a perfect world, the ear screws should go aligned with the rear edge of the Traps(it is mentioned just for your consideration). Reference images -The brow trim is too low(and slightly angled). We are suggesting to rise it up a bit. Your brow trim is sitting lower than ideal for a Stunt TK, and looks more like those worn by Hero TKs. Raising it a bit would give you a much more screen accurate appearance. Stunt reference images Hero reference images -Another very common detail is the next one. The brow trim, should be a bit shorter. The one on the right side is perfect, the left one should be a bit shorter. We recommend you do it little by little so as not to cut too much. Reference images -As seen below, it looks like there is quite a bit of paint on the sides of your right Hovi-tip screen(the left one is perfect!) A few minutes with a razor knife, and fixed!!! Reference images - The paint details on the vocoder could use some definition with a few touch-ups(some non-acetone paint remover, some toothpicks and a few cotton swabs)... Reference images -It looks like you have too much padding on the top of the helmet. For a better overall look should sit a bit lower. This will improve your field of vision as well. Reference images -It looks like your shoulder bridges are too long in the back. You can trim them a little to be more screen accurate. Reference images -Maybe you can raise your biceps a little. It's not that they're misplaced, it's simply to keep them from hitting the edge of the shoulder bells when you extend your arms. -The TD must be centered(a simple dressing issue). Also, it looks like the end of the canvas belt is sticking out a bit. If it's too long, you can trim it a bit (easy fix). Reference images -Button plates should have straight corners, not rounded. Maybe you can sand the edges a little so that the edges are not so rounded. Reference images -We think this rivets are too close to the corner of the ammo belt. This is not affecting you for level 3 but for a more screen accuracy we notice and let you know it for future adjustments. Reference images -The Hengslter counter on the blaster is a bit on an angle compared to screen-used examples. Maybe you can rotate it a little. That would be great! Reference images *************************************************** Centurion Requirements; In this section we prepare you for Centurion. Because Centurion photos show more detail than EIB, items pertaining to Centurion might be seen there and not here and additional photos may be required. We try to point out all that we can from what we see, but the final accuracy is the responsibility of the trooper. -Your tears lines seem to need a bit more black paint in some areas. Just a few seconds with a permanent marker can do the trick. Reference images -Your forearms appear to be too large (should be reduced by about 1.5 to 2 cm at the top for a sleeker look)...We think that you can adjust their size a bit and this will improve your overall look. Reference images Reference image -We think that the look of the buttons needs to be improved. You can use a toothpick with some (NON ACETONE) paint remover. The buttons do not need to be perfect, but we need them to be a little more rounded. I would suggest using a small "Filbert" style (round end) brush. We are sure you will do a great job. Reference images -L3-The top of the ABS ammo belt should sit at or just above the bottom of the central and vertical abdomen button panels. The belt is almost in place. You just need to raise it a little bit. You can put some velcro behind the AB belt, to prevent it from moving. Reference images -Ab plate is overlapping the kidney armor on both sides. As we see that you are a "thin trooper", maybe you can place some foam inside the armor(if needed), and so, align the sides correctly. Maybe it's just a dressing issue, since we see that in some photos, there is no overlapping(in this case, it is enough to be careful when dressing). Reference images -We have several problems with the TD...Don't worry, they are all easy to fix. First of all, raised "buttons" should ideally face toward the rear (Image 1). Also, your end caps appear to be too wide(image 2).It will be necessary to trim them a little. You will need to move the clips outward too. It also appears that the clips are sitting above the control panel(Image 3). Image 1 Image 2 Image 3 To solve all these issues, this is what we would suggest: 1. Remove the clips and trim off the ends (you can use a hacksaw). 2. Trim end caps. 3. Move the clips to where the ends meet the bottom of the control pad and next to the end caps. . 4. Drill holes in the clips for the new screw position. 5. Re-attach the screws. If you have any doubts, you can see the reference images below(or you can contact the DO's team too). Reference images -Your butt plate is riding out and should be brought in to where it aligns with the kidney plate. I would suggest doing a strapping adjustment to get it closer. You can also add a pair of "V tabs" to the end of the plate and this should make the fix. Reference images - The gaps at the bottom of the rear ridges should be filled or backed with a small square of ABS. Very easy fix . Reference images And that's all Sam. We are sure we will see your application for Centurion soon. If you have any questions, you can contact the DO's team, we will be more than happy to help you... Congratulations!!! -
Congratulations Glen... Any coins or patches to celebrate the 10th?
-
Hi Eric! Welcome to FISD. Congratulations on your BBB day!
-
Congratulations Glen...
-
Congratulations Asa!!! May the force be with you!!!.
-
I'll be there!!!
-
Hello Soma!!! Congratulations and welcome to FISD!!!
-
Hi Glen!!! Added to the processing line... .....................Nails are especially disgusting .
-
. I love this one especially(obviously)! I think the sense of humor is the best of all our senses...And believe me when I tell you that we DO's feel this way when a review contains many issues to be pointed out(yes, there are moments we do not enjoy, especially when we have to request complicated fixes). I hope that people in general do not see us as the villains in the movie. Thank you for these memes. A little sense of humor after all that we are living, never hurts....
-
wip Stormtrooper ANH, RS Prop master.
Chemi replied to The Vegan Stormtrooper's topic in ANH Build Threads
Hello Paul. You are doing a great job!!! As Glen says, lowering your forearms a little will improve your overall look a lot. You could also try to reduce the gap between the tops of the shoulder bells and the shoulder bridges. Reference images Again, congratulations , your armor looks great !!!!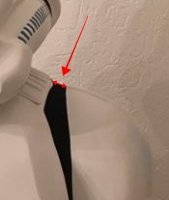
-
TK-85421 Requesting HWT EIB Status (ATA) Approved #9
Chemi replied to gmrhodes13's topic in Request Expert Infantry Status
Congratulations Glen -
Hi Kris, and thank you for your EIB application! CRL and EIB Application Requirements: All required photos have been submitted, and on behalf of the entire D.O. staff we are pleased to welcome you to the rank of Expert Infantry. Congratulations! Other-Armor Fit/Assembly; In this area we review observations made by your fellow troopers and the DO team. Some observations may lead to suggestions to improve the overall look of your armour. Note that we consider both text (CRL) and pictures (screen caps/reference images) when reviewing submissions. Excellent armor Kris, your Garrison will be proud!!!!! Keep in mind that most things are just minor dressing issues. -Well, starting from the top, the ear screws should go aligned with the rear edge of the Traps (it is mentioned just for your consideration as it is a more elaborate setting). Reference images -We think that the brow trim of your helmet (as you can see in the photos below), to be more screen accurate, should be a little shorter, this is a quick fix, just be careful to do it little by little so as not to cut too much. Reference images -It looks like you have too much padding on the top of the helmet. For a better overall look should sit a bit lower. Also, this will improve your field of vision as well. Reference images - Just a dressing issue here. On the right side, your forearm is a little high (the left one is perfect). (The symmetry of the armor parts is very important ). Reference images - This is something that happens to all of us. A little paint occasionally (it will only take you about 5 minutes), and your armor will shine like new. Reference images -Another dressing issue, also easy to fix. Right thigh appears slightly rotated outwards. On the other hand, you could slightly lower both thighs to avoid bites and noises when walking. Reference images *************************************************** Centurion Requirements; In this section we prepare you for Centurion. Because Centurion photos show more detail than EIB, items pertaining to Centurion might be seen there and not here and additional photos may be required. We try to point out all that we can from what we see, but the final accuracy is the responsibility of the trooper. -For Centurion level, the tops of the shoulder bells need to be a bit closer to the shoulder bridges(a little more noticeable on the right shoulder bell, the left is almost perfect). This is a fairly easy fix by shortening the straps that hold the shoulder bell on. Reference images L3-Ideally there no gap between the abdomen and kidney armor. Abdominal and Kidney Plate align horizontally at top. A small adjustment in the straps(or tighten the belt a little more), will close that gap. Reference images L3- The corners of the plastic ammo belt shall be trimmed at a 45 degree angle that meets the outer edge of the cloth belt. Maybe, trimming the edges of the plastic ammo belt a little will be enough to fix it. Reference images ç L3- The top of the ABS ammo belt should sit at or just above the bottom of the central and vertical abdomen button panels. You can add a piece of Velcro to the belt and AB plate to keep it in place. Reference images - The gaps at the bottom of the rear ridges should be filled or backed with a small square of ABS. Reference images As you can see in the picture of your sniper knee, the ridges on the top do not align with the ridges on the top of the shin as required for level 2. This is something we have previously allowed, so we do it for Expert Infantry in this case, but it will no longer be allowed. It doesn't need to be perfect, but it needs to be a lot closer for Centurion. If you need help, please contact any of us on the DO staff!!! Reference images And that's all Kris!!! As you can see, most things are dressing issues, so I hope to see your Centurion application soon.
