

Chemi
-
Posts
1,887 -
Joined
-
Last visited
-
Days Won
5
Content Type
Profiles
Forums
Gallery
Articles
Everything posted by Chemi
-
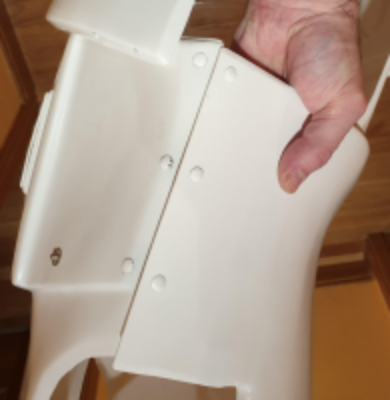
 Hi Nicholas. Thanks for your patience. First of all, I would like to tell you that your armor looks great. However, there are a few details that need to be fixed before we can put the Centurion badge under your name. These details are very easy to fix, don't worry. -You did a very good job on the teeth area. Most of yours are perfect, but there seems to be a bit much on the tops of the ones shown. A little non-acetone paint remover, a toothpick and some Q-tips and it will be perfect. Reference image -L3: The top of the ABS ammo belt should sit at or just above the bottom of the central and vertical abdomen button panels. It is still a little low. It's not much, but we think you should raise it a little. Reference images -L3: Lower thigh ridge joins (front and rear) shall butt-up flush against each other. Any gaps must be backed with ABS or filled as not to be noticeable. We can see that on the front side, you fixed it, so this will not be a problem for you. You can visit this thread here, I'm sure Joseph will be happy to shoot you a packet of white Sugru for free. If you want, PM Joseph. Reference image Reference image L3: -Plate does not overlap the edges of this area and shall show a definite straight cut edge around all sides. This is a super easy fix by just prying off the plate, trimming it and re-attaching it. Reference images L3: -T-tracks and grips shall be of a black plastic appearance with no silver/metallic weathering allowed. A light coat of black paint, and it will be perfect! Reference images That's all Nicholas. We are sure that these small fixes, are not a problem for you, seeing the great job you have done with the fixes you were asked for in your EIB application.
 -
Congratulations #510
-
Hi Nicholas!!! Thanks for your application. I would like to ask you a favor. Could you add a pic of your neck seal, one of thigh ammo pack (inner sides) and another of the 6 rivets on the left side? Something like this... Thanks!!!
-
Well Luca, you have certainly put a lot of time into your armor. I have no doubt that it is an armor with which you will achieve the Centurion badge(we will see your apps). Congratulations on all the hard work you are putting into getting the perfect armor. No doubt it will be an honor for the German Garrison to see you parading with its members...And maybe, who knows, I will also have the honor of parading with you....
-
-
Hi Dan! We are very happy that you have submitted your Centurion application. We'll be with you soon.
-
Congratulations TK-10527!!!
-
Bienvenido!!!. Bueno, con ese nick, estoy seguro de que o eres de la zona o te gusta la cultura Maya... Es una cultura que a mi me tiene enamorado... Un saludo y bienvenido al FISD!!! Welcome!!!. Well, with that nickname, I'm sure you're either from the area or you like the Mayan culture.... It is a culture that I am in love with.... Greetings and welcome to FISD!!!!
-
Hello Rob!!! Welcome to FISD. That would be great, Rob...And as Mario rightly says, if you need anything, just ask.
-
Hello and Welcome to FISD Andrew!!!
-
Hi Austin. You need to add a link to your 501st membership profile, have a look at others posts
-
TK-10272 Requesting ANH Stunt Centurion Status [Anovos] [509]
Chemi replied to JHowe102's topic in Request Centurion Status
Hi Jessie, and thank you for your Centurion application! Thank you very much for your patience. CRL and CENTURION Application Requirements: All required photos have been submitted, and on behalf of the entire D.O. staff we are pleased to welcome you to the rank of CENTURION. Congratulations! Other-Armor Fit/Assembly; In this area we review observations made by your fellow troopers and the DO team. Some observations may lead to suggestions to improve the overall look of your armor. Note that we consider both text (CRL) and pictures (screen caps/reference images) when reviewing submissions. Nothing to add. Excellent work, Jessie. Congratulations #509. -
Excellent Bart!!! Keep us updated!!!
-
Hi Bart. I am sorry for what happened. I am very happy that you want to join us...Welcome!!!!
-
TK-92099 Requesting ANH Stunt EIB Status 1042
Chemi replied to Merlin_Stohlmann's topic in Request Expert Infantry Status
Congratulations Merlin!!! -
Hello Marcel, congratulations!!!
-
It’s Official! Congratulations to Andrew (Sly11) our DL for 2022!
Chemi replied to starsaber25's topic in Announcements
Congratulations Andrew!!! -
They just uploaded a video to Youtube... You can try to contact them there... On the other hand, its website is already up and running
-
TK84215 requesting ANH Stunt EIB status (TM) (1041)
Chemi replied to Lazerjock's topic in Request Expert Infantry Status
Congratulations Chris!!! #1041 Awesome job brother -
I forgot to include the recommendations... It's done. Thank you.
-
Hi Ardeshir, and thank you for your Centurion application! CRL and CENTURION Application Requirements: All required photos have been submitted, and on behalf of the entire D.O. staff we are pleased to welcome you to the rank of CENTURION. Congratulations! Other-Armor Fit/Assembly; In this area we review observations made by your fellow troopers and the DO team. Some observations may lead to suggestions to improve the overall look of your armor. Note that we consider both text (CRL) and pictures (screen caps/reference images) when reviewing submissions. We would suggest changing out 2 items: -As you have seen in your Executioner application, we noticed that the picatinny rail is a bit long, should only have 2 raised sections (ribs) in the center and the holes are close to the ends as seen in the reference images below. Reference images -The D-ring you presently have is an actual D-shape as opposed to a more square shape. Reference image Congratulations on your 7th Centurion.
-
Great news!!!...
-
Hello Ardeshir. Thank you for your patience. As you have seen in your Executioner application, we noticed that the picatinny rail is a bit long, should only have 2 raised sections (ribs) in the center and the holes are close to the ends as seen in the reference images below. Reference images -The D-ring you presently have is an actual D-shape as opposed to a more square shape. Reference image We believe that these two issues must be corrected before we can grant you your 7th Centurion. We know this is a big issue, but we also know that you are a perfectionist, that you like to take care of details and that you are a very professional person. Also, we know that you have first hand information, so if you have any questions or complaints, you know you can contact us @Deployment Officer Team. Thank you very much Ardeshir!
-
Hi Ardeshir... I want to congratulate you for this fantastic submission... I've received messages from members of my Garrison, who are impressed with your submission. Congratulations. We're working on it...
-
Hello Shayan, welcome to FISD As Mario said, the best way is to see a lot of videos and read a lot of posts... You can also ask for help from members of your Garrison who will be happy to help you with your armor (although with the covid, this may be more complicated). And you can also open your own WIP, where we can help you on your way to Centurion level !!! ESB WIP THREADS. Remember that you can contact the entire DO Team whenever you want @Deployment Officer Team...We never sleep (sometimes we close our eyes, but we are listening!!!). Good luck!!!
