
Hesikaya
-
Posts
368 -
Joined
-
Last visited
-
Days Won
2
Content Type
Profiles
Forums
Gallery
Articles
Everything posted by Hesikaya
-
TK Monkus' RS Prop Masters ANH-S Build Thread (first build)
Hesikaya replied to TK Monkus's topic in ANH Build Threads
Yes, the flat side you'll want to keep correctly sized for your cover strip width. So they should be about half the size of the cover strip on each of the flat edges. On the other side you will be able to do your fine tuning since it will be the back and it does not have the ridge. -
Hello from the Florida Panhandle!
Hesikaya replied to Apomegranite's topic in New Member Introductions
Welcome to FISD Alexander and good luck on your submission! -
TK Monkus' RS Prop Masters ANH-S Build Thread (first build)
Hesikaya replied to TK Monkus's topic in ANH Build Threads
You're gonna want to size it to yourself. I would encourage you not to make it too tight. You're going to want to have some room to move around, flex your muscles as you walk, move, and get around. I found once I had all my pieces built I still had to make a couple minor adjustments so don't fret trying to get them absolutely perfect the first go. Finding ways to enlarge a part is much harder than trimming one down. Sounds like you're already planning it but when you make those cuts along the sides of the biceps and forearms try to even out the distance as much as possible so your cover strips end up equidistant from each other. Sent from my sorrosuub C1 comm link device using Tapatalk -
TK Monkus' RS Prop Masters ANH-S Build Thread (first build)
Hesikaya replied to TK Monkus's topic in ANH Build Threads
Looking good so far. I too use several different techniques to trim. Razor blade and dremel being my primary. I usually find myself taking several passes as I feel it's safer to take the time and cut a little bit at a time than run the risk of cutting too much. Once you've gotten those biceps made you'll be rocking and rolling on the next parts. When you get to the forearms you'll want there to be no return edge on the wrist side. On the elbow side you can still keep some of you wish. Also, it's a good idea to wear your undershirt when test fitting. That way you know for sure you've gotten your parts the right size. Sent from my sorrosuub C1 comm link device using Tapatalk -
TK Monkus' RS Prop Masters ANH-S Build Thread (first build)
Hesikaya replied to TK Monkus's topic in ANH Build Threads
By all means Post away! We're here to help! If you can't figure something out don't hesitate to ask here on your build thread. There's always a trooper lurking about with an idea or link to what you're looking for. -
TK Monkus' RS Prop Masters ANH-S Build Thread (first build)
Hesikaya replied to TK Monkus's topic in ANH Build Threads
Looks like an exciting build about to happen! Your Vocoder is actually on the face of your helmet and just needs a coat of paint. Perhaps you mean your Hovi tips? The black cylindrical tusks with wire mesh in the dimples on the front? I didn't see them in your photos. I would say that following an RS build would be a great idea. I have an Anovos kit and followed Tony's build that was already referenced above. It was expertly detailed. Being that you have a different maker there may be some small differences but overall the armor is all very similar maker to maker. Another suggestion would be to check out other troopers EIB and Centurion applications especially those with RS armor to see any common fixes and noteworthy problem areas. Have you reached out to your local garrison? They too may be able to offer you some guidance. Can't wait to see your build thread begin. -
Welcome to FISD Daren! You are in the right place for help. Glen has already gotten you some handy links but there is still a wealth of knowledge around here for you to check out. It wouldn't hurt to start a build in progress thread while you work on your shiny new armor. There loads of folks on here all the time that are willing to share their knowledge and advice.
-
Interested to see how the anti fog does for you.
-
After discovering new greeblies we didn't know existed for 43 years I added them to my blaster. Such a neat and cool add on from justjoseph63 that will likely be overlooked by most but still worth it.
-
Welcome Luke!
-
Imperial Trooper Suit for approval to the 501st
Hesikaya replied to TrooperHubbz's topic in New Member Introductions
Welcome Richard! Rudi has an excellent point. Having someone local build it would give you the opportunity to be more involved in its construction and give you the confidence you'll need to make repairs or alterations later. Also if you haven't already, consider having it built to the higher standards of Expert Infantry and Centurion for added screen accuracy. We are in the midst of celebrating reaching 1000 troopers who've reached Expert infantry status and 500 Centurion! -
Congrats to our newest Centurions! Sent from my sorrosuub C1 comm link device using Tapatalk
-
Congrats KC! Sent from my sorrosuub C1 comm link device using Tapatalk
-
I'm new here... but I've been here for 5 years. :)
Hesikaya replied to SirUberNoobPwnr's topic in New Member Introductions
Welcome aboard Mike! -
Welcome to FISD Steven. Looking forward to seeing your build thread soon!
-
It was nice chatting with you earlier. Looks like that Anovos kit is coming together nicely. It goes without saying that Glen always has some solid advice and I think moving that thigh padding is a great idea to keep that pesky sniper plate in place. I ended up taking my thighs apart a couple times and trimming more off a little at a time to get them tapered for a better fit. E6000 is amazing stuff. I'm wondering about how your arms feel? Looks like your biceps hang a little low over your elbow and its causing your forearms to cover the ends of your wrist plates. Do you have a lot of wiggle room in the forearms? Keep plugging away and you should be on your way to EIB and Centurion in no time!
-
Welcome to FISD Corry, Lots of great info around here for you to turn that fun brown box into something amazing.
-
Welcome back James! You're in the best place to learn all there is top know about improving stormtrooper armor.
-
Welcome James! Definitely take your time and do your research while you are accumulating the funds to make your purchases. Don't feel any need to rush. There will always be more rebels to catch and smiles to make. The important thing is to make your armor right and well and have fun doing it. Maybe that was more than one thing? Also, don't forget to start a build thread. It gives you a great place to ask questions, receive quality advice and feedback. It's like having a bunch of the FISD with you while you build.
-
Welcome Angus! No better time to get started than right now. Good luck on your build.
-
Welcome to FISD David. Great to have you here.
-
Congratulations Ghostrider! Buzz the laser turret.
-
Raindrop’s 4.5 AM ANH Stunt Build
Hesikaya replied to TheDecisiveRaindrop's topic in ANH Build Threads
Raindrop that's coming together nicely. Keep up the good work. It seems there's always something that could use a revision or a minor tweaking. I just got approved for Centurion and am still making adjustments so don't let that bother you. You're almost there trooper! Sent from my sorrosuub C1 comm link device using Tapatalk -
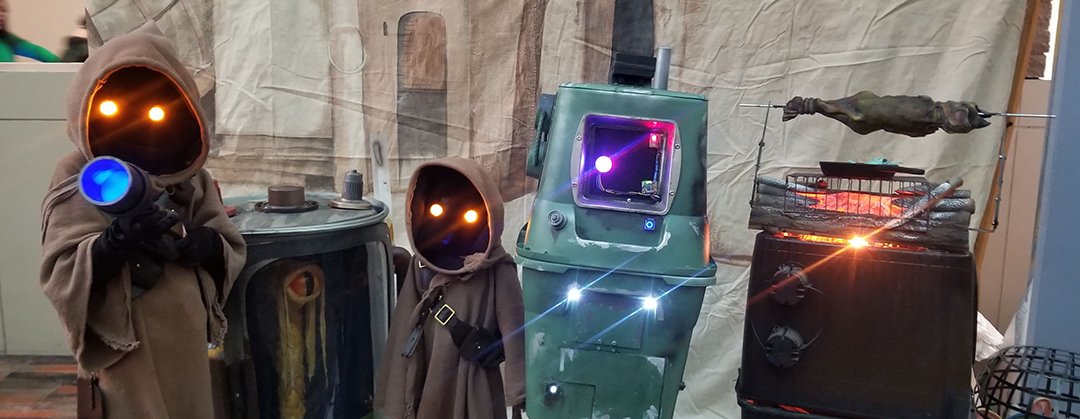
Howdy! I’m Scott from the Dune Sea Garrison / Jundland Wastes Squad. Getting into all this has been a journey that I wish I would’ve started so much sooner. I always liked the stormtroopers and then I saw a video on YouTube showing a never ending parade of them going down an escalator at a convention. I was dumbfounded. If there’s that many of them in one place surely, I can find a kit myself I thought. Many years later, when my employer made a “whoops” that resulted in owing me a handsome amount of backpay I ordered a kit from Anovos and joined FISD. Having been bitten by the bug I started working on some foam armor for the younglings in hopes we three could march around the neighborhood together come October. My first troop was in 2019. My favorite so far has been going into hospitals and cheering up the little ones there. Seeing a kid in a hospital bed have their expression change from despair to utter excitement and joy has been amazing! My boys have outgrown their foam TK’s and now join me at every event they’re allowed to rocking a Gonk droid and Jawa costume as Galactic Academy cadets.
-
TK-88667 Requesting ANH Stunt Centurion Status [Anovos] (484)
Hesikaya replied to TK88667's topic in Request Centurion Status
Congrats Ken! Welcome to Centurion.
