

msouza
-
Posts
761 -
Joined
-
Last visited
Content Type
Profiles
Forums
Gallery
Articles
Everything posted by msouza
-
 Hey Derek, Sorry for the delay in responding but your fellow trooper has hit the nail on the head with the paint going into the lip area. I will need to see this adjusted before we can get started. the easiest way to fix this is with some mineral spirits and a tooth pick. dip the toothpick and use it as an eraser of sorts but with a little effort you come out with the results shown in the reference image. As stated in the CRLs for Basic approval: Frown is painted gray and does not leave the teeth area. reference images.
 -
TK- 98695 Requesting ANH Hero EIB Status (SDS) [935]
msouza replied to Helotech's topic in Request Expert Infantry Status
Thanks for your patience Trooper we appreciate it and I'll be right with you! -
TK-14292 requesting TK Commander EIB Status [AFP] [929]
msouza replied to Aizenoso's topic in Request Expert Infantry Status
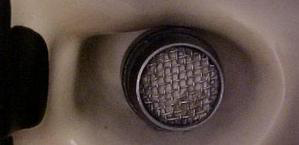
Hi Rodrigo, Thanks for your application for EIB with your TK Commando build and also get us that much closer to our March to 1000. Lets jump right in shall we? CRL and EIB Application Requirements All required photos are now in and, after review, we are pleased to welcome you to Expert Infantry rank. On behalf of the DO team and myself, many congratulations! Other-Armor Fit/Assembly In this area we review observations made by your fellow troopers and the DO team. Some observations may lead to suggestions to improve the overall look of your armor. Note that we consider both text (CRL) and pictures (screen caps/reference images) when reviewing submissions. As always I like to go from the helmet on down. Absolutely love how you've taken Josephs advise and dove right in with the ear adjustments. The only suggestion I'll add is with the strip on the top of the helmet. Good call on adjusting the paint on the bottom section and bringing it closer to the corner of the eye but the top line should naturally flow with the curve as opposed to a straight line. Take a look at the CRL model & see how it follows the natural dome. Reference Photos My next suggestion on the helmet would be the Frown / Teeth area. you can see it in the photos above along with the one added below. I would like to see the blue strip continue onto the gum lime. I tried to enlarge the area to show the lip/gum line that I'm referencing Reference Photo Next would be your Hovi Tips, If you were going with any TK other then the Commander your Hovi tips would be perfect!!!!! But on this version the preference is to keep the rims and insides black. A quick fix with some model paint or if you want you can take them off remove the screens as re paint them all black re install the screens the replace. Reference Photo OK onto your Neck Seal... nothing wrong with it but I wanted to mention that I love how you're friends Grandmother is the maker .. Next up I'm going to touch on your shoulder bells. While you did take Josephs advise and trimmed them to the correct size while rounding off the corners appropriately I want to get into the scuffing. You've paid amazing attention to detail in the painting / weathering of your kit I'd like to see a little more scuffing on the shoulder. Remember this is just a suggestion and I believe that weathering is open to interpretation but take a look at the reference photos vs your submitted photos and you'll see the difference. Reference Photo Centurion Requirements: In this section we prepare you for Centurion. More photos may be requested in the future that allow us to make better decisions on possible adjustments. If there are any areas of concern they will be discussed here. Because Centurion photos show much more detail than EIB, items to pertaining to Centurion might be seen there and not here. We try to point out all that we can from what is seen, but the final accuracy is the responsibility of the trooper. For Centurion I will ask that the following be adjusted prior to resubmittal. Per the CRL: Ear screws shall be slotted, flat topped, countersunk and painted white. You can see in the reference photo that the bottom ear screw is almost non-existing. this can be achieved quickly with countersink / deburring tool that can be picked up at any hardware store. Reference Photo Per the CRL : Neck trim shall be of an s-type profile rather than a u-type profile I know you've made many changes to your helmet and it looks as if you have the correct S trim but I will require photos showing the edge. Reference Photo These are a couple examples that I can see and point out but honestly your photos bounced around a bit and I'm going to ask for Centurion that you upload a new set of all the required photos laid out per https://www.whitearmor.net/forum/topic/22605-centurion-application-photo-checklist/ From all of us here at the Deployment office welcome to EIB & congrats, see you at Centurion. -
TK-14292 requesting TK Commander EIB Status [AFP] [929]
msouza replied to Aizenoso's topic in Request Expert Infantry Status
No issues at all. Currently we have three deployment officers and one just went on Holiday. All applications have a second person briefly go over them to make sure nothing was missed or offer up different suggestions. This should be wrapped up shortly. -
TK-14292 requesting TK Commander EIB Status [AFP] [929]
msouza replied to Aizenoso's topic in Request Expert Infantry Status
No worries, I’m actually working on this now and should have it wrapped up shortly. -
TK-14292 requesting TK Commander EIB Status [AFP] [929]
msouza replied to Aizenoso's topic in Request Expert Infantry Status
Hola Aizenoso, gracias por tu solicitud para el BEI. Parece que Joseph ya te ha dado buenos consejos. ¡Estaré contigo en breve! -
Hi Andrew, Thanks for your application for EIB. It's always great to see fellow troopers taken that extra step to bring their Armor that much closer to screen accurate. CRL and EIB Application Requirements All required photos are now in and, after review, we are pleased to welcome you to Expert Infantry rank. On behalf of the DO team and myself, many congratulations! Other-Armor Fit/Assembly In this area we review observations made by your fellow troopers and the DO team. Some observations may lead to suggestions to improve the overall look of your armor. Note that we consider both text (CRL) and pictures (screen caps/reference images) when reviewing submissions I like to start with the helmet and work my way down, ready lets begin. Great job on fixing the frown so our first stop are your ears. You can see in the reference photos how the screws align with the front trap and it follows the same line down to the bottom screw as well. Reference Image Last thing on your helmet is your Vocoder, although the paint job itself is awesome... nice clean lines... the paint on the vocoder could definitely stand to come up a bit. If you notice the ridges, the paint does not go all the way to the top. It may just be me, but it looks odd. EASY fix! Next I'm going to call attention to the bicep, it looks as if you could bring them up just a bit. I honestly think this is from moving around while taken pictures but it is something to be aware of. You can see in the shot from behind how high up they wore them. 10 bonus points for wearing the thumb print on the left bicep.... Reference Photo Next we'll move to the butt plate. 99.9% of the time this a strapping issue. If your using elastic strap try switching the outside edge straps to nylon so you have no give on those points and that should give you the nice straight lines...notice a theme... Reference Image The last suggestion I'll give be fore moving onto Centurion requirements is a quick fix that'll make a big difference and that's your cover strips on the shins. The right one in particular extends past the armor. Take a look at the CRL photos and it shows what you should be aiming for. its trimmed just shy of the bottom with the edges 45 degree angles cut to help things from getting caught up on. Reference Photo Centurion Requirements In this section we prepare you for Centurion. More photos may be requested in the future that allow us to make better decisions on possible adjustments. If there are any areas of concern they will be discussed here. Because Centurion photos show much more detail than EIB, items to pertaining to Centurion might be seen there and not here. We try to point out all that we can from what is seen, but the final accuracy is the responsibility of the trooper. Per CRL "There should be a minimal gap between the shoulder armor and the chest/back plates." While yours are close I'd like to see them a little closer. I think once you adjust the biceps from the suggestion above this will take care if the problem. You can also cut the rest of the return edge from the bottom on the bell and that should bring it in tight. Reference Photo Next will be your Ab Button Details. Per the CRL: "Abdomen armor buttons are integrated and painted directly on the armor. Ab button paint shall not extend beyond the bottom of the actual raised button. Reference Photos Onto your Kidney/Abdomen section. Per the CRL "Ideally there no gap between the abdomen and kidney armor. Abdominal and Kidney Plate align horizontally at top. A single visible seam line is present." Yours are extremely close and again I think its from moving prior to your photos but it is something that needs to be addressed before Centurion but its a really easy fix. . I looks as if you use Nylon strapping as the base of your snaps but I'm not sure if you use the same material for the top of the strapping. Switching the top strapping to nylon will get rid of the flexibility that allow this. Reference Photos Lastly I'm going to request that you adjust your Thermal Detonator Looking at the reference photos you can see the details molded into the thermal detonator are more prominent and also has a lot less gray showing on the bottom. The best way I can describe to you would be to picture it as a clock and then move it forward 15 min or 45 deg. I think the easiest way to achieve this would be to re-bend your brackets so the screws are pointing to the ground and the detail piece resembles the reference photos or you could trim the bracket tabs and drill new holes in the bracket and reuse the hole in the pipe. This will leave you three sets of holes but the brackets will cover them and no one will know any better. (In other words fix the orientation of the thermal detonator and I wont see the holes left once the brackets are reinstalled.) Reference Photo I know it seems like a lot of "little things" but you've shown your willingness to take your fellow Troopers suggestions and improved your armor that much closer to screen accurate. From all of us at FISD Deployment Office - congrats, see you at Centurion, etc
-
Andrew, I'm going to ask for a quick fix before I can continue your app. Per the CRL's both new and older versions state "Frown is painted gray and does not leave the teeth area" Take a look at the reference photo on the right and you'll see what we're looking for. Fortunately with a toothpick, mineral spirits and time you get it looking screen accurate in no time. Post the new photos when you get this complete and we'll go from there.
-
Thanks for your patience Andrew, I'll be going over your application for EIB. Looks like Glen and Mario have given you some great advice. Hang tight while I go over everything & I'll get back to you shortly.
-
TK-71970 Requesting ANH Stunt Centurion Status [451]
msouza replied to Joako7's topic in Request Centurion Status
Hi Jaoquin, Thanks for your application for Centurion, Always great to see a fellow trooper take their armor to the next level. CRL and Centurion Application Requirements All required photos are now in and, after review, we are pleased to welcome you to Centurion! On behalf of the DO team and myself, many congratulations! Other-Armor Fit/Assembly In this area we discuss areas that could benefit from additional improvement. Note that we consider both text (CRL) and pictures (screen caps/reference images) when reviewing submissions. And just like in EIB we'll start from the top down. First stop would be your Hovi Tips, you've made the adjustment in weathering the exterior rim as requested but if you want to take it to that next level I would suggest you paint the inside of the rim white as well. The inside of yours are white as required but take a look at the screen used tips and your see what a difference just that little bit will make. Reference Photo Before I move onto your belt I want to comment on your fore arm fix and thank you for having trust in your fellow troopers the difference between your EIB photos and the fix is night & day! Well done Jaoquin. This just may be an adjustment from moving prior to submitting your photos but double check your belt as it should cover just about half of the bottom button on the abs. I've added a snap to make sure mine sits in the same position all the time so I don't have to worry once I put it on or a piece of velcro would do the same. Reference Photo Same comment for the fix on the sniper knee as well, great job! Again great job on the adjustments and welcome to the rank of Centurion. Now go out and make the Empire proud!! -
Robert, I need to request that you fix the following before we proceed. Take a look at the frown on your helmet, it appears that the gray paint bleed a little onto the lip area (both upper & lower. ) And per the CRL" Frown is painted gray and does not leave the teeth area. A total of 8 cut outs in the teeth area of the frown are present." Good thing is that it's a easy fix with a little mineral spirits and a tooth pick. Take a look at the reference photos and you'll see the look you want to go for. Reference Photos
-
Hi Ardeshir, Thanks for your application for Centurion. Its always great to see someone wanting to take that extra step and make their armor look that much closer to screen accurate. CRL and Centurion Application Requirements All required photos are now in and, after review, we are pleased to welcome you to Centurion! On behalf of the DO team and myself, many congratulations! Other-Armor Fit/Assembly In this area we discuss areas that could benefit from additional improvement. Note that we consider both text (CRL) and pictures (screen caps/reference images) when reviewing submissions and some of the suggested changes are minute and the tiny little details. Just like in your EIB application i will start from the top & work my way down. We touched on it a little in your EIB application but Anovus like to place the ears with the screws vertically when in fact they are on an angle following the trap on the temple. The one on you left side is really close but the right seen stright up & down, nothing a little ambition and some abs paste cant fix. Reference Photos Reference Photo Also watch your alignment when suiting up, Have your fellow Troopers give you a once over or take a look in the mirror to make sure your forearms are in the right positition and it also looks as if your left bicep could come up a bit. Your action photos look better so just something to keep in mind. Reference Photo Other then that I have to say this is a great looking build, I can tell you have taken everyones advice and took all the steps necessary to bring your armor to a whole new level! - congratulations trooper and welcome to the ranks of Centurion!
-
Robert, After much discussion we are going to proceed with this application, I've started the initial assesment and will Thanks try and get you approved quickly.
-
Robert After taken a second look I have to stick with my original assessment on the tube strips and the need to be adjusted. It really is a quick fix and can be done with painter tape and patience. Apply the painters tape over the top of them to help keep the original shape and curvature while still allowing to be repositioned.
-
ok a couple hours and a few dollars later I can get back at it. Thanks again for your patience. One thing I'm going to need you to do before we proceed is to make a minor adjustment on your hovi tips. Per the CRL " Correct 'Hovi mic' aerator tips are present. Screens used shall be of a wide type mesh, with the rim of the mic and the inside white or painted white." You did a great job on weathering the edges of them but take a look at the reference photos and you'll see that the insides are white as well. Reference photo
-
Ok sorry about this taken so long but as I sat down to get this done my cat literally sat on my laptop and cracked the screen ugh off to get a new one be right back!!!
-
Ardeshir, Great to see your application for Centurion & thanks for your patience. I'll be back with you shortly!
-
Hey Robert, Thanks for your patience as I work through your application for EIB. I am going to point out what Joseph has brought up already and that's your tube stripes. Per the CRL for EIB (Level 2) the tube stripes are positioned approximately a pencil width from the side of the cheek. Take a look at the images below and you'll see how they follow the contour of the cheeks and have a slight bow to them. If you could go ahead and take care of that and post up some photos I'd appreciate it. This should be a relatively easy fix, I remember being so edger to assemble my bucket that I put the tube stripes backwards..lol Easiest way is to use some to the blue painters tape to apply over the top and get underneath the original just enough for it to come up but still be stuck the painters tape so you can reposition all of them at one. Reference photo
-
Hey Robert, Just dropping a line to let you know we haven't forgotten about you. I've started your review and will get with you shortly, Thanks for your patience!
-
TK-32294 Requesting ANH Stunt Centurion Status [ATA] (436)
msouza replied to Bazz's topic in Request Centurion Status
Hi Adi, Thanks for your application for Centurion and for your patience as we work through this! CRL and Centurion Application Requirements All required photos are now in and, after review, we are pleased to welcome you to Centurion! On behalf of the DO team and myself, many congratulations! Other-Armor Fit/Assembly In this area we discuss areas that could benefit from additional improvement. Note that we consider both text (CRL) and pictures (screen caps/reference images) when reviewing submissions. Great job on resizing your forearms, I know you were a bit concerned with having to cut them but well done!! Only a couple thing I would like to point out and its being a bit nit picky and they did not hold you back from Centurion, at this level it's all about the small details that will really make your armor look its best. Check out the Screw & Ear alignment, you can see in the photo how on the left side the bottom of the ear aligns with the trap on the brow white the right side its off a bit and the bottom screw on the left ear could be brought down as well and check out how thin the bottom of the reference photo ears are and you'll see that you could scale yours down a bit to. If your feeling ambitious and want to find some use for the scraps of ABS you created making those fore arms look amazing take a look at the reference photo & have at it!! Reference Photos Like I said earlier I know you were a bit apprehensive about cutting up your forearms but the end result looks amazing Great job & Welcome to the ranks of Centurion! Congratulations from all of us here @ FISD now go and make the Empire Proud. -
TK-32294 Requesting ANH Stunt Centurion Status [ATA] (436)
msouza replied to Bazz's topic in Request Centurion Status
Adi, great job on adjusting your forearms, if you could suit up & post some photos showing off your newly fitted armor I’d appreciate it.! Front, back, left &right with arms down and arms raised would be great. -
TK-32294 Requesting ANH Stunt Centurion Status [ATA] (436)
msouza replied to Bazz's topic in Request Centurion Status
That little bit made a huge difference! Grate work! Sent from my iPhone using Tapatalk -
Eric, As far as a build goes we all do things a little different but you can look at any of @ukswrath build threads as most of us really consider his a step by step instruction manual. You can see his thread on ATA armor here!! And thanks to our Executive Office @justjoseph63 you can find a list of all the extras that you could think of here! Any other questions feel free to reach out as we're all here to help!
-
Galaxy's Edge - "What's up With Cardinal These Days"
msouza replied to gmrhodes13's topic in Off Topic
Yes Please! -
TK-42128 Requesting ANH Stunt EIB Status [Anovos] (917)
msouza replied to equuspolo's topic in Request Expert Infantry Status
If you haven't done so yet post up your request for certificate here
