-
Posts
12,619 -
Joined
-
Last visited
-
Days Won
317
Content Type
Profiles
Forums
Gallery
Articles
Media Demo
Everything posted by justjoseph63
-
I could have earned a masters degree in engineering in the time I've spent on here, or even built a medium sized home. Still lovin' it, though, and it keeps me out of mischief.
-

TK Binder Question
justjoseph63 replied to Quadan's topic in Boots, Soft Parts, and other Accessories
I purchased mine from Darman to go with the awesome binders I bought from Randy (TK210290). He built them like a tank from heavy duty leather with a magnetic catch. The holster was available in black or white. Not sure if he is still making them, but you could hit him up and ask. ---------- -

purchasing from Anovos soon, need clarification on a build
justjoseph63 replied to pedro2931's topic in ANH (Stunt and Hero)
After seeing this photo I initially thought these were a newer version of Incinerator Troopers, but after watching the clip from the new Battlefront teaser this is from, they are calling these Shock Troopers. Apparently a newer version of Heavy Weapons trooper, and the weapons they are using are not flamethrowers, DLT-19s or T-21s. Plus, the backpack is different, there are no shoulder or hip ammo pouch. I am not sure I would go with this build, Pedro, as there is not a CRL for it that I am aware of, and getting approval could be difficult if not impossible at this point. You might be better off going with a regular Incinerator Trooper, as Mark mentioned, as the paint job is similar. http://www.501st.com/databank/Costuming:TK_incinerator -

Are these boots good and approvable?
justjoseph63 replied to Target92's topic in Boots, Soft Parts, and other Accessories
I would steer clear of these, Brandon. For that price, you should go with Imperial boots, www.imperialboots.com -
Hola! I would like to update my "Supply List...." thread http://www.whitearmor.net/forum/topic/31404-supply-list-for-your-tk-build/ to include all items needed for the hook and loop calf closure method. I realize that a lot of new builders will go with the Velcro method, but I wanted to at least provide a list the items needed for this, in case anyone wants to go with the "classic" style as an alternative. If you can provide a link/photos to a build using this method, I would give you full credit, obviously. Many thanks in advance!
-

Internet Explorer - Can't Cut and Paste
justjoseph63 replied to wingnut65's topic in Forum Help & Support
I had the same problem, Jeff, until I switched to Google Chrome. No problems at all posting images now. -

Boot Soles? And are these good?
justjoseph63 replied to Knockerbot's topic in Boots, Soft Parts, and other Accessories
I am more than pleased with my Imperial boots, Fergus. Great customer service! As far as accuracy, mine were approved all the way to Centurion. -
I used the French blue, John. And yes, the use of templates is fine. Here is what I would suggest to get nice clean lines.... 1. For the traps and tears, paint the gray background first, let it dry overnight (the longer the better). 2. Apply the decal carefully, making sure the edges are down flat. 3. Apply a thin layer of the same gray paint. This will seal the edges, and prevent the black from bleeding underneath them. 4. Let that dry for about 5 minutes, or just until dry. 5. Then paint the stripes using black. I suggest 2 thin coats rather than 1 thick one. 6. Let that dry just until it sets a bit, like 5 minutes, then remove the template immediately. Otherwise it might stick to the original foundation color and lift it off the ABS. For the tube stripes, use white paint as in step 3 before the blue. Some sellers send you a spare set of templates, so you can always practice on a spare piece of ABS first if you like.
-

Knockerbot large AP build
justjoseph63 replied to Knockerbot's topic in Build Threads Requireing Maintenance
I would suggest purchasing your E-11. If you get it in a resin kit form, like Doopydoos, that will keep you bust for a while! You can also spend time checking out the build threads, and make sure all of your supplies are ready to go for when your kit arrives. -
If you do decide to go with the CA (super) glue, I would go for the gel type so it doesn't run, and purchase some Zip Kicker accelerator, which dries it immediately when you spray it on.. One of the problems with regular CA glue is that if it drips or runs, removing them is a long, laborious process.
-
I would suggest a few things, if I may, Christopher... Since this is your first build, I would follow Steve and Kirk's suggestion of (pardon the pun) sticking with the E-6000. Second, take your time... as the old saying goes, "measure twice, cut once". Also, have a look at the Trooperbay videos http://trooperbay.com/assemble-accurate-stromtrooper-armor/. Very informative. Lastly, you should start a build thread, where you can post all your questions in one place, along with photos.... lots of photos. It will keep you more organized, giving you an easier reference, and vastly increase the amount of answers rather than posting them one at a time.
-

Source for decals ?
justjoseph63 replied to Feedback's topic in Boots, Soft Parts, and other Accessories
A good idea is to just Google "Star Wars decals", Pat, which should give you quite a few results. I am not sure if the FISD decals are available until you get your TK#, but perhaps someone on here could enlighten you, (and me)! Your Garrison website may be a place to look/ask, and you should also try http://www.skaught.com/store/?pCat=9, as he has some unique ones, and is also a 501st member. Are you using this as an actual tool box or an armor bin? -

Transporting an E-11
justjoseph63 replied to DroidHunter's topic in Build Threads Requireing Maintenance
This is a GREAT idea, Bill! I have been looking for something along these lines. If you decide to make these to sell, please let me know. -
I retrospect, I actually wish I had not used the Liquid nails, Greg. When I went to remove the "radio" box to mount the speaker inside, it was difficult, so say the least. Got er' done, though!
-
IMHO, it looks like it would take quite a bit work to get this thing up to par, and simply not worth the time and effort, considering that there are better alternatives..
-
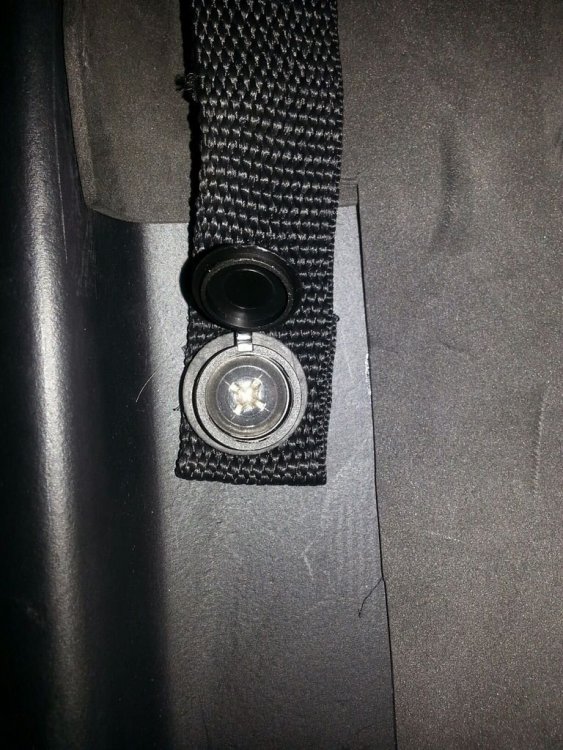
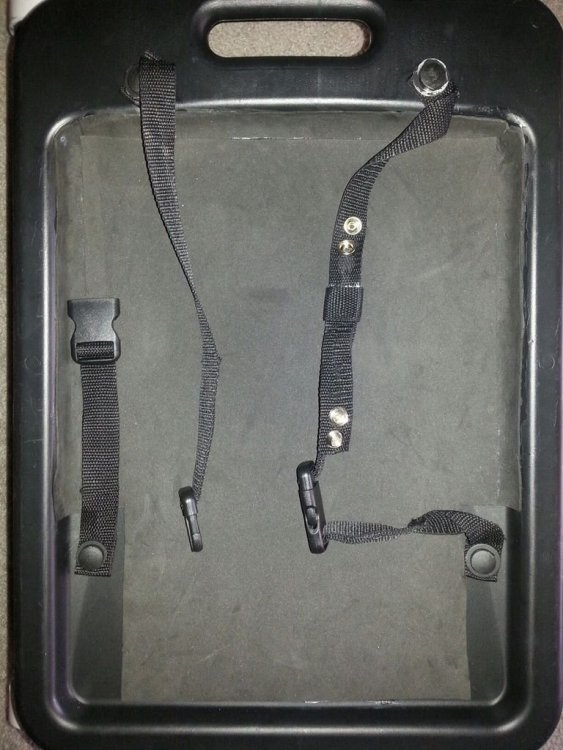
This is what I did, Andrew... I used 1 1/2 inch long coarse thread machine screws and some Liquid Nails adhesive to hold the boxes on. I cut out the center portion of the oil pan on the back (the side that faces in), which gave me easy access to get the screws in. After that, I purchased a sheet of black craft foam from Michael's, cut that to fit around the opening, leaving about 1 inch extra all the way around, and super-glued it over the opening. (See photo). I like it because it will not scratch the O II plate on my armor, and allows a bit of room for it to sit flush against my back. For the straps, I used the 1 inch machine type bolts to hold them on, and put washers/nuts on the inside. I also used these small plastic screw covers to cover the heads, (purely aesthetic). You can find them in the specialty area of Lowe's, but may have to ask where they are. In the 2nd photo, It shows one of them open, (they snap closed over the screw head). In the first photos, they are all closed. You could also use the nut/bolt/washer method to hold the boxes on as well, but I have done many troops with mine, and have had no problems. Side note: If you are considering one of Tony's (ukswrath) HWT TK radio chatter speaker systems to integrate into it, it is probably better to do it first, but it can be done at a later date like I did. You are welcome to PM me if you have any specific questions. Hope this helps!
-

HOW TO: Modify your armor to walk 1,000 miles
justjoseph63 replied to AsBlondeAsLuke's topic in Tutorials, Tips and HOWTOs
Awesome story and video. Diana. Truly inspiring, and thanks for sharing it!!! -
I just took a look at the trailer, and yes, they do refer to them as Shock Troopers. I don't recognize the weapons, though.
-

Stecksstore Snaps
justjoseph63 replied to LoveMonkey's topic in Boots, Soft Parts, and other Accessories
Haven't heard of these, Kirk, but they are exactly the right size. I would also like to find out if they are of Tandy style quality, because that price in phenomenal! -
I'm not exactly sure what these are supposed to be, but I don't think they are Shock (Heavy weapons) troopers... They look more like updated Incinerator Troopers, but without the pauldron and ammo pack, and with the addition of a backpack. Just my opinion, though..
-
Good call, Jason! Didn't think about that.


