


ukswrath
-
Posts
14,622 -
Joined
-
Last visited
-
Days Won
180
Content Type
Profiles
Forums
Gallery
Articles
Everything posted by ukswrath
-
Lorelei's 5'4" ATA ANH-S Centurion-Hopeful Build
ukswrath replied to TheLorelei's topic in ANH Build Threads
Eye sockets - As little back return edge as possible is recommended however, in the following reference photo you see some screen used helmets with the back return edge. We feel though it is screen accurate it just doesn't look as clean as it does without it. I've seen several people make binders of my Anovos build especially after someone created a PDF. Whatever works for ya I always say. -
Awesome congratulations
-
TK-11131 requesting ANH Stunt Centurion status [DA props] [415]
ukswrath replied to Xinx's topic in Request Centurion Status
Hey Pawel one of the DO's will be with you shortly. As mentioned by your fellow troopers Centurion is the ultimate level and we want you to look your best not only for yourself but for the legion. In addition the above your right shoulder bell is not as uniform as the left, please make the adjustment to even them up. Once you've made the mandatory or suggested repairs please post new photos below. You're almost there, keep up the great work. Your Centurion badge awaits -
NoZoupForYou’s Stunt TK Build (Anovos)
ukswrath replied to NoZoupForYou's topic in Build Threads Requireing Maintenance
Rat nailed it. If you take a look at some other build threads the most common remedy is a single piece of material (most commonly nylon webbing) that connects the two. You can use snaps and Rat has mentioned or glue it directly to the armor, and since it's not seen it has no bearing on any level of approval -
Lorelei's 5'4" ATA ANH-S Centurion-Hopeful Build
ukswrath replied to TheLorelei's topic in ANH Build Threads
If you don't like to hand paint I've found Testors 1238T spray enamel is a very close runner up to the screen accurate Humbrol #5 or Testors 1138, and can be found at most hobby stores. Michaels - http://www.michaels.com/testors-gloss-enamel-spray/10060926.html?cm_mmc=PLASearch-_-google-_-MICH_National_PLA_Shopping_Null_Null_All+Products_General-_-Crafts+and+Hobbies&gclid=Cj0KCQjwuafdBRDmARIsAPpBmVXP9vkmP095akiW2smqsYMRcwvRQeYwDkMSg324kcbKXHNOGnK3YqoaAsb9EALw_wcB -
NoZoupForYou’s Stunt TK Build (Anovos)
ukswrath replied to NoZoupForYou's topic in Build Threads Requireing Maintenance
Hum got any photos with them installed with your boots on? -
NoZoupForYou’s Stunt TK Build (Anovos)
ukswrath replied to NoZoupForYou's topic in Build Threads Requireing Maintenance
40-50mm is pretty wide. I suggest dividing some of that between the front cover strip to maybe even things out a bit. -
It's not a huge deal but the hovi tips screen mesh should actually sit just inside, instead of at the tip edge. Keep up the great work Reference photo
-
Lorelei's 5'4" ATA ANH-S Centurion-Hopeful Build
ukswrath replied to TheLorelei's topic in ANH Build Threads
Great work so far Lorelei . Looks like you've got some great advice also. -
I goofed and damaged my completed bucket
ukswrath replied to Poseidon's topic in Assembly, Mods, and Painting
Great save on the repair btw. I would never notice if we were to meet on a troop. It looks like typical dirt or smudge marks that armor accumulates when trooping . -
-
Agree with the above. Vcoder reference photo
-
Very nice. FWIW my T-21 utilizes plastic air line for the tubing.
-
Interior strip length doesn't matter so long as it doesn't extend past the edge of the armor also. Here's a canon photo
-
1. For length's sake, how low should shin/calf sit on the upper calf leg to allow for movement and bending of the leg as I walk? A. It varies from trooper to trooper and you really won't know how it effects you until you wear them around. I'll leave you with a reverence photo. This should give you some idea. 2. Is there a rule of thumb on how far back your lower leg should be able to move? A. No, but it helps if you have enough flexibility to climb stairs. 3. So, what's a good compromise between minimizing black and being able to bend far enough to walk decently without looking like C-3PO hobbling about? A. You can trim out the a good majority of the rear lower and still be acceptable at Centurion. Here's another reference photos (you may have see these already)
-
My numbers and the illustration template are guidelines and may not apply exactly to your armor. Bottom line is once assembled you want the upper ammo belt to be at or just below the lowest Ab buttons like seen in the following reference photos.
-
Looking good, nice work The minor gap between the cover strip and armor is ok so long as the strength is there. You don't want this popping loose. Other than that make sure the covcer strips don't extend past the armors edge. The bicep with the 14 sticker could stand to be reshaped.
-
HOWTO: Make your ANOVOS TFA kit more accurate
ukswrath replied to SolderMaster's topic in TFA Stormtrooper
At this point until current customers have received their orders, no we are not recommending the Anovos armor. Feel free to keep an eye on following sections and websites: Currently recommended armor https://www.whitearmor.net/forum/topic/11538-the-various-types-of-armor-and-where-to-find-them/ Up and coming armor https://www.whitearmor.net/forum/forum/29-hard-armor-general-discussion/ https://www.facebook.com/groups/189609135004054/ -
I goofed and damaged my completed bucket
ukswrath replied to Poseidon's topic in Assembly, Mods, and Painting
What Rat said ^^ -
TK-28888 Requesting ANH (Stunt) EIB Status [MTK] [856]
ukswrath replied to gijim's topic in Request Expert Infantry Status
Alright Jim thank you for your EIB application and patience. Let's take a look shall we. CRL and EIB Application Requirements: All the required submission photos have been posted. Thank you for making the suggested fixes mentioned by your fellow troopers. Your armor appears to display all necessary element as set out in the level 2 CRL. The DO crew would like to welcome you to Expert Infantry. Beautiful job on your MTK .... Congratulations Other-Armor Fit/Assembly: In this section we review observations made by your fellow troopers and ourselves. Some observations may lead to suggestions to improve the overall look of your armor. If any suggestion affects any application it will be listed separately in the above or below sections. We have a few concerns to go over so starting at the top. The tube stripes are a bit too far from the face. They should be roughly be a #2 pencil width away. We're encouraging you to reposition the stripes. Please take a look at the reference photo that's been provided. Reference photo Next up, the frown. It could just be a photo angle issue but it looks as if the right side is not as thick and as long as the left. If this is the case please thicken up and lengthen that area to give the frown a nice uniform look. Reference photo Working around to the back left vent looks considerably larger and longer than the right. We're requesting you revisit this area and correct it as necessary so that both sides are of similar shape and size. Reference photo The lower right ear appears to be a bit bigger than the left. Not a huge deal but worth mentioning none the less. Reference photo Though the shoulder bell strapping to shoulder strap cover is rarely talked about nor mentioned in the CRL, it's worth mentioning it should be black in color. Reference photo While on the shoulders there should only be one layer of material holding the cover down. Reference photo Making our way down, the chest plate should remain covering the Ab and there should be very minimal gap between the back and kidney plates. Tightening up the straps should bring these areas into spec. Reference photo Taking a look at the Ab plates the 4 button vertical plate should be smaller than the raised section that it's glued to. We're suggesting you trim it down a bit. Reference photo So we were taking a good look at the cloth waist belt and comparing to canon photos and your appears to be really thick and off white more than normal. I understand this is a good belt however, it just doesn't look canon. We're suggesting thin it out and lighten it up some how. Reference photo Holster is very shiny. It should look semi gloss in texture. Toning down the reflection would make it look more accurate. Reference photo Now for the legs, not a big deal but it looks as if the cover strips are extending past the top of the thighs. If they We encourage you to trim them back to the edge of the armor. Reference photos That's it for the EIB section. Centurion Suggestions: In this section we prepare you the best we can for Centurion. If there are any areas of concern they will be discussed here. We have a few areas to discuss here as well. There can be no return edge on the wrist side of the forearms. Though yours appear to be pretty clean we can still see a little remaining. Please remove as needed. The CRL states: "Level three certification (if applicable): No return edge on the inside of the front of the forearm is allowed." Reference photo Ab to Kidney plate spacing. There should be very minimal gap between these two areas. Tightening the strapping between the two should do the trick. The CRL states: "Level three certification (if applicable): Ideally there no gap between the abdomen and kidney armor." Reference photo Lastly the drop boxes appear to be a bit out of alignment with the farthest edges of the waist ammo belt. Adding a bit of glue between the cloth belt and connecting strap should hold them in place. The CRL states: "Level three certification (if applicable): Drop boxes are vertically aligned with the end of the ammo belt with minimal gap between belt and box." Reference photo Congratulation again, great job and hope to see you at Centurion -
Ensi's ANH Stunt Build [ATA] With Centurion in mind!
ukswrath replied to Ensi's topic in ANH Build Threads
Yours isn't bad at all but you can twist the TD up onto the clips if you wish. Pick an angle Here's a few reference photos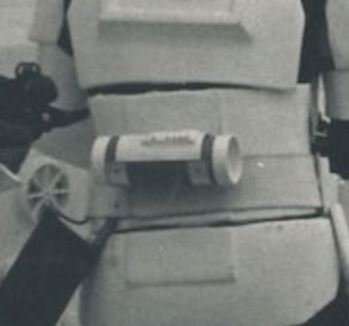
-
ANOVOS (DENUO NOVO) FOTK Armor Delivery Possibility
ukswrath replied to JonnieBear's topic in TFA Stormtrooper
Well unfortunately something will be sacrificed with vacuum forming, high details or quality. Not even RS or TM have details like this. -
ANOVOS (DENUO NOVO) FOTK Armor Delivery Possibility
ukswrath replied to JonnieBear's topic in TFA Stormtrooper
They can't if you want L3 White gaffers tape? It worked for OTTK s right lol -
ANOVOS (DENUO NOVO) FOTK Armor Delivery Possibility
ukswrath replied to JonnieBear's topic in TFA Stormtrooper
Beta. Man this armor is crisp. Lines are very clean. Looks a bit different than TFA type and more like TLJ. The negative, sorry Anovos. As been expected the yoke (back and shoulders) are separate from the inner chest. That means filler and painting work will be needed, if you want to hit the higher levels of approval. Unless they have some hidden spec on how to assemble, this area the outer chest will not cover this seam I'm afraid. The positive, the FISD has a few build threads to guide the way -
Xan's ANH Stunt Build [ATA]
ukswrath replied to Xanthais's topic in Build Threads Requireing Maintenance
lol, actually I have a WTF build thread about ready to post and guess what I forgot to take, chest plate after trimming photos DOE!
