


Sly11
-
Posts
13,367 -
Joined
-
Last visited
-
Days Won
278
Content Type
Profiles
Forums
Gallery
Articles
Everything posted by Sly11
-

TK12111 Requesting TFA EIB status (Anovos) [APPROVED] 2nd
Sly11 replied to zebedee's topic in Request Expert Infantry Status
Hi Rowan, we will be with you shortly, thank you for your patience -
TK-19165 Requesting EIB status. ANH TK Stunt [789]
Sly11 replied to Steaditrooper's topic in Request Expert Infantry Status
We will be with you shortly Sean, thanks for your patience -
TK10116 Requesting TFA Centurion status (Anovos) [Approved 3rd]
Sly11 replied to ukswrath's topic in Request Centurion Status
Hi Tony, thank you for your application and welcome to your Centurion review!! CRL and Centurion Application Requirements: All submission photos are present. Your armor displays all the necessary elements to qualify for Centurion, Congratulations!! and welcome to the rank., again lol Other-Armor Fit/Assembly: Excellent job overall on this armour, and an outstanding example for all budding FO TK 's to follow. Nothing more to add. Congratulations brother, continue to make the FISD and Golden Gate Garrison proud!! -
TK21155 requesting ANH Stunt EIB status [MTK] [787]
Sly11 replied to yo_its_nino's topic in Request Expert Infantry Status
Welcome Nino and thank you for your EIB application. Let's get to it. CRL and EIB Application Requirements: All the required submission photos have been posted, and your armour meets all the necessary requirements for level 2. With that Tony and myself would like to welcome you to Expert Infantry, congratulations Other-Armor Fit/Assembly: In this section we review observations made by your fellow troopers and ourselves. Some observations may lead to suggestions to improve the overall look of your armor. If any suggestion affects any application, it will be listed separately in the above or below sections. Great build over all but we do have a few suggestions to get you looking the best you can Thanks for extending the cover strip on your shin, we will discuss it further on in the review Starting from the top, we noticed one of your ear screws is incorrect all the others look fine so should be easy enough for you to take one out and take it with you when you go looking for a replacement. Reference image Also, overall there is far too much material left on the ears and they are quite different in thickness This is also preventing this one in particular from sitting properly at the bottom We think these need to be re trimmed as you have loads of material to work with, and it will give a much cleaner look to the helmet. Moving down to the shoulder bells, these need some realignment to tidy you up. The top of the Bell should be level with and virtually touching the plastic shoulder bridge. This will bring the bells closer to your chest plate closing down the gap a bit more. reference image We also believe your Biceps are too large, maybe you have huge guns but from the images it looks like you could remove a good inch from the diameter of them This will also help your shoulder bells sit closer to the cheat plate There is plenty of ridge visible from the sides of the cover strips so you have some material to play with and still have the cover strips sit nice and flat. Centurion Suggestions: In this section we prepare you for Centurion as best we can. This is your time to shine, we love accuracy and we push everyone to meet and exceed the CRL where possible, you are close, can you feel it! Only a couple of items here to meet CRL requirements and its all to do with alignment of your Ab and kidney plates As per the CRL for level 3 For level three certification (if applicable): Ideally there no gap between the abdomen and kidney armor. Shin cover strip. Thanks again for quickly remedying the length of the strip, but we are going to ask you to replace it with a full length single strip for Centurion You have done a great job so far making armour designed for a 6 foot tall trooper fit you, and at 5'3" that is a big task. Here we are at the end, congratulations trooper, make your corrections, we know you can do this as you have a very nice build. Head on out and hope to see you in Centurion review next year -
CANCELLED This year the Redback garrison hosted a charity ball to raise funds for a children s charity Act for Kids. The night was a resounding success raising $31,614 in just 5 hours. The date is now locked in and we will be doing it all again next year. So if you are planning a trip to the Land down under and are looking for a HUGE troop, then pencil in August 4th 2018 Brisbane. There will be a grande parade down the center of Brisbane city's Queen St Mall on the day and the main event in the evening.
-
TK21155 requesting ANH Stunt EIB status [MTK] [787]
Sly11 replied to yo_its_nino's topic in Request Expert Infantry Status
This will do fine for EIB, will be with you soon and thank you for your patience. -
TK10116 Requesting TFA EIB status (Anovos)[APPROVED] 3rd
Sly11 replied to ukswrath's topic in Request Expert Infantry Status
OK, OK enough fun with the DO's application lol, it's time to get on with it. Tony, thank you for your TFA EI application. Its not often we are privileged with applications from members of staff, let alone one of the deployment officers. I think we all know Tony has quite the reputation for his build threads, level of detail and quest for ultimate accuracy, so I looked at his application several times to make sure all the boxes were ticked. Did I expect to find anything out of place! no, nor did I, but as you all would expect from either of us in this unusual position, I had to make sure and looked over it for a couple of days. CRL and EIB Application Requirements: Now that he has added the action shot , all images are present and exhibit the attributes required as set out in the level 2 CRL congratulations on a beautiful build Other-Armor Fit/Assembly: In this section we review observations made by your fellow troopers and ourselves. Some observations may lead to suggestions to improve the overall look of your armor. If any suggestion affects any application, it will be listed separately in the above or below sections. I have nothing to add here, and thankfully, as ultimately we ask for high standards from the general membership so it is our job to make sure we also meet and exceed that expectation. Centurion Suggestions: In this section we prepare you for Centurion. If there are any areas of concern this is where they are discussed. Nothing to add Get that Centurion application in Tony it should be another easy pass. -
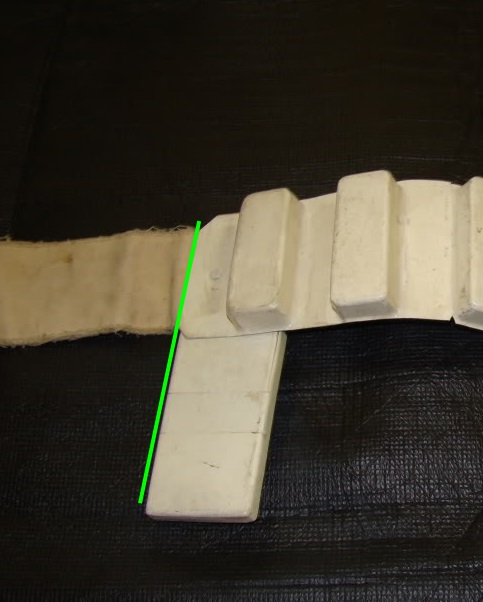
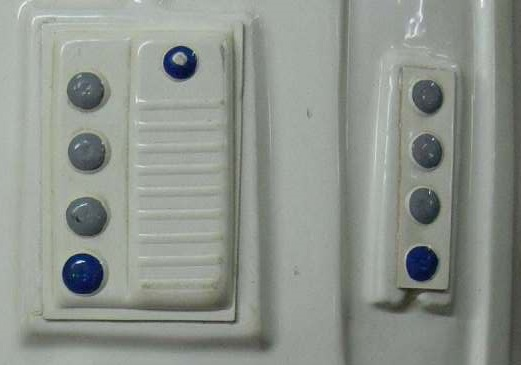
Hey Rob thank you for your application and welcome to your EI review CRL and EIB Application Requirements: All the required submission photos have been posted, and your armour meets all the necessary requirements for level 2. With that Tony and myself would like to welcome you to Expert Infantry, congratulations Other-Armor Fit/Assembly: In this section we review observations made by your fellow troopers and ourselves. Some observations may lead to suggestions to improve the overall look of your armor. If any suggestion affects any application, it will be listed separately in the above or below sections. Nothing major to fix just a dressing issues and an accuracy item to note. Keep an eye on the thick white elastic straps under your shoulder bridges. They are pulling out from under and make your shoulder bells sit further away than they should from the bridges. Reference image Although the screws you have used in the Thermal Det are close, the screen used type were Pan head slotted, where you have used domed head slotted. This will not have a bearing on any approval, it's just a further step towards accuracy. This item also has no bearing on an application but again is a finer detail of accuracy The small vertical Ab button plate looks like it has a slight overhang on the section it mounts too. I'm not sure how yours is glued, but if it can be removed there is still a little bit of material that can be trimmed so it sits like the below reference image Reference image Centurion Suggestions: In this section we prepare you for Centurion. More photos are requested that allow us to make better decisions on possible adjustment etc. If there are any areas of concern they will be discussed here. Drop box alignment. As per level 3 CRL For level three certification (if applicable): Drop boxes are vertically aligned with the end of the ammo belt with minimal gap between belt and box. It appears your Drop boxes slide in from the ends a little, these can be secured using a dab of glue or even adhesive Velcro to keep them in the correct position. reference image Here we are at the end of another successful EI approval, congratulations Rob, you deserve it. Hope to see a Centurion application from you soon.
-
Yep that's all good, please stand by.
-
TK21155 requesting ANH Stunt EIB status [MTK] [787]
Sly11 replied to yo_its_nino's topic in Request Expert Infantry Status
Thanks Nino, we will be with you shortly, but i would like to give you an opportunity to fix something and submit a replacement photo, while you wait for us to get to your full review. The cover strip on your non sniper plate shin, should go all the way to the top and not finish at the ridge. Please see the below reference images. Any questions, please feel free to send Tony or myself a PM. -
TK10116 Requesting TFA EIB status (Anovos)[APPROVED] 3rd
Sly11 replied to ukswrath's topic in Request Expert Infantry Status
Hi Tony, looking good, but you are miss the action shot from your application. Could you please add at your earliest convenience. -
TK42911 requesting ANH Stunt Centurion status (RWA) [366]
Sly11 replied to CableGuy's topic in Request Centurion Status
Hey Dan welcome to the moment you've been waiting for.... Centurion review CRL and Centurion Application Requirements: All required submission photos are present and your armour meets all benchmarks as set out in the level 3 CRL. Thank you for making the suggested mods from your EI review, so without further delay, congratulations on a beautiful armour build and reaching Centurion rank Other-Armor Fit/Assembly: Nothing to add except head on out and make us all proud -
TK42911 requesting ANH Stunt Centurion status (RWA) [366]
Sly11 replied to CableGuy's topic in Request Centurion Status
Nice work Dan, will be with you shortly. -
Hey Sean, keep up the good work
-
I think a level 2 is perfect, basic level we can over look it as it will take time for many to actually acquire the correct cod, paint it etc etc
-
TK61514 requesting TFA EIB status [Jimmiroquai] [784]
Sly11 replied to Ensi's topic in Request Expert Infantry Status
Hi Dan I will elaborate a little on why Tony requested a photo of your internal strapping. As we offer advise on how to make many corrections, it is always in the best interest of the applicants that we make an educated decision on how something may need to be fixed or readjusted. Internal strapping will never have a bearing on your approval, but can help us to help you guys when it comes to solid advice. I have used images of members internal strapping to help explain fixes so the armour sits better on them, and without those photos it becomes guess work. We are working on the photo check list and new visual guides for FO TK's which will help everyone, just like they have for all our OT TK's over the years. Hope this sheds a little light on the life of a DO in the FISD You look fantastic by the way. -
TK42911 requesting EIB status, ANH (RWA) [783]
Sly11 replied to CableGuy's topic in Request Expert Infantry Status
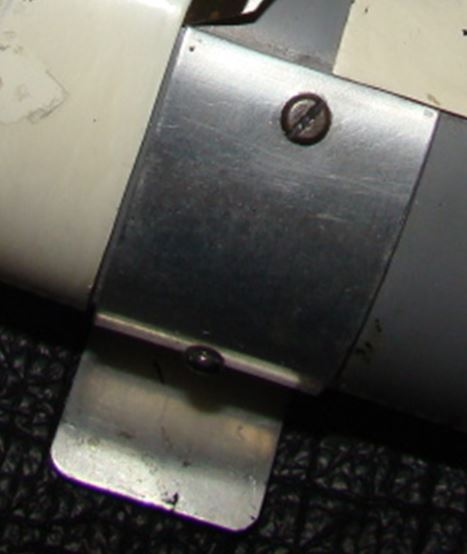
Hi Daniel welcome to your EI review and thank you for your application. CRL and EIB Application Requirements: All submission photos have been posted. Your armor displays all the necessary elements to qualify for Expert Infantry. Welcome trooper, congratulations! Other-Armor Fit/Assembly: In this section we review observations made by your fellow troopers and ourselves. Some observations may lead to suggestions to improve the overall look of your armor. If any suggestion affects any application, it will be listed separately in the above or below sections. Very nice build, excellent work Dan,good attention to detail and great looking E11 as well. We only have a few small items to mention so here they are. The first is simply a dressing issue, just get the gap between the bottom of your bicep and top of the fore arm even on both arms. The second is a very quick trim job on the cover strips on the back of your thighs. These look like they could cause you injury potentially damage your under suit. I would sand those pointy corners off as a preventative measure. This last one is just an accuracy thing, a nice to have but not a necessity. You have slotted screw and yes they are painted black, but the screen used screws are the pan head variety, not the dome.Like we said, not a necessity but another step closer to screen accurate. The reference image shows what a pan head screw looks. Centurion Suggestions: In this section we prepare you for Centurion. If there are any areas of concern this is where they are discussed. You have provided a pretty comprehensive set of images so this makes it easier to see if anything we cant normally see might stand out, and we are happy to report everything is looking good for an easy Centurion application. Congrats once again and hope to see you in Centurion review soon.
-
TK42911 requesting EIB status, ANH (RWA) [783]
Sly11 replied to CableGuy's topic in Request Expert Infantry Status
Hi Dan, very nice application, we shall be with you soon. -
Hi Rob Can you please add an image of the back of your belt showing the holster and drop box attachments etc. The usual is to lay the belt out on the floor and take the photo. We are also going to give you the opportunity to fix an element wich is required for lvl 2. It apears there is quite a gap between the end caps and the brackets on your thermal Det. The cRL mentions. For level two certification (if applicable): Thermal detonator belt clips are positioned with little to no gap between the clips and the end caps. reference image If you can also give the end of those bracket a slight roll over so they dont stick out too far. Any questions we are here to help
-
Yes the links do work, just easier to look at a thread and see the actual images, rather than clicking on each individual link. You may find you get more feedback and more detailed responses if the photos are immediately visible.
-
Hi Sam You are choosing the wrong link to share the images directly onto the forum page., from IMGUR. Its the second from the bottom of the link list on the right hand side of the image you select. Its titled BBCode (message boards and forums) Hope that hepls.
-
TK-24233 Requesting ANH Stunt (Anovos) EIB Status [781]
Sly11 replied to BDWC's topic in Request Expert Infantry Status
Thanks for your patience Jim, we will be with you soon. -
TK-24269 requesting TFA EIB status (KB)[780]
Sly11 replied to Coil's topic in Request Expert Infantry Status
Welcome Andreas and thank you for your EIB application and your patience. Let's get to it. CRL and EIB Application Requirements: All the required submission photos have been posted, except for your action shot, please add in as soon as possible. Your armour meets all the necessary requirements for level 2. With that Tony and myself would like to welcome you to Expert Infantry, congratulations Other-Armor Fit/Assembly: In this section we review observations made by your fellow troopers and ourselves. Some observations may lead to suggestions to improve the overall look of your armor. If any suggestion affects any application, it will be listed separately in the above or below sections. I would like to mention that try as I did to modify and crop your images like we do in other applications, the type of photo sevrer you used would not allow me to do so. Hopefully any reference images I have posted do help show what may need to be changed and or upgraded for any future application. Centurion Suggestions: In this section we prepare you for Centurion as best we can. There are a few upgrades over EIB and we will always push applicants to hit those marks, unlike the aim of a Stormtrooper lol. You have a couple of small additions to make to meet the Level 3 requirement but based on the quality of your build, these will be easy for you to achieve. First will be the addition of the Shoulder Bell brace. This will bring the bells level across the shoulder and make you look broader and even more intimidating. For level three certification (if applicable): Shoulder bell brace, a tab of plastic that extends from the top of the arc along the shoulder of the back/yoke, shall be present. Reference images The other items are really upgrades, like the neck seal with 11 ribs, and the rubber gaskets. If the CRL mentions a particular item is needed at level 3 then please add a photo of that. An example would be the 11 ribbed neck seal or the inside of a bicep showing the overlap join etc. Well you did it, Congratulations once again and head on out Expert infantryman -
TK-24269 requesting TFA EIB status (KB)[780]
Sly11 replied to Coil's topic in Request Expert Infantry Status
There is one last photo we just realized was missing. Your action shot. This is needed for the Legion data base, so please post it up as soon as you can. Stand by for your review. -
Great work as always Germain.
