


Sly11
-
Posts
13,367 -
Joined
-
Last visited
-
Days Won
278
Content Type
Profiles
Forums
Gallery
Articles
Everything posted by Sly11
-
 Hey Tom, nice work. Its been a busy Star Wars weekend so we will be with you soon.
 -
Hi Jim The guys above have all made valid points, SDS has been passed before but you need to add the requirements like charging handle D ring etc. IMHO there are better options for your hard earned dollars, and the UK is rich in available sources. A little bit of research and asking questions as you have, goes a long way in our hobby
-
TK-30806 Requesting ANH Stunt EIB Status (RWA) [827]
Sly11 replied to andy_watford's topic in Request Expert Infantry Status
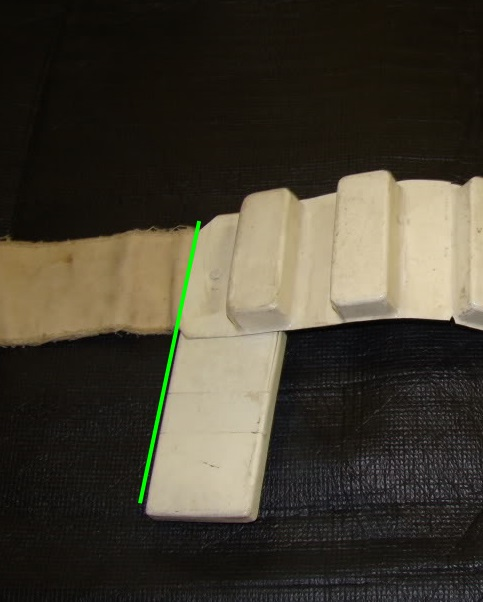
Hey Andy, thank you for your EI application, lets see what we have here. CRL and EIB Application Requirements: All submission photos are present. Great work on your armor Andy, it's obvious you have taken great pride in your build and it shows. That said, your armor displays all the necessary elements to qualify for Expert Infantry. Congratulations Trooper! Other-Armor Fit/Assembly: In this section we review observations made by us and your fellow troopers. If there were any suggested corrections they would be made here. We only have one suggestion, and that is to trim down some of the excess material on the small AB button plate.The plate itself should reside within the boundaries of the mounting area as per the below reference image. Reference Image Centurion Suggestions: In this section we prepare you for Centurion. If there are any areas of concern they will be discussed here. And again, only one item to mention and really a very easy adjustment Level three certification (if applicable): Drop boxes are vertically aligned with the end of the ammo belt with minimal gap between belt and box Reference image Mate, what a lovely job you have done with this kit, we are delighted to say we have nothing more to add. Congratulations on a well deserved Expert Infantry badge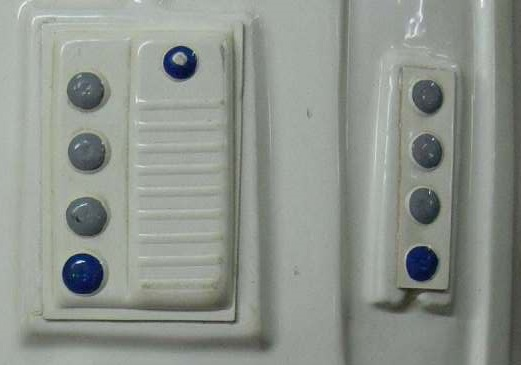
-
TK-30806 Requesting ANH Stunt EIB Status (RWA) [827]
Sly11 replied to andy_watford's topic in Request Expert Infantry Status
Ooohh very nice, Good on you Andy, I am working on your application shortly. -
TK-30806 Requesting ANH Stunt EIB Status (RWA) [827]
Sly11 replied to andy_watford's topic in Request Expert Infantry Status
Good to see you guys are all over it , nice build Andy, fix those screws and we will be with you shortly. -
TK15128 requesting ESB centurion status (RS) [397]
Sly11 replied to Lord_Vader84's topic in Request Centurion Status
Welcome back Alessio, Thank you for your Centurion application, lets get you approved. CRL and Centurion Application Requirements: All submission photos are present. Your armor displays all the required components as set out in the level 3 CRL. Tony and I would like to congratulate and welcome you to Centurion, Excellent work!! Other-Armor Fit/Assembly: Thank you for making the adjustment as set out in your EIB review , we have no more to add. Head on out Centurion -
Hi Justin, welcome to Centurion review, and thank you for your application. CRL and Centurion Application Requirements: All submission photos are present. Your armor displays all the necessary elements to qualify for Centurion so congratulations Trooper! Other-Armor Fit/Assembly: Thank you for making the requested repairs, you have done a great job. We still think the fore arms can be dropped a little more to even out the large black area at the wrist end, and I would also like to recommend you change the Velcro strapping specifically between your kidney and Butt plate so the butt doesn't pop out as much . Nothing more to add. Thanks again and welcome to the Centurion ranks
-
TK-26383 Requesting ANH Stunt Centurion Status [TM] [393]
Sly11 replied to Mark_Bouillon's topic in Request Centurion Status
Hi Mark, welcome back and thank you for your Centurion application, lets get you approved. CRL and Centurion Application Requirements: All submission photos are present. Your armor displays all the necessary elements to qualify for Centurion so congratulations Trooper! Other-Armor Fit/Assembly: Thank you for changing those Mic tips back to the original style, we will always recommend making changes like those for after approvals. Wonderful job on your armour. Nothing more to add. Thanks again and welcome to the Centurion ranks -
TK-26383 Requesting ANH Stunt Centurion Status [TM] [393]
Sly11 replied to Mark_Bouillon's topic in Request Centurion Status
Hi Mark Thanks for the corrections brother, we will be back with you shortly. -
Hey Tom, appreciate your patience and thank you for your EI application. CRL and EIB Application Requirements: All submission photos have been posted, and your armour meets all requirements as set out in the Level 2 CRL. Congratulations! on a beautiful build Other-Armor Fit/Assembly: In this section we review observations made by your fellow troopers and ourselves. Some observations may lead to suggestions to improve the overall look of your armor. Only minor tweaks to mention like your ammo belt could sit a little higher. These are pure accuracy niggles that wont effect any future application, but we do like to see our troopers look as consistent as possible. Reference Image Another very minor detail could be to trim the small Ab button plate down the long edges so it sit within the molded mounting area. Reference Image Centurion Suggestions: Because Centurion photos show much more detail than EIB, items pertaining to Centurion might be seen there and not here. We try to point out all we can from what is seen but the final accuracy is the responsibility of the trooper. At this time you appear to be to have most things in order for Centurion. The main item will be closing up those side gaps between Ab and Kidney plates. As per level 3 CRL Level three certification (if applicable): Ideally there no gap between the abdomen and kidney armor. That's it Tom, you are officially Expert Infantry, hope to see your Centurion application soon
-
TK-13434 Requesting ANH Stunt EIB Status (RS) [824]
Sly11 replied to bartonajb's topic in Request Expert Infantry Status
Hey Andrew, thank you for your EI application, lets take a look. CRL and EIB Application Requirements: All submission photos are present. Great work on your armor Sebastian, it's obvious you have taken great pride in your build and it shows. That said, your armor displays all the necessary elements to qualify for Expert Infantry. Congratulations Trooper! Other-Armor Fit/Assembly: In this section we review observations made by us and your fellow troopers. If there were any suggested corrections they would be made here. We only have one suggestion, and that is to rotate your shoulder bells forward and closing down the gap between them and your chest plate. There is a slight gap also at the top of the bells and the shoulder bridges, that could be as simple as shortening up the two top straps. This will also help close that gap at the front. Reference image Centurion Suggestions: In this section we prepare you for Centurion. If there are any areas of concern they will be discussed here. We are delighted to say, we have nothing to add here. Congratulations on a well deserved Expert Infantry badge -
TK-13434 Requesting ANH Stunt EIB Status (RS) [824]
Sly11 replied to bartonajb's topic in Request Expert Infantry Status
Hey Andrew, sweat build my friend. I will be working on your review later today back soon. -
Hi Daniel welcome back and thank you for your Centurion application. CRL and Centurion Application Requirements: All required submission photos are present and your armour meets all elements as set out in the lvl 3 CRL, with out further delay, Tony and I would like to congratulations and welcome to Centurion Other-Armor Fit/Assembly: Centurion is the ultimate level of accuracy and appearance. In this section we mention any finer points you may be able to achieve to make your armour as accurate and clean as possible. I would just like to mention the small gap on the rivet side of your armor. It appears you have a slight overlap on the opposite side that if you adjusted (shortened) the elastic connectors behind the rivets, you could close that side and alleviate the overlap on the other. We also think this opening may have only been caused from raising your arms and creating the separation. And one last thing. Shim work and ABS paste is never easy, and you have done a good job, but we think either adding a little more ABS paste to the small depressions and sanding back again to clean them up will give you a more even finish. Congratulations once again sir, head on out as a proud Centurion
-
TK-42784 requesting ANH Stunt centurion status (Aovos/WTF) [391]
Sly11 replied to talem84's topic in Request Centurion Status
Hey Brian welcome back and thank you for your Centurion application. CRL and Centurion Application Requirements: All required submission photos are present. Thank you for making the suggested update during your EIB application. Beautiful job on your build . Tony and I are pleased to announce your armor displays all the elements as set out in the Lvl 3 CRL. Congratulations and welcome to Centurion Other-Armor Fit/Assembly: I have one small recommendation to help prevent any possible damage to your undersuit and your self. You could trim the areas circled in the below image and sand the edges smooth as they look like they could catch. Overall you have one tidy build and should be very proud. Time to head out and continue to make the Empire and your garrison proud -
Perfect mate, thank you, with you in a moment.
-
TK-42784 requesting ANH Stunt centurion status (Aovos/WTF) [391]
Sly11 replied to talem84's topic in Request Centurion Status
Looking sharp Brian, I will be with you as soon as possible. Thank you for your patience. -
Hey Daniel, that looks much better mate, thank you for making the adjustment. Tony and I are just catching up on applications so we will be with you shortly. Just one Item I need you to attend to due to the Level 3 CRL Looks like one of your fore arms still has some material that can be removed from the wrist end at the ridge where the dimples run up the length. Level three certification (if applicable): No return edge on the inside of the front of the forearm is allowed. reference Any questions, we are here to help. Looking good brother.
-
TK-26383 Requesting ANH Stunt Centurion Status [TM] [393]
Sly11 replied to Mark_Bouillon's topic in Request Centurion Status
Hi Mark, thanks for your patience. We are getting close to your review and i just went through it an have something we would like you to replace. The Hovi tips on your helmet are not actually correct. They are a different shape compared to what they should look like and look more like modified caps from something. There are a couple of members on the forums here that sell Hovi tips cast off originals, Trooperbay has some that are passable at Centurion, or perhaps contact one of the armour vendors as most generally supply accurate Hovi tips. Reference image Also your drop boxes are still not sitting in the correct positions or you have used the same photos from your EIB showing one sitting too far out and the other sitting in from the edge. On one belt image they are correct on the other side of the belt in the next photo they are again not aligned. All we need to see here is one or two photos of you kitted up with those drop boxes aligned with the ends as per the CRL that we mentioned in your EI review. You have a beautiful set of armour, lets get you looking perfect as you are so close. -
TK-15128 Requesting ESB EIB Status (RS prop) [818]
Sly11 replied to Lord_Vader84's topic in Request Expert Infantry Status
Look for the set of Greeblies across the rear section of the barrel to identify the Promo blaster version, the standard version doesn't have them Promo Blaster -
TK-15128 Requesting ESB EIB Status (RS prop) [818]
Sly11 replied to Lord_Vader84's topic in Request Expert Infantry Status
Hey Alessio, welcome and thank you for your EIB application. Let's take a look. CRL and EIB Application Requirements: All the required submission photos have been posted., your armour displays all necessary element as set out in the level 2 CRL, Congratulations. Other-Armor Fit/Assembly: In this section we review observations made by your fellow troopers and ourselves. Some observations may lead to suggestions to improve the overall look of your armor. If any suggestion affects any application, it will be listed separately in the above or below sections. Smart looking build Alessio, we dont see many ESB troopers come through the ranks, good to see. We only have a few minor tweaks or touch ups to recommend which will get you looking the best you can so lets go through those Just a small gap between the tops of your shoulder bells and the plastic shoulder bridges. Shorten those elastic straps that connect the two at the top and they will sit perfectly. ESB reference image Another suggestion we have is to raise the plastic ammo belt up so it sits just on or slightly over the bottom of the lowest Ab button. Reference Image The black boarders of the ear rank bumps are quite a bit thicker than the boarders on your tears and traps. If you can thin those down again this will look perfect. One last thing to note is the Tube stripes. These should be parallel to the cheeks where yours are running on slight angles. If these are easy enough to remove and reapply, they should sit approximately a pencil width from the cheeks. Reference Image Centurion Suggestions: Because Centurion photos show much more detail than EIB, items pertaining to Centurion might be seen there and not here. We try to point out all we can from what is seen but the final accuracy is the responsibility of the trooper. A this time due to the corrections you have made we have nothing to add, but it would be great if you attend to the boarders as mentioned on the ear bumps. Great job on your build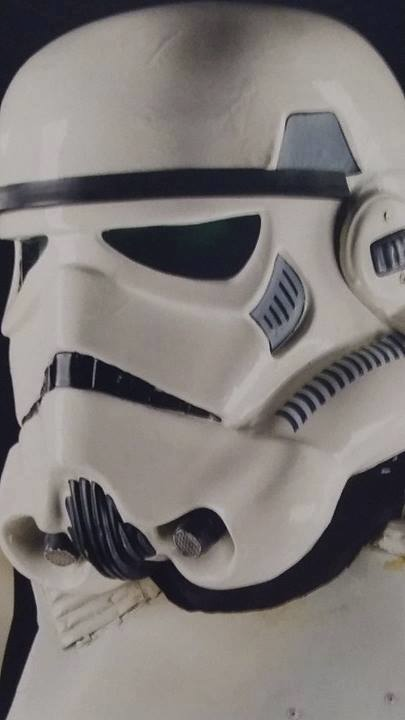
-
TK-77520 Requesting ANH Hero Centurion Status (TM) [390]
Sly11 replied to Hoda's topic in Request Centurion Status
Hey Eric!! welcome to your Centurion review, thank you for applying. CRL and Centurion Application Requirements: All required submission photos are present. Thank you for making the small adjustments as mentioned in your EIB review, very nice and beautiful job on your build. Tony and I would like to welcome you to Centurion. Great job! Other-Armor Fit/Assembly: We have nothing to add here Time to get out there representing the Empire as its newest Centurion -
TK-77520 Requesting ANH Hero Centurion Status (TM) [390]
Sly11 replied to Hoda's topic in Request Centurion Status
Good catch Eric, we will be with you shortly, thank you so much for your patience. Just one thing, any chance you can try and close that side gap up completely between your Ab and kidney plate (rivet side) it is so close to perfect I feel compelled to ask you to try -
Hi Tom and thanks for being so patient. Could you please add a photo of the rear of your blaster showing the D ring. I am working on your application now
-
TK57996 requesting ESB centurion status (AP) [388]
Sly11 replied to Calimero's topic in Request Centurion Status
Hi Dominic, welcome back and thank you for your Centurion application, time to get you approved. CRL and Centurion Application Requirements: All submission photos are present. Your armor displays all the necessary elements to qualify for Centurion so congratulations Trooper! . Other-Armor Fit/Assembly: Thank you for making the requested mod and trimming out the last of that return edge, you have done a excellent job and we have nothing more to add. Thanks again and welcome to the Centurion ranks -
April 2018 Request for CRL Updates thread
Sly11 replied to Daetrin's topic in Hard Armor (General Discussion)
Yep that works for me.
