gmrhodes13
-
Posts
31,219 -
Joined
-
Last visited
-
Days Won
1,070
Content Type
Profiles
Forums
Gallery
Articles
Everything posted by gmrhodes13
-

Tim’s first time build (RS Prop Masters ESB TK)
gmrhodes13 replied to TrickyT81's topic in ESB Build Threads
Strapping Systems Rivet Setting 101 by justjoseph63 (Print PDF) Snap Setting 101 by justjoseph63 (Print PDF) Snap Setting Hardware Solutions by TheRascalKing E6000 and Snaps Discussion by Harbinger, Snap Options by ukswrath Snaps with Rivet Heads by TheSwede Split Rivet Placement by DroidHunter How to Use a Rivet Tool by huttman How to Make Snap Plates by stukatrooper Elastic ABS Reinforcement by Cricket Types of Inner Strapping by Shinyarmour1 Internal Strapping by justjoseph63, nrgband Thigh Garter System by Pencap510 Making Thigh Garters by Spectre -
Looking good
-
Most of the time you will find they use either E6000 glue or a more permanent super glue. Just lifting a corner up a little may allow the rest of the button cover to release, if it's a permanent glue then you may be able to either soak in a bath of hot salty water, can help dissolve the glue or leave in a freezer for some time, this can also help release the glue with a little pressure under one corner. If you get really stuck I would suggest speaking with your armor supplier about replacement button covers or try the following: I normally use a heat glue for heating plastic but you have to have some practice with it, you can go from almost pliable to molten mess in the blink of an eye
-
Still as far away but flying in the opposite direction, looks like I'll miss this one too. But one day, one day

-
Nice look at the Flamethrower at 27 seconds At 3:48
-
Pushing down hard so the piece bulges outwards then wrapping tape around tightly will help to keep the cover strip flat while the glue dries, but any pieces under pressure need longer to dry, I wait 48 to 72 hours before removing the tape. Read what I posted above, most pieces will come together using a little pressure and tape. NOTE how much tape I have used to keep the cover strips laying flat If it was me I'd remove that cover strip, sand the end so it looks nice, then re-glue. E6000 excess glue will come off, either rubbing with your thumb, or using popstick or even scrap sharp pieces of ABS plastic, just keep cutting off the dull end. You can also use polish to help with stubborn spots but try to use one of the same color or it can get stuck under the corners of your cover strips.
-
Any pieces under any strain usually take a little longer to dry, I leave mine for 48 to 72 hours. Although they can be seen on some screen used armor you may want to trim these ends of your coverstrips as they may catch when moving your arms, this is more a comfort thing than screen accuracy

-
Looking to get started/ Little bit about me
gmrhodes13 replied to BlytheH's topic in New Member Introductions
Hello and welcome aboard, this thread should give you some help You will find a lot of info in the Legacy Stormtrooper area https://www.whitearmor.net/forum/forum/76-legacy-stormtrooper-joker-squad/ The 501st has base standards for costume approval, these are called the CRL's (costume reference library) Legacy Stormtrooper can be found here https://databank.501st.com/databank/Costuming:Legacy_Trooper_Female Don't be afraid to ask questions, good luck and hope to see a build thread from you soon -
Hello and welcome aboard, here's a great thread full of helpful info, may help you on your journey And you can request 501st access here Looking forward to seeing a build thread from you soon
-
Definitely worth the fix, looks muuuuuuuuuuuch better
-
Looking much better. Just remember also that when you have the armor on the belt angle may change a little they tend to angle up towards the rear so make sure you recheck before taking submission photos
-
This is a thread from back in 2017 and the member has not been on the forum since 2018 so I doubt you will receive an answer
-
Doesn't look like anything Star Wars
-
We had some of them down under so they can't be that rare although there was a couple not available and exclusive
-
WTF TK ANH Stunt Build thread - newbie needs help
gmrhodes13 replied to cnsf's topic in ANH Build Threads
Have you reached out to your local garrison , you can find them here https://www.501st.com/maps/ -
Mod F: Coiled wires between the counter and the cylinders were not used on screen, only on promotional pictures. There is also evidence of some counters being additionally supported by a wire, simply wrapped around the scope's feet (see ANH Leia's escort scene for reference). RPF Link
-
Any bend on the belt will be a help as it will take some strain off the snaps but some don't even worry about bending the belt. Unfortunately belt height will be picked up for L3: The top of the ABS ammo belt should sit at or just above the bottom of the central and vertical abdomen button panels.
-
Do one side at a time, wait until completely dry before gluing the other side. Apply downwards pressure on the top of the cover strip, the plastic will flex quite a bit, then wrap tape around tightly. Once you have one piece of tape wrapped around push downwards again then apply tape, your first piece may be a little slack now so you can retighten. You also may want to just clean up the ends of your cover strips, look a little rough and could catch when moving. @ukswrath bicep assembly See how much tape I needed to use on some sections of this build I also have a "how to" in one of my commission build threads, again lots of tap And in case it hasn't been mentioned you need to rough up both armor pieces and coverstrips with some coarse sandpaper, this will help the glue to adhere better
-
That's pretty standard on a lot of armor, you will find once you start gluing coverstrips on the ovals will flatten a little more. You can need a bit of pressure to get the covers strips to lay flat, clamps, magnets and tape can help, for the really bad ones push down first so they are rounder and apply the tape, it should hold once the glue has dried. You also need at least 24 hours for E6000 to dry properly and any pieces under pressure need a little more so 48 to 72 hours is best. It can be a slow process but there's always other things you can be doing while waiting for glue to dry If once you have one side glued you can check to see how much the other side will come flat, if you still can't get them right they may need a hot water bath. Here's another AP thread that talks about oval forearms, may be of help
-
For folding you can also hold each side with pliers, add some plastic to the teeth areas so they don't bite in then fold. The hardest I found was ATA armor, that stuff is thick and you really have to score well.
-
Blooper's Heavy F-11D Build
gmrhodes13 replied to TheBlooperTrooper's topic in Weapons of the First Order
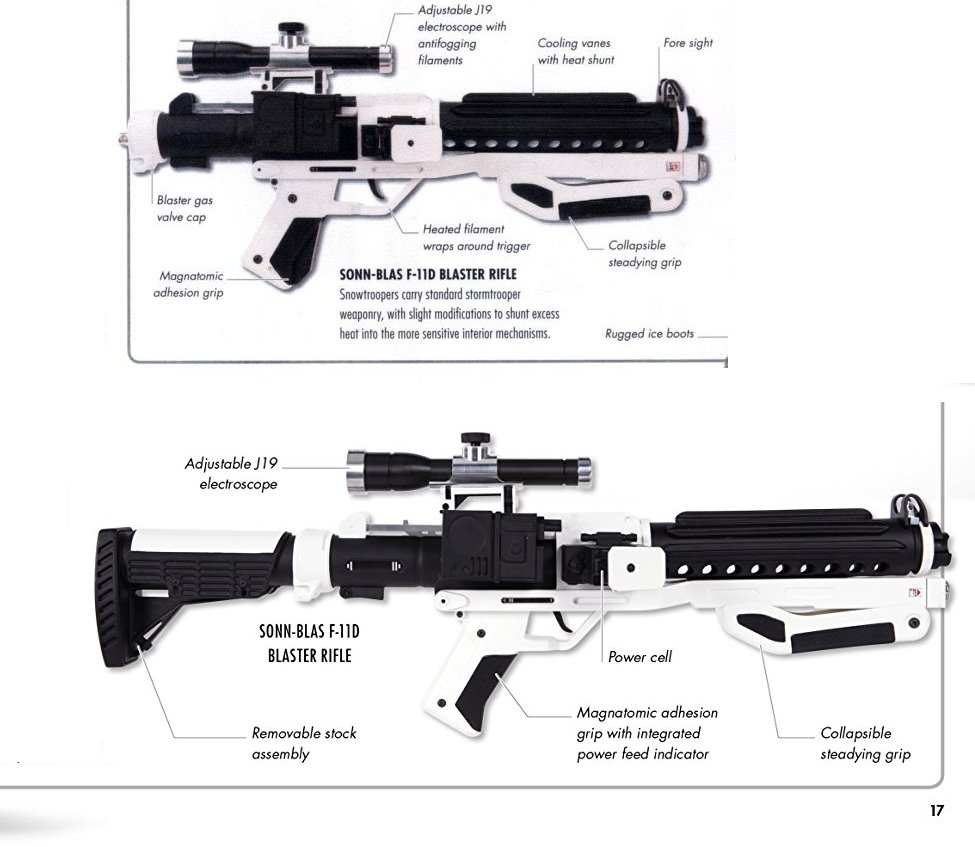
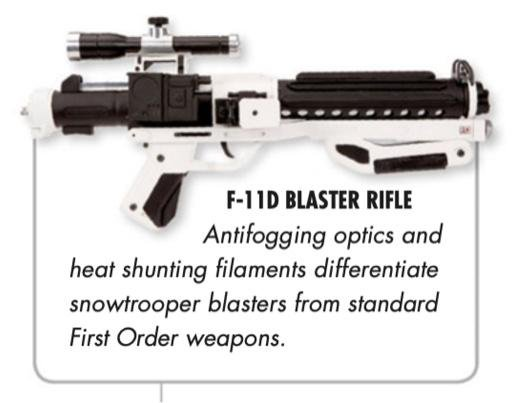
Great work One small color detail on the heavy blaster is the rear sight is white not black like the standard blasters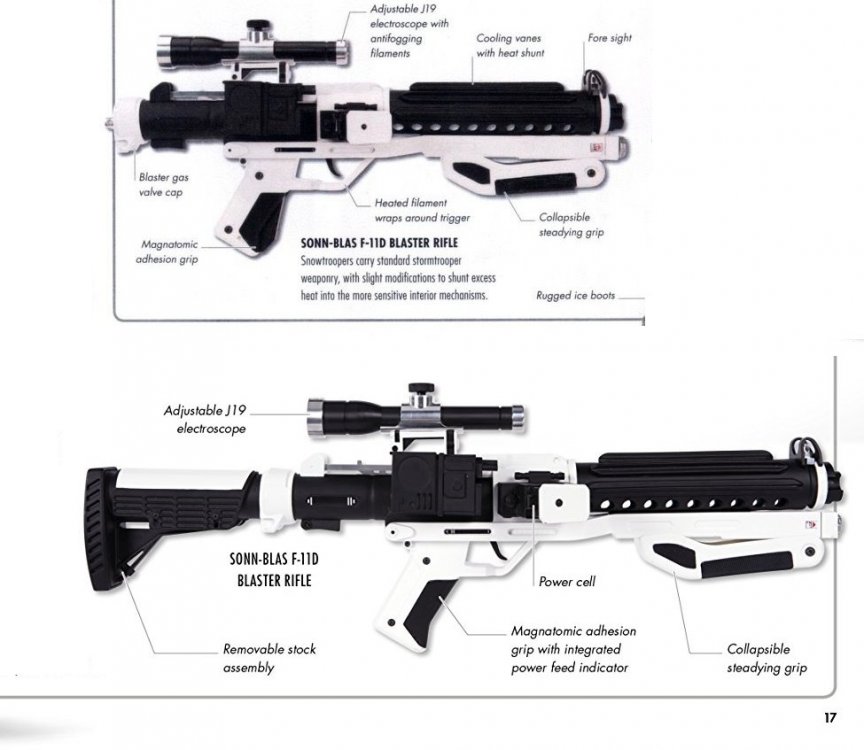

-
Some great research there, looking forward to seeing the progress
-
Yep a little more elbow grease, I use 120 also