gazmosis
-
Posts
4,043 -
Joined
-
Last visited
-
Days Won
23
Content Type
Profiles
Forums
Gallery
Articles
Everything posted by gazmosis
-

Kit Clarifications for my first build
gazmosis replied to Jedisaber's topic in Getting Started - Read this First!
Nice Tim! Specifically the EIB applications which require a picture of the strapping systems. -
Kit Clarifications for my first build
gazmosis replied to Jedisaber's topic in Getting Started - Read this First!
The only thing that even resembles anything you can buy that goes towards the strapping system is the webbing snap plates and the original metal bracket system that was used on the original suits. With either one, you will still need to fashion pretty much all your straps using either elastic, webbing , or both. There are few centurion requirements regarding strapping for the exception of visible hardware(side split rivets, male snap on the right side, crotch split rivet and crotch male snaps) the only strap that really shows is the one in the shoulder bells that goes around the bicep. This needs to be black and around 3/4 inch wide. The other important straps are the wider straps that connect the chest and back under the ribbed shoulder bridges. These need to be white and made from elastic or webbing. Elastic is more accurate. The straps that attach the shoulders to that white strap are black, and the straps that attach the drop boxes to the waist belt should be 3/4 white elastic. The rest of the interior strapping is really up to you how you want to do it. Just make sure everything except those chest to back shoulder straps are black. Did I miss anything?? -
storm trooper armor supply list
gazmosis replied to shamankid's topic in Getting Started - Read this First!
Unless you plan on becoming a distributor, the initial investment to make a proper set of ANH armor from scratch and not be guaranteed the right result, will FAR outweigh the cost of buying a set from one of the makers here. Give us your body type and measurement around your belly button so we can better guide you. -
TK 10251 Requesting ANH Stunt EIB Status [RS][420]
gazmosis replied to Artstar's topic in Request Expert Infantry Status
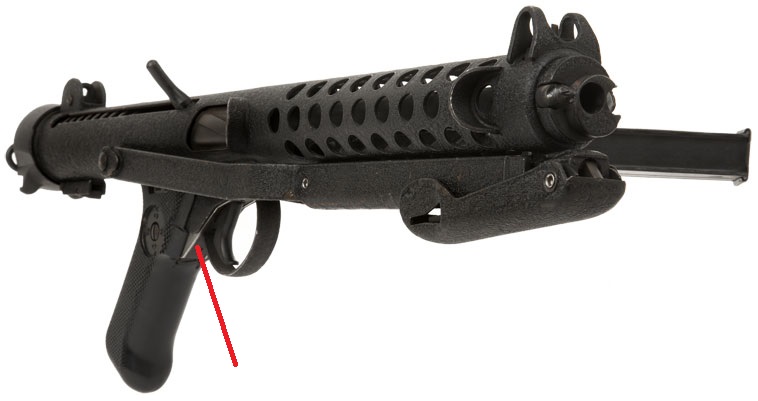
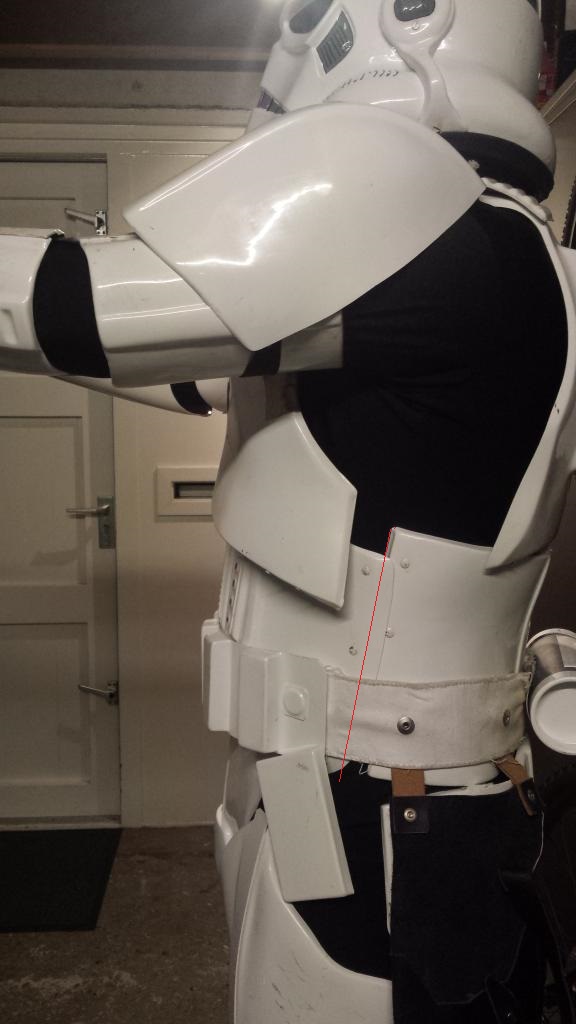
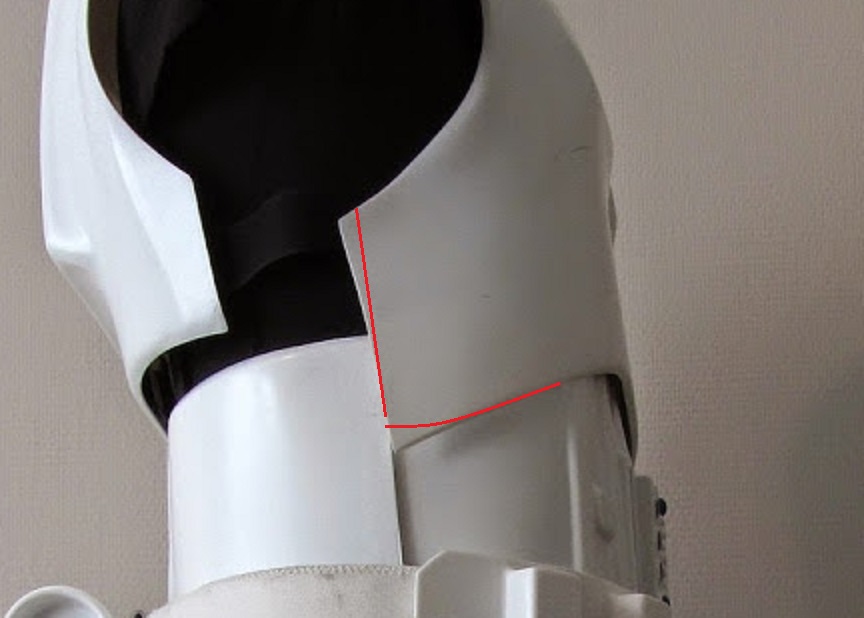
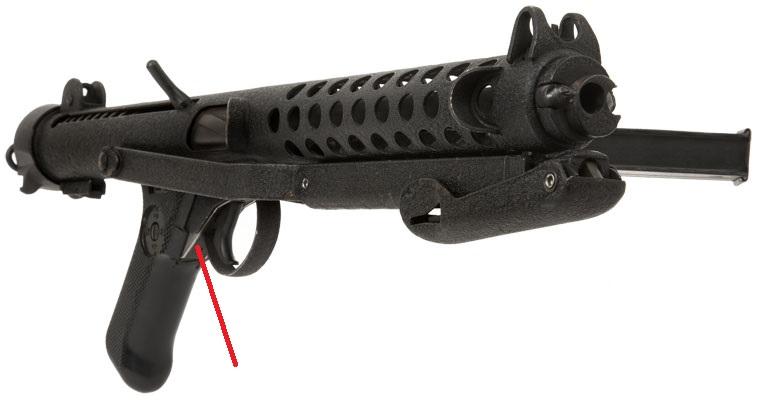
Alright Artie!! Welcome back and congrats on the approvals of your other costumes AWESOME photos at the end there!! *Note* Artie originally applied for EIB back in Dec of 2013. There were some issues that needed to be addressed as well as a slight re-organization of his application pictures. Thank you for working with me on this so we can finally move forward!!!! Now let's look at your armor!!!!! CRL and EIB Requirements: ​Darth Aloha's original assessment noting excessive side gaps has been resolved. You have successfully reduced yourself to eliminate that! Congrats!!!! There were several blasters pictured with some issues. A single blaster was chosen to represent with and an incredible one it is! You armor reflects all necessary elements for EIB. With that, I would like to congratulate and welcome you to EIB!!! Other-Armor Fit/Assembly: In this section, myself and your fellow troopers make suggestions toward improving the over all look/fit of your armor. Unless stated specifically, no suggestions here will affect any application. Twan mentioned this above and cannot agree with him more; your kidney and ab tops are very far out of alignment. I am not saying they have to make a perfect line across the top, but they need to be adjusted to align better than you have it pictured. This point will be brought up again in "Centurion Suggestions" below. I love your natural weathering!! Looks very authentic! It is not possible without replacing your belt to fix this next point. The rivet position on the outer most portion of the belt should be placed so the rivet cover sits just off the edge of the belt. I changed the right one on this pic so you can see the comparison of what I am talking about: I will say again how nice your blaster is. It can be nicer if you added a little weathering and silver details that are present on the real Sterlings specifically around the trigger group like this: Something else that Eric brought up in the original assessment was the location of your holster strap mounts on your belt. I agree they are too high. They should be within the lower half of the belt however, unless you replaced your belt which I am not going to make you do, this cannot be repaired unless someone has come up with a genius way to repair fabric so that it's undetectable. If you wanted to take your accuracy one step further, you could dab a little black on those thermal detonator screws. Centurion Suggestions: There are a couple things I'd like to see done before you apply for this badge. I will bring up the alignment of your ab and kidney tops. This needs to be remedied somehow. While we are on the subject of your sides, CONGRATS again on the reduction of YOU! Now, you have some unnecessary overlap on your left side that can be trimmed away to bring the rivets closer to their proper locations.I marked it in red: The male snap on your right side ab corner and your crotch rivet will need the paint removed. These were not painted. I went through basically every frame of the photo references to see if there was a screen trooper that had the tape like you have on the left side of your chest. I could not find one. If in fact these are repairs, you should strengthen these from the backside by whatever means you want: Poorman's fiberglass (t-shirt/superglue) extra plastic reinforcement or whatever. But those areas need to be cleaned up on the surface. If you do decide to move forward with a Centurion application, you will need a new back pic showing your armor with your holster attached. Congratulations again, Artie!!!!
-
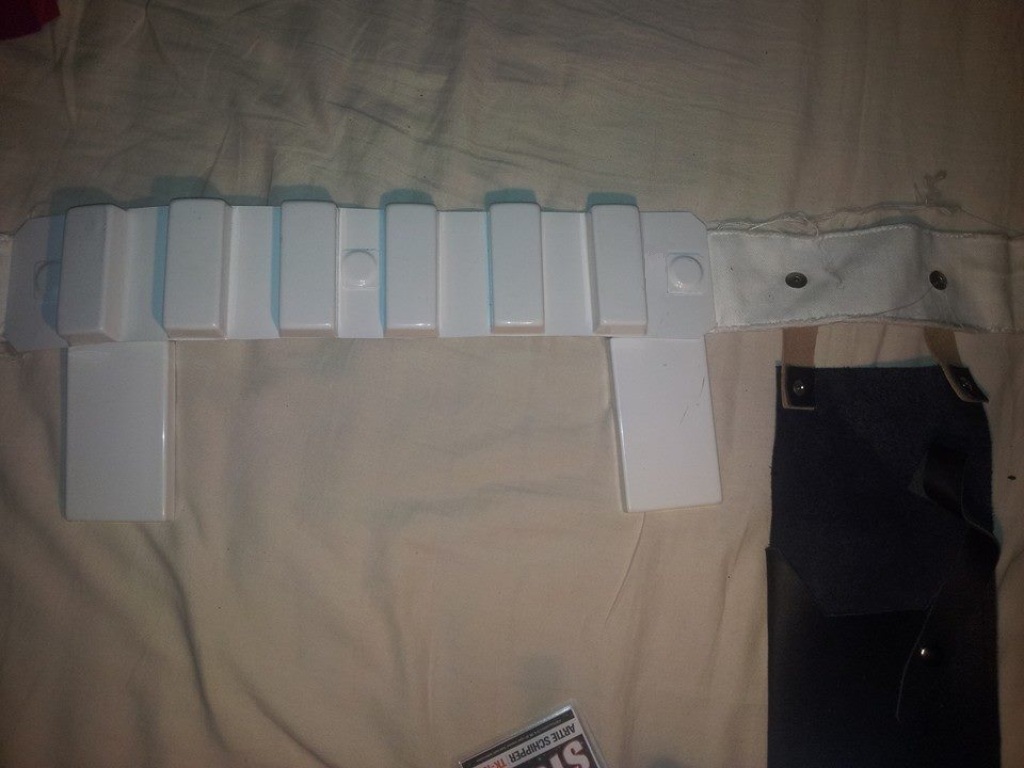
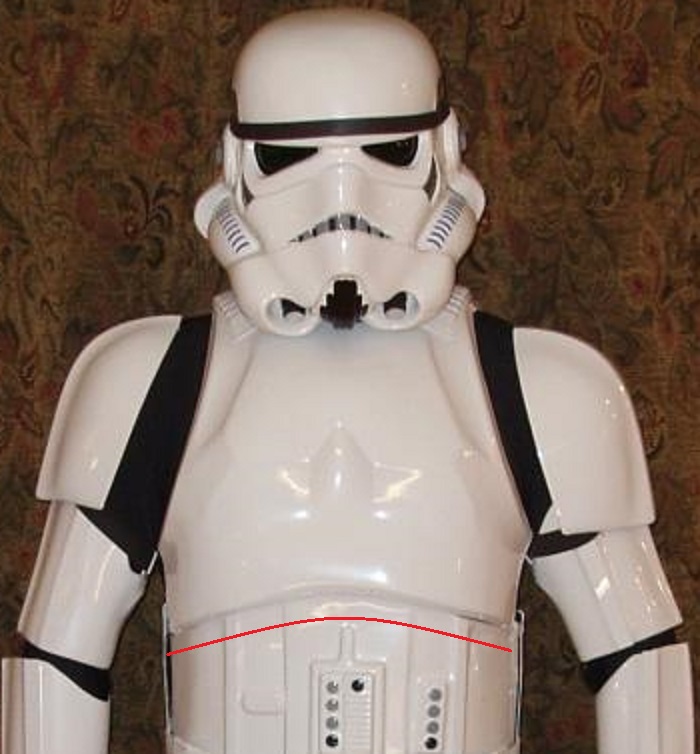
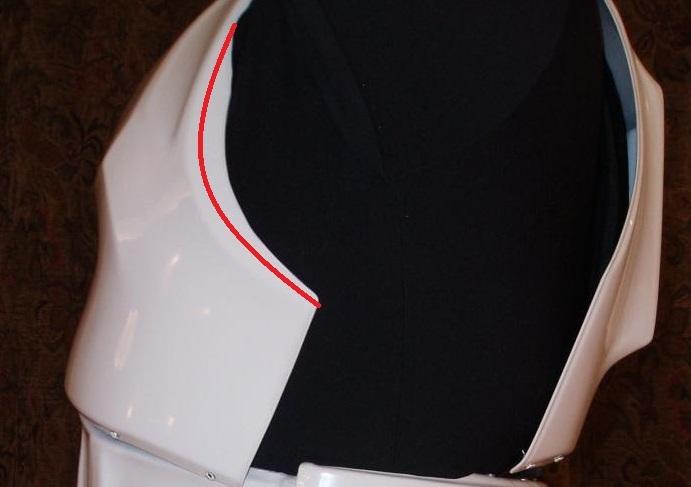
Going back to your two belts, use the bottom belt. You have three rivet points ( one in the middle and one on each end. ) however, the dimples in the outer most rivet points are far too close to the boxes. They should be closer to the edge of the belt with the final rivet cover sitting slightly off the edge.
-
That helmet is just an awesome sight. Nice tube stripes! They' eb been getting thin on other builds recently
-
trooper12's RT-Mod ABS ANH Stunt Build
gazmosis replied to trooper12's topic in Build Threads Requireing Maintenance
If you have access to a hobby heating iron, you can massage those notches out -
And I agree. I am going to lock this thread as it has come as far as it can and still be productive which it is quickly approaching NOT being. The information is here. The comparisons are made. The people will decide which they want to buy.
-
New airsoft MK4 L2A3 soon on market
gazmosis replied to skyone's topic in General Weapons Discussion
$500. That's painful -
Ridiculously minimal. I hope Roy is ready?!
-
Looking good there brother!
-
Forcesensitive RS props abs ESB build
gazmosis replied to Eddie TK Head's topic in Build Threads Requireing Maintenance
Yeah but he doesn't sell them -
TK-77177 Requesting ANH Stunt EIB status[SDS][419]
gazmosis replied to Shrapnel's topic in Request Expert Infantry Status
Hey Simon: Great follow-up! Sorry about the assumption of the thigh straps being attached to the inside of your ab. I see those snaps and they are only usually used for that purpose in that location. My bad. Anyway, With your correction of the calf closure, I put through your EIB badge. Congratulations and welcome to EIB!!! Regarding your upgrades, you never stated which adhesive you used in your assembly. If in fact is was something that you can get the halves apart with damage, the process of upgrading your seams ma seem daunting until you get done with the first one. After that, you will have the hang of it. If it is something that you just won't get to right now, I would at least, cut the overlap on your calf closure so the halves butt up to each other and install a cover strip of around 25 mm in width to your calves. This will at least get one upgrade chalked off the list. You can use Velcro or the metal hooks attached to elastic to keep them closed. We hope that you can make this happen! In the meantime, enjoy your EIB quality armor and get out there and make people smile!!!! -
You look great ! I would wear your handplates on the correct hands, but other than that you will have no problems!
-
Forcesensitive RS props abs ESB build
gazmosis replied to Eddie TK Head's topic in Build Threads Requireing Maintenance
Oh if only someone could find a crate load of those! -
I actually have these in my helmet. Just make sure your hair is really short, you have tiny profile fans or both. Hair stops the blades
-
The only thing you would need to do is to make sure you paint any exposed white within the slats so they don't stand out.
-
Are we talking 5 foot even? If that's the case, without sugar coating anything, there are no TK armor sets designed for a trooper of that size. Like Andrew said, you can start with one of the smaller suits like AP but "smaller" here means circumference of parts. It is still designed for someone 5'8" -6'. You start getting below that, and parts will need to be cut and their length reduced.
-
TK-77177 Requesting ANH Stunt EIB status[SDS][419]
gazmosis replied to Shrapnel's topic in Request Expert Infantry Status
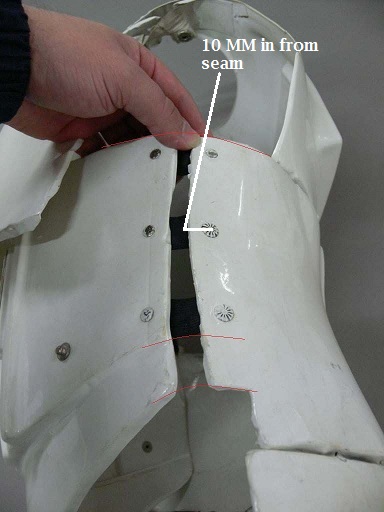
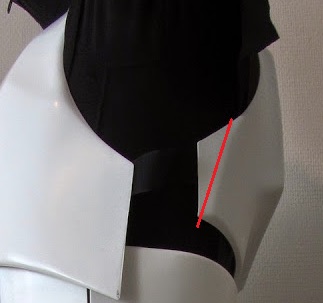
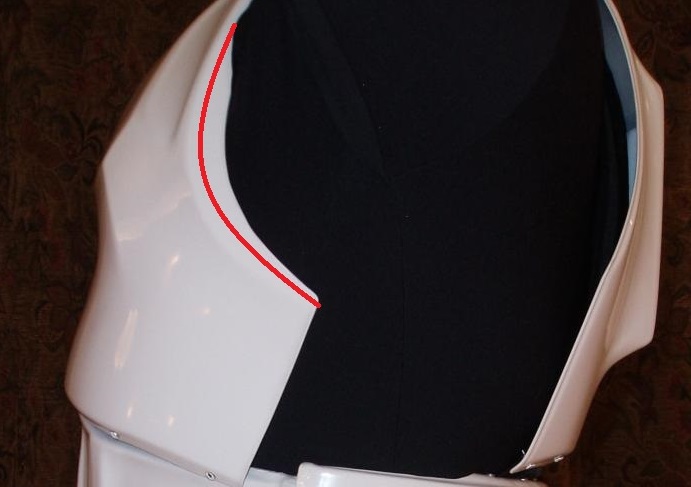
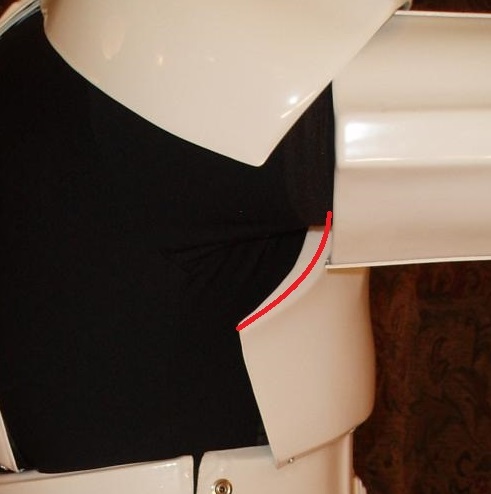
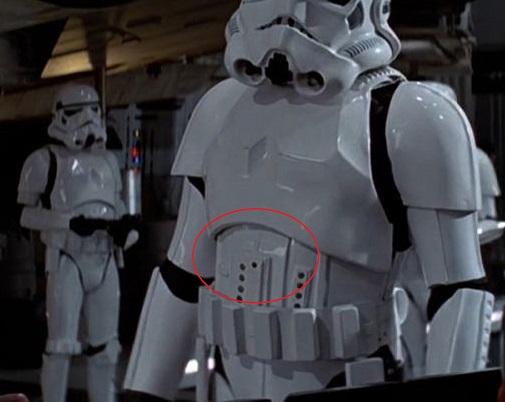
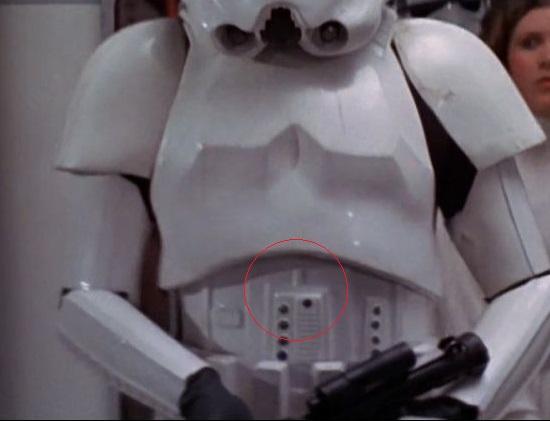
Hey Simon! Thank you for your application for EIB! We don't get a chance to see too many sets of SDS armor, so let's look at yours!! There is a lot to cover here. In no way are we trying to beat you up. We are just making suggestions to provide you with the information should you decide that you want to take this armor to the next level. That said, let's get to it!! CRL and EIB Application Requirements: You have all required photos properly posted. Nicely done!!! You are one adjustment away from EIB. I am surprised that your GML missed this because it is really construction 101, but as Germain pointed out, your right calf closure has the inside overlapping the outside. The outer halves always overlap the inner halves. Make this adjustment and we can move forward with your badge! Other-Armor Fit/Assembly: These are suggestions that go toward improving the overall look of your armor. These suggestions will NOT affect any application unless otherwise stated. Putting all the stories behind regarding this armor maker, you have a very good base set of armor. You have a very good and balanced fit. May I say also that your E-11 is splendid!!! What I would recommend is that you swap out the velcro on your strapping system to straps and snaps. There are far less "wardrobe malfunctions" and no ripping and crackling noises. I would also recommend building a garter system to hold up your thighs rather than the snaps on the inside of your ab. This will free up your movements and leave no possibility of your thighs coming undone from your armor. I have only one comment on the general construction and that is your plastic waist belt is a little wide. However, your canvas belt seems to be sized to this so fixing it at this point would be useless. Carry on!! Centurion Suggestions: ​This is the section that is really the separation between most armors available here and SDS. Most troopers who have Centurion in mind, build it following those guidelines right out of the box. Making adjustments, ad ons, and repairs after the fact is always most difficult. But if you intend on shooting for this accuracy badge, there is some work that will need to be done first. First and foremost is the overlap construction of your parts. This method was only used in the ROTJ armor which yours is not. It seems that the fronts of your thighs and shins have the correct butt joint/cover strip construction that should be followed on ALL your parts. The good news here is that looking at your parts, the overlap is excessive. this means it is very possible to trim this down to a single seam butt joint and top that seam with a cover strip. This is only possible based on whether or not you can get the halves apart. The last time I heard SDS was using a plastic melt/weld that fuses the parts together. You can probably contact them and ask their opinion of what you should do to get the halves apart. Should you have any questions regarding the correct construction procedures, look up the build threads and there should be around a million examples of this. You already have the correct gloves, now you need the flexible/latex hand guards You will need the hardware for along your side seams. The 6 split rivets on your left side: and the inward facing male snap on your right side: Note their positions and distances from the seam line. You will need the two, inward facing snaps on the crotch portion of the butt plate as well as the split rivet on the cod portion of the ab. The blue buttons on your ab button plates look added on. All the buttons here need to be originally molded into the plate then painted directly onto the raised buttons If you plan on tackling the cover strip challenge, keep in mind that the cover strips on your shin backs and thighs(fronts and backs) should only go UP TO and not exceed the ridges. You will need to trim the one cover strip on the front of your left thigh. This is an example of a thigh back with the proper strip placement: Your chest plate will need to altered slightly. Right now, the distinct upside down "U" shape of the bottom is just too similar to the old FX plate that needed upgrading. Here is what I am suggesting as a change here: It merely takes the end and curves it slightly to level it off and take away that "U" shape. IF you really wanted to be sneaky and put in a new return edge here you would be a rockstar!!! While we are on the subject of trimming things, a bit can be taken off both sides of your back: This will mess with your connecting strap here, but replacing the velcro with snaps is always a plus. You will need to change out the black straps that connect your chest and back with white elastic or webbing. The details on your helmet will either need to be hand painted or the "hand painted look" decals can be purchased from Trooperbay Laslty but not super high priority are the belt clips on your Thermal detonator. These should be 25-28 MM thin aluminum strips. Your screws are great. The clips need to be wider. Like I said, this can be last on your list. I know this sounds like a lot but we are here to support you should you decide to take on this challenge. If not and you are satisfied with EIB, make that calf closure change and we will celebrate that!!!


-
You could keep the bracket system for your back/kidney. I would just knock the return edge back a little bit. Just leave enough return edge to support the screw loop on the bracket. You don;t want to go too thin or the screw hole will create a weak spot.
-
Drools! Massive, wet huge drool puddle!!!! Just Wow!
-
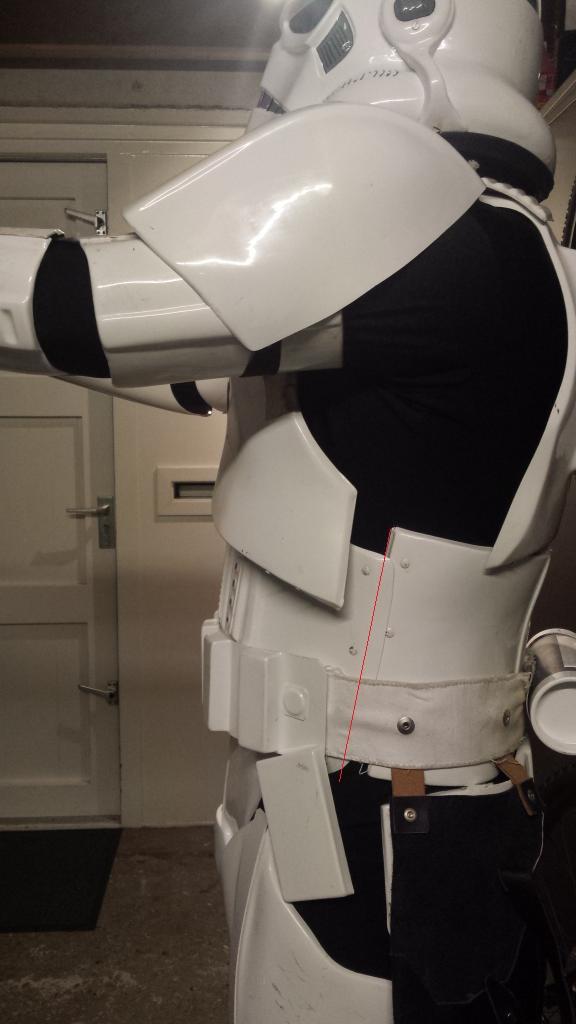
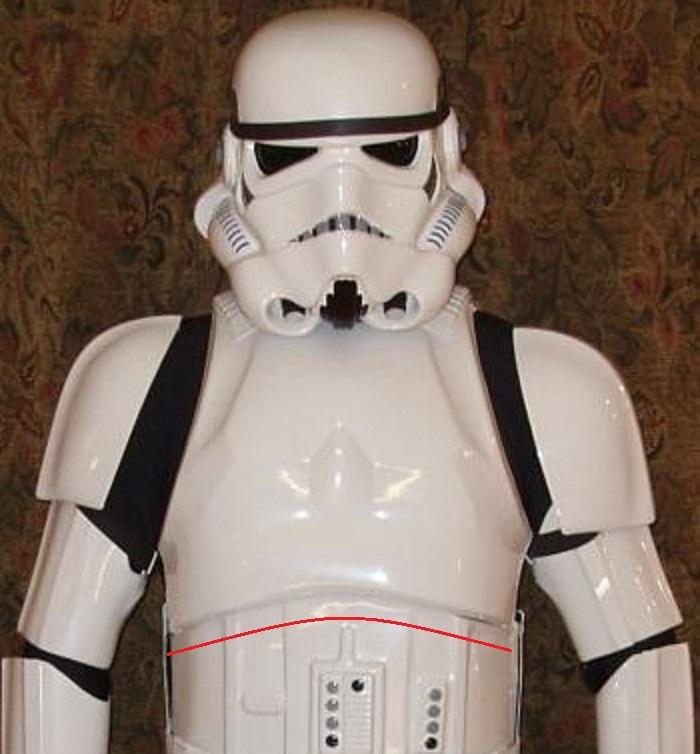
Alright, Pete! Thank you for your application for Expert Infantry! You have a very nice set of armor accompanied by a nice build! Let's take a look at your armor!! CRL and EIB Application Requirements: All required submission photos have been posted. Very nicely done!!! Your armor meets all the requirements for EIB!! With that, I would like to congratulate and welcome you to Expert Infantry!!! Other-Armor Fit/Assembly: This is the section where your fellow troopers and myself provide suggestions toward the overall look of your armor. Unless specifically stated, these suggestions will not affect any application! I want to start with your shoulders. They are sitting a distance from your ribbed shoulder bridges and should be right up close if not touching them. I believe there are two factors causing this the main one being your bicep hooks. Not everyone is built the same unfortunately. Some have longer this or shorter that. We have to adapt our armor to our bodies. Sometimes that is easier said than done. Although your bicep hooks are a nice touch and accurate with the "Han" suit, they are pulling your shoulders out of position at least on your right side. The second is that your shoulder bell to shoulder bridge straps are just too long. Try playing with these adjustments to bring them closer together. The next thing is your torso. I am trying to figure out if it is shimmed or if you have just left all extra material on your sides. Typically during fitting, the ab and kidney are placed together on the body and any overlap on the sides is marked off and trimmed. With your weight dimension at 210, I find it difficult to understand why you need any extra material at all. IT is just a suggestion, but some re-sizing here will give your torso a much more streamlined look and although it might be snug, it's a small price to pay. Something I also noticed was that you left all the unnecessary return edge at the top of your kidney. I like the incorporation of the original style brackets, but you really don't need any more than 3/8 inch of return edge to make those work. Reducing this may also help to bring your ab and kidney closer together. You may want to go back and remove some of the extra return edge off the sides of the chest. You have a LOT here that can be removed: Your belt had a bit of a droop in the front. This should be raised so that it sits up against or slightly above the bottom of the button plates. The last suggestion I have is in regards to your chest. It seems to look very uncomfortable and being pushed way up on your body. The on screen troopers had their chests, for the most part, resting right at that ridge line that extends up from the button plate. Yours is way above this. Compare the distance between the top of the button plate on your armor with these screen troopers. I think if you lengthened the elastic that joins the chest and ab and lowered your chest to about here:, It might improve function and may even bring your shoulder bells closer to the top. The last thing that I noticed that if you want to tackle is up to you, is the thickness of the ears on the helmet. Han's helmet ears were really thin as seen in this shot but maybe I'm just being picky. Centurion Suggestions: I would like to see your shoulders and belt brought up closer to the proper positions. Other than that, unless something shows up on your Centurion photos, I can't see anything that would hold you back! Congratulations again!!!!!

-
AWWWWWww!Thanks, Andrew!
-
TK Armor at Disney World Star Wars
gazmosis replied to TK69581's topic in Hard Armor (General Discussion)
no, it's not -
DVH Pipe Build with Extras
gazmosis replied to I'm Batman's topic in Build Threads Requireing Maintenance
What are you going to mate the hinge point to the pipe with? There's a lot of stress there! I have my doubts that glue will work here.