


RogueTrooper
-
Posts
4,222 -
Joined
-
Last visited
Content Type
Profiles
Forums
Gallery
Articles
Everything posted by RogueTrooper
-
Nice one Bill.. I will have to see how cheap I can find a DS lite case....thank man.
-
Please can I say it.... Someone PM me that has not won yet, or haven't used their two submissions for the EP4/Vader round, and give it to you... it's e.z.
-

Applied for new job...at Intergalactic Headquarters
RogueTrooper replied to tigger68's topic in Off Topic
The tree house looks more like the Wookies on Kashyyyk Who wouldn't want to work for a company that's named, "Intergalactic Headquarters" Just right out of a galaxy far, far away.... Best of luck to you Tiffanie with the job and the move -
OOOH!!!I KNOW!! I KNOW!! I KNOW!!! But I can't play anymore FRAK!!!
-
TK409's Neck Seal is top notch...Chris is a great guy as well. ---------
-
Just make the thigh pieces fit to you (make all pieces fit to your body style)and try to get the finish strips as close to the 20mm for the legs as possible and you will be fine. Go get you some poster board and try cutting out different thickness strips out of the poster board and lay them on the thigh armor and see which is going to come the closest before cutting the real finishing strips. 20 to 25mm usually is the parameter when you are looking at larger sizes. The accurate strip is actualy 20mm. If you get the poster board and cut the different test strip pieces and lay them on the thigh armor and post pix, we will give you our opinion on which looks best.
-
I saw one of these on eBay
RogueTrooper replied to poisonfox's topic in Build Threads Requireing Maintenance
I'm just taking a stab, I think that Jesse got it off of Ebay... Because a few months ago, there was one of this (Real M38) that when for that price on Ebay.... And his looks like it has the same marking (missing paint) as the one from the auction. Great looking scope Jesse! -
Step away from the bid button...move along, move along.... I love the statement it the auction: "This is a exact replica of the original, cost me a lot of money happy bidding." Over priced! There is so much not right about this suit Wrong Boots. The tops of the tighs don't look right at all. There's screws through the outside of shoulder bells. That's just the highlights..... You can find a great kit here. Prices starting at £253 GBP / $400 USD, and you will be much more satisfying. Then you can get the right add ons and not have to try in fixing something like this. Also, you don't want to wear a used undersuit... eewwww
-
I never had one of their products before...so I cannot say good or bad. I normally go with the Custom Saber Shop. You might want to post the same question about saberforge over on the Replica Prop Forum Good luck man!
-
I saw one of these on eBay
RogueTrooper replied to poisonfox's topic in Build Threads Requireing Maintenance
I said "I bid on it", I did not say I won ... Alas, I all my coins are spoken for... From what I gathered, I do not think that the winner was a SW fan, but a Miltary collector. I think it went a bit too high, but that's just me. -
I saw one of these on eBay
RogueTrooper replied to poisonfox's topic in Build Threads Requireing Maintenance
I bid on it. -
I have seen this before, but it always makes me laugh There's another one like this with Samuel L. Jackson as Mace. But there's sooo much foul language in the over dubbing that it wouldn't be appropriate to post the link.
-
Extreme Hasbro chop
RogueTrooper replied to Quebectrooper's topic in Build Threads Requireing Maintenance
The Sterling alone weighs between 9.5 to 10 pounds. That's not counting the add ons, M38 scope, t-tracks, Hengstler counter, scope rail, and cylinders... So after all that it's got some weight to it... -
I guess great minds think alike I wanted first to thank you for posting this contest, I love triva & games like this... Good luck to everybody with the rest of the lines. May the movie lines be with you..... always PM sent.
-
That is strange about the Iambubby zip. When I downloaded it I was able to open it and print it without any problems. Glitches with the internet and software - go figure! When you are able to print the pages out (properly), and get ready to wrap the template around the pipe, before you drill use a center punch/tap. If you don't already have one you can get one at any hardware or home improvement store. Why I say use a center punch/tap is that it will give the drill bit something to guide into, especially since it is much harder to drill accurately into a curved surface like a pipe. You won't have to worry about the template shifting on you after that, because you will have marked where each hole needs to be. Start out with a smaller bit first, around a 1/16". Then you will have a pilot hole for everything that you have to drill especially when it comes to the 7/16" and the couple of 1/2" vent holes that you have to drill. Let me know how it turns out.
-
Enjoy...maybe...
-
With your weight to height ratio, you could possibly get away with one of the more accurate kits, like AP, ATA, TE2, TM, etc. With these you will probably see a little more black between the armor, but if you work at adjusting your suit (how it fits you) you can mask it. The RT-Mod might be a little loose on you, but you can also use padding to compensate and trim down some of the areas. Also the RT-Mod does come pre-trimmed, so you wouldn't have as much work to do except for making it fit to your body frame. If you haven't seen this about Getting Started it should help you out with the RT-MOD.
-
QUI-GON : The ability to speak does not make you intelligent. Now get outta here! QUI-GON : Perhaps I killed a Jedi and stole it from him.
-
If you are talking about the "E11 barrel 1.5" folder with the two documents, yeah there is something missing in the file itself to be able to open it like a normal jpeg. If you right click on one of the documents, the drop down box will give you choices. Scroll to "open with" and choose "paint." If paint does not appear in the list of programs, then scroll down to "choose program" and then look through and find the "paint" program and open it from there. It will then open in "paint" and you will be able to print it out on a standard 8.5 X 11 sheet of paper and it will come out the correct size for wrapping it around a 1.5 size piece of pipe. If you don't have the paint program, then you should be able to download it for free off of CNET. Just google it. The barrel blue print is split into two different sections, but there are arrow/markers to match the two sheets of paper together, so you have everything lining up. If you have any problems, just let me know. I will help you out any way possible.
-
Extreme Hasbro chop
RogueTrooper replied to Quebectrooper's topic in Build Threads Requireing Maintenance
Yeah, I think extending the barrel will make it look more authentic. But, if you want to go uber accurate, then file or sand the left side of the barrel flat the way the real Sterlings are for the Bayonet and add the Bayonet Mount. Also if it was mine, I would do some weathering to give it that battle worn look. Here is a pic of my real Sterling to show you what I am talking about. But if you don't want to go that extent, I still think it will look great. -
Also, if you get the itch and want to build an ANH E11 from scratch, then take a look at this link: -----------
-
For ANH E11: Blaster * Folding stock (does not need to function) * Hengstler counter * D-ring on the rear * Correct style scope * Two power cylinders on the magazine * Scratch-built, resin cast, Hyperfirm rubber cast. -- Total of 6 T-racks on blaster (leaving the lowest row on the Hengstler side un-covered) * Hasbro blasters: -- Total of 7 T-racks (if you cover all the original Hasbro rows of holes) or 6 T-racks (if you cover the original Hasbro "open row" of holes on the Hengstler side. Below this, you must grind off the original Hasbro lower T-rack and drill a new row of holes) -- Hasbro blasters are discouraged but allowed * No ESB/ROTJ greeblies on the blaster are allowed
-
Oldie but a goodie, it ranks up there with "Troops" Thanks for posting
-
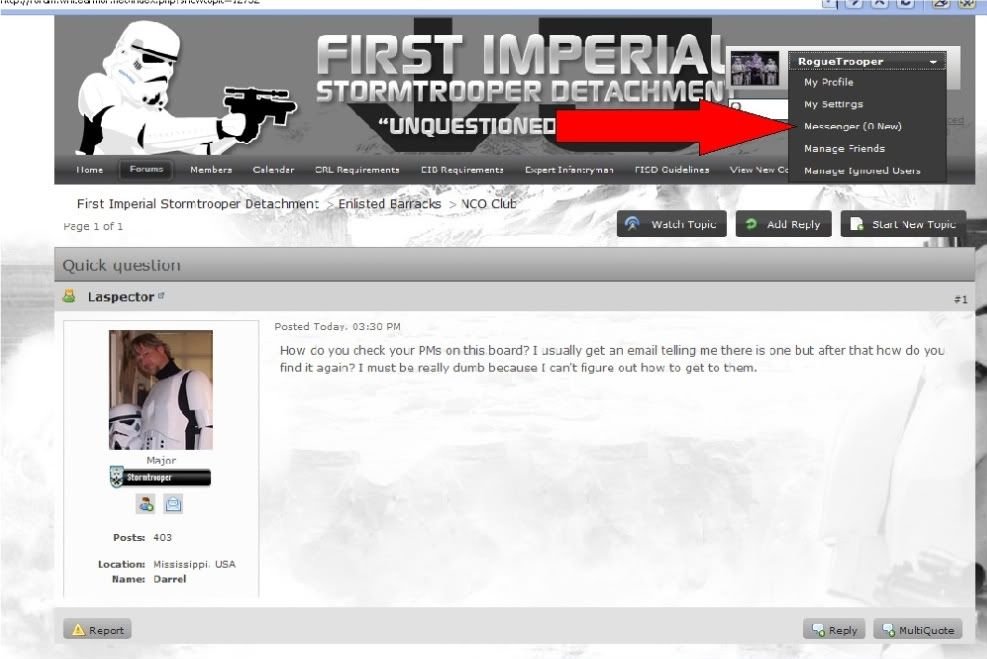
Up at the top right hand side where your FISD member name is and the sign in/out, help located. Use the drop down tab beside your name: (Laspector) and you will see the different options. One of which is your PM's or messages. Just like in this pic of mine.
-
sr props E-11 build
RogueTrooper replied to dashrazor's topic in Build Threads Requireing Maintenance
Have fun Mason...BTW what electronic goodies are you putting in your E11? Are you going with a Blaster Core.