Leaderboard


Popular Content
Showing content with the highest reputation on 01/05/2025 in all areas
-
The server migration is now done, if you see anything odd please let us know!4 points
-
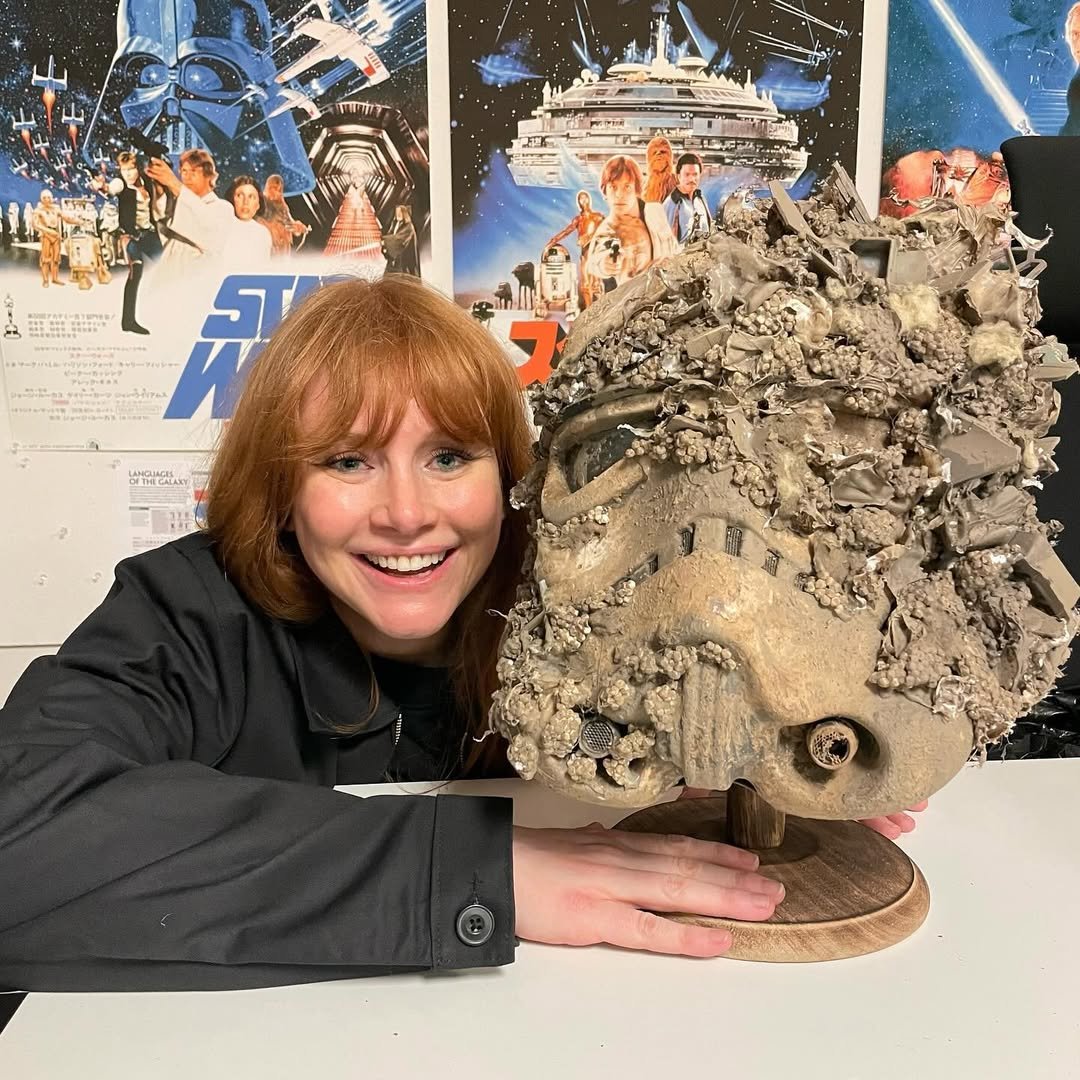
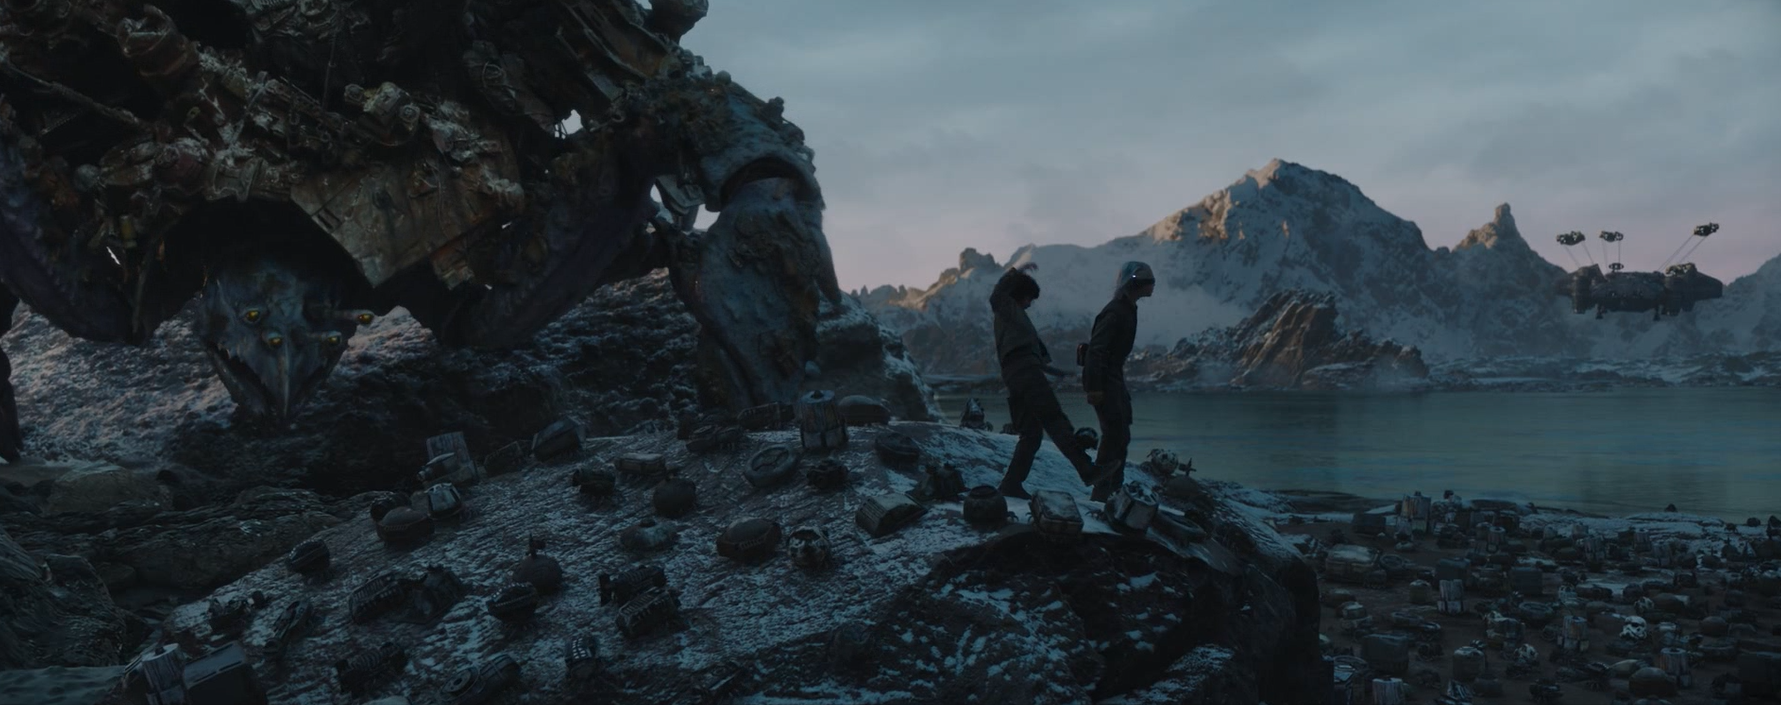
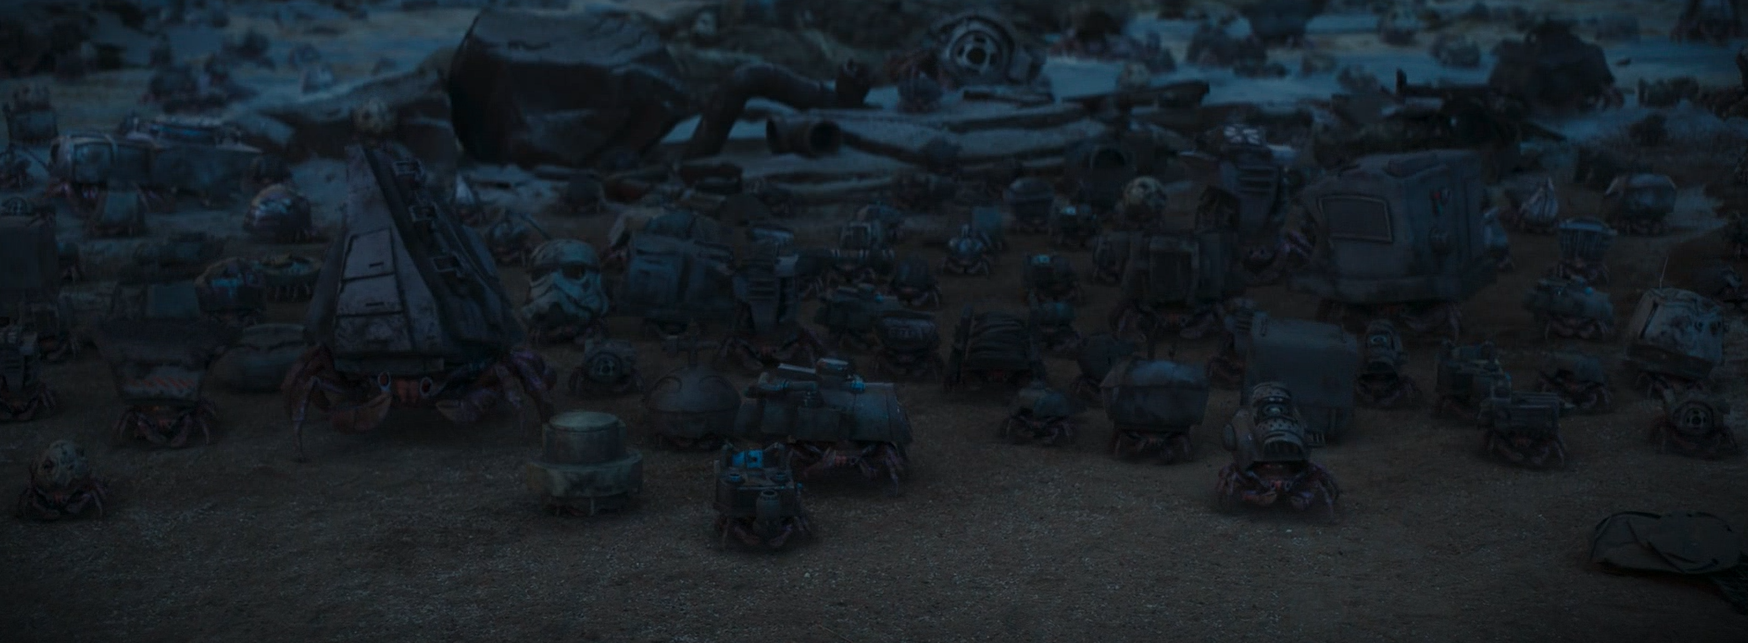
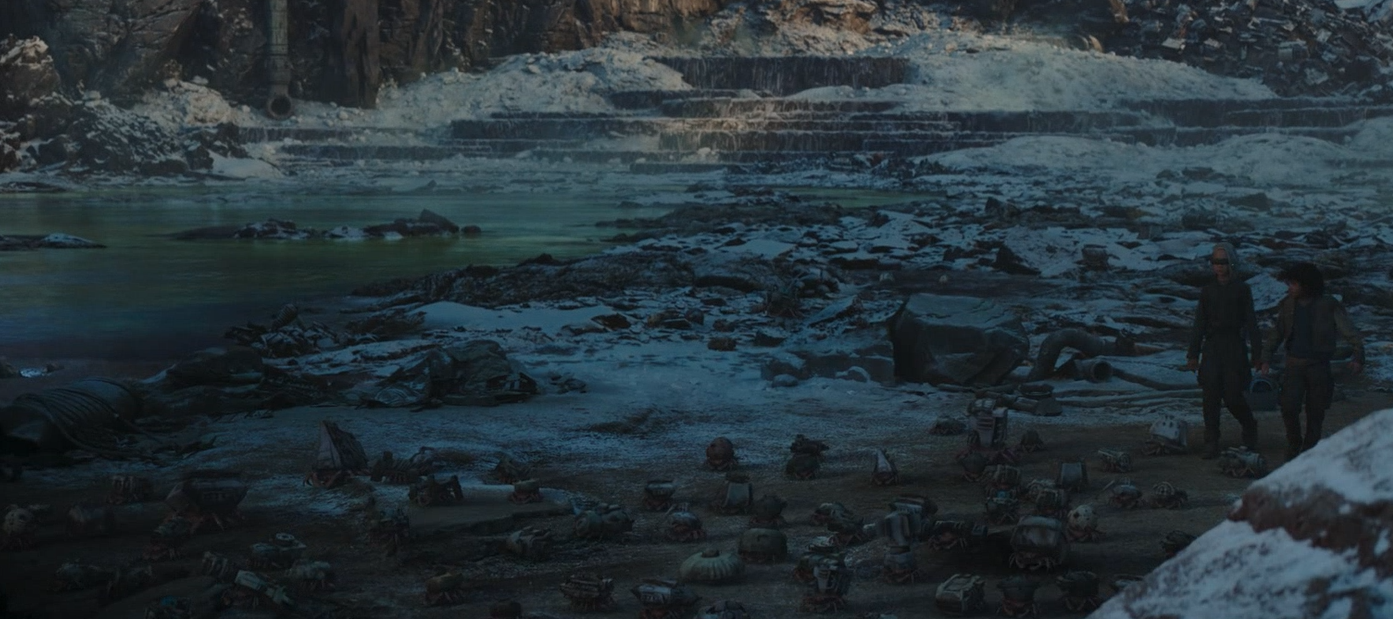
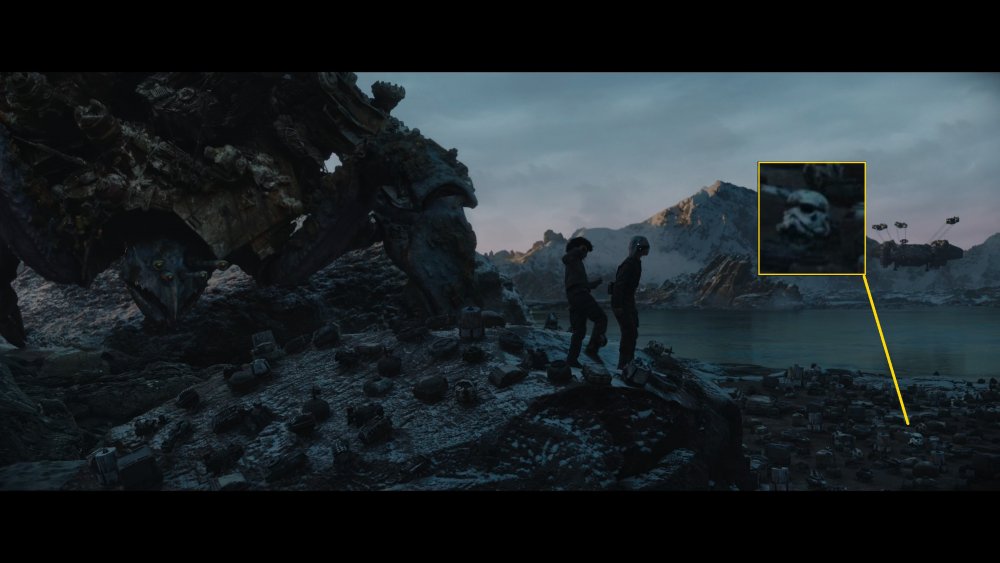
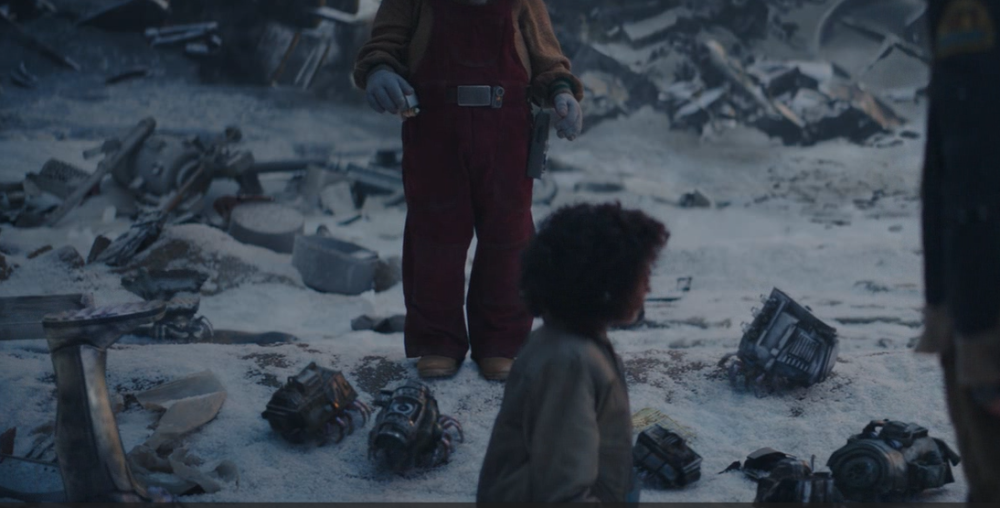
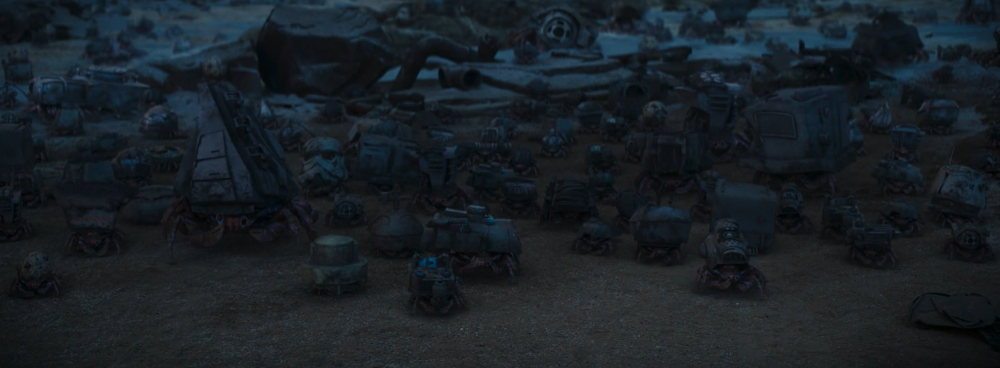
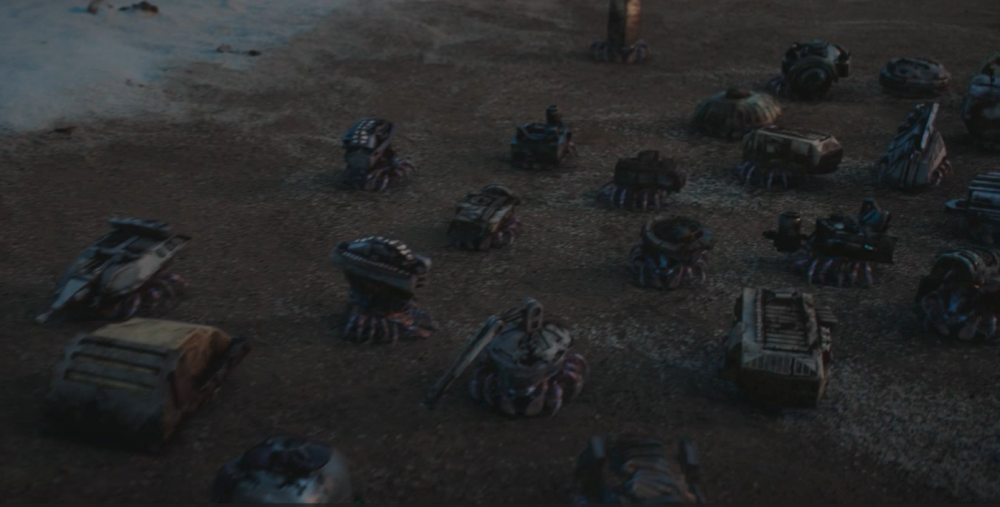
Stormtrooper Trash Crab - Possible Spoilers - Skeleton Crew EPVI Trash crabs were a hermit crab-like species of crabs that roamed the planet Lanupa where they scavenged and wore pieces of technological scrap. Trash crabs then were able to communicate, although very limited, with the technology they scavenged, which the human Wim believed was a sign they were sentient. One gigantic member of the species was Tet'niss. Trash crabs were similar to the scrap crabs of the Outer Rim planet Trionak. Did you spot the Stormtrooper helmet trash crab? Bryce Dallas Howard pictured with one of the helmets (although I've not spotted this one in the episode, yet) Love the shin and boot There are a lot of other Star Wars items used, a couple of jedi training remotes, some R unit heads, mouse droid shell, as well as a lot of other items, how many can you identify?


 3 points
 -
Nice work, you do appear to have a slight angle on the brow trim though, easily fixed by bringing the brow trim down a little
 3 points
 -
Yes, was looking in horror at the ear pieces wondering how the hell those where getting trimmed and mounted ?2 points
-
Unfortunately no continuity in the costumes or which timeline they fall into, definitely ROTK based though. This happened a lot with earlier games, model was base on ROTJ but some details were different.2 points
-
Update #10 - ‘with some modifications’ Thought about placing some kind of control panel below the drawers. Should be easy to make from wood with some knobs and greeblies. Then I got an old tablet in hands and things went a bit crazy. Sorry, had missed to take photos of some steps. Now what to do with that thing? Would be cool to have some Star Wars footage, looking like coming from Death Star security cameras or so. Hm, maybe that already exists?! On Youtube I indeed found a suitable clip. So I contacted the owner and asked for permission to use it. As chance had it, this was made by FISD member Daniel @SKUTCH and he agreed. Thanks again, Daniel. He looped a 3.5 mins sequence to a 25 mins clip. I chopped it down to 2.5 mins with no audio and transferred it to the tablet, where it can run in an endless loop. Wondering how it looks like? You got to wait a moment. Then it was time to fill that cabinet with everything I had gathered over the years plus the blasters, all decoration and stuff. I started at the bottom because some things are just stacked on top of each other. Ever since finding those device covers, I dreamed of how cool it would be to have the red and white lights blinking, like seen on many background props in the movies. Unfortunately I wasn‘t able to do that but luckily there is Dave @Cody42 in my Squad. He had offered to build custom-made circuit boards to fit behind the covers. It took some time, phone calls, measurements and bucks but he went all out and designed the following: Having no AC power outlet nearby the cabinet, he ingeniously made the circuit boards to work at 5V DC via Mini-USB port. That means they can be operated with a standard power bank. It is also possible to switch through various light modes, adjust the brightness and the interval time. And whatever you select remains stored in the memory, even when the power source gets disconnected. https://youtu.be/x7fIisnKrJM In the video you can see two temporary push buttons. These are required for configuration. For the final setup Dave had simply planned with my black switches, which were already present in both panels. Dave, I cannot thank you enough for this awesome work. Even after a few years now, everything is still working fine. And that‘s it. Project finally completed. The cabinet is completely filled with goodies and electronics. The 'surveillance' video looks very cool and the lamps change every 10 secs. As photos don‘t work well to show the final result, I simply filmed the cabinet from top to bottom. Enjoy.2 points
-
Thanks for all the kind words, guys. Means a lot to me. Thanks Brian. Hope you don't mind I meanwhile took your premium scope out of that little showcase box. It simply was too much fun to tell people "One of these scopes is real. Guess which one - without touching." Hey Tony. Guessing I won't ever offer something like this for sale. Just imagine the shipping costs... However, if you want to upgrade the wall-mount for your blasters, here is a link to the gun rack, which started it all. The measurements should help to build something similar and you can expand or reduce the size to match your amount of blasters.1 point
-
Not as many as you!1 point
-
Amazing!!!! Tino magic! So happy to see this project in its full glory.1 point
-
I have mine hanging from hooks on a wall, boring! I'd love to see these for sale1 point
-
Done the last trimming and sanding. Test fitted the rubber trim on the opening of the helmet. Ready for paint…1 point
-
Part 2, the ears. Forgot how I hate the stress of fitting the ears ? The Hero helmet was a bit harder than my Stunt as it only has 2 screws holding it down so you need to be extra thorough to get a flush fit. Must say I’m really impressed with the mold lines on Troopermasters ears, they are almost spot on when fitting. After a lot of testing, fitting, cutting and sanding.. we have a basic Hero helmet done ?1 point
-
Starting up with the basics.. cleaning the ABS. Easier when it’s all in parts so when you’re done assembling just wipe it down and you’re done ✅ Using my lexan scissors I do a basic trim on all parts. In sharp corners if I’m afraid of cutting and making the abs crack I drill a little safety hole. It’s easy with a small file making a sharp corner when done trimming. Fitting faceplate and back. Using magnets to hold them when adjusting and some extra masking tape when the positioning feels right. Forgot the eyes and teeth when doing this so back stepped and did both. You get carried away sometimes ? When you’ve found the spot that feels right for the faceplate it’s time for the first upper rivets on the sides and a test fit… (Taped in the lenses to get a real feel)1 point
-
They're definitely Rogue One/New Generation based, and appear to be generally pretty accurate. As with all video games, it can be difficult to tell what are intentional (or unintentional) changes made by the design/development team, from what are limitations in graphics rendering (either at the development or end user's side), but generally speaking, they are pretty solid. The one bigger deviation that I pointed out to them was the pieces that connect the back and chest armor under the arm are white on their game models, instead of black as in all other modern live action suits but it doesn't look like they were able to update it in game (or chose not to). Personally, I think they just like to change at least one thing between every movie or game, every time to mess with us. Either way, it's not different enough to warrant its own CRL, but it might be nice to see the CRL updated to allow those to be optionally white or black since there is reference to that end.1 point
-
I think these are good, what say you @gmrhodes13? Sent from my SM-N981U1 using Tapatalk1 point
-
We are working on this. You will hear from us shortly. Thank you for your patience, Colin.1 point
-
I have the same exact suit from RSPM. I am also in the process of getting approved. Hope you don't have any issues.1 point
-
Incredible work, I love it.1 point
-
Very nice, looking great1 point
-
Oooh proper PCBs and everything Nice. You clearly have a much higher quality drop point at your work than I do, don't think a few broken mice and gross old keyboards would yield much of use! This has come out really nice.1 point
-
Update #09 - Cabinet background Never felt happy with all that free space inside the cabinet. And the boring rear door was still clearly visible. So I had to focus on the background instead of the display pieces. Was happy with the result and for me both panels brought some Star Wars vibe into that cabinet. Yes, blinking lights would have been very cool but I lack the skills to build something. We‘ll get back to that later. Next I had to reorganize a few items inside the cabinet. About six years ago, two drawers had been added, just laying on a painted wooden shelf. Their flat metal surface made them slip around, each time I touched them. Pretty useless when not being mounted. So I tackled this next… Moving the drawers to the middle, caused a large area to fill right below them. This (plus other things) will be covered in the next update...1 point
-
No idea what I'm talking about? Take a look over here!1 point
-
Best of luck trooper! You look great!1 point