Leaderboard


Popular Content
Showing content with the highest reputation on 01/26/2023 in all areas
-
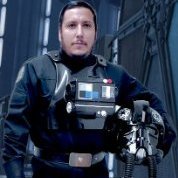
Continuing with my lightspeed pace of the past week, for your consideration @Deployment Officer Team, here now is my Centurion application. And of course, fine friends, please don't hesitate to reach out for any additional photos or armor adjustments that may be necessary for this highest standard of presentation! Name: Caleb M 501st Unit: Venator Squad, Georgia Garrison Armor: ATA Works (RIP Terrell Reber) Thermal Detonator: AM (DDD) Thermal Detonator clips: ukswrath Helmet: ATA Works Canvas Belt: Imperial Issue (Rob Kittell) Neck Seal: Darman's Props Boots: Imperial Boots Hand Guards: justjoseph63 (silicone) Gloves: generic rubber with handguards pre-attached by justjoseph63 Undersuit: Extreme Racing UK's Stormtrooper-Store one-piece Strapping system: Justin's RascalSnaps Holster: Darman's Props (8 oz leather) E-11 Blaster: Hellhounds Props (rubber) circa 2019 Height: 6' 0" (183 cms) Weight: 186 lbs (84.4 kilos) at time of photos. CRL: ANH Stunt Graciously assisted by @TKSpartan, @TheRascalKing, @justjoseph63, @Cricket, @zv288bot, among many others, for whom I'm forever grateful. Dressing and submission photos taken with the help of @paradoxb3. He patiently spent hours making me look presentable! Link to EI approval thread: https://www.whitearmor.net/forum/topic/53014-tk-73692-requesting-anh-stunt-eib-status-ata/ Full Body Rear Image Re-Shoot: Blaster Removed Version: New Re-Trimmed Kidney after EI approval (v4): Armor Details Painted with Humbrol 5 Admiralty Gray and 14 French Blue Bottom extra return edge on kidney have since been removed, as shown in prior photos above. Helmet Details Initial EI Submission. Teeth paint since updated, as shown in later images. And it case it wasn't noticed, I had actually replaced my brow trim so that the ends had straight vertical cuts, as mentioned in @Morgi's ESB conversion thread. I had previously preferred the angled brow trim look, to match the rear edge of the trap, but I'll admit that I'm growing more fond of these straight cuts. Here's what mine originally looked like in my build thread: Now back to official L3 photos. Revised L2 and L3 Teeth Paint: Accessories I decided to have mercy on everybody and not post my additional thermal detonator photos as seen in my Pre-Approval and EI submissions. Blaster Details Additional photos can be found on my rubber blaster comparison thread HERE. TK-73692 standing by. Who am I kidding! Of course I wasn't going to leave out my extra TD photos. Entire photoset in this Flickr Album4 points
-
These both needed to make their way in here from @MaskedVengeance's Centurion submission.4 points
-
4 points
-
That spiderman one tho.3 points
-
Alternative Requests: Recreating every Stormtrooper figurine ... or recreating the Spiderman Meme3 points
-
3 points
-
Good luck Caleb!3 points
-
Did some very rough sanding on the ABS paste. Results look good on the ab side seams: I think those are good to go for finish sanding and polishing. The shoulder seams are going to need more work due to the overlap: So more rough sanding and then probably another coat of ABS paste3 points
-
Oh this is a brilliant idea. I'm adding a new section to my write up. A entire CRL just for the TD. Then the tube, panel, end caps, and clips will each be their own sub-component with basic, L2, and L3 parameters. I have a bad feeling about this...2 points
-
Building up in layers is also a good idea, allows it to dry fully. If you are applying for higher levels you will need to add a screw to your picatinny rail On the ridged rail the third retaining button head closest to the elbow is an Allen key dome Hex bolt, approximately 5mm head width. Decals or paint are not permissible.2 points
-
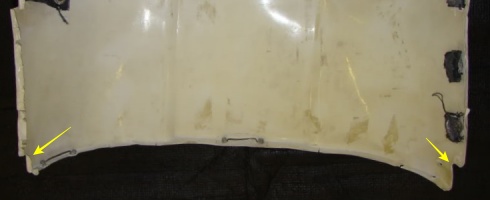
Painted the arm and leg greeblies: Then attached the clips to the forearms: And the biceps: I think I trimmed too much return edge from the inner chest shoulder: Since I was worried about having enough space for the shoulder plate support tabs and strapping slots, I glued some little bits to both sides to fill the gap. Then trimmed and sanded: Then I sanded the lip caused by the overlap on the shoulders, to prep for ABS paste: Decided to tackle the ab seams first, so I taped off the area to prevent any spread and applied to the left side: I used a toothpick, which I thought would help get it into the seam, but turned out to make a messier application: So on the right side I used a popsicle stick, which was much easier to work with: Next, I applied the ABS paste to both shoulders: I’ll let this dry overnight and then try some sanding tomorrow.2 points
-
Whoa! A surprise afternoon gift! Thank you so much, Joseph and the rest of the DO team! You better believe that there's gonna be an L3 submission on your desk tomorrow with proper kidney notches!2 points
-
Congratulations, Caleb! Go get that Centurion Badge as well2 points
-
Oh no Picture taken three seconds after my last re-fresh2 points
-
Mine is what you get when you look up "Morgi" on a phone's number pad: 66744 Since Morgi is my nickname on all 501st sites and a nickname from the time I discovered the 501st it seemed more than fitting. Shout-out to @T-Jay who convinced me to go with that instead of my birthday2 points
-
Thanks so much, Mario! I'm looking forward to being the bestest bad guy there is. Right on, Adam! Most of my family are amazed, and at the same time confused, by my TK build. And you attending DC basically means I gotta go now. You gonna bring your kit and participate in the parade? If so, we also need to kit up and make the Chaos Div @Morgi and @Swoby proud! Thanks Jorge! I'm gonna be tagging you in my Attache app when I submit. And I now have no excuse to get down to Rome, Kennesaw, Marietta, or ATL to troop and finally snag that hardware from you! Thanks for following along, Randy! And don't worry, finishing my HWT is on the docket for this year! Thanks Jonatan! Now I just gotta catch up on my build thread and the PDF, which is already nearly 200 pages long! Stay safe with those blades!2 points
-
Me: I won't post any more memes today. Also me: I certainly am very proud -- this whole thread is awesome Did you know that you can get push-up notifications on your phone for the FISD?2 points
-
Hey, @T-Jay, found your twin (Oh, and I hope you didn't expect to escape ever having any memes made about you) It's a wonderful E-11 Also, no memes about the E-11 Blaster Reference so far? Shame on me2 points
-
I figured that I would start this now even though it will be a while before I actually start building. I want to document everything from the start to show time lines to receive items. Armour Jimmiroquai TFA FOTK kit Ordered on November 10, 2022 Shipped on Dec 10, 2022 Arrived December 16, 2022 Boots Crowprops TK Trooper FO/R1 Short Boots. https://crowprops.bigcartel.com/product/fo-r1-tk Ordered November 11, 2022 Shipped Jan 17, 2023 Arrived Jan 25, 2023 Gloves Endor Finders Stormtrooper Gloves (Black stitching) https://www.endorfinders.com/shop/tfa-stormtrooper-gloves?utm_medium=email&utm_source=customer_notification Ordered November 11, 2022 Arrived November 28, 2022 Rubber Gaskets Thorsson and Associates Workshop http://www.tandaworkshop.com/ [email protected] Ordered November 29, 2022 Shipped December 29, 2022 (was ready to ship Dec 7 but I missed the notification for final payment) Arrived January 11, 2023. Metal Holster R2Dan - Dantooine Prop Collecting Ordered November 29, 2022 Arrived December 30, 20221 point
-
TBH, I avoid sewing whenever I can. I can either e6000 them in place or I'll just make up a big bag of them and replace as needed.1 point
-
The Hero helmet should only have three indents and then be flat the rest of the way out, but on the right side of your helmet (as you look at it) there is a small fourth indent The cap seems to have a larger forehead portion than the distance between the front and back trapezoids. Even with camera warp towards the edges I think this is still the case, and I think it would help a lot with the overall look to know exactly where the differences are between the Hero and the Stunt. The triangular area here is straight out flat. It seems like yours is too and it will probably stretch out when you attach the ears, but the temples should stretch out all the way. Your third tooth looks a little big, but that's also dependant of course to how it is cut out. I don't know if it helps at all but it is like the chin is in an underbite position towards the left. The right side here I'm able to see the parts both below the teeth and above the teeth. The right side with the same angle it's not possible. The middle tooth starts more towards the left fo centerline. Here is is easier to see the actual difference of the underbite towards the left (as you wear the helmet). Here you also see the middle tooth being off center. I don't know if some of this helps you at all, if not just take it as affirmation that you've done things right already! Here's a gif in which I aligned the nose bridge above the teeth with the both images and the eyes. We can see when switching between them the the tears in my Hero bucket rotates clockwise, and bottom right corner of the trap isn't as rounded off, and the shape of the mouth and chin almost squishes into the face a bit more, just to name a few things.1 point
-
You guys are either going to go nuts for the Thermal Det resource thread that I've been working on for months, or kick me out of FISD on the basis of insanity.1 point
-
I keep a few extras in my armor bin for when one goes missing off my shoulder. Not sure if that's more or less lazy than sewing some in...1 point
-
Thanks Mario! You guys rock!1 point
-
Late to the party ! Congratulations Caleb!!1 point
-
Well, I had seen conflicting reports of whether or not the angled look would be approvable for L3, including cases of both being passed but also statements that angled is no longer appropriate. I wanted to remove any doubt and thus opted for the vertical-cut trim which is most-seen on-screen. It's been this style on my bucket now for several months, and the look really is growing on me, perhaps due to it being what I was 501st approved with.1 point
-
My journey to join the 501st Legion has followed a seemingly never ending path, and many of you have been alongside supporting me over the past several years, but for the purpose of this note I'm going to go back even further. This is my Star Wars story. I've been a lifelong Star Wars fan, and my earliest memories of the universe were from my elementary school years. While I don't remember my first film viewing, I do recall a time when my parents deemed me too young to watch the films, but I was a full-fledged fan by the time I reached middle school (school years/grades 6-8). Interestingly, I don't think I saw The Phantom Menace in theatres when I was in 5th grade in 1999 (but I did see it in 3D back in 2012 before the Disney acquisition), but I have vivid memories of seeing Attack of the Clones on the big screen in 2002. Fast forward to my College/University years, and I sported my first ever star wars costume component on September 1, 2008, shown below. Really it was simply a friend's plastic Vader mask, and I only wore it long enough to snap this photo and upload it to facebook. Around that same time, between 2008-2010, my college buddies and I stumbled upon some "whitearmor" website, where we learned that real stormtrooper armor could be attained for a mere/whopping $600 (if I recall correctly). Of course this was out of the question on a student budget, so we moved on. At some point I should go back and review old screenshots and saved images on an old hard drive to see if I saved anything from FISD at that time. Skip ahead another decade and we come to October 22, 2019 when I first donned a stormtrooper helmet. We had a themed tailgate-type event at work and the IT department had a Star Wars table. (Would you expect anything different?) At the conclusion of the event I just had to try on my friend's Black Series bucket, which perfectly complimented my silly Christmas sweater, dontcha think?! I was hooked. Within a week I (re)found FISD and began consuming as much information as I could find; my saved resources would later be compiled into what is now the All-In-One Resource Thread. On November 11, 2019 I emailed Terrell at ATA Works and on the 14th facebook messaged my Imperial Attache, Jorge @zv288bot. Several days later I joined the GA Legion facebook groups, created accounts on FISD and the GA and Midsouth Garrisons' forums, and reached out to Justin @TheRascalKing. I ended my New Member Introduction post on FISD with "I look forward to joining the Legion in the not too distant future! Thanks in advance, Troopers, for all your help!", certainly not foreseeing how long the journey would actually be. On November 27, 2019 I took my first real steps towards the 501st with a Trooperbay purchase consisting of my Hellhounds E-11 rubber blaster, flexible hand guards (later exchanged for Joseph's), and a helmet guide and decals. And yes, I recorded all of this on a timeline document. But of course I also NEEDED immediate gratification, so I asked my wife for a Black Series TK Helmet for Christmas, and that's what I received. On January 3, 2020 I was officially added to the ATA armor wait list with an ETA of 9 weeks, and I sold a drone and some other personal items to fund the purchase. I couldn't be more excited. But for those of you keeping track of dates, do the math; January 2020 + 9 weeks. My Big Brown Box Day came on March 5, 2020, one week before the novel coronavirus shut down the US. While some people were able to take advantage of the lockdowns and make significant progress on their builds, much of my time continued to be occupied by then one-year-old daughter. If I made any progress on my build it occurred between midnight and 3:00am, or 5:00am-7:00am. Progress was slow and funds were tight on a single income. At one point I resigned to sell my armor, and if it were not for a very special trooper, I would not be posting this today. I will never be able to thank you enough. Yes, I took a photo of my clock every time worked on my build past 1:00am. The times before 4:00am meant to stayed up late, and for times after that, I woke up early. Oh, and there was one all-nighter as well. If I'm being honest with myself, a couple other contributing factors to my slow build were 1) the mental barrier of trimming and fitting the helmet ears, and 2) my desire for a thorough and well-formatted build thread and corresponding PDF compilation. Coupled with my OCD-like tendencies and perfectionism, these were crippling to my progress. At times I went months without any build work. Two years later, in the summer of 2022, I was asked by my wife's best friend if I could make an appearance as a TK at her son's birthday party at the end of September. Since my wife and I were expecting our second daughter at the end of August I figured I would need to wrap up my build before delivery. But as luck would have it, our new princess arrived nearly three weeks early, and my armor remained incomplete. It's a miracle that I'm alive to say this, but somehow I managed to find the time to get my armor into civilian-passable shape (through 3:00am armor build nights and one all-nighter), and on September 24th, the day of the party, I fully kitted up for the very first time, literally. To say I was pushing it is an understatement, especially considering I should have done to the ER for stitches that morning after a bad hobby blade accident that night. But I was determined to make the little boy's birthday special. @paradoxb3, a brilliant armor alignment and photo stager and the first and only 501st member I've ever met to this day, even joined me to multiply the fun! Here is what I looked like, with a substitute WTF helmet featuring droopy brow trim, incomplete shoulder bridges hidden by the pauldron, neckseal dressing issues, rotated forearms, non-secured sagging belt, missing drop boxes, and many other issues that eagle-eyed TKs would notice. But I was a stormtrooper. And the smiles on all the children's (and their parents) made it worth it. Thanks to some extra motivation from Devin, Joseph, Cricket, Justin, and my now Squad Leader, Scout (TI-35006), in the four months since then I was able to complete everything needed for basic Legion approval. I do still intend to tweak some aspects of my helmet ears, adjust some strapping, and add in rear cover strips, some of which may be necessary for L2 and L3 approval. But for now, I'M A STORMTROOPER! I'd like to acknowledge and thank troopers that went above and beyond in their support of me over these several years of building. Some of you helped in specific areas, and others in a variety of ways, all of which I'm beyond grateful for. Without you, there's no way I get this project off the ground, much less complete it. And to any others reading this who also provided feedback, encouragement, and assistance, a big heartfelt THANK YOU! Jorge @zv288bot Justin @TheRascalKing Mario @TKSpartan Joseph @justjoseph63 Cricket @Cricket Along my first ever costume construction journey I learned more about stormtroopers than I could have ever foreseen. Who knew about all the variations and nuances?! I also learned a great deal about actually assembling an armor kit, and here are some specific tips in no particular order, some of which I also made note of in my build thread. E-6000 is as slippery as they say. Combat this by having adequate guidelines/marks so proper alignment can be maintained. Also use tape to keep pieces stationary in their intended locations before applying clamps and magnets. E-6000 will react to at least some paints. Seeping glue absorbed the color of the spray paint I used on my thermal detonator, and I was left with a wet paint mess. NEVER BE IN A HURRY. I repeat, NEVER. Consider your build a marathon, not sprint. And actually—just completely forego the competition metaphor altogether. Being rushed will result in shortcuts or lapses in attentiveness. Your armor is a costly work of art, and art takes time. If you have to ask yourself and deliberate whether or not you have enough time for preparation, execution, and cleanup, then you probably don't. Take your time. Do things methodically. No shortcuts. Leave extra time to spare should something unforeseen arise. Case in point: my build too three years with on-and-off progress. When preparing paint, always stir the bottle instead of shaking. This minimizes or eliminates the introduction of air bubbles into the paint. Toothpicks work great to stirring tiny bottles of enamel paint. Enamel paints can take far longer to dry/cure than regular latex home paint or hobby acrylics. Give yourself ample curing time prior to recoating or handling. Apply multiple thin coats of paint rather than one thick coat. Thick coats of enamel will dry unevenly (surface vs underneath), resulting in wrinkling. As me how I know. When cutting/trimming anything, work in stages removing only a little material at a time. This can apply to rubber trim or ABS plastic. It's easy to trim off more if needed, but nearly impossible to add material back once you've removed it. LISTEN to those with more experience and wisdom. Their tips and feedback will be indispensable. Apply this to life in general as well. Buy a deburring tool. This will help you quickly and efficiently smooth out sharp edges of plastic armor after initial trimming or rough-grit sanding. Heck, it could be arguing that such a tool could even be used instead of sanding. Here is the LINK to the one I purchased. Buy sanding/polishing sticks (aka emory boards). The semi-firm structure that these provide, coupled with their small size, are great for sanding curves or tight hard-to-reach areas. Here is the LINK to what I purchased. Buy anything and everything that Joseph sells. Flexible hand guards, hardware kits, and other greeblies and props. Top quality and well priced. Just DEW IT. Always wear the appropriate PPE (personal protective equipment). When using blades, this means wearing cutting gloves. When sanding ABS, wear is mask or respirator. When using power tools, protect your eyes with glasses. It's not a question of IF an accident will happen; it's WHEN. In fact, blood will trimming armor is a rite of passage, of sorts. I nearly sliced off my entire knuckle due to thinking one or two quick cuts didn't warrant gloves. Don't be like me. Research is key, and ask lots of questions. This forum contains all the information you'll need, whether it be in written form or through conversation with fellow builders. I'm a bit partial, but this All-In-One Resource thread is a great place to start. Start your own build thread and post lots of photos and ask as many questions. Veteran builders will come to your aid! Build your armor to Level Three (Centurion) from the beginning, rather than "upgrade" later on. Some of finer details are easier to implement from the beginning than to update after-the-fact. There's no extra cost other than for a blaster if you didn't have one for basic approval, and it'll save time and possible headaches later. Even if you don't intend to apply for higher levels of immediately, knock out some of the details in advance, if at all possible. Don't sweat it if you make mistakes or your armor or paint job doesn't look as good as somebody else's. It's your work of art to be proud of. Remember that the screen-used suits in the films were a wreck, with inconsistences, cracks, and sometimes held together by white gaff tape. There may also be differing opinions on techniques or final outcome goals, but do what you feel comfortable and happy with. Set goals and celebrate milestones, especially if your easily susceptible to becoming overwhelmed. Seeing all the raw plastic on BBB Day can be daunting, so break up the work and take baby steps. If you get burnt out on a specific component, step away from that part or your build entirely. Come back refreshed and ready to tackle the challenge. Celebrate when you meet individual goals or finish certain armor pieces and post up your handiwork so others can join in your excitement! Plan on approval photo shoots taking longer than expected. I naively thought our shoot would take half an hour. Try 2-3x that, just for my fully-kitting photos. I then spent several more hours taking the detail shots for L2 and L3. Speaking of which, L2 approval requires some images that aren't on the L3 list. Ask me how I know. @revlimiter And last but not least, trim off those armor return edges (unless you have a very slender body-type)! Joseph's sometimes controversial Return Edges 101 thread goes more in-depth on this topic. So now that I'm 501st approved, what next? Well, as our Imperial CO once said, "This is where the fun begins." My ANH Stunt build is just a stepping stone for my plan to join the four EI (and Centurion) approvals club. Next up will be likely be an ESB TK conversion (hey, does anybody have any clamshell handguards I could take off your hands, figuratively and literally?), followed by an ANH Hero. I also have all the components for a HWT (my build thread HERE), but the backpack assembly will take me a while, especially since I'd like to find a 3D printed vent box and a downward-angled tombstone box. Additionally, I snagged a Rothco Ranger black vest that I want to theme up with Legion identification, so I'll soon be seeking a large FISD patch to place on the back, as well as one of those nice metallic 501st nametags, a rank bar from @Alay, and perhaps even some pins from Jeff (ID-17004). And let's not get started on the coins I need want... I also need to continue and finish up my actual ANH Stunt build thread, which is embarrassingly incomplete. My intention for it, along with my PDF compilation of it, has been to serve as a thorough build resource for future builders, so obviously I need to complete it. I have literally hundreds of backlogged photos waiting to be inserted with process descriptions. Expect to see updates on that front in the coming weeks and months, and even though the kit has been assembled, continued feedback on processes and results in that thread will always be appreciated! On my journey I constantly saw or experienced FISD's motto of Troopers Helping Troopers, and I want to join in giving back and passing it forward. Needless to say, as a finally-credentialed TK, I'm going to continue to follow the boards and spend even more time in the New Members and Builds sections assisting new builders. Perhaps I can even join Jorge as a second Imperial Attaché in Georgia's Venator Squad, especially since the metropolitan area I actually reside near (Chattanooga, TN) has no Attaché in the Mos Nooga Squad of the Midsouth Garrison. All that to say, I'm not going anywhere. This community is my home, and I look forward to many more years with you, my Imperial brothers and sisters! And trooping! What am I going to do about trooping, you might ask. Well, the local TN unit isn't very active as far I can tell, but the Georgia Garrison folks stay busy. Unfortunately, most of that activity occurs several hours south of me in Atlanta, so I'll probably be a minimally-trooping trooper. Haha. Hopefully there will be some May 4th options in my local area, but it's likely that my first ever con will be Dragoncon later this year. I'm not sure if I'd actually go to the convention floor or panels, but the parade sounds fun. If there was to be an FISD gathering at DG, I'd certainly make an effort to be there too! The next Braves Star Wars Night Game will definitely be on my schedule, and someday I'd love to participate in one of the Star Wars film screenings with a live orchestra performing the symphonic score. And there we have it. Perhaps the longest "Sounding-Off" post of all time. Oh, and here's the story behind my TK ID selection. Thanks again for following along, friends. And until next time... TK-73692 reporting for duty.1 point
-
Mine is a combo of the years my kids were born 1996 2000 2004 hence 960041 point
-
See how they look on, I have had to oval a few for those with narrower arms1 point
-
Well I do cheat a little, it has been ready since you first posted your application1 point
-
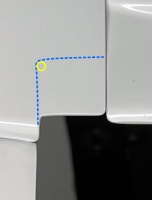
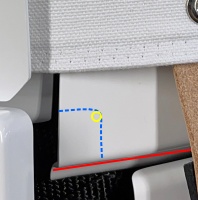
Hi Caleb, and thank you for your EIB submission for ANH Stunt! CRL and EIB Application Requirements: All required photos have been submitted, and on behalf of the entire D.O. staff we are pleased to welcome you to the rank of Expert Infantry. Congratulations! Other-Armor Fit/Assembly; In this area we review observations made by your fellow troopers and the DO team. Some observations may lead to suggestions to improve the overall look of your armor, and please keep in mind that we consider both text (CRL) and pictures (screen caps/reference images) when reviewing submissions. First THANK YOU for not only taking care of that teeth paint, but beating us to the punch on the shoulder bridge elastic and trimming the bottom of the kidney. Nice work! (I expected no less, though, lol). Looks like all of your hard work and and attention to detail have paid off, brother.. truly a spectacular build, so nothing to see in this area. Move along.. Centurion Requirements: In this section we prepare you for our highest tier of approval. Because Centurion photos must show more detail than EIB, items pertaining to Level 3 might be seen there and not here and additional photos may be required. We try to point out all that we can from what we are able to clearly see, but the final accuracy is the responsibility of the trooper. Only one item here, and it's nothing that you can't accomplish in about 8 to 10 minutes at most. SO, while the notches on the kidneys are not a requirement, it looks like you started one on the right side. As per the CRL, "If present, each notch is approximately 22 mm tall and the back of the notch ideally is aligned with the front edges of the posterior plate". So, that means that you will need one on both sides. The rear of the one you started on the right side (first pic) is already aligned perfectly with the posterior plate, but don't worry, not a big deal if the left notch is slightly out of alignment with the posterior plate. Ideally? Yes. Required? Nope. I'm sure you already know this, but it is important to drill out the corners (yellow circles) and keep them slightly rounded (just as you have now) so that you don't have a sharp angle there, which can lead to splitting. Reference images And that's it! Again, a beautiful job on this armor, sir. Congrats on being the newest EI in the GA. Garrison, and time to get that Centurion submission in once you get those notches done!
 1 point
 -
I built my whole E-11b and didn't read the CRL. At least it's just another counter that I need to print.1 point
-
1 point
-
I just chose my birthdate to more easily remember my birthday! ...Or was it the other way around?1 point
-
Dude I can relate to the ears.1 point
-
1 point
-
No I’ll probably use Velcro. I chatted with equuspolo (Ardeshir) and he recommended overlapping for extra support. Time to bite the bullet and glue the inner chest and back: Started cuttings for a batch of ABS paste:1 point
-
Thanks for the feedback, Joseph! I had already gotten to work on the center tooth, which had received mention on my pre-approval thread. That one tooth took me perhaps 30 minutes because, you know, I work slow. Even still, I'm not terribly happy with the resulting bottom line, as it's just not as crisp as I'd like. Below is a before-and-after GIF, as well as a still photo immediately after. Man, I really wish the bottoms of the teeth were acceptable as-is. From certain angles the painted teeth will always appear to bulge, but I respect the evaluation. The next two photo comps below are from earlier in my build after my initial teeth painting in which I stayed further away from the gums. At that time I wasn't happy with the direct front look in which there were white "bulges" at the bottom of the each tooth, and decided to extend the paint a bit while still remaining inside of the profile of the teeth as shown from the front. Seems I was wrong in that; bummer! =) OLD PHOTOS: On another topic, after realizing that my left shoulder bridge had come out of the elastic retainers in one of my photos from my initial shoot, I tried to include addition images showing the bridges in place. However, due to additional comments on my pre-approval thread, I decided to retake that photo yesterday. Below you'll find the result of that. Goodness, I'm surprised I didn't snap my bridges right off while contorting my body while kitting up by myself at 4:21am. And lastly, I also went ahead and shaved off more of the bottom return edge on my kidney, and cut notes to align with the posterior piece. Here are three photos showing these updates. Looks like I'll now need to downsize my v-tabs! So since it appears that more than the center tooth still need additional attention (I haven't convinced you guys, have I? lol), I'll get to work on that. Today is my wife's birthday so I don't anticipate getting to this until the wee hours of tomorrow morning, and frankly it'll probably take me more than one session to do. I sense lunch-break armor tweaking at work early next week.1 point
-
There is also a thread on the legion forum which can be an interesting read for those interested https://www.501st.com/forum/viewtopic.php?f=5&t=102646&hilit=tkid1 point
-
I wasn't very imaginative. It was the date I submitted my final approval photos to my GML. Never been good at picking things like this, but it did seem to roll off the tongue nicely. Bart1 point
-
I waited (it took) 42 years to get my own TK armor and in that time i had thought of many different options of what number id like to have. Went into a small panic when the application stated " pick your 5 favourite IDs". Owning an armor was my dream so wanted the ID to be about me - selfish i know but is what it is. So i opted for my date of birth (as I was also to be "born" into the 501st) as being the most fitting. But not in its standard format. So a quick re-arrange and i found all 5 in the master list. And there we are...TK-10962. Sent from my SM-A127F using Tapatalk1 point
-
That's just fantastic. Seriously nice. And everyone here should ignore that lego set number for the next 7 years till my daughter turns 18 and can get into 501st1 point
-
I wasn't sure if I should post in this thread, or Glen's post, so I opted with the more recent of the two. And here is a link to my post on the story behind my nickname (MV). Three years after creating my account and starting my 501st journey, and I finally have my very own shiny new TK number. 73692. When I first started my build (actually before I had even purchased my armor) I started brainstorming what TK number I might want, and began by compiling all the spoken numbers from the Star Wars films. The most known were 1138 and 421, but I desired something a bit more nuanced. My birthdate and zip code were also available on the 501st ID list, and for a time I got hung up on variations of 3263827 (Death Star trash compactor). I also considered 501+ my age, which was available, but elapsed time has now rendered my current age unavailable. A number corresponding to a scripture verse referencing helping others, due to the abounding assistance I've received from other troopers, was also on the table, as was the Lego set number (75276) of the mini Stormtrooper helmet. (Seriously, somebody needs to jump on that Lego TK number, and you heard it here first lol). However, I eventually decided on a string of individual numbers spoken in sequence in A New Hope. 10 - 7 - 3 - 6 - 9 - 2 - 11 - 5 Anybody recognize the sequence and corresponding film scene? I'll give you a hint below, as part of a more in-universe explanation, though this is not a full character backstory as others have written in this thread. Back to real life now. In fact, back in 2019 or 2020 I wrote that aforementioned numerical sequence on a small sticky note and stuck it in my wallet for safekeeping, and for the past three years it has remained in the exact same spot, prominently placed atop my driver's license. Much like my TK character's mini story, this was to serve as a reminder to press on with the continuation of my armor build. And now I can finally remove the note and regain easier access to my real life ID. Haha. For those of you who still haven't sorted out my TK ID: TK-73692 standing by.1 point
-
Thanks so much for the suggestions and help i've been able to go through the current forum posts and collect all the 3d files for greeblies, weapons, accessories etc. just looking for armor. I'm 3d printing because i can pay piece by piece and i actually really enjoy sanding and prepping. its been a hobby of mine for a while now. With the experience i have gained i'm ready to take this project on. I'm excited and as soon as i get my first print done i'll create a WIP in the forums. Always able to find amazing people and help. If others would like to contribute soft good resources i'm open to the suggestions for great product and price mostly great product.1 point
-
The rest of the armour arrived today. Again, very happy with the quality. Looks like I will need to make some adjustments to the leg and arm parts as they are a bit too small. I can’t get my hand through the wrist opening. one other thing I am realizing is that when you try pieces on, the fibreglass is very itchy. I likely will coat the inside with plastidip, unless someone has a better solution. I also ordered a death trooper kit at the same time, which I am going to build first, so this one will be on hold for a bit.1 point
-
Just heard from Jim Tripon. My armour shipped yesterday and tracking says it should be here by the 15th. That is fast shipping from overseas.1 point
-
Gloves arrived yesterday from Endor Finders. Very happy with the quality of the gloves. There is a bit of bleeding of the black onto the white, which they say will happen on their website. Nothing that a bit of polish / cleaner wont fix I assume. Such a big upgrade from the dishwashing gloves the original TK's wore.1 point
-
Perhaps here: Thorsson & Associates Web: http://www.tandaworkshop.com/ FB: https://www.facebook.com/Thorsson-Associates-Workshop-112076042142986 Email: [email protected]
 1 point