Leaderboard


Popular Content
Showing content with the highest reputation on 05/23/2022 in all areas
-
Finished! Again, please keep in mind that this 3D E-11 kit was apparently designed from the "Battlefront" videogame version so there are some significant differences. Most I could overcome, but a big one was the holes in the shroud. They simply do not correspond to the screen used (MGC) ones. I got as close as I could, so bear that in mind. Once I got ready to mount the U channels I found that my rivet gun was too wide to fit down into the channels themselves (pic 1). After a few choice curse words muttered under my breath I knew had to figure out how to attach them. I briefly considered screws, but it just wouldn't be the same. SO, I separated the rivets (14 of them), separated the mandrels (center parts), cut down the length and epoxied them back into the rivet pins as seen in the second 2 pics below. I should have mentioned before that when building the main body that I installed a thin metal tube inside the shroud to give the appearance of an actual barrel. Oops. My plan ended up as seen below (pic 1). Drill out the holes on the channels and shroud/barrel (just as one normally would) but I epoxied each modified rivet in. I was afraid this may make it sort of fragile, but after the epoxy set they are actually very sturdy. WHEW! HINT: Drill all holes in the channels and shroud BEFORE attaching them. The holes for the rivets were integrated into the print, but they did not line up correctly (mainly due to the barrel mods) so I drilled new ones. Hint: Make sure the holes for the rivets are between the holes in the shroud (pic 2). The channel that sits on the left side will have to have the bottom bent down on the front to accommodate the front "D" ring. HINT: Attach the D-ring/mount AFTER attaching the channels. The stock that came with the kit was too long after cutting down the length of the of the shroud earlier , and to add some "heft" I used a real vintage Sterling folding stock for this build, which differs slightly from the original- especially in the area seen with the red arrow (first pic). Not too noticeable, but I hope it doesn't keep me up at night thinking about it.** I did add the rivet on the side, which as I mentioned before will prevent the stock from extending. **It will. After touching up the paint and letting that dry overnight, I added some light weathering. Had these made for all my display pieces. And that's it. Finished, and finally added to my "wall-o'-weapons". To anyone who has followed this, thanks for looking! U-Channels- After spending more time that I care to admit to searching for these, I finally found a seller (George) on the RPF. Once he got them made shipping was fast and I honestly could not be more pleased with the quality. A little pricey, but well worth every cent in my opinion. Link to his sales thread on the RPF here. UPDATE: I did not realize that the seller was actually Caleb @TKCaleb who has been a member here since 2008. SO- it looks like you can contact him here as well!3 points
-
Not mentioning any names
 3 points
 -
That would be awesome! I'll message you to set it up. I've got two little ones so things have been busy and I haven't even been able to start yet, but planning on it soon.2 points
-
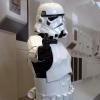
Hey Chris. I am open to a zoom call or something if you would like since we are pretty much starting out at the same time on AP kits. I can fill you in on what my experience has been with the pieces that I have worked on and the things I have learned (including which way is up on the biceps). Just let me know if you are interested.2 points
-
Accurate I'll admit, and better than our perceived image:2 points
-
Of course you can do this, Chris!!! As Joseph says, don't try to rush. When in doubt, always ask before cutting or gluing (don't be afraid to ask lots of questions), and be sure to add photos(a picture is worth a thousand words) ...1 point
-
Hi there, many thanks for the reply and your help, regards Neil1 point
-
Today's (May 22, 2022) update: I finished assembling the barrel, handle, and rear folding stock (minus one of the triggers I will finish in my next work session). I thought I'd get the scope done today but unfortunately there was a small set back with that. I tried to get around using the procedures listed with the parts but ultimately had to go with it. Hoping that the 40mm screws I have will work, as I'm not able to find anything longer that will fit the same size. I also did a rough fit of the parts to see how it all looked - I'm toying with the idea of making a pinhole in the hengstler unit so I can use a paperclip to enable / disable that light instead of unscrewing it all the time, though that's something for another day. Barrel: Handle and rear folding stock (This will have the front trigger attached soon and is currently being partially repainted on parts where it wasn't quite as white as I wanted. Full rough fit:1 point
-
Really depends how wide you would need the cover strips, if it's only a few mm you should be fine. Note screen forearms do have some gap between the ridges and cover strips1 point
-
Motoring along. You may want to add either another snap or some velcro at your knees, just one snap will possibly allow the knee armor to twist, I went with velcro just so I could adjust for best positioning.1 point
-
Truly beautiful work!! And that wall. Inspirational!1 point
-
Welcome to FISD James! You have certainly come to the right place for all the information you could ever want on Stormtroopers. These forums are vast and may seem overwhelming but fear not, we have your back. Ask as many questions as you can and our staff and members will guide you all the way to completion of your costume. The 501st pride themselves on a reasonably high level of accuracy when it comes to costuming, and as many will tell you, this hobby not only requires plenty of research, it also isn't necessarily cheap. The vendors list supplied in a prior post is a good guide to reputable armour sellers, generally a safe bet to go through one of them for good quality kit. You can have armour built for you but that certainly adds to the overall cost, so most of us assemble the kits ourselves which makes for the best fit as well as saving a few bucks. Good luck on your journey sir and once again, welcome to FISD.1 point
-
New CRL Half arsed TK'S Description: Stormtrooper, Whatever we could pull together at a moment's notice. Prefix: TK?? Detachment: First Imperial Stormtrooper Detachment Ahhh I don't think so Jack! Context: Episode: not in this universe buddy! These Stormtroopers (Stunt/Hero/rubies/various fond parts from costume shops) were the pre-emptive laughing stock in the boarding party, or boring party, cosplay event of the Rebel blockade runner the "You ain't bringing that costume in here IV", and made up the main garrison of poor man's productions that could be seen throughout the corridors of shady conventions and at cheap events.1 point