Leaderboard


Popular Content
Showing content with the highest reputation on 03/25/2022 in Posts
-
Hey everyone, I just signed up today and I’m looking forward to meeting new people and excited to see what everyone is up to and working on. I am in the middle of building a ANH stunt TK and can’t wait to get it done and get out there and start trooping. This is my first cosplay build ever and it’s been very fun and challenging so far. cheers! -Daniel3 points
-
Hi Nick. The lines you marked looks good IMO. But If it was me, I would delay the AB section trimming, I'd wait until I'm sure theres no gap between the abdomen and kidney armor as it's a Centurion Level requirement. CRL L3: Ideally there no gap between the abdomen and kidney armor. Abdominal and Kidney Plate align horizontally at top. References Return Edge1 point
-
Hi Mario! @TKSpartan Thanks so much! It seems this is the consensus so far and my local GML has stated the same. The photos with the markings really helps. I think once I pull these pieces in a bit more it will solve the issue. I have a bunch of padding I can add as well. Thanks again for the support so far.1 point
-
Hi Glen, @gmrhodes13 Thanks so much! I am planning on making these adjustments this weekend. I did not want to cut too much initially and I have left the thighs Velcroed on the inside because of this. I appreciate the feedback.1 point
-
Nice first kit up Daniel. It looks like everything is fitting very well, If I may what catch my attention in the thighs and shins section. I would suggest to make a try and overlap a little more the inner joint (you can use painter tape) to reduce the room a bit more. otherwise, IMO you looks good at this stage !1 point
-
Exciting times, I remember that feeling of first kit up. A couple of areas I added some foam padding to help centralize, the inner top sides of the shins and the lower outer sides of the thighs, if you look at your front image your thighs are angled inwards towards the base and the shins top are also angled inwards, the additional foam helped to keep them in alignment, something you may want to play with. Also knee armor is a pain to get sitting right, if you check your image they both appear too far to the outer side and also angled downwards towards the middle. Just a case of playing with gaps and positions.1 point
-
I have been working on my TK kit for the last few months. I thought I could do it without help and just from the instructions. I don't think I did too bad but, I do need help. I got my kit from ANOVOS about 6 years ago. I will post pictures of my results later when I have time to take some. Please be gentle with your comments.1 point
-
Hello and welcome aboard, just in case you haven't seen this thread it's full of helpful info1 point
-
This thread may be of help1 point
-
1 point
-
Welcome! Posting as many photos as you can will certainly help. No need to worry about us being "gentle", lol... we do not judge, and are here to help! Keep in mind that we were all in your position at one time, so never be afraid to ask questions (as many as you like) or hit us up for advice. It's what we do best!1 point
-
Hi, welcome to FISD. we'll be more than happy to help you with your Build . If you have finished your armor, you may want to post some Pre approval photos HERE and receive some feedback from fellow Troopers. Most of us use IMGUR to post photos directly into post, you can take a look to this tutorial Good luck and looking forward for your photos.1 point
-
This is how I applied Turner's texture paint. Photo is actually from another E-11 project of mine but is the identical procedure. Got an old sponge from the kitchen and just kept dabbing a small amount of the paint onto a small area and keep dabbing till it's almost dry. Then repeat the procedure again and again till it covers with entire area. I found this worked the best for me. I recommend testing various amounts and procedure on a scrap material till you find the finish you like. Mine turned out like this. Again this photo is from another project but I think you get the idea.1 point
-
Thanks so much. Yes I’m happy to share and looking forward to everyone’s input on my progress thus far! I’m planning to post photos sometime today.1 point
-
Welcome in Trooper! I am the Los Angeles Squad Community Outreach/ Charity Liaison. Let me know if I can be of service.1 point
-
Thanks man! Appreciate your help so far. I’ll start posting pics ASAP!1 point
-
I have attached the left ear and all screws are countersunk. On to the right side! Thanks, M1 point
-
Thanks for the info, Glen, but given the fact that I have no-one to take pictures with and no pictures of my up to date armor (there have been several modifications lately) that are in the typical approval poses, I'll just try my luck with applying directly, based on my pre-approval back in July/August and the feedback from several garrison members I've received since approval That being said: Thanks to everyone who's supported me to this point -- folks in my garrison who endured hours of TK Talk, the people on here with their continuous help in my build thread and especially Tino (T-Jay) who's been the best Attaché I could've asked for! Now, if anyone sees anything on this build thread or in my troop log that they think I should improve, please point it out to me! I've got tomorrow and the day after for some last minute stuff, the rest we'll see in my EIB application.1 point
-
Here is Eric's link, he posted in the wrong place. Please grant him access. https://www.501st.com/members/displaymemberdetails.php?userID=270321 point
-
I'm here with the last things that I wanted to do before my application for EIB. Looking forward to taking the pictures this weekend and hoping that there's nothing that I overlooked... To start with, I made a list of everything that I thought I could improve with my armor. I've had that list going on for a while now, but this time I went through the last ANH Stunt Centurion Applications, writing down just about anything said. Then I sorted through that list and ended up with 17 improvements that I thought I should get done before my application. The last two weekends I worked through those, so here's a few of the things that I did. Helmet Paint This was mostly a small clean-up, making sure the lines were sharper. Perhaps not the biggest change, but Vocoder lines seem to be something that gets pointed out fairly often. ABS Belt If you've ever looked at the ABS belt, you know that the corners have to be cut at 45° and have to meet the fabric. I'd cut a little too much in my initial build, so I used this opportunity to change that. I don't have a picture without the clamp right now, but I can assure you that it looks a lot better now. Bicep Cover Strip Feel free to continue with the level 4 jokes on this one, but I reglued several cover strips. When I build this armor last summer I didn't always work as cleanly as I'd have liked me to, looking back. I hadn't been a FISD member then, the bicep especially were my first cover strips... It was good, but it wasn't pretty. So this was something that I did purely for myself: removing some of the cover strips (partway or fully and not only at the bicep), cleaning up the glue and regluing it. Honestly? I love the result. It looks tidy and like armor and not like it's in the movie and about to fall apart Thermal Detonator Now, this was not something I'd expected, but upon going through past approvals and the amazing reference by Joseph, I came to the realization that I basically would have to rebuild the entire thing. One of the end caps had a gap to the metal clip, same as the ABS plate. Additionally, the black paint on the screws had all but vanished. Upon fitting both of the ABS pieces, I realized that they hadn't been cut as straight as they should have been, so I got to cut and sand the entire thing a bit. Looking pretty good now, if you asked me Other Those were just some of the 17 improvements, but they're the only ones I've got pictures of. As they're the most interesting things, I'm not too worried about skipping a detailed description of me cleaning up pencil mark or glue residue The next thing will be my approval pictures and then we'll have to see if the DO's can spot anything else that I need to improve. Otherwise I'm sure I'll stumble across more nonsensical improvements in the future in my quest for the mystical level four1 point
-
Hey troopers, We now have a white stormtrooper helmet! Yay. To be more specific, after the Oxide Red cost came 3 coats of Ford Diamond White spray paint. Here’s a little snippet of the spraying… Painting my helmet ;-) #stormtrooper #shorts #rspropmasters #starwars #spraypaint #retro And the results are as follows; The final coat is applied quite thick( giving it the gloss/shiny finish. It’s hard to get the same shine over the whole helmet, however, the main parts are nice and glossy. Here’s how it look against an ABS helmet (left) and another spray painted helmet (right). Below, the beautiful lumps and bumps: Next up, the hand painted details… [emoji2956][emoji2956][emoji2956]1 point
-
Nice work, you could remove some material from the inside curve of the sniper plate: "For a more screen accurate look, it is suggested that the top of the rear ridge of the sniper plate be aligned with the top ridge of the calf. Also note that the sides are angled rather than curved."
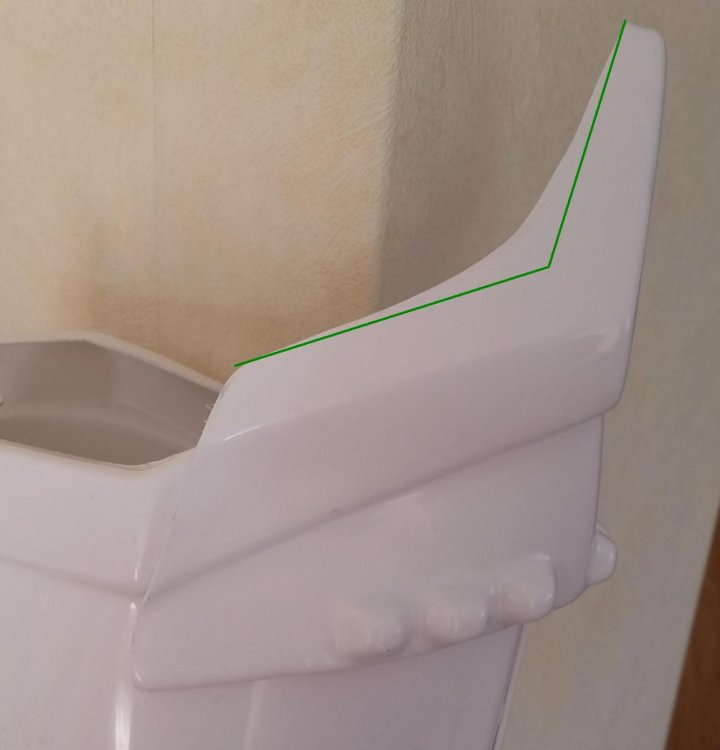 1 point
 -
So, you are tackling that ROTK and you hit a snag. How to do this or how is everyone doing that. Well this is the place to ask and respond to others so that we can all share knowledge with out having to read every build thread to find that answer you need right now. Let’s keep it productive and if someone has a different method to do something, please keep in mind that there is more than one way to skin that cat. Further, it is still a good idea to read through the build threads. We need to support each other and keep everyone motivated. This thread is simply meant to be a quick reference. I will start it off with a few tips. Masking tape- Although you will need a lot of standard blue painters’ tape, when painting the smaller detailed areas on the helmet and abdomen, I recommend you mask these areas off with smaller width and higher quality masking tape. Tamiya is what I use. Tamiya is model masking tape and comes in small rolls with widths between 2mm through 18mm. You can get Tamiya masking tape from Amazon and most hobby model shops. I normally use the Tamiya to mask off the detailed areas like the teeth, tears, traps, and ear bars then use the blue masking tape to bridge between the Tamiya tape and whatever you use to cover the larger areas (plastic bags, paper, etc…) https://www.amazon.com/s?k=tamyia+masking+tape&ref=nb_sb_noss_2 Needle Files- If you going to cut out your vents on your helmet, most of us will use a Dremel to do most of this but then you need to clean up these cuts to make them uniform and smooth. Needle files are the way to go. You can get a set of these small files from Amazon, Harbor Freight, and hobby stores. https://www.amazon.com/Hardened-Strength-Barrette-Crossing-Equaling/dp/B07PPYWSCY/ref=sr_1_10?dchild=1&keywords=needle+files+set&qid=1598290682&sr=8-10 Adhesives- For those of us new to cosplay, you will see people mention CA and E6000. So what the heck are these? CA Glue CA is short for CA glue or commonly known as Super Glue. The CA is the chemical abbreviation for Cyanoacrylate Acid. So yes, that stuff that will make you fingers stick to each other and tear off skin is what a lot of us use for building costumes. In addition to basic CA glue, it also comes in a variety of thickness formulas and you can also get an aerosol can of CA glue accelerator to make the glue instantly set. Another trick to use with CA glue is to apply a bead of the CA glue to a crack in plastic then drizzle some baking soda on the wet CA glue. The baking soda with cause the glue to instantly cure and the baking soda creates a plastic that will fill the crack. You can sand it and paint over it. We use this method to fill gaps and fix broken parts of costumes. Obviously, you can find CA glue everywhere, but the accelerator may be a bit more difficult. Try searching on Amazon or google for Name brands like 2p-10, Zip Kicker, Loctite, and Stick Fast. E6000 E6000 is a perchloroethylene adhesive. Its application is very similar to silicone adhesive and provides a few characteristics over CA glue. This is from the product data sheet and can explain it better than I can. E6000® is a unique SELF-LEVELING, non-flammable industrial adhesive formulated to meet high-performance requirements. It permanently adheres to more surfaces than virtually any other adhesive, providing exceptional adhesion to wood, metal, glass, fiberglass, ceramics, masonry, concrete, asphalt, leather, rubber, PVC, neoprene, vinyl and many plastics. E6000 maintains its flexible bond in extreme cold temperatures, will not crack or become brittle and is excellent for bonding items subject to vibration. For applications that are exposed to direct sunlight, paint over E6000 after curing or use E6800 UV formula. So, the big thing here is that it is flexible, that means you can use it on armor in places you want to flex and where Ca glue would crack or cause the armor to crack. Its also safer to use on plastics than CA glue which may weaken or melt the plastic. The trade off here is that E6000 needs time to cure and must be clamped in place while curing. When you look at someone’s build thread and you see several round silver things suspended on the armor, almost always they are rare earth magnets that are on the inside and outside of the armor holding things together while the E6000 is curing (normally 24 hours). So, with adhesives, there are a lot of options, but these are just two examples of what most of us use. One type of adhesive may not be the most ideal for aspects of your armor and you may want to consider using different adhesives for different parts of the armor. Ok that’s what I have for now. Toss out your suggestions and questions and lets find those answers.1 point
-
Don't use Bondo, use Poly Flex for your filling and final finish: https://smile.amazon.com/Fibreglass-Evercoat-411-Poly-Flex-Polyester/dp/B000P6US6A/ref=sr_1_3?dchild=1&keywords=polyflex&qid=1598527233&sr=8-3 Bondo has zero flex and as soon as the armor bends/flexes the bondo will crack away from the plastic surface. I'm a "Clone Guy" and have had one since my very first approval back in 2007 and can't tell you how much it sucks to have a big piece of armor crack off at an event. I found this stuff back in 2010 and have never used Bondo again. The nice thing is this can be used as the filler AND the finisher. Yes it is "expensive" but you get what you pay for here. Another thing is the small tube of hardener that comes with the bottle is blue. You can buy the same tube of hardener for Bondo, red, at Walmart and it works the same. I've used it on some of the resin pieces of my ROTK and the helmet. On my FOTK I used it on every seam and no issues 5 years later with any of them cracking apart. Plastic Clamps, Metal Clamps, and Rare Earth Magnets are HUGE to get this kit done. I have several of the big bags of multiple sized clamps from Walmart in a big bowl in my shop along with several of the smaller metal clamps with strong holding power. You can never have enough different sized and powered clamps. Rare Earth Magnets are great for areas you can't reach with a clamp like the middle of a shin or thigh. You can put 3 or 4 of these between the clamps and they'll hold the pieces tight while drying from the glue or whatever you used to put them together. A big key is to get super strong ones. A couple things I'd suggest is to have something metal to keep them on. I use a metal wire basket that is secured to wall. Next make sure you keep all the plastic rings that go between the magnets. The magnets are STRONG and it is tough to get them apart if they have attached to each other. They will grab onto ANYTHING metal so anything close will be grabbed. Also if they are far enough apart they will crack apart if they grab each other and come together. They'll also pinch the sides of your fingers. They can be a pain in the butt to use because of all that but the benefits outweigh the problems. The last thing I'll throw in with clamps is that you should have some small pieces of wood close to your clamp area along with pieces that are long enough to cover the length of a thigh, shin, or ab plate. Why? Lets say you need to clamp down something too far in for a clamp to reach and it is too thick for the earth magnets to hold tightly. I have several 1"x1" strips that are long enough to cover those pieces length wise. You can put this piece over whatever you want to hold down and clamp it at both ends. Now you have a clamp that can cover any span of your armor. If you can't see what I'm talking about this picture will show you how I use clamps and pieces of wood to secure pieces I can't with just a clamp or magnet.
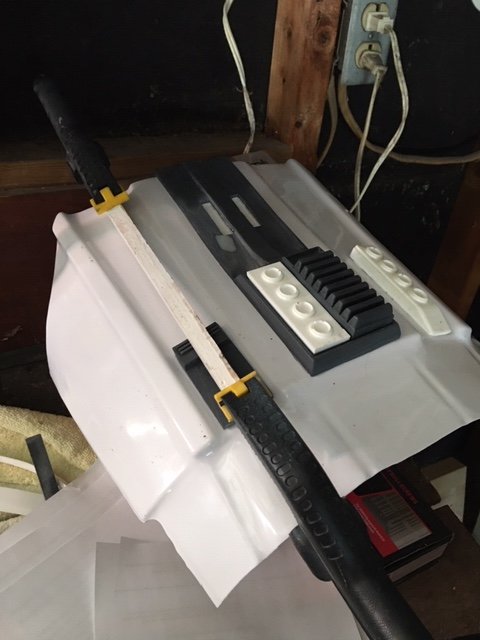 1 point