Leaderboard


Popular Content
Showing content with the highest reputation on 02/20/2022 in all areas
-
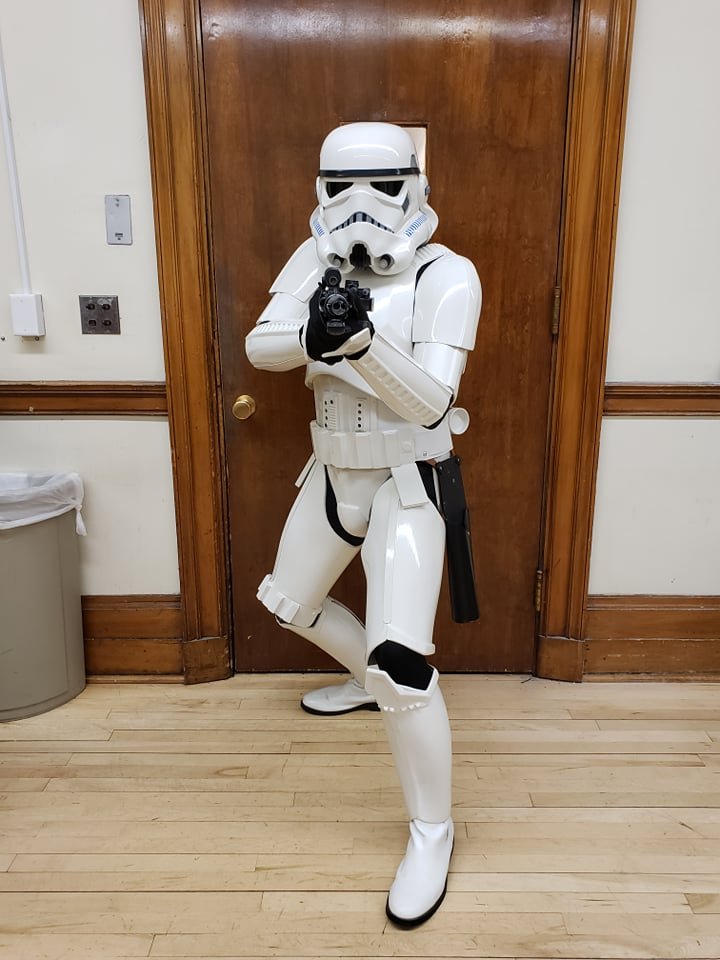
I got approved by my GML in person at a troop last night! TK 10527 reporting!
 2 points
 -
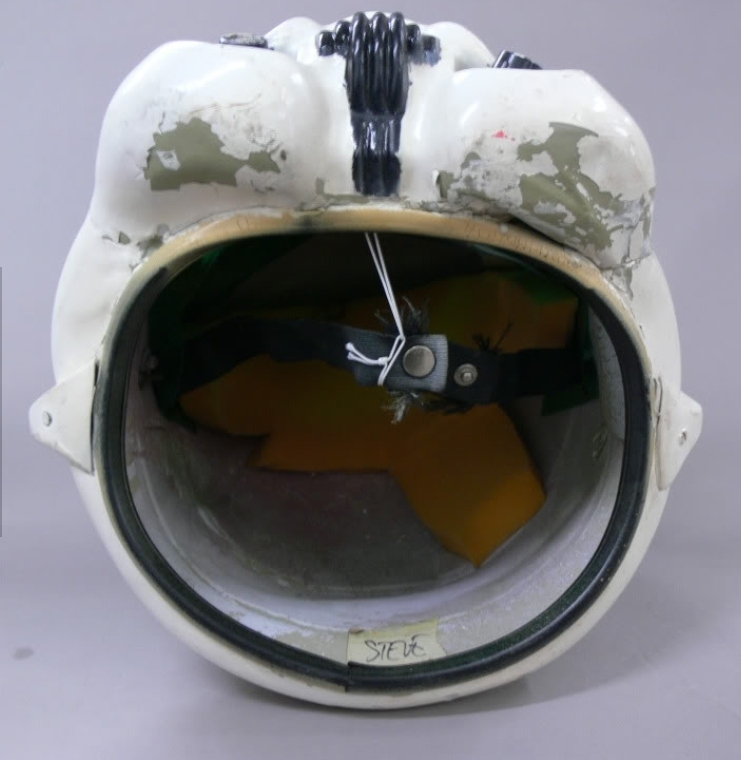
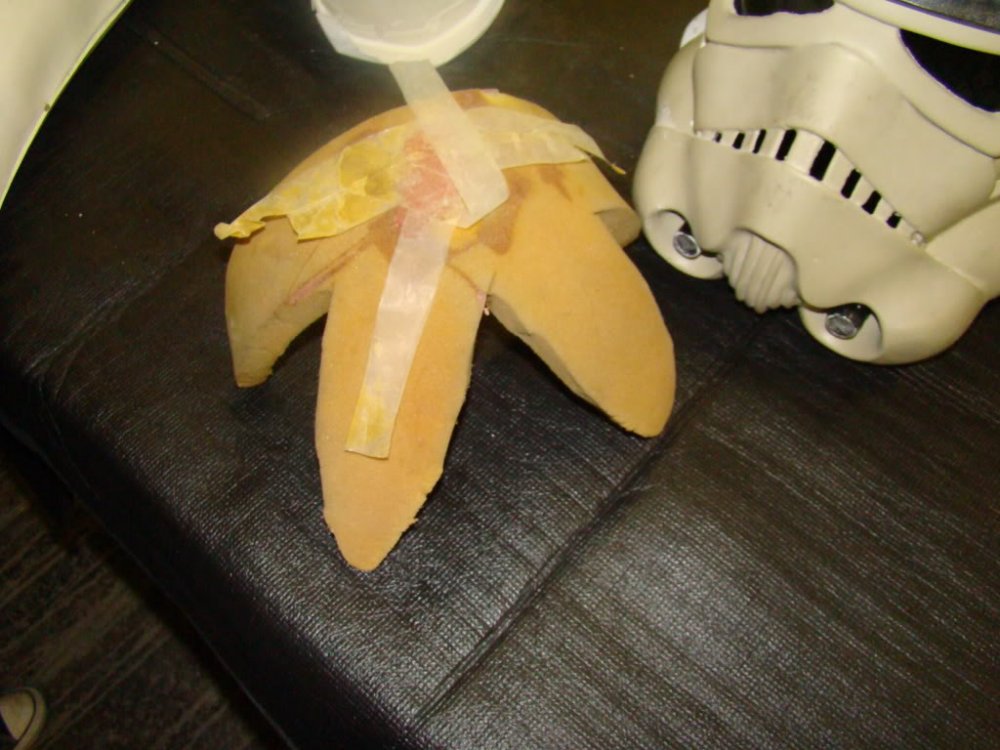
I use a thin maple leaf piece in the top and a 1 1/2 block either side of the head to stop any rotation or dropping Originals used the maple leaf design Some use these as you can place them anywhere but I found they are a little stiff for my liking

 2 points
 -
Hi fellow 501st Legion members, After nearly 3 years of development and refinement of the hardware and the code, I'm happy to announce that the currently most advanced blaster firmware FX-BlasterOS (previously known as Proto Blaster Platform) goes open-source, freely downloadable for anyone. To get an impression of the features you can implement now for free, look at the Intro Video on YouTube. For Easter Eggs, make sure you watch it till the end : FX-BlasterOS Intro Video With the software going open-source, you have multiple choices too to build your blaster electronics: Tier1: if you want a high-quality, proven solution which optimally supports all features of FX-BlasterOS, follow the below link: You advantage: - proven, tested - small enough to fit into any blaster - you can charge your Li-Ion battery over USB - comes with extensive power saving options for a sleep mode which can sustain your prop for several months on the shelf - comes already pre-installed with full version of FX-BlasterOS Tier2: you can stick together your own electronics from cheap parts, look how easy it is using Arduino boards and breakouts (see also the Shoping list below for details): To ease programming for those who are not (yet) familier with Arduino, there are detailed working instructions how to do it on the Wiki Page of the Git. In case of anz trouble of technical support request, use the Issue tab of the Git. There is also the possibility to source a carrier board for the cheap components, hugely simplifying the task of soldering and making the electronics more reliable. You can use skyone's excellent rider board which can be used with components compatible with FX-BlasterOS. https://www.whitearmor.net/forum/topic/19322-arduino-a-cheap-board-for-e11-blaster-effects/?do=findComment&comment=646230 Shopping List Here is also a shopping list for you of components you will need: Arduino Board: Arduino Nano (actually any Atmega328P based board, wiring examples will be shown for the Nano): ebay search term: Arduino Nano v3 https://www.ebay.de/itm/Nano-V3-0-ATmega-328-Board-CH340-USB-Chip-Arduino-Kompatibel/252742123829?hash=item3ad89ac135:g:xCEAAOSwPGtb33e0:rk:1:pf:0 DFPlayer Mini: ebay search term: "DFPlayer mini". Please ask the seller if the module comes with the original manufacturer's YX5200-24SS or YX6300-24SS chipset. You will also want to have a 470 Ohm thru hole resistor to connect the D8 of the Nano to the RX of the DFPlayer. https://www.ebay.de/itm/TF-Card-U-Disk-Mini-MP3-Player-Audio-Voice-Modul-Arduino-DFPlayer-Tafel-AIP/153290978607?hash=item23b0dab52f:g:uewAAOSwP6pbtdXJ:rk:1:pf:0 Speaker: recommended are OD: 20mm or 28mm Impedance: 8Ohm Power: 1W to 2W ebay search term: "20mm 2W 8Ohm speaker" Examples: https://www.ebay.de/itm/2pc-Audio-Speaker-20mm-8Ohm-8-2W-Stereo-Woofer-Trumpet-Horn-Loudspeaker-Power/162171125788?hash=item25c227001c:g:WRgAAOSwMtxXsvaV:rk:1:pf:0 https://www.ebay.de/itm/28mm-8-Ohm-2W-Round-Speaker-For-DCC-Sound-Like-Loksound-Hornby-Bachmann-Zimo/263578226658?hash=item3d5e7c8fe2:g:BToAAOSwm-Zavo6p:rk:2:pf:0 Neopixel Sticks (for PLI/Status bar): ebay search term: "WS2812 stick" https://www.ebay.de/itm/Adafruit-NeoPixel-Stick-8-x-WS2812-5050-RGB-LED-Strip-Driver-for-Arduino-r3/272010992457?hash=item3f551e5b49:g:7YMAAOSw7aBVBxRo:rk:7:pf:0 Important: type shall be WS2812/WS2812B 5050 RGB (not RGBW!!!) or sk6218 3535 RGB (not RGBW!!!) Single neopixel on round PCB (for nozzle light): ebay search term: "neopixel flora" https://www.ebay.de/itm/Adafruit-Flora-RGB-Smart-NeoPixel-version-2-Pack-of-4-ADA1260/231237003534?epid=1028248696&hash=item35d6cca90e:g:LGoAAOSwNC5ZezSY:rk:6:pf:0 The original design is from Adafruit, please support the development by purchasing Adafruit products. You can also find similar offers on eBay from cheaper sources as well. Neopixel stripes (for barrel ligting): ebay search term: "WS2812 stripe" https://www.ebay.de/itm/5m-30-60-144-RGB-LED-Streifen-Stripe-mit-WS2812B-5050-SMD-LEDs-WS2812-Versand-DE/222192610445?hash=item33bbb62c8d:m:mR_Pz7NGzDUQhwH1s-6BFvg:rk:1:pf:0 Important: type shall be WS2812/WS2812B 5050 RGB (not RGBW!!!) or sk6218 3535 RGB (not RGBW!!!). As most blaster props are black it is recommended to buy a non-waterproof, 60LED/m type of pixel stripe. The striper are soldered together every 0.5m, but you can shorten the stripes easily to any lenght using scrissors, cutting the stripe at the copper landings. Momentary Switch: ebay search term: "momentary switch" or "tactile switch" You will need a single momentary (not latching!!!) swicth for the MK1, MK2 and MK3 builds, two for MK4 and MK5. For the trigger it is recommended to use a switch with a long arm like this one: https://www.ebay.de/itm/Mikroschalter-Mikrotaster-mit-langem-Hebel-250V-3A-125V-5A-S67/330793297018?epid=1154680769&hash=item4d04d1247a:g:8EgAAMXQlrxRcPJ9:rk:1:pf:0 For the mode select, aux. switch you can take the momentary switch of your choice, they come in an infinite variety, take the one which suits your needs. I myself like these small ones: https://www.ebay.de/itm/6mm-x-6mm-Tactile-Push-Button-Switch-Micro-Momentary-Tact-Assortment-Kit-TE948/283285172378?hash=item41f51cb09a:g:SjoAAOSwo-VcAmNI:rk:9:pf:0 OLED Display with 128x32 resolution with I2C interface: ebay search term: "OLED 128*32" I2C" https://www.ebay.de/itm/0-91-128x32-IIC-I2C-Blue-OLED-Display-DIY-Module-DC3-3V-5V-128-32-Arduino/322536659354?hash=item4b18aed99a:g:ag8AAOSwK6RZLbR9:rk:5:pf:0 or for the scope a smaller one of type "OLED 64x48 I2C" https://www.ebay.de/itm/4pin-White-0-66-Screen-IIC-I2C-0-66in-OLED-Display-Module-64x48-for-AVR-STM32/272861748083?ssPageName=STRK%3AMEBIDX%3AIT&_trksid=p2057872.m2749.l2649 Connectors for switches, speaker etc.: ebay search term: "micro JST 2-pin" For 2-wire connections like for switches, speaker, I recommend micro JST connectors with 1.25mm pitch: https://www.ebay.de/itm/5-Paar-2Pin-1-25-1-25mm-1-25mm-GH-Micro-JST-Stecker-Buchse-10cm-28AWG-Kabel-RC/172626910637?hash=item28315d9dad:g:XHsAAOSwux5YTaEB:rk:3:pf:0 2.1mm recharge port: https://www.ebay.de/itm/DC-Einbaubuchse-Stift-2-1-mm-geschlossene-Bauart-Lotanschlus-fur-Hohlstecker/141127499530?hash=item20dbdabf0a:g:4mIAAOSww~xZ1KXj:rk:9:pf:0 Micro- and/or Mini-USB breakout boards: ebay search term: "micro USB breakout" or "mini USB breakout" https://www.ebay.de/itm/Micro-USB-Platine-Adapter-fur-Breadboard-DIP-DIL-Breakout-Board-Arduino/183233499430?hash=item2aa9915126:g:kywAAOSwm8NbAIfU:rk:6:pf:0 https://www.ebay.de/itm/Adafruit-USB-Mini-B-Breakout-Board/272373312981?epid=1663565126&hash=item3f6ab6edd5:g:8BYAAOSwIIFbML51:rk:3:pf:01 point
-
Name: Dan Quinn ID: TK-80419 Username: KaiserintheHood Garrison: Midwest Garrison Armor Maker: Walt’s Trooper Factory Helmet Maker: Walt’s Trooper Factory Blaster Maker: Hellhounds Height/Weight: 5 foot 11” 145 pounds Boot Maker: Crow Props Canvas Belt Supplier: Self made Neck Seal: Self made Hand Guard: Trooperbay Holster Maker: Darman props EIB link: *Changes since EIB* Padding completely removed from top of helmet. Right bottom countersunk screw on helmet adjusted as much as possible. New tube stripes. More paint to vocoder. New large ab buttons. ABS belt ends trimmed. And it wasn't called out but shoulders have been trimmed.1 point
-
Good luck Dan! Fingers crossed[emoji1696]1 point
-
Hi Dan! We are very happy that you have submitted your Centurion application. We'll be with you soon.1 point
-
Well I think I finally got it. Padding is where I like it and still have a good field of view. And if you use a glue gun watch out, that stuff is hot!1 point
-
TK 10527 requesting Detachment access. Got approved last night. https://www.501st.com/members/displaymemberdetails.php?userID=29025&fbclid=IwAR35fyuPyg43m6BgDt9fXhW9hLCSCm65TZkFK_CcwJgL1gmvQse6w4iRjPM Thanks!1 point
-
https://www.501st.com/members/displaymemberdetails.php?userID=34153 Here you go! Sorry... All these forums are still new to me... Getting myself acquainted though.1 point
-
It was 53 degrees here the other day so I was able to sand outside and get a quick coat of black paint on my belt boxes. I used 60 grit, 220 and 8001 point
-
Yeah, it's a give and take with the padding. I took into account the field of vision and the padding on top. I adjusted the pads an got it to where it does not sit high. I think also that the electronics (Fan set up, audio modulator and hearing assist) will also weigh it down a bit.1 point
-
Looking good so far Daniel, I'm getting the popcorn out for this as you get deeper into the build.1 point
-
1 point
-
Just adding this link or I'll forget, it's missing A LOT of images and many use this as a source for E-11 references, many of the images will show if you right click and select "open link in new window", I will get to this thread once I have more time (perhaps after elections) Also an update on where we are, unfortunately I have found that when the security (https) requirement was added to the forums many links and images that previously would open (in many of the completed sections) no longer do so, this basically means going over all the work that's already been undertaken to check all links, so this project is far from finished.1 point
-
Not straight out of the box, check out this thread1 point