Leaderboard


Popular Content
Showing content with the highest reputation on 11/24/2021 in Posts
-
Hello All, I'm a 501st trooper with several approved costumes, and a ridiculous number of others in the works. I actually thought I wouldn't need to scratch the TK itch, but who can deny the iconic Stormtrooper? I realize I'll eventually need one (or more?) in my stable. I'm currently building a Rogue One Jedha Patrol Pack, soooo I'll probably need armor to carry it. I know FISD is the place to be, so I'll look forward to learning.3 points
-
No such thing as a ridiculous number, I can vouch for that Will be looking forward to seeing your progress, good luck with the build2 points
-
Yep, they pop up on eBay here and there, but ensure it's actually Anovos not recast - new in original box is usually safe from a reputable seller. Or, honestly, I wouldn't be surprised to see Denuo Novo start offering them next year... Alsoalso, ensure it will fit you. Anovos is not easy to shim or fit for larger folks and there really aren't replacement panels available anymore.2 points
-
Time to open another build log for my ANH TK. follow the TK build here Revvek’s ANOVOS TK upgrades (stunt) I ended up going for a TroopaCoola JMC kit! This is an example photo of one completed. Very nicely detailed! It arrived intact a few weeks ago and I haven’t done anything on it yet, other than unpack it. lots of parts! (I also got some TroopaCoola fans for my bucket) hope to find to go get working on this soon!1 point
-
TK-19984 Reporting for Duty! UK Garrison - Looking forward to meeting you all!1 point
-
Good stuff. Following with interest. :-)1 point
-
Enjoy the build!! Sent from my SM-G950F using Tapatalk1 point
-
Looking forward to seeing the progress1 point
-
Yup, the ribbed shoulder 'covers' that attach to the chest plate, whatever you want to call them. Reinforce them. They're one of the weakest points on the armor and very prone to cracking. I usually just run a same-width strip of pre-bent ABS sheet glued under each one. Does wonders. You can see towards the top right of this photo, sorry I don't have a closeup handy.1 point
-
Hey Wayne, looking forward to seeing this finished out, and congrats on the nuptials! Just got hitched recently myself. I'd strongly recommend taking a look at the OP on this thread and using it to format your submission info and photos, to make it easier on everyone. Good luck!1 point
-
Congrats and welcome, trooper!1 point
-
You need to be an approved legion member and have access to the trading cards area.1 point
-
Sooooo... My bucket is insanely amazing and better than I ever expected. With the headphones on it's a perfect fit. Better than my actual racing helmet. The SHA works incredibly, the voice is loud, clear, yet garbled in the right way. The fans keep me cool. It's comfortable and not floppy. I have amazing vision through it after the careful repositioning of everything. It's a dream. ... and I can't actually put the helmet on while wearing armor. I have to slide one or both headphones in and out to install and remove it. I can't do that with the gloves on or the arm articulation I have while wearing the armor. I've tried but... it just doesn't work. Not workable at all. I have to be able to slide the helmet on while the speakers are in place. I have 3 more sets of various thin headphones on the way to fix this issue. I will fix this.1 point
-
Great looking set of armor Well done!1 point
-
Looks sweet! Great work!1 point
-
Should've bought 2 orders at 2015 celebration if I had known they'd double in price; I really like the clean up they did on the casting, like an improved, but accurate, reboot.1 point
-
https://www.ebay.com/itm/194367096440?hash=item2d412e8678:g:1uAAAOSwMpNhQq6p If you or anyone else is still looking... not the BEST price, but anything under $1k for one these days isn't terrible. Hope it helps!1 point
-
Looking Nice Trooper !! Well done1 point
-
Unfortunately I can't flex the best face mould since the originals [emoji23] looks like a crappy fx at the moment but I've diagnosed the issues on the mould. Blue is fill and green is remove. Eyes are my main concern at the moment and the area in front of the tears are too flat but other than that it's not bad. Dome mould is fixed and comes off OK now. Hopefully I can show off something real nice soon, I think it's well on the right track at least. Keen to hear critiques. Sent from my SM-G950F using Tapatalk1 point
-
I'm now certain I've created a monster.1 point
-
Welcome to FISD !!1 point
-
Congratulations trooper, looking forward to seeing your EIB application soon1 point
-
Well in true Rotj style I managed to crush the dome and face moulds however I managed to salvage it. The ears are [emoji8][emoji108] chefs kiss good. Very happy with them. The face you can see the V2 on the left and V1 on the right. It was a weak pull as I had to stop the vac early due to the face crushing but it's not too bad. Very very happy with the vocoder and how that looks. Needs a few tweaks to sharpen it up. Dome I cannot for the life of me pull off the mould without completely destroying it due to undercuts so if anyone has any ideas I'm all ears. Sent from my SM-G950F using Tapatalk1 point
-
So far so good with them, and Anovos armor was actually among my favorites - it's basically cleaned up RS (I won't start that debate tho ) - they just were a terrible company with deplorable business practices. If Denuo took possession of the same molds and production facilities, I'm optimistic we'll see OTTKs from them, but I know their focus is on fulfilling FOTK backorders.1 point
-
Thanks for the suggestions! I'm working on getting that TD to be a bit better. As for me, I'm approved and got a TK number!!!! TK 89400 reporting for duty!! Also, I did some work on my blaster. It's a vintage Hyperfirm B grade, apparently one of the last they sold. It had weathering all over the place. Lots on the grip. Some on the T-tracks. TONS of brass on the scope. So I repainted it completely. I'm a fan of weathering. I like it and tend to weather most of my models. But it needs to be at least realistic and not too obvious. Major wear areas should have weathering visible from a few feet away, but the rest should be very subtle. At least in my opinion. I tried to do that here. I also added an accurate D ring to the blaster. I drilled out the scope a bit and fit a dot of black vinyl with an epoxy dome to give the front a bit more character. Sad black rubber scope was sad... and now it's much happier. And then I printed up a counter sticker and something fun for the scope! I drilled the scope out to a bit over 24 mm and gave it some depth. Then I filled it a tiny bit with resin to give it a flat base. And then I printed a scope sticker on holofoil with an epoxy dome. The design is based on Crosshair's scope in Bad Batch with a little bit of tweaking. Even with being stuck in a shallow well, the holofoil manages to catch light nicely and reflect rainbows as it gets waved around. Super fun. The counter sticker is black and white printed over dark grey vinyl. The design is simple, but overlaid on a hengstler counter photo to get the dimensions right. I'll swap this one out for one with my TK number shortly. The nicer weathering and small personal details have me loving this little E11. Fun to combine my day job with TK tweaks!1 point
-
Hi Carter. Personally I have purchased a couple from Ebay I have no issues, (I have first checked the sellers reputation and reviews.) . You may want to take a look there.1 point
-
A 10mm bit will open it up [emoji106] Sent from my SM-G950F using Tapatalk1 point
-
Hey joseph made one or 2 mods. Currently getting married so will post soon as wedding planning taken over Sent from my SM-G986B using Tapatalk1 point
-
Hi folks, I’ve reworked the weathering a little and added the white lettering to the M38 scope. With that in mind, I just HAD to take some new, swanky photos and share them with you all. For anyone that wants to learn a little more about the processes involved, and to see more photos of the finished blaster, here’s a new video: Thanks for stopping by. Any questions, don’t hesitate to ask. :-) Dan1 point
-
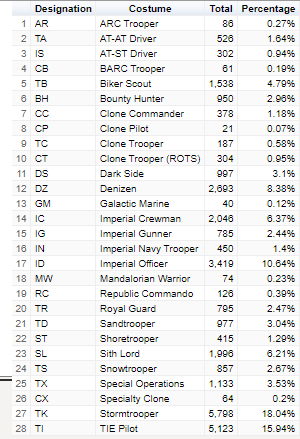
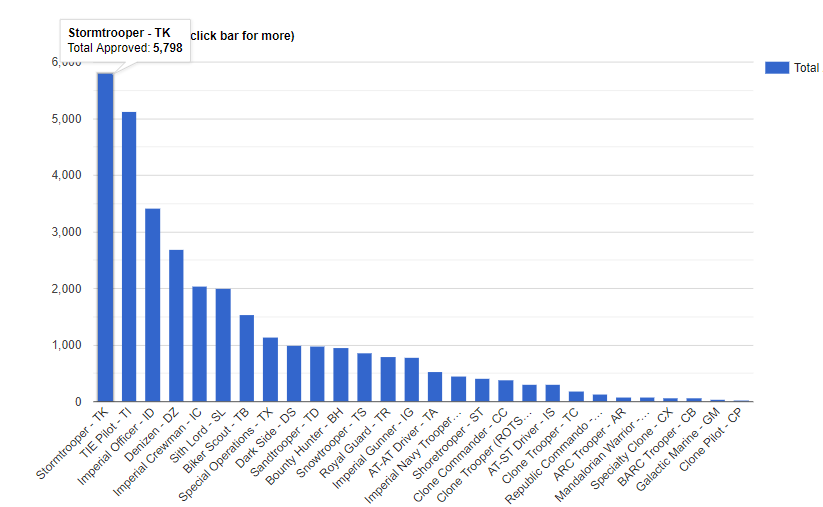
Total approved costumes as of 3/09/2021: 32,141
 1 point
 -
Hey folks, I’m calling this JMC E-11 kit FINISHED.... (well, for now, at least) [emoji6] Yes, there are a few areas where I could go to town on parts, replace this, change that, however, this project was initially to see how the JMC E-11 kit (now known as “Kit 1”) was on delivery, how the parts went together, any feedback on how the production models of these could be improved. The only real additional part I’ve added is the scope rail (which I had already). I’ll do a summary video soon, covering various parts that I haven’t yet documented, however, my conclusion about this kit is that it is TRULY EXCELLENT!!! As I’ve said throughout, easy to work with, very well made and supplied by Marc at TroopaCoola, and an excellent final product with impeccable service. Get your order in today... [emoji6] Thanks for following the build. :-) Dan1 point
-
Hey folks, Drawing closer to finishing this blaster. In this little update, I have; Added D-ring Added lock/free screw (actually just a resin cast) Added hex bolt on bottom of grip Added spring Prepared charging/cocking handle This certainly doesn’t look pretty, however, it looks okay once in the barrel. I used a child’s garden hoe as the correct diameter to coil my spring. And now some photos of where it’s up to.1 point
-
Hey troopers, A little more progress on this blaster. I’ve now attached the JMC scope and Hengstler to the scope rail. I’ve started a little subtle weathering, too. Rear end cap needs toning down and lots of other little bits still to do. :-)1 point
-
Thanks Tino and Tony. :-) I’ve given the scope another coat of Humbrol Brass 54, as well as the front end of the Hengstler. As the rear of the original Hengstler counters were plastic, they should not be sprayed with a brass coat. The plastic part would not have had metal effect weathering. I started to work on the “OFF —>” detailing on the end cap of the magazine, however, it’s not quite to the standard I’d like. I’ll likely do this again. And finally, the folding stock now has a coat of Hammered Black, so I test fitted it to the barrel. A little shiny still at this moment, but, I’m liking the finish. :-)1 point
-
Hey folks, A little bit of progress on the painting front. After a couple of different sources confirming the presence of crinkle paint on the original weapons, and thus likely the props in ANH, I went ahead with applying Hammerite Hammered Black spray paint. First coat was very glossy and had a lot of separation. The paint in the below photo was still wet, so extra glossy. However, upon drying, the paint looked a little pitted. The second cost went on much nicer, filling those “pitted” gaps and making for a much better finish. And here is where we are up to. I have test fitted a couple of metallic parts, just for contrast.1 point


.thumb.jpg.6d328112c293e966a129e9e62a88b910.jpg)


.thumb.png.69856e02550a2e6d07e44a2b1bda020c.png)