
Leaderboard


Popular Content
Showing content with the highest reputation on 09/06/2021 in all areas
-
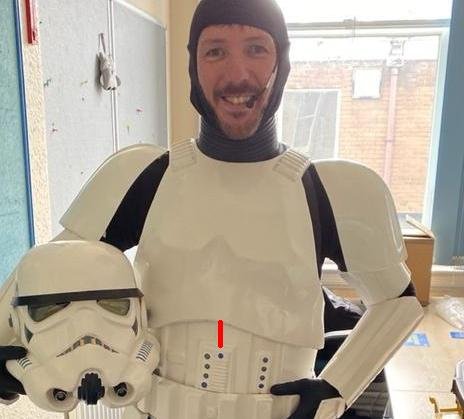
I was in a state of limbo with my AM 4.5 build with updates coming in months at a time. What finally got me to finish my armor was wrangling for the first live troop since Covid at the 2021 Flagstaff 4th of July Parade. Having over 100 members of my garrison showing up was awesome and so I quickly got motivated and submitted my photos. I am a little on the heavier side hence the Armor Master build, but I was super conscious about my weight and felt less and less motivated as I put on the armor, much less submit my photos for approval. after the parade, I took a deep breath, asked my local garrison members to help take the photos for me, and sent them off to the GMLs. Two weeks later, I get an email saying that I got accepted into the legion without any modifications needed. That gave me the confidence boost I *really* needed, and made me excited for my first troop that was just a few days away.
 3 points
 -
Okay, holy **** I haven't been on here for a WHILE and my inbox was full with questions about this armor thread. Truth is, i did finish the model and somebody who wanted to make vacuum form molds of the armor wanted me to model it exclusively for him. I agreed on that since he "hired" me. After that the guy did not hold up his end of the deal and the whole project got so frustrating to deal with, that i stepped away from it. Until then I had modeled the TFA as well as the TLJ options of the armor in close contact to some people from the 501st to give feedback for the models and keep them as accurate as possible. I was contacted by someone on this forum through my FB profile and we talked about the possibility to make the files available. I am currently going through my files to make them easy to understand for anyone who will be printing the for themselves. I will set up a digital download through my etsy page (https://www.etsy.com/shop/Die3DSchmiede). I have made a mold for the TLJ helmet but haven't sold anything for a while because I was busy elsewhere. To anyone who tried to contact me: I am sorry for not getting back to you. And if you are still looking for this armor file, this is your chance to get on board.3 points
-
Perfect, Tim. You can definitely trim down the rear of the tops. I would take it off about a centimeter or two at first, and if you need to take more, do it in increments. The only small issue is that you still have a good amount of the return edge on the sides of the thigh tops and some in the rear. When you trim off that return edge, the opening will be larger, but hopefully it will not be noticeable. You should be able to fit about 4 fingers comfortably between the thigh piece and your leg. Anything larger and it will look odd, but in a worse-case scenario we can help with that as well. Let's cross that bridge when if we come to it! Photos from your EI submission2 points
-
Not sure if the powers that be would agree with my methods, but I didn't like the gap formed between the lower plate and the shin where spiders and other vermin can crawl up into, so I used some heat to shape the plate onto my shins for a flush profile. While the e6000 was drying and the plate clamped (use non marring clamp feet on non conforming points), I masked the exposed shin with painters tape and used a low heat setting and slowly heated the plate. As the plate softened, the clamping force flexed into the crevasses.2 points
-
Now there's a term I haven't heard in a long, long, time, lol. I do miss ol' Del boy... Glad Rich is helping you out on this, Colin. He is AWESOME!2 points
-
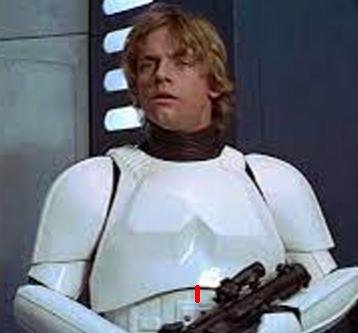
You may be able to bring your ab/cod up a bit, if you compare Luke and the gap between his chest and ab plate and yours. If not you should be able to trim the tops of thighs without much issue, although I would let the DO's comment whether they would be acceptable for higher level clearance as to shape/return edge, @justjoseph63, @TKSpartan, @Chemi Here's a couple of shorter trooper builds, from memory I think most have higher clearance, could be some reference material for you as to what they modified https://www.whitearmor.net/forum/topic/38416-crickets-rs-stunt-build-for-the-vertically-challenged/ https://www.whitearmor.net/forum/topic/38842-fragarocks-rs-stunt-build-not-to-scale/ https://www.whitearmor.net/forum/topic/42868-sha-shas-wtf-anh-stunt-build-complete/
 2 points
 -
Happy Labor Day! This well-earned holiday brings you a monthly update focused on the helmet! Let's start with the frown! Using some extra-small q-tips (You can find these at Hobby Lobby.), paint thinner and good ol' 1138 Gray. (That CAN'T just be a coincidence lol!) for touch-ups, I managed to neatly trim those trouble areas. Onto the tears. Using some Gloss Black paint, I expanded the black outline, which of course, resulted in having to completely repaint the tear lines. In this next pic, you'll also notice the difference that decals make in comparison to my previous, hand-painted effort. BIG Thank You's to @justjoseph63 for sending me a set of FREE blue decals! They obviously make a HUGE difference! BTW the sticker was applied before the ear piece was removed to ensure a proper fit. Also note the brow trim's...trimming haha. For these decals, I not only used paint thinner to remove the previously-placed blue paint, but Goof Off, as well. There were some expected stains that I knew would be difficult to completely remove. This next pic shows a more obvious stain. I made sure to use the pencil test to guarantee a proper width from the corner of the cheek. Next, I decided to adjust the black lines as seen on the back gray areas of the back. I used a not-so-successful masking method to produce straighter lines. I'm not sure if it's an improvement-which is a shame cuz this was truly tedious work. Lastly, I removed the lining along the bottom of the bucket to remove the predicted stains. Yup, I see the two prominent stains along the bottom there, underneath the comm-links. I'll be sure to take care of those. Also, as much as it pained me to decide, I'm gonna go ahead and redo those ear pieces. With my experience adjusting all of these pieces, my confidence has greatly increased and I know that I can do better. Aye aye aye, what am I getting myself into, lol? Hopefully, next month I will be showing off those new earpieces with minimal to no space shown between the ears and bucket! That's all I had time for this month, ya'll. (Life is crazy with a baby and a wife who's in grad school haha!) In addition to the improved earpieces, next month I will include work on the hardhat suspensions and bottom-liner mounting. As always, your help and suggestions are most invaluable and appreciated and I can't wait to see what you have to say about the latest and greatest. Take care y'all!1 point
-
It's a bit difficult to see the entire scope of the issue without seeing how much of an overlap you have on the posterior plate, and a photo would certainly help a lot. Keep in mind that the distance from the top of the thigh in front and the cod can vary as seen in the first pic, but it sounds like you may have a common issue with that infernal clicking noise coming from the rear of the thigh tops hitting the posterior plate in the back. (I had the same issue). The thing to think about is comfort. As seen in the last 3 photos you can certainly trim down the backs of those thigh tops to compensate without it affecting Centurion approval. Before doing that, it may sound odd but as I mentioned, if you could post up a photo of the overlap issue in that area we can definitely steer you in the right direction and pinpoint where you can/should trim.1 point
-
The only issue with trimming down the shins is you then bring the thigh down over the knee which could interfere with the knee bending.1 point
-
Yes, done! Only downside is you have my TK number in aurebesh! Pm me your email and I'll do a version for you with your TK number1 point
-
OK, here goes... At the top of this page is your FISD username, left click to bring down the drop down box. Right click on Account Settings, and select open in new tab (this let you flick between these instructions and actually editing your signature) On the account settings page select signature on the left hand side of the window (bottom of the list). You should see: [Signature Restrictions] under that is [View Signatures] Under that is a box that shows a preview of your signature as well as where you can type text (with editor tools for changing font style and colour and adding links to other pages) Under that is another box where you can either drag and drop images for your signature, or you can click on [choose files] to navigate to the files you want to use. When you're all done click save at the very bottom of that page. Find any post you've already made (maybe here) to see exactly how your signature looks. If you're anything like me it'll change several times before you're happy with it. Any probs let me know1 point
-
Always something happening on one of the busiest forums in the legion! Welcome to FISD Mike, great photo too.1 point
-
Wow necro post lol1 point
-
There wasn't really much additional bend. It felt like the normal amount. I did think of the overcorrection and tried that, but still no difference. Maybe I will boil water and just try pouring it over the pieces? Thanks, M1 point
-
HOW I ADDED SHIMS TO MY LARGE THIGHS * Before starting this process, get a friend to help you measure your custom shims required to cover your back thighs. I recommend using simple cardboard to make templates (stencils) first and then cutting the ABS plastic. If you need ABS extension plastics, I recommend getting them from our friends at TrooperBay.com. ---------------------------------------------------------------------------------------------------------------------------------------------------------------------- Hello Everyone, For large troopers like me, I had to shim my thighs to fit me. There's new people visiting the FISD and I wanted to help. Below are a few images on how I completed this special task. Please feel free to message me with your questions below. I'm happy to help. If you're wondering if "shimmed thighs" are approved for Centurion, they answer is yes! This is how I covered the gaps in between the thigh armor and custom shims. I used Apoxie Sculpt because its non-toxic and easier to work with (remember to wear gloves). All you need is water in a spray bottle to keep it moist as your working the compound into the gaps. Be sure not to use too much water. Just keep it moist like clay or joint compound (like sheet rock work). Allow to dry overnight and then sand down the area to a finished and smooth look and feel. I used various sand paper to smooth out the rough surfaces left from the dried Apoxie Sculpt. Please note: You only have to cover up the outside finish of the thighs to make look like one piece. No cover up work required for the inside of the thighs. You can use automotive bondo, ABS paste, or other compounds. Its totally up to you and your comfort level. Always remember to follow the manufacturer's information on use, handling, clean up, and safety concerns. Now, the primer and spray paint will be your greatest challenge. Since my NE kit is glossy white, I was able to use an all in one primer and paint - Rustoleum glossy white. I would suggest bringing your thigh armor to your local paint or hardware store and asking an experienced associate on color matching. Good Luck and let me know your project turns out.1 point


