


Johnny Karate
-
Posts
24 -
Joined
-
Last visited
Content Type
Profiles
Forums
Gallery
Articles
Everything posted by Johnny Karate
-

Accurate 3d printed First Order Stormtrooper
Johnny Karate replied to Johnny Karate's topic in TFA Stormtrooper
That makes sense! I will get in contact with you! Currently juggling responsibilities as a father of twins (5 weeks old) and life. Printing progress is a bit slow -
Accurate 3d printed First Order Stormtrooper
Johnny Karate replied to Johnny Karate's topic in TFA Stormtrooper
Of course. Once purchased, you will have access to the archive and the updates will be applied when they are done. You can download them any time. -
Accurate 3d printed First Order Stormtrooper
Johnny Karate replied to Johnny Karate's topic in TFA Stormtrooper
I FINALLY managed to get a decent listing up on Etsy for the files, if anyone is still waiting for this... Meanwhile, I'm printing this suit for myself as well. I would love to have this thread turned into a build thread. https://www.etsy.com/Die3DSchmiede/listing/1089257123/first-order-stormtrooper-3d-print-file?utm_source=Copy&utm_medium=ListingManager&utm_campaign=Share&utm_term=so.lmsm&share_time=1632673906184 -
Accurate 3d printed First Order Stormtrooper
Johnny Karate replied to Johnny Karate's topic in TFA Stormtrooper
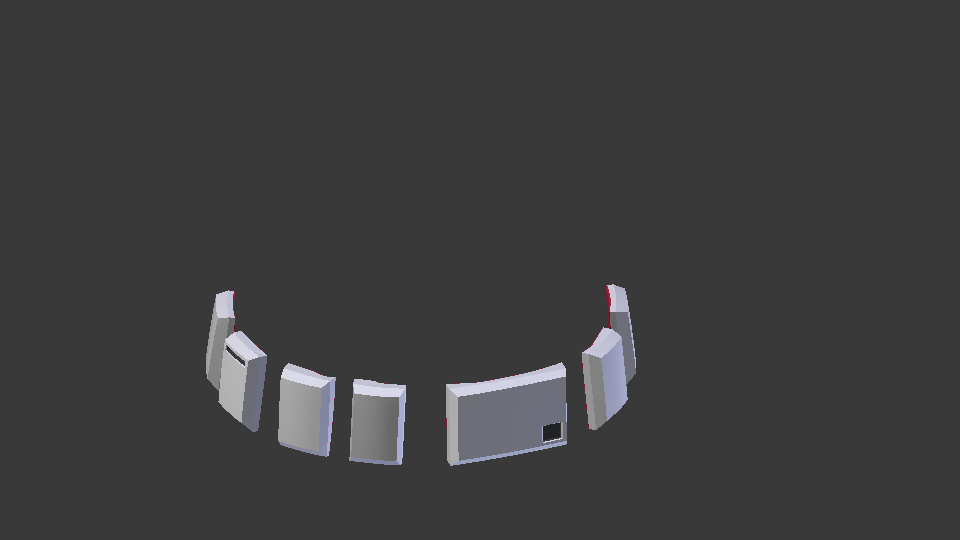
I'm prepping the files for printing right now and I have printed the Abdominal Section to test out how the boxes will fit... Looks good so far. The size of the individual parts is of course dependent on how you scale it. The Chestpiece won't fit on my Anycubic Predator and it has a 38cm Diameter Buildplate. But my Chiron will probably be able to handle it with 40cm rectangular buildplate...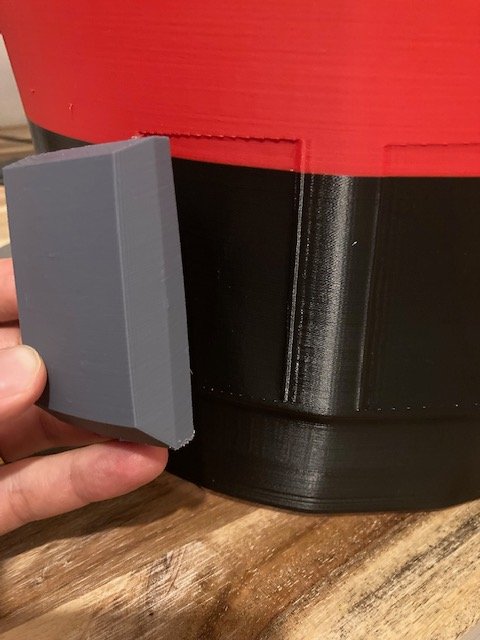
-
Accurate 3d printed First Order Stormtrooper
Johnny Karate replied to Johnny Karate's topic in TFA Stormtrooper
And because I had some time, I modeled the level 3 forearm shape as well... Feedback welcome! Left is the normal shape and right is the updated one. -
Accurate 3d printed First Order Stormtrooper
Johnny Karate replied to Johnny Karate's topic in TFA Stormtrooper
Thank you for the link to the CRL discussion! I was aware that in TLJ there were 2 versions of the forearms visible: the old style and the one you referred to. I see now that for level 3 clearance, the costume has to have the new style forearm. I will add that as well, so people can choose which one they would like to go with. -
Accurate 3d printed First Order Stormtrooper
Johnny Karate replied to Johnny Karate's topic in TFA Stormtrooper
Yes, it is hard to make out. In some of the frames in the movie it looks like the ridges are more pronounced and in some they look very smooth. I added a side by side comparison of the two Codpieces I made. Left is TFA, right is TLJ... -
Accurate 3d printed First Order Stormtrooper
Johnny Karate replied to Johnny Karate's topic in TFA Stormtrooper
Okay, I promised some pictures so here goes: I made some screen captures of the whole TLJ suit version assembled. The changes to the TFA suit seem minimalistic, but they are present: The most obvious would be the helmet of course. The more subtle changes were made to the Bicep (overlapping, rounded edge), the forearm Picatiny-style rail (Torx-screw), the Codpiece (more narrow and slight ridges visible), the Thighs (overlapping, rounded edge), the Thermal Pack (cylinder length and color scheme). Just have a look at it and let me know what you think. -
Accurate 3d printed First Order Stormtrooper
Johnny Karate replied to Johnny Karate's topic in TFA Stormtrooper
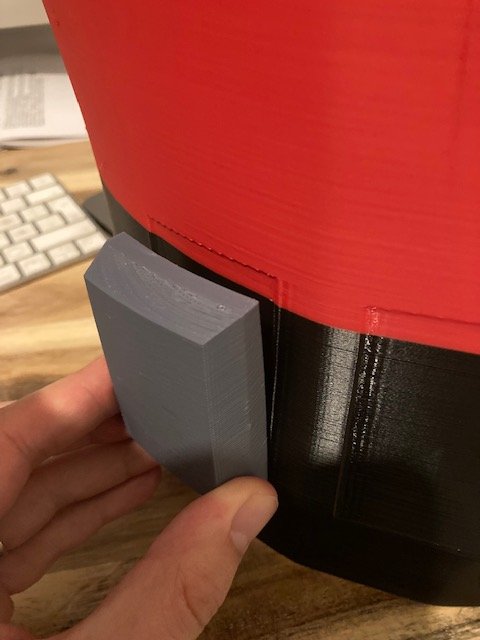
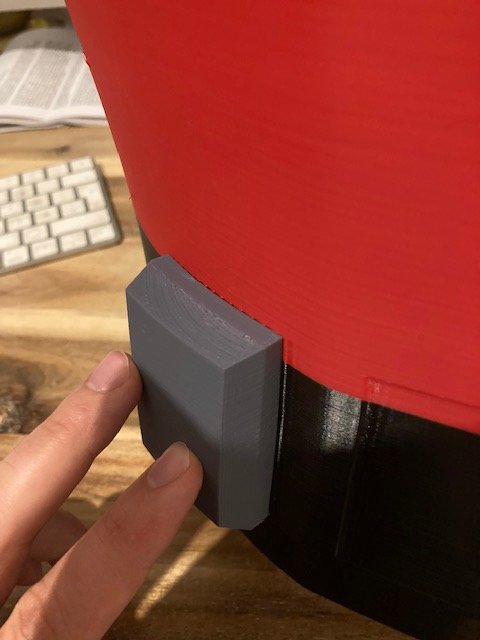
I always appreciate feedback The recesses are there to make it easier to glue the boxes on in the right places. -
Accurate 3d printed First Order Stormtrooper
Johnny Karate replied to Johnny Karate's topic in TFA Stormtrooper
I know, that is why I updated the files. You have full control over the the gap now, since the boxes are seperate. -
Accurate 3d printed First Order Stormtrooper
Johnny Karate replied to Johnny Karate's topic in TFA Stormtrooper
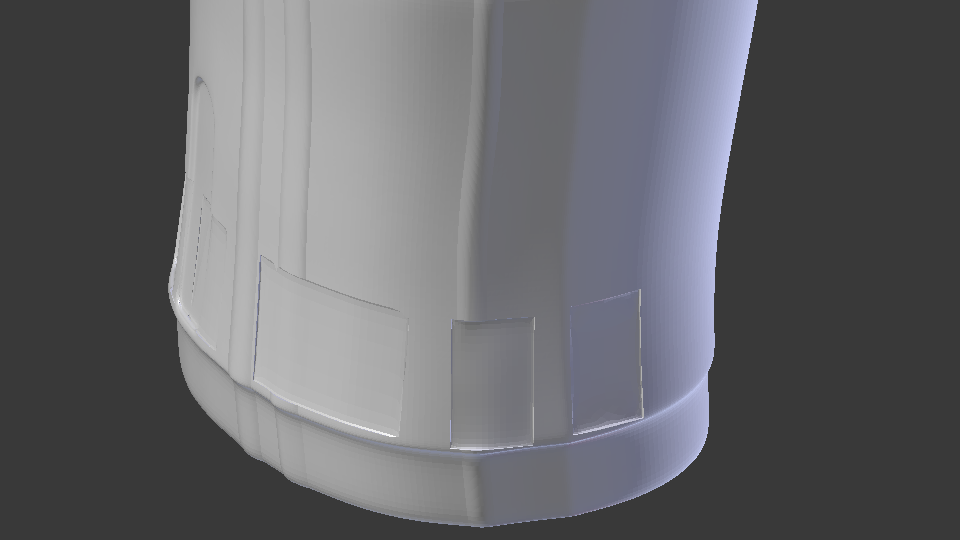
And while the kids are sleeping... I'm actually getting some work done! - I fixed the meshes - seperated the individual boxes - made matching indentations for the boxes to be glued onto the abdominal section after post processing Not long now until this is downloadable!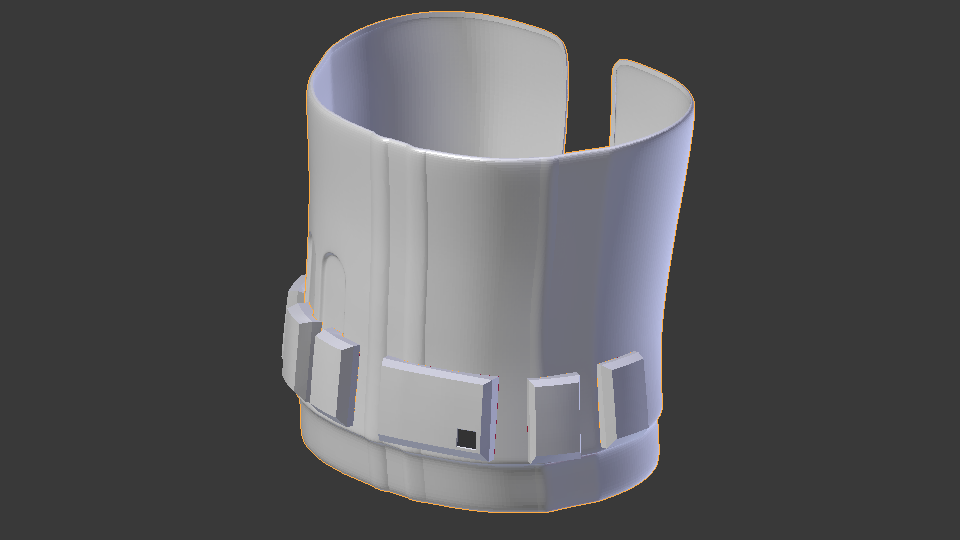
-
Accurate 3d printed First Order Stormtrooper
Johnny Karate replied to Johnny Karate's topic in TFA Stormtrooper
No, those usually mess up the mesh even more... It's not a hard fix to do by myself and I can make it easier to print in one go. The abdominal boxes have not merged with the abdominal armor as they should have. I'll be done with that today. I'd rather do it myself and have full control over the outcome -
Accurate 3d printed First Order Stormtrooper
Johnny Karate replied to Johnny Karate's topic in TFA Stormtrooper
Okay, just to let you guys know: I am reviewing the individual files for maximum printability and I ran into an issue on the Abdominal Section. Some meshes were colliding, causing gaps and holes in some slicing programs. I use Cura, Ideamaker and Simplify3D. While Cura usually handles those issues really well and forgives some mesh defects (like overlapping volumes), Ideamaker and S3D are not as forgiving. While I'm on it, I will make the abdominal boxes separate. That way it is easier to print and post process. I saw that the updated CRL features those as well (finally)... Hang on, I will give an update with pictures soon. -
Accurate 3d printed First Order Stormtrooper
Johnny Karate replied to Johnny Karate's topic in TFA Stormtrooper
Okay, holy **** I haven't been on here for a WHILE and my inbox was full with questions about this armor thread. Truth is, i did finish the model and somebody who wanted to make vacuum form molds of the armor wanted me to model it exclusively for him. I agreed on that since he "hired" me. After that the guy did not hold up his end of the deal and the whole project got so frustrating to deal with, that i stepped away from it. Until then I had modeled the TFA as well as the TLJ options of the armor in close contact to some people from the 501st to give feedback for the models and keep them as accurate as possible. I was contacted by someone on this forum through my FB profile and we talked about the possibility to make the files available. I am currently going through my files to make them easy to understand for anyone who will be printing the for themselves. I will set up a digital download through my etsy page (https://www.etsy.com/shop/Die3DSchmiede). I have made a mold for the TLJ helmet but haven't sold anything for a while because I was busy elsewhere. To anyone who tried to contact me: I am sorry for not getting back to you. And if you are still looking for this armor file, this is your chance to get on board. -
Accurate 3d printed First Order Stormtrooper
Johnny Karate replied to Johnny Karate's topic in TFA Stormtrooper
Thanks! I just used a Hotglue-Gun to do it. I pressed the tip in slowly, so the material melted away to the outside due to the konical shape of the hotglue-gun. -
Accurate 3d printed First Order Stormtrooper
Johnny Karate replied to Johnny Karate's topic in TFA Stormtrooper
Hey guys, I have finished one of my helmets as a birthday present for a good friend of mine. He requested severe battle damage... so i went a little crazy... On closer inspection, the snout would have needed more sanding before painting it. But time was running out. -
Accurate 3d printed First Order Stormtrooper
Johnny Karate replied to Johnny Karate's topic in TFA Stormtrooper
Over Christmas and New Years I've been busy with family stuff and friends. I did manage to squeeze in some printing and post processing time though. On the left is the first test print that I've made of the helmet. On the right is the updated version in ABS. You can see the registration shape for the "Nose" pretty well here. Don't judge me for not sanding the welding marks the nose will cover them up anyways. -
Accurate 3d printed First Order Stormtrooper
Johnny Karate replied to Johnny Karate's topic in TFA Stormtrooper
Thank you guys! I have finished printing the helmet in ABS. I am doing the cold vapor treatment at the moment. I'll post some pics when it is done -
Accurate 3d printed First Order Stormtrooper
Johnny Karate replied to Johnny Karate's topic in TFA Stormtrooper
I modeled a lot of stuff now and I know how much of a pain it is by only going after reference pictures. I have recently finished the young Boba helmet from the animated series and that took me about a week. As for your idea about the yoke being an extra inner chest plate... that is actually not a bad idea. It would add stability as well. I might do that.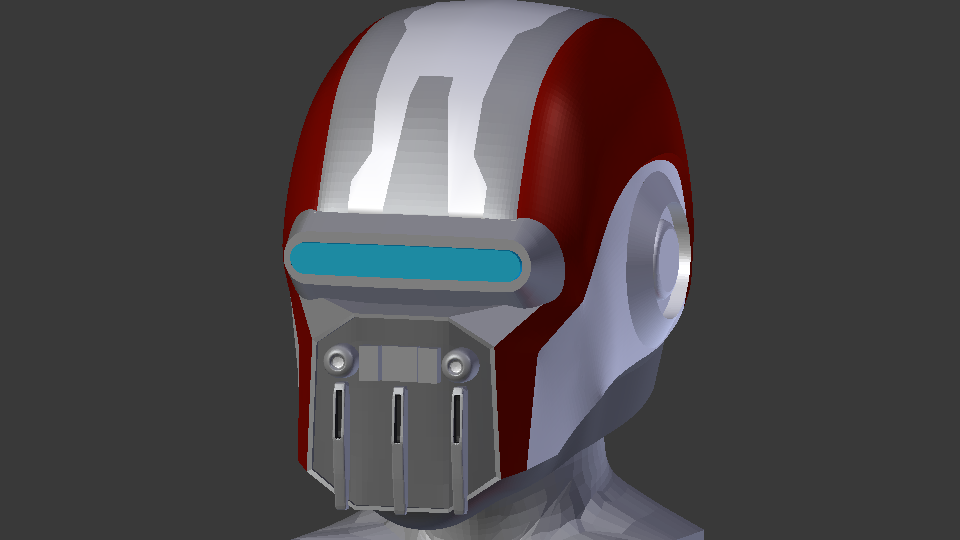
-
Accurate 3d printed First Order Stormtrooper
Johnny Karate replied to Johnny Karate's topic in TFA Stormtrooper
Alright, updated the first Post with all the pics I intended to put in there. Now here are the pictures of the first test print, showing the hexagonal printed part fitting in on the helmet. Please note, that the "Nose" part is not yet attached to the Helmet. -
Accurate 3d printed First Order Stormtrooper
Johnny Karate replied to Johnny Karate's topic in TFA Stormtrooper
Am I missing something here? I am just going to print the file and post process the printed parts (sanding, painting etc.) to make them wearable. No molding and casting required. Yes, a lot of the painstaking work was sidestepped, I agree. But having a good reference model, even with textures only goes so far. Creating a high poly 3d printable model with all the details (especially the helmet) was a long process that took quite some effort. -
Accurate 3d printed First Order Stormtrooper
Johnny Karate replied to Johnny Karate's topic in TFA Stormtrooper
I'm using an Ultimaker 2, so print bed is around 210x210x210mm. I'm not going to share the files publicly, but you can always send me a PM about it. -
Accurate 3d printed First Order Stormtrooper
Johnny Karate replied to Johnny Karate's topic in TFA Stormtrooper
Well, I had planned to upload pictures of the files in the first post but file size is limited. Are pic heavy posts not welcome here? -
Hello all, First of all, thanks for having me! I've been lurking around the forum and seen some amazing builds. I grew up watching Star Wars with my Dad and made my first Vader suit when I was 12... from papermaché and cardboard. I couldn't find the picture of it but let me say... I needed some more practice I've been doing props for 4 years now and a while back I decided to go for a 3d printer... find out to model my own stuff. Over a year ago I wanted to make a File for the new Storm Trooper Armor for myself that would be approvable for the 501st. Reference was scarce (for polygonal modeling) and I just made the Helmet back then. It was pretty decent but some details were off and the shape of the dome wasn't 100%. A buddy of mine sent me a low poly game model to look at and it came with textures. That was awesome because that gave me something to start with. A lot of details on the textures were just right and the overall proportions looked correct. I used it as a base reference to make my own model. I have sinced tracked down the origin of the model and I believe that it was JakeGreen163 on DeviantArt who made it available. I've since had help from some dedicated Star Wars Costume Pros who pointed out various mistakes and things to improve at. A lot of hours and dedication have gone into making this a very high quality model, as close to the real thing as possible. 501st, here I come :D Some details on the model: - The hexagonal structure on the Helmet would have been really hard to model and post process, so I came up with two 3d printer-friendly solution. First: A glue-on solution: The hexagonal structure is printed flat and then glued in place. Second: The hexagonal structure can be inserted into a small undercut and is held in place by the "Nose"-section. If you don't understand what I mean, look at the pictures. - Visor-Stencil: I have a vacformer but I figured, since it is not a requirement for the 501st approval to have a bubble lens. I could just as well make a cutout for the visor since that is easier to apply a black tint to. So I made a stencil that would fit just right. I already printed the helmet. I'm prepping the rest of the suit next. Progress on this will not be super fast because I print a lot for customers as well. TFA Helmet: TLJ Helmet: Hexagonal inserts: Rest of the suit: Helmet with undercut that even Anovos was missing until now:
