Leaderboard


Popular Content
Showing content with the highest reputation on 01/30/2021 in Posts
-
Att all troopers It gives me great pleasure to announce FISD's latest CRL The Force Unleashed Stormtrooper Special thanks goes to Glen, gmrhodes13, for his very solid build of this costume but also for his major role in establishing this new CRL. Please join me in congratulating Glen. https://databank.501st.com/databank/Costuming:TK_forceunleashed3 points
-
It's worth the extra work and wait, look a lot better in the end2 points
-
You got this! Your already doing the right thing. Take lots of pictures and reach out for answers. Everyone on there first build had some type of issue. Heck I had forearms that didn't look like two even halves, messed my shins up trying to use a heat gun to form them and let alone shin gate and a bell gate lol Measure 3 times cut once. Cut less than you need, try it on and if you need to do a small amount more than let's do some more2 points
-
TK-85421 Requesting TFU EIB Status (RS) For your consideration: EIB Application = No 7 Costume = Stormtrooper, The Force Unleashed Costume CRL Link = https://databank.501st.com/databank/Costuming:TK_forceunleashed Name = Glen "Q" Rhodes TK ID = 85421 Forum Name = gmrhodes13 Legion Profile = https://www.501st.com/members/displaymember.php?userID=15264&costumeID=532 Garrison/Squad = Desert Scorpion Garrison Armor = RS Props Helmet = ATA Blaster = Scratch build & Doopy Doo's Backplate overlap fixed1 point
-
You also need this link to your legion membership profile https://www.501st.com/members/displaymemberdetails.php?userID=314091 point
-
Hopefully this will help explain it better. So you can see the line where I want to cut here. But instead of following that line along the ridge, I’m going to cut a few mm out from there, then come back and follow the rest of the line. Afterwards, it should look like this: Now you can file that excess material back until you get a straight fit with the other side. One of these big flat ones: The bigger the better as it’s easier to see if you’re filing at a straight angle, in line with the cut. I’m sure plenty of people would consider this overkill but I struggled with the legs as much as you and really wanted them to come out good. This worked for me and allowed me to go nice and slow until I had the join I was happy with. Sent from my iPhone using Tapatalk1 point
-
Tk-51279 from garrison Argentina requesting access. http://501st.com/members/displaymember.php?userID=286891 point
-
To keep some continuity, it was changed a few years ago to help "standardize" them because folks were adding all sorts of attachments (radios, lights, greeblies, antennas and such). Oil drain pans should definitely be a rectangular shape, as that is what is seen in the videogames they are based off of: The thickness of the pan is up to you. I went with the thicker one (photo 1) as used in Templar726's build (link here) because I liked the beefier look, but I don't think those are available any longer. The thinner ones are more readily available, and the 12.5 qt. size (photo 2) seems to be the most popular. Amazon is out of them, but I found one here. This is the type Tony uses in his awesome build thread here. 1 21 point
-
I've been made aware that some of these parts were not what they were said to be and I have subsequently been accused of recasting. I was unaware of this and now that it has been bought to my attention I will not be progressing with these parts and instead redoing them. I do not wish to make this issue any complicated as I've done my best to avoid issues like this so I would like the time to apologise for this matter. If any one would like to discuss further don't hesitate to reach out.1 point
-
Hi Rodney, Firstly, HANG IN THERE, TROOPER!! I know it can be tough, and rather daunting. Especially when you are trying to measure the fitment around the back of your own legs. But, you are doing the right thing by taking your time and asking great questions. Can I ask, have you trimmed out the lower part of the thighs? In this photo, is this un-trimmed? If that is un-trimmed, I’d suggest starting here. Unless you have trimmed that area, you won’t be able to get a good fit around your knee. As below, a few millimetres is usually enough. Once you have that trimmed, you can wrap is around your leg again and start measuring up. As below, a big part of fitting the thighs is working out the sizes of the “lower ridge”. (Shown in green). As you’ll see, the ridge on the inner and outer is not ‘exactly’ the same, however, it’s pretty close. Many builders aim for approximately the same width of ridge on the inner and outer, and the same on both thighs. (If you’ve watched the RS video for this part, they share the exact sizes of their specific screen used suit. However, I looked at using those sizes but they were too small for my thighs). So, if it were me, I’d test fit the parts, as you did below, and measure the total width of the lower ridge (across both inner and outer parts, shown with horizontal green line). Once you have that total width, you can halve that measurement and apply evenly to inner and outer pieces. Now, to be safe, if (for example) you measure up and you think you need a 60mm ridge on the inner and 60mm ridge on the outer, maybe do your initial trim to 70mm and 70mm. Then tape the pieces to yourself and see how it fits. If it’s too baggy, you then have up to a further 10mm on both pieces to trim. I hope that all makes sense. Just take your time, keep sharing your updates here and we’ll do our best to help you though it. #troopershelpingtroopers1 point
-
Wow Glen this is an awesome build. Congrats. Awesome weathering brother.1 point
-
Regardless, Thanks, Kudos, Love, Thoughts, Prayers and Best Wishes to all of you that have gotten me this far. Without you, I'd look like a Minecraft StormTrooper.1 point
-
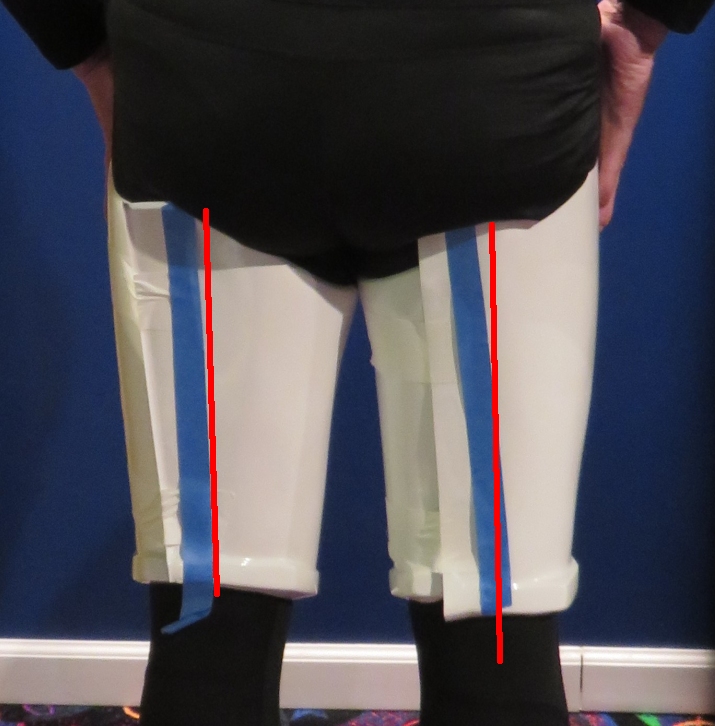
It's not rocket science Just watch the angle of the coverstrips. Here's my RS TFU thighs for comparison (note left rear is twisted)
 1 point
 -
Glen, thank you very much brother. Appreciate all of your help and encouragement and support. Thank you.1 point
-
Mario, thank you beyond words my friend. What a great day today has been for me and this just made it even better. Thank you brother.1 point
-
I feel your pain, believe me! I agree with what you said earlier that this side of things doesn’t seem to get much coverage in tutorial videos or other WIPs, I just couldn’t fathom how seemingly NO ONE else had struggled with this. If you take it super slow, and keep stopping to check and re-check you will get there eventually. I had your same lack of confidence plus the fear that I’d already screwed one set of thighs up but I got there in the end and so will you. You’ve done a fantastic job so far. I still have one of the screwed up thighs. If you like, I can do a quick video which will hopefully explain it better and PM it to you? Sent from my iPhone using Tapatalk1 point
-
Hi there, Hopefully you don’t mind me jumping in on your thread but I’m only speaking up because I also had trouble with the thighs and shins similar to you. On my build, I actually cut the thighs wrong and had to order a whole new pair [emoji2359] I neglected to make sure that there was an equal distance from the cut at the back to the edge of the knee ridge. Hopefully some pictures will explain. So this was incorrect: You can see where my cuts were and the red line where the cut should’ve been. There was so much of your experience with thighs and shins that were the same as mine, I thought best to make sure you didn’t make the same mistake. Also, making sure you get that cut at the back in the centre of that bottom ridge will help massively with getting the rear cut in line with the front one. I also had the same problem as you when cutting the shins. I found that as much as I tried to get a straight line, clamping straight edges and rulers e.t.c, as soon as I cut - the edges weren’t straight. I thought I was going crazy, I’d always have a kind of bowed effect where there seemed to be loads more excess to trim in the centre. My method was to cut 5-10mm less than I needed to (if your cut line is red, go to green) And then slowly sand from the centre on both sides with lots of stopping to offer the edges up in between. Don’t forget, you have 12mm or so grace so they don’t have to be perfect but this method got me pretty good results. Same with the thighs. Sent from my iPhone using Tapatalk1 point
-
Congratulations on your second version of this costume, well done1 point
-
Hi Ardeshir, and thank you for your Centurion application! CRL and Centurion Application Requirements: All required photos have been submitted, and on behalf of the entire D.O. staff we are pleased to welcome you to the rank of CENTURION . Congratulations! Other-Armor Fit/Assembly; In this area we review observations made by your fellow troopers and the DO team. Some observations may lead to suggestions to improve the overall look of your armour. Note that we consider both text (CRL) and pictures (screen caps/reference images) when reviewing submissions. Another great build Trooper and you did an awesome work on those fixes, congratulations Centurion !! ***************************************************1 point
-
Ok, so removed the clamps and magnets from side one of the Right forearm, took a popsickle stick and shaved off all the glue boogers and started in on Side 2. Used my last 15mm cover strip, trimmed, test fit and adhered. Clamps and magnets applied. This finishes the right forearm. Tomorrow we'll hit the Left forearm. Made a couple more 15mm cover strips. After the Left is finished all that remains is fitting thighs and shins and finally on to the elastic straps.1 point
-
If anyone is curious what my other bins are like, here are some pics: Clone Trooper - 327th Star Corps: Lights: Swag box with lights: Jedi (tubes store saber blades): Rodian mask and hands (for a Rodian Jedi): Endor Rebel Trooper (this one is just decals and weathering a green case):1 point
-
I know that this can be frustrating. We have all been there. As we explained to you on our Ohio Garrison academy Facebook page, having a member come to you to help you is not an option with the pandemic. I've scanned over your build thread, and you have been getting fantastic help here. When you have posted to our academy page, our garrison members have also provided you with pointers. So, don't give up. As has been explained above, you need to align the top edges, and then trim off the excess on the bottom, following the general curved shape needed for the bottom. Scott Bleisath TK-44140 Ohio Garrison - CO1 point
-
Done with the Biceps. Moving on to the forearms. Starting with the Right. Cover strip trimmed, clamps and magnets applied. First one on. Also trimmed the cover strip for the opposite side. Going to have to make a couple more 15mm cover strips tonight. I thought I could maybe get away with half segments for each forearm, but each side took a full segment. Added a couple days, looks like 3 more days. But the step after that is really scary. I HAVE TO get the thighs and shins cut and cover strips applied. If I cut too much, or crooked the piece is toast. Very difficult and I may need help, but with this Covid crap, nobody is available to get this fitted properly.1 point
-
did I do it right? 501st Legion - Vader's Fist1 point
-
You need to post the link to your 501st membership profile, have a look at other posts in this thread . You won't be able to start a post thete until you have access granted.1 point


.thumb.png.69856e02550a2e6d07e44a2b1bda020c.png)