Leaderboard


Popular Content
Showing content with the highest reputation on 08/17/2020 in all areas
-
I can’t believe that anyone would pay over the odds for a kit from the Mandalorian. Being brutally honest, it’s not even very well built or fitted. The topic of “oh, that makes [xyz] kit cannon” is a slippery slope. Let’s be honest, they are built to various qualities, as are the various armour suppliers. Personally, I believe that new-comers should be aspiring to replicate original, screen used suits, not copies.2 points
-
Someone on another group posted this catalogue for an auction because it had an Endor helmet, but in looking through it, there are a few other Star Wars helmets and props, including a Vader, and an original AHN stunt TK helmet that I thought should be posted here (with an interior shot): Also a full TK suit from the Madalorian: Full catalogue pdf is here, TK helmet is on Page 190, and the Star Wars suff is around there: https://content.propstore.com/auction/EMLA+LA/EMLA-LA2020_Catalog_OnlineView_B2.pdf?fbclid=IwAR17FbHEU6uevTIdV73_hg5VyPZxzuvVcxoxOsV_ye-xh_hieltXS9UbRO81 point
-
Hey all! Starting my second 501st costume and I decided to go back to the original that started it all. I've got the pieces trimmed and sanded, and am getting into sizing it down (I'm 5'7" 165#). Aiming for Centurion bc why not?? I've had my WTF BBB for about 2 years and just lately during lockdown did I start to make real progress on it. Lessons learned the hard way so far: 1. This plastic shows *everything*! Be super careful with cuts and sanding; there's no removing the evidence later. (I was spoiled by my CW ARC for having all the Bondo and paint to cover up mistakes!) 2. Cutting cover strips to width is super tedious, and straight lines are harder than they appear. Invest in clamps and magnets, and then buy double that amount. 3. CA glue and Zip Kicker are great for instant gratification, but they can wreak havoc on the finish of the plastic. 4. No matter how much research you do, you will have questions you never thought to ask. This is what the build thread is for (hopefully!) So, without further ado... I've started assembly with the left forearm. It's pinchy at the top and seems loose at the wrist. (I was cursed with narrow wrists and wide hands.) 1. Should I use and elastic closure so I can cut the wrist narrower and still allow it to stretch open to fit my hand through? 2. What do I do about the wickedly misaligned top edges? 3. The return edges at the top are super pinchy. Can I trim those down or remove them altogether? 4. Are minor sanding scuffs going to tank my Centurion status? https://imgur.com/gallery/g5Kq6uF Sent from my SM-G970U1 using Tapatalk1 point
-
[EDIT] Switching to TFA FOTK since KB Props armor is TFA and finding the TLJ parts is a little difficult. I will return to TLJ later! Hey everybody, Momo here! I'm pretty new to this community, got cadet status for the Georgia Garrison not too long ago. I have aspirations to become an FOTK someday and a few days ago I got my big start with the Big Brown Box! Ive already ordered my lexan scissors off Amazon so im waiting for them to come so I can get started on trimming these pieces but I got a lot more tools and soft goods to gather. I need to keep my eyes open for Imperial Boots to start taking orders again so I can get my boots and gloves. Everything else will come with time. This is my first stormtrooper and I'm still learning the terminology of stuff and exploring this side of costuming...but hopefully one day I can join the ranks! This is the look im going for when its all said and done. I'm still deciding on pauldron color, but red is probably what I'm going to end up with. This is the aftermath of taking everything out of the BBB. Its a lot of stuff! I'm kinda worried about stuff not fitting right but some of these pieces are enormous xD I'm only 5ft but I'm not the skinny variety so fitment will be interesting. List of stuff for my stormtrooper thus far. Most of it is not ordered yet, but its good to have an idea of where I'm going for things. Research is still ongoing! Will edit post to reflect updates on Parts List Parts List: -Hard Bits- TLJ Helmet: KB Props (Received) Armor: KB Props [Only comes in TFA] (Received) TLJ Cod: TBA TLJ Forearms: TBA TLJ Thermal Detonator: TBA TLJ Thighs: TBA Pauldron: KB Props (Received) TFA FOTK: In progress Eventually I want a voice amp and stuff but I'll worry about that after I finish the suit. Fans may be a must though. I usually just rig a CPU fan in there but I might want something a little more professional this time around. I'll probably be adding more to this list later. For now this is all, updates will be slow as I'm not trying to rush this. Dont wanna make any mistakes, I am new after all Gonna take it slow and carefully for the best result! This be exciting times!1 point
-
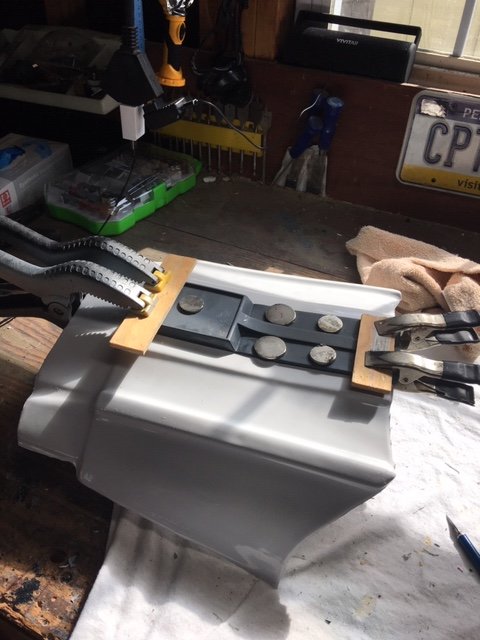
I sprayed satin white inside the barrel, which only needed a few coats. I'll apply putty tomorrow to a few more exterior spots that I noticed. In between coats, I wet sanded the belt and sides tp 400. Looks like most of it's good, except the 2 Dremel cuts near the notches. I'll apply some more putty tomorrow. Since I finished so quickly, I figured "why not start the next set of pieces early!" So I cleaned off the shoulder bells and biceps and noticed that it looks like they were scrubbed with a wire brush!? So many scratches! THIS is why @gmrhodes13 recommends spray putty, I'm sure that would've been super helpful today! I spread a bunch of putty on these pieces and scraped them thin. Hopefully wet sanding with 220 in a couple days smooths them out...1 point
-
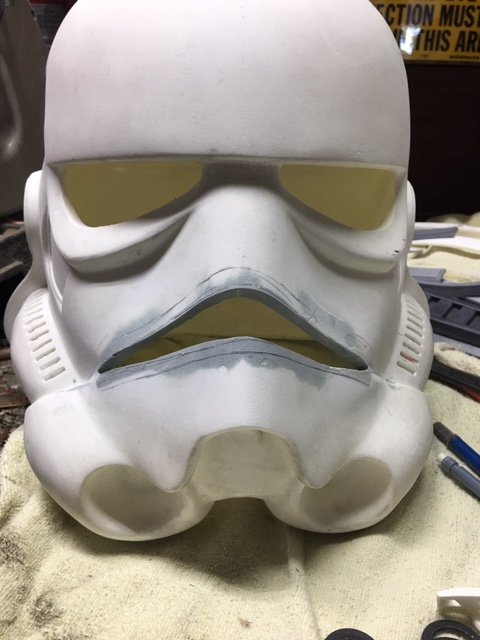
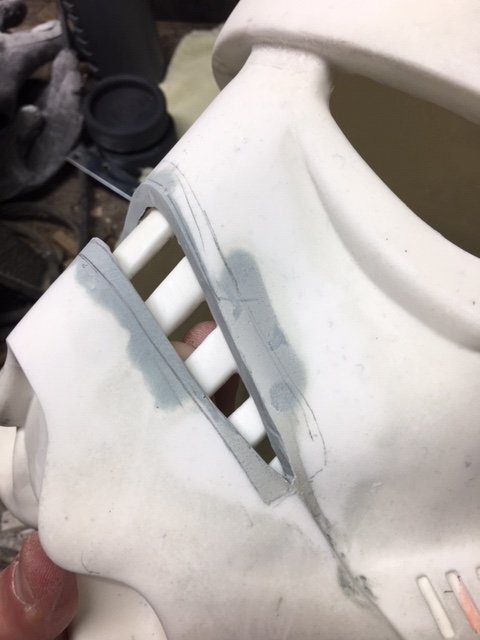
So I got all the abs trimmed, sanded and final sanded. I got all the resin pieces sanded and cleaned up. The big thing I ended up doing was buying a table top belt sander to sand down the resin bits. I can't tell you how fast that went compared to hand sanding or palm sanding. I also worked a BUNCH on the frown on the helmet. I cut it out and had to grind down inside the helmet a lot to get the frown to even look good. I sanded more and more and it just didn't look right. I kept looking at reference pics and the frown and couldn't figure out WTF I could do to make it look right and then it hit me. I need to have a thicker wall down into the frown so I backed the frown opening with tape and filled the entire thing with poly flex. After letting it sit for 2 days I sanded it down on the outside and put the frown piece over the filled in opening and traced the hole I wanted. After I did that I cut out the frown with a dremel cutting disk. I sanded down the inside piece with fine sandpaper. I held the frown piece in the opening and it still didn't look right. I'm looking at the movie helmet and comparing and the frown just sits too far down and in the hole. I'm not sure if the frown piece provided is suppose to sit behind the opening made in the helmet OR if you are suppose to cut out an even bigger opening and glue/sand in the frown. So I had an idea to sand down the frown piece so the teeth sit almost flush with the opening inside. I sanded about 50% away and it was still too deep. I ended up taking almost all the top of the teeth part away with the belt sander. As you can see the teeth sit almost as they do in the movie helmets. I almost wish I could get just the teeth pieces and glue them in. I might try to figure that out later but for now I am happy. Lots of work to get it right. It's important to point out here that no one makes perfect armor and bits. You've go to "figure things out" to make things work sometimes and especially when a Maker makes new armor. I think this frown piece is the trickest part on HSP's armor so far. I'm overall happy with everything HSP has provided with this kit. I also started gluing resin pieces. I glued the OII piece into the backplate and the first strip on the ab section. When I glue resin to ABS I rough up the abs section. I also use 5 Minute epoxy. If I end up having problems with them staying I'll screw small screws from behind the ABS pieces into the resin. I've done that on my Shoretrooper and Mudtrooper and it works.

 1 point
 -
Allrighty thank you1 point
-
I second Lou’s pointer towards AJ’s build thread. If you can’t find it, I have a link to it in my All-In-One Resource thread, below. I would link to AJ’s thread directly, but I don’t have access to it at this time. Additionally, AJ’s thread is so great that I actually created a printable PDF of it, which can also be downloaded and viewed on a tablet. https://www.whitearmor.net/forum/topic/49412-all-in-one-tk-anh-stunt-index-of-resources-by-maskedvengeance/ Sent from my iPhone using Tapatalk1 point
-
Super! Looking forward to seeing more!1 point
-
1 point
-
It was only a matter of time before one of those lucky enough to have been part of the Mandalorian, would see dollar signs and decide to cash in. Me personally, I would have tried to get as many as possible to sign the armour and keep it as a memento of a truly once in a lifetime experience.1 point
-
This is the video I watched that made me curious about flexible filament https://youtu.be/96mIEBRZvNY Rigid, yet flexible. Of course it's out of stock, but I definitely intend on picking some up once it comes back. The only issue with the flexible stuff is it's difficult to smooth and paint. If I'm able to get some, I'll try it out and post some pics. Ok, So Akira-Yuming came through again. I asked if they would take a swing at altering the file for their ROTK Bucket. Specifically, I asked if they could remove the vocoder, and remove the filling of the teeth, tubes, traps and tears. Their response at 11:57 P.M. last night was "This is more troublesome, I will try it, it will take some time." At 8:42 A.M. the responded with this: And with my separate vocoder file the sliced helmet looks like this: I'm so excited to print this out. The helmet before the alterations was essentially the same as the one I previously made, which I loved up until I destroyed it. However, with the changes, I feel the helmet will be at another level. I was so happy with their work, I bought their Phase 2 Clone Armor as well. I'll try to post more progress updates later.1 point
-
I have to agree with Joseph here. From what I can see he has consent to print the files. So long as he doesn't remove the watermark and resell them it shouldn't matter what material they're made from of as a finished product. Bishop has shown no desire to resell them so it's safe to say they are for his own personal use.1 point
-
Hi, Here is my 5 minute fix and my additional picture, thanks for the reply. I can provide more pictures as I'll wear it for some pictures later. Thanks, Alex
 1 point
 -
Ooo, and regarding the coverstrips question, I recently did a video about that very topic. :-)1 point
-
I think you’ll find that many Troopers are turned off by anything from SDS due to the conflict with LFL. I might suggest you look into Hellhounds Props for a rubber E-11, which is similar to the old Hyperfirms or the more current Praetorians. I have a review of a comparison between all of them linked in my signature. Hope this helps! Sent from my iPhone using Tapatalk1 point
-
Got my lexan scissors recently, thought i'd get to work on trimming some ABS. Got more soft goods on the way as well! Cant wait till they get here! First thing I did was cut out this chest vent with a dremel. Seemed easy enough. Thank god I didnt have to do the other method of cutting it out and inserting a resin piece like I've seen some people do on here. The pill boxes I'm gonna need to find a drill bit or something to go on my dremel to cut those out. I'll see whats in the dremel box but I know I'm missing a couple pieces... I decided to test fitment of back piece and yoke together and trim out the middle of the yoke like i've seen a lot of people do. It wasnt an option not to, there was no way my bust was fitting in there without cutting the middle lol I think the fitment of front to back is pretty good. I'm still deciding how to cut the opening for the arms though. They cant stay the way there are for sure, the chest piece ends up riding up too high and if I wear a helmet it will end up resting on the shoulders which is no bueno. This is how im planning to trim it so far from the build threads I've looked at. Any thoughts or adjustments? Excuse my totally unapprovable ninja turtles FOTK helm But I currently cant see out of my TLJ helm so this will have to do for now to get an idea how it looks. I already feel like when I get to the ab plate its gonna have to be cut almost in half cause its so long on me. I also feel like cutting off more of the yoke in the front, like the part that goes under my arms. Something similar to this. Would make putting it on ALOT easier too. Being short was a challenge already, but I'm not the skinniest of short people right now D: I'm working on that too! Dieting and walks, with some biking. Hopefully in a few months this stuff will fit better! Till then, more trimming...1 point
-
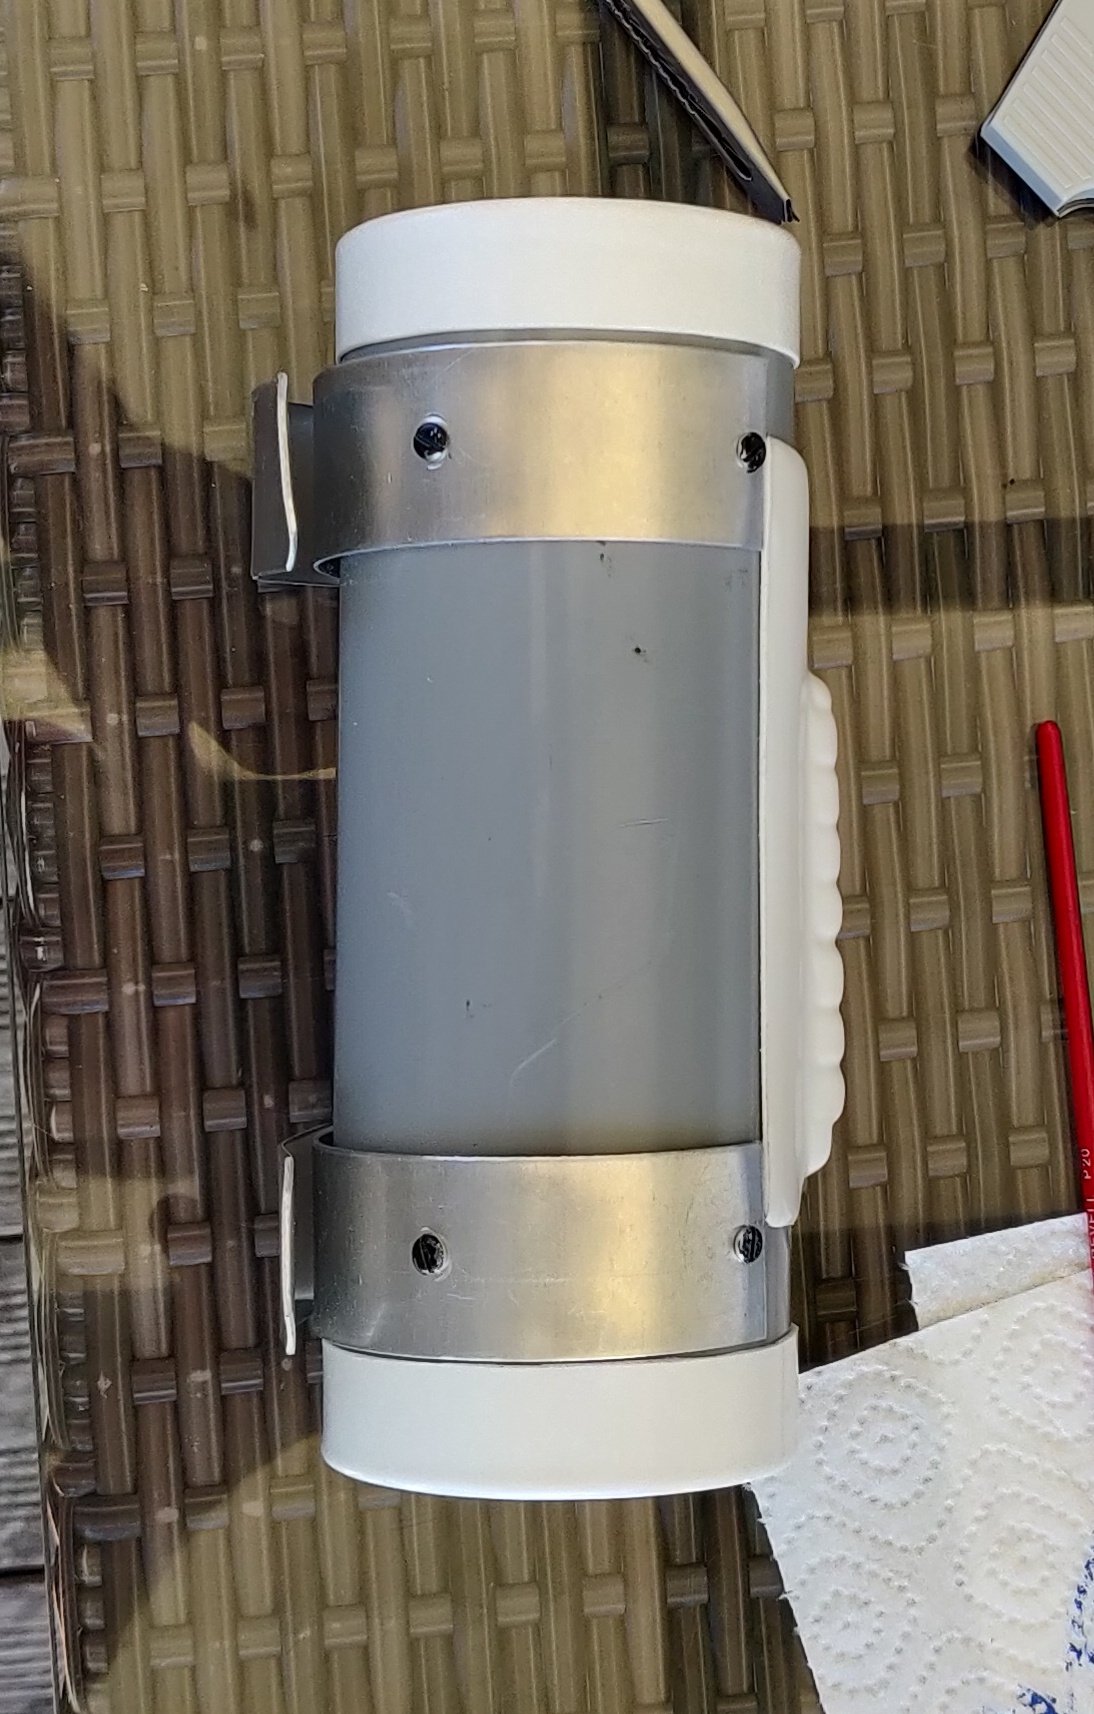
I've used mine for air travel but it's just a bit too big for transport to some of our smaller troops and for up stairs so I use a suit case and helmet bag most of the time.1 point
-
So as I was doing my research I stumbled upon this thread from a few years back and this storage case is awesome! I decided I had to have it so I ran down to Home Depot to go get it! It sure is a lot bigger in person, I was starting to get worried it wouldnt fit in my back seat when I realized the trunk was gonna be a no go. But crisis averted! I'm definitely painting this thing white and pimping it out later on. I went ahead and moved all my armor pieces out of the BBB and into here. Much more spacious, though I still dont feel comfortable shoving my helmet in there. I also got my hands on some E6000 and ordered zap-a-gap off amazon as well as my boots and gloves from Imperial Boots. Starting to accumulate a bunch of stuff, though, still waiting for my lexan scissors... The wait and research continues!1 point
-
The SS Momo has set sail!1 point
-
Greetings Troopers! With this thread being one of my top builds for referencing I thought I would compile it into a downloadable/printable PDF document. The Table of Contents is clickable—scrolling the document straight to the selected section—at least on a computer, and each main thread entry has a URL link straight back to the web posting. Also included are AJ's Pre-Approval, EI, and Centurion submissions, so the full scope of his armor build process could be documented and seen in one place. I've already shared the PDF file with AJ, but below is the link for all of you to have. AJ's O.F. AM TK Build https://drive.google.com/file/d/1kXZnv64H9fERK9rwoCWrDxKVy_71ovbU/view?usp=sharing Bonus! For my All-In-One TK reference thread I had also created a PDF document of AJ's reinforced shoulder bridge thread, which is linked below. I hope some of you will find AJ's threads as helpful as I have, and that these documents will add additional value to his work! AJ's Reinforced Shoulder Bridges https://drive.google.com/file/d/1GgREnqxtqXmQ_QsZJmK2C_6tD16Nro4y/view?usp=sharing1 point
-
Tube Stripes, frown and tear/trap stripes. One note with the tube stripe stencils. I let the paint dry and the edges were peeling up when I was trying to remove it. I was able to carefully cut the stencil from the paint with an exacto knife. I still had to put tape down and touch up the edges and then clean up with a toothpick and mineral spirits. In hindsight it would be easier to try and peel the stencils while the paint is still wet. Either way I think it turned out ok.1 point
-
For everyone with a Husky armor box..., lets make a more usable workspace. This build will explain how to easily add shelving to your armor box, giving you more staging room when you’re suiting up for a troop. First let’s start by removing the 2 plugs on the opposite side of the handle. Same location, opposite side, of where the handle slides into the box, there are 2 plugs that need to be removed. From the underside of the ledge, push the locking-foot up and start working the plug out. For me one plug just popped out and the other was very difficult to remove. To make it easier, you can drill a screw into the face of the plug, then clamp vice-grips to the screw, making it easier to pull the plug out. Don’t forget to push the locking-foot up. Removed? Great! Next you’ll need 2 each, 1/2” pvc 90s and some 1/2” pvc pipe. 1 piece roughly 19” long and 2 pieces roughly 15” long. Leave the lengths a hair long just to make sure you get the best fit. You can trim them down as needed. The 19” piece of pipe is your center and the 15” pieces are the legs. Connect the pipe with the 90s to make a U. Now take your U of pvc and slip each leg into the Box where you removed the plugs. Take your Tote that came with the Box and set it in the pvc U and mark the pipe, near the Box, so you know what the maximum distance the pipe needs to be extended to hold the Tote. As long as you’re happy with the fit, go ahead and glue that pipe to the 90s to make your U solid. To hold the U in place while in travel I used a Velcro cord wrap. I drilled 3 small holes side-by-side and trimmed between the holes to shape a slot. Then I feed the Velcro strap through the slot and secure the U. NOTE - Do not use the U, secured or extended, as a handle to lift your box. Lid shelf frame - You’ll need some 3/16” steel rod which should be available at any hardware store. I bought 36” lengths for my small shelf frame. Measure the distance apart of the eye ports on the underside of the lid. Mine measured about 12” apart. That will be the width of your shelf. Next decide the depth of your shelf. I went with 10”. Now take your 3/16” steel rod and measure the depth first (again, mine was 10”). Bend there 90 degrees. From that bend measure the width (again, mine was 12”). Bend another 90 degrees making a U. Now the last leg will be to long and will need to be cut. Hacksaw, bolt cutters or I used a copper pipe wheel cutter. Cut the last leg the same length as the first leg. WARNING - CUT EDGES ARE SHARP! Use a file, grinder, stone or concrete to round off and smooth out the cut edges. Take your steel rod U and test fit it to your lid. If it’s angled up to high, remove the U and bend the last inch or so of each leg down a little, then reinstall. Repeat until you get the angle you like. Like magic, you made a shelf frame. Repeat to make an additional shelf frame if needed. Next you need a shelf platform for your pvc U and your steel U. I used fabric for mine. Basically you’ll need a piece like a pillowcase that will slip over the frame you made. With that said, it’s possible a pillowcase might work for the pvc U. But an even easier option would be a tee shirt ab section. Take an old tee shirt you don’t mind cutting up, see if the opening securely slides on the pvc. If so, trim it down, cutting straight across from armpit to armpit. For the steel shelf frame find yourself an infants tee shirt and do the same thing. You can always make your own if you, or someone you know, is handy with a sewing machine. That’s it! Now you have more room to set out and access your armor for a troop. Upon closing up your Box, pack up your armor, return your Tote to its position, remove the fabric platforms and toss them in the Tote. Next remove the steel frame U and turn it legs-down, over your Tote, against one of the inside walls, it will just hang there. Slide in the pvc U and secure it with the Velcro. Happy Trooping!1 point