Leaderboard


Popular Content
Showing content with the highest reputation on 08/04/2020 in Posts
-
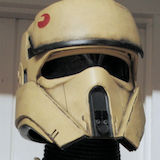
Okay, let's talk SPATS. I mentioned earlier that I was working on assembling the spats, and now I can safely say that I am done! Here's my own take on these: First, I had to cut the file so the back seam and buckle part could be completely detached from the front part of the spat and still remain in one piece. A little time in Meshmixer took care of this easily. Next, I had to figure out how to attach the spat together, allow it to open, and still remain fixed to the shin. I read recently that the screen used suits closed using a snap popper and velcro, and the front half was attached to the shin with VHB tape. I decided to emulate this with some changes. If you've followed my magnetic shin mods for my TK builds, you can guess that it didn't take much for me to realize that a magnet would work perfectly in this application instead of a snap. I had an assortment of N52 magnets on hand, so I picked out something small that would fit nicely and still remain hidden. Here you can see the hole I drilled for the magnet. I made sure that the magnet would fit through the hole without any issues. It's a go! Next I made a few magnet buttons (one for each spat). I cleaned off the extra E6000 later. While the glue cured on the buttons, I made a mark for where the opposing magnet needed to be glued on the outer part of the spat. Here you can see the pencil mark where the opposite magnet will go. I used some blue tape to make sure that the spat was lined up well, then glued the magnet on the outer half of the spat. Here you can see how it fits inside the hole. And how it looks when it is open. I made sure to clean up the excess glue from around the magnet to ensure a tight closure. Here are the magnet buttons fully cured. I trimmed the extra plastic around them to make sure they fit nicely in the inner part of the spat. Inside button glued in place. Outside view so you can see how tightly the closure connects. Additional view of the installed magnets. The magnets stay locked with the magnetic attraction and the physical lock of the opposite magnet being seated inside the hole of the spat. Additional views: Next I took some VHB tape I had on hand to attach the spat to the shin. I stuck some leftover Velcro tape vellum to on the tape to make the VHB tape easier to work with while trimming. Stuck on. This is just a temporary test fit for now, which is why the segment is short. I then attached loop velcro to the spat and sewed some elastics with hook velcro for closures. Spat stuck on and it looks good to me! Back view of the half-assembled spat. The boots I bought for Cameron didn't work out (not at all like in the pics in the eBay listing!), so I picked up some leather-like Vans that will work well for him. I still need to paint the bottoms rubber black. I had Cameron try on the shoes and shin with the spat in place. Here you can see how the spat fits. The spat is only attached to the shin at the front, allowing flex of the two halves for the foot to go in the shin part. You can see the flap of elastic and velcro on the right. That will secure the spat and allow for a little flex if needed. The elastic flap allows for a hinge-type closure, with the magnet locking the halves together. Closed and easily locks. Magnets FTW! All together now! Ideally, I should have left the VHB tape alone for several hours before attempting to mess with it. I found it came off pretty easily once we removed the shin. This might also be because the 2K gloss is really slick stuff, and I think most tape adhesives would have a tough time sticking on it. I think a good solution to adhere the front of the spat to the shin would be to simply glue it there with E6000 and let it cure for a few days. That will be my next step for these. Overall, I'm pretty happy with my spat solution now. I'm still adjusting strapping and gaskets, so work now can proceed on other areas to take me to the finish line.5 points
-
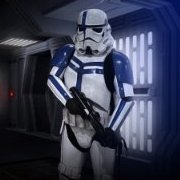
I have. I've been selling it with my Shoretrooper rigging kit for about a year. This is a picture of my Shoretrooper armour with the brown/black elastic on it.4 points
-
Wet sanded all the putty to 220 today. Most of it went fine, except the oval spot had a few pinholes. Filled them up and set it all aside. Tomorrow I plan on spraying satin white inside the chest/back/straps. Then wait 3 days and spray gloss white outside! A few days after that and I can velcro them together!! I also marked on the barrel where I can trim to make it more narrow (but I rounded down, since I can always trim more off if needed), and on the back of the belt to make it even with the front.3 points
-
Hard to say for sure because our time in those two episodes was split over three days and we moved around quite a bit. I THINKKKK in that shot, I'm this guy? I remember having to step out of the way when Giancarlo walked up, then filled back in behind him. And honestly, I think it's good that I have such a hard time picking myself out. The troopers that stuck out usually weren't for good reasons - we should all just blend and look the same in armor! I know for sure that's me in the balaclava on the right in Episode 3 tho3 points
-
Absolutely clear. After viewing my photos, that was my judgement as well. I’m happy to have confirmation on that.2 points
-
For those that just need to know2 points
-
Hi fellow 501st Legion members, After nearly 3 years of development and refinement of the hardware and the code, I'm happy to announce that the currently most advanced blaster firmware FX-BlasterOS (previously known as Proto Blaster Platform) goes open-source, freely downloadable for anyone. To get an impression of the features you can implement now for free, look at the Intro Video on YouTube. For Easter Eggs, make sure you watch it till the end : FX-BlasterOS Intro Video With the software going open-source, you have multiple choices too to build your blaster electronics: Tier1: if you want a high-quality, proven solution which optimally supports all features of FX-BlasterOS, follow the below link: You advantage: - proven, tested - small enough to fit into any blaster - you can charge your Li-Ion battery over USB - comes with extensive power saving options for a sleep mode which can sustain your prop for several months on the shelf - comes already pre-installed with full version of FX-BlasterOS Tier2: you can stick together your own electronics from cheap parts, look how easy it is using Arduino boards and breakouts (see also the Shoping list below for details): To ease programming for those who are not (yet) familier with Arduino, there are detailed working instructions how to do it on the Wiki Page of the Git. In case of anz trouble of technical support request, use the Issue tab of the Git. There is also the possibility to source a carrier board for the cheap components, hugely simplifying the task of soldering and making the electronics more reliable. You can use skyone's excellent rider board which can be used with components compatible with FX-BlasterOS. https://www.whitearmor.net/forum/topic/19322-arduino-a-cheap-board-for-e11-blaster-effects/?do=findComment&comment=646230 Shopping List Here is also a shopping list for you of components you will need: Arduino Board: Arduino Nano (actually any Atmega328P based board, wiring examples will be shown for the Nano): ebay search term: Arduino Nano v3 https://www.ebay.de/itm/Nano-V3-0-ATmega-328-Board-CH340-USB-Chip-Arduino-Kompatibel/252742123829?hash=item3ad89ac135:g:xCEAAOSwPGtb33e0:rk:1:pf:0 DFPlayer Mini: ebay search term: "DFPlayer mini". Please ask the seller if the module comes with the original manufacturer's YX5200-24SS or YX6300-24SS chipset. You will also want to have a 470 Ohm thru hole resistor to connect the D8 of the Nano to the RX of the DFPlayer. https://www.ebay.de/itm/TF-Card-U-Disk-Mini-MP3-Player-Audio-Voice-Modul-Arduino-DFPlayer-Tafel-AIP/153290978607?hash=item23b0dab52f:g:uewAAOSwP6pbtdXJ:rk:1:pf:0 Speaker: recommended are OD: 20mm or 28mm Impedance: 8Ohm Power: 1W to 2W ebay search term: "20mm 2W 8Ohm speaker" Examples: https://www.ebay.de/itm/2pc-Audio-Speaker-20mm-8Ohm-8-2W-Stereo-Woofer-Trumpet-Horn-Loudspeaker-Power/162171125788?hash=item25c227001c:g:WRgAAOSwMtxXsvaV:rk:1:pf:0 https://www.ebay.de/itm/28mm-8-Ohm-2W-Round-Speaker-For-DCC-Sound-Like-Loksound-Hornby-Bachmann-Zimo/263578226658?hash=item3d5e7c8fe2:g:BToAAOSwm-Zavo6p:rk:2:pf:0 Neopixel Sticks (for PLI/Status bar): ebay search term: "WS2812 stick" https://www.ebay.de/itm/Adafruit-NeoPixel-Stick-8-x-WS2812-5050-RGB-LED-Strip-Driver-for-Arduino-r3/272010992457?hash=item3f551e5b49:g:7YMAAOSw7aBVBxRo:rk:7:pf:0 Important: type shall be WS2812/WS2812B 5050 RGB (not RGBW!!!) or sk6218 3535 RGB (not RGBW!!!) Single neopixel on round PCB (for nozzle light): ebay search term: "neopixel flora" https://www.ebay.de/itm/Adafruit-Flora-RGB-Smart-NeoPixel-version-2-Pack-of-4-ADA1260/231237003534?epid=1028248696&hash=item35d6cca90e:g:LGoAAOSwNC5ZezSY:rk:6:pf:0 The original design is from Adafruit, please support the development by purchasing Adafruit products. You can also find similar offers on eBay from cheaper sources as well. Neopixel stripes (for barrel ligting): ebay search term: "WS2812 stripe" https://www.ebay.de/itm/5m-30-60-144-RGB-LED-Streifen-Stripe-mit-WS2812B-5050-SMD-LEDs-WS2812-Versand-DE/222192610445?hash=item33bbb62c8d:m:mR_Pz7NGzDUQhwH1s-6BFvg:rk:1:pf:0 Important: type shall be WS2812/WS2812B 5050 RGB (not RGBW!!!) or sk6218 3535 RGB (not RGBW!!!). As most blaster props are black it is recommended to buy a non-waterproof, 60LED/m type of pixel stripe. The striper are soldered together every 0.5m, but you can shorten the stripes easily to any lenght using scrissors, cutting the stripe at the copper landings. Momentary Switch: ebay search term: "momentary switch" or "tactile switch" You will need a single momentary (not latching!!!) swicth for the MK1, MK2 and MK3 builds, two for MK4 and MK5. For the trigger it is recommended to use a switch with a long arm like this one: https://www.ebay.de/itm/Mikroschalter-Mikrotaster-mit-langem-Hebel-250V-3A-125V-5A-S67/330793297018?epid=1154680769&hash=item4d04d1247a:g:8EgAAMXQlrxRcPJ9:rk:1:pf:0 For the mode select, aux. switch you can take the momentary switch of your choice, they come in an infinite variety, take the one which suits your needs. I myself like these small ones: https://www.ebay.de/itm/6mm-x-6mm-Tactile-Push-Button-Switch-Micro-Momentary-Tact-Assortment-Kit-TE948/283285172378?hash=item41f51cb09a:g:SjoAAOSwo-VcAmNI:rk:9:pf:0 OLED Display with 128x32 resolution with I2C interface: ebay search term: "OLED 128*32" I2C" https://www.ebay.de/itm/0-91-128x32-IIC-I2C-Blue-OLED-Display-DIY-Module-DC3-3V-5V-128-32-Arduino/322536659354?hash=item4b18aed99a:g:ag8AAOSwK6RZLbR9:rk:5:pf:0 or for the scope a smaller one of type "OLED 64x48 I2C" https://www.ebay.de/itm/4pin-White-0-66-Screen-IIC-I2C-0-66in-OLED-Display-Module-64x48-for-AVR-STM32/272861748083?ssPageName=STRK%3AMEBIDX%3AIT&_trksid=p2057872.m2749.l2649 Connectors for switches, speaker etc.: ebay search term: "micro JST 2-pin" For 2-wire connections like for switches, speaker, I recommend micro JST connectors with 1.25mm pitch: https://www.ebay.de/itm/5-Paar-2Pin-1-25-1-25mm-1-25mm-GH-Micro-JST-Stecker-Buchse-10cm-28AWG-Kabel-RC/172626910637?hash=item28315d9dad:g:XHsAAOSwux5YTaEB:rk:3:pf:0 2.1mm recharge port: https://www.ebay.de/itm/DC-Einbaubuchse-Stift-2-1-mm-geschlossene-Bauart-Lotanschlus-fur-Hohlstecker/141127499530?hash=item20dbdabf0a:g:4mIAAOSww~xZ1KXj:rk:9:pf:0 Micro- and/or Mini-USB breakout boards: ebay search term: "micro USB breakout" or "mini USB breakout" https://www.ebay.de/itm/Micro-USB-Platine-Adapter-fur-Breadboard-DIP-DIL-Breakout-Board-Arduino/183233499430?hash=item2aa9915126:g:kywAAOSwm8NbAIfU:rk:6:pf:0 https://www.ebay.de/itm/Adafruit-USB-Mini-B-Breakout-Board/272373312981?epid=1663565126&hash=item3f6ab6edd5:g:8BYAAOSwIIFbML51:rk:3:pf:01 point
-
Well, now you can call that whole costume "screen used" [emoji6]1 point
-
Thank you for adding those extra photos Justin even thought we can actually see some aspects from a general photo, It's better to have the detail close image for registry, suggestions ,future references , and for my old eyes . For the TD clips , they are not a L3 blocker, you will see it just as suggestion. Cheers1 point
-
Thank you! You know, I literally took those extra photos and was like "Nahhh, I won't need em... You can see it's glued..." hahaha Added the above! I appreciate the keen eye and suggestions! Thank you!1 point
-
Keep up the good work Shawn1 point
-
The settings menu - we call it config - can be reached by pressing the trigger/activation switch in Idle Mode (i.e. the blaster is not activated yet) until your hear "Config Mode". So it's all in the code and every key facet of the system can be configured in that menu. As to your troubles with the buzzing speaker, it is well known if you do not hook up a battery or the battery is weak/discharged. Reason is simple: the audio amp is quite powerful and if not enough current is available (and USB alone will not be able to supply enough), the board will go to undervoltage and reset, hence the buzzing.1 point
-
Looks fantastic Justin, good luck.1 point
-
It's certainly worth future consideration, although one might have to worry about dirt and grime building up on the clear parts over time. I've also had to tear parts apart and glue them together due to bad layer lines, probably due to some extruder clogging. Overall, the epoxy joints seem to be stronger than layer lines. One thing I kept in mind was the "grain" of the print. most of the outer barrel was printed vertically, and the inner barrels printed horizontally, in order to "cross the grains" and further increase strength in the barrel especially. Overall, I'm considering doing a light resin coat on the outside before sanding, priming, and painting. Epoxy's an option but I would have to whip up a lot of small batches and apply it as evenly as possible to avoid pooling, which might be tricky and sticky. I'm currently researching spray-on solutions as I finish initial building.1 point
-
I find that with a lot of 3D parts not having the strength. A fellow member who printed a few DLT19's ended up hollowing the barrel in places and using a clear acrylic tube inside just to help with strength, but wasn't cheap.1 point
-
Hi all I decided to follow the RS Props method for the right thigh cover strip, which is to make it pretty much all the way to the top of the taller outer thigh piece. This means no sculpting of either the cover strip itself or the thigh pieces. I have now glued on the right thigh cover strip and am waiting for it to dry: In the meantime I did the first trim of the shin pieces - only one set shown as they're identical in the RS kit - does this look okay? Thanks Adam.1 point
-
I added additional photos above. I think the Cardinal Red is going to be the way to go.1 point
-
There will also be a special piece I've been putting together for use in the newsletter for when we reach 10001 point
-
Finished my tk today, so I'll do my approval pics the next day, maybe I'll catch up1 point
-
Awesome. I am glad they are going with the TFA helmet. Going to get the action figure now. Sent from my iPhone using Tapatalk1 point
-
For those interested appears we made 500 in September 2015 And number 500 was1 point
-
This build looks just amazing!1 point
-
The FX-BlasterOS story goes on. I've been working on a full feature firmware including improved scope and status bar OLED display animation, idle mode status bar LED animation and for those facing droid problems, the new electrocute droid killer FX:1 point