Leaderboard


Popular Content
Showing content with the highest reputation on 04/07/2020 in all areas
-
Well done, Roy! :-) Great review, Sha Sha. :-)2 points
-
Hi Roy, I appreciate your patience. Thanks so much for the quick turnaround with the fixes! I do agree with Joseph that your bucket does look better without that top padding. Hopefully you can still see! CRL and EIB Application Requirements All required photos are now in and, after review, we are pleased to welcome you to Expert Infantry rank. On behalf of Joseph and myself, many congratulations! Other-Armor Fit/Assembly In this area we review observations made by your fellow troopers and the DO team. Some observations may lead to suggestions to improve the overall look of your armor. Note that we consider both text (CRL) and pictures (screen caps/reference images) when reviewing submissions FIrst, it appears you're using white nylon strapping to connect your chest and back. That is totally fine, but we do know that the screen used suits used white elastic, so if you're going for that next level of accuracy, you could consider swapping it out. Reference Image: Continuing on, a couple dressing issues. First, it appears your left bicep is riding just a touch too high. Ideally we like to see symmetry and evenness in the gaps between armor, so it might be a simple dressing issue, or you might need to adjust the strapping a bit. Reference Images: Onto your belt, a lot of troopers prefer the weathered look which is absolutely fine, but we're suggesting you give your belt a bit of a haircut to trim off some of the extra threads. Reference Image: Next, the screws on the end of the TD clips should ideally be closer to the end of the clips. Obviously this would require you to replace your TD clips so it's merely a suggestion for those who want to go the extra mile. Reference Image: Moving along, the left part of your butt plate appears to have popped above your kidney. I'm not sure if it's a dressing issue or something that would require a strapping adjustment, but that's something you'll want to keep an eye out for. I have also heard folks adding small ABS tabs to their butt plates to ensure they stay tucked under the kidney. Reference Images: Next, an extremely minor detail, but it really makes everything look super clean if you make sure your cover strips are aligned. You can see your calf pieces are a bit off kilter. So next time you're out at a troop (and we all hope that we'll be able to troop again sooner rather than later), have a handler give you a once over just to be sure everything is lined up. Finally, another super minor issue with your left calf closure. That's one of those areas that's impossible to see yourself once you're suited up, so again just have a handler take a look for you and make any necessary adjustments. Centurion Requirements In this section we prepare you for Centurion. More photos may be requested in the future that allow us to make better decisions on possible adjustments. If there are any areas of concern they will be discussed here. Because Centurion photos show much more detail than EIB, items to pertaining to Centurion might be seen there and not here. We try to point out all that we can from what is seen, but the final accuracy is the responsibility of the trooper. The L3 CRL states: Ideally there is no gap between the abdomen and kidney armor. Your right side gap looks fantastic, but we'd like you to try to eliminate more of the gap on the left side. This could just be a dressing issue, or you may need to tighten the strapping between the left side of your ab and kidney. I personally use nylon strapping (vs elastic) on my left side to try to prevent any gap from emerging. Reference Image: Next, the L3 CRL states: The top of the ABS ammo belt should sit at or just above the bottom of the central and vertical abdomen button panels. Your belt positioning is pretty good, but should be brought up just a tad. You'll see in the reference images that many troopers actually have the plastic part of the belt slightly overlapping the bottom ab buttons. On my own kit I added two small strips of velcro to my ab armor to keep the belt from sagging. Reference Images: Continuing with the belt, the L3 CRL states: Drop boxes are vertically aligned with the end of the ammo belt with minimal gap between belt and box. It may just be the camera angle, but it appears your drop boxes have a bit o fa tendency to wander. Most troopers add a bit of glue to the drop box elastic to help keep it in place on the belt. Reference Image: Next, the L3 CRL states: Ab button paint shall not extend beyond the bottom of the actual raised button. It's a bit hard to tell, but I believe you'll need to make some small adjustments to your ab button paint. If you take a look at the reference photos, you'll see that the ab buttons are actually a but underpainted. It shouldn't be more than a bit of time with a toothpick or cotton swap and some paint thinner or mineral spirits. Reference Images: And that's it! A few required changes for Centurion, but we have full confidence in your ability to tackle them. Congratulations again, and we'll see you at Centurion! Stay safe.2 points
-
Hi, new member here:) I've been dreaming of having a stormtrooper armour and joining the 501. for years now, and at age 20 I feel like my body is finally done growing, thus it makes sense to start working on that armor. I've read through a lot of the pages on this forum during the last couple of days, so that I am at least somewhat informed about what I'm going for. That being an ANH stunt, clearly the most classical choice. I'll defininitely be looking towards centurion in the long run, but for this year I'll be perfectly happy with achieving Level 1 in late summer/fall. Now I've been looking at the various armours from your most helpful "vetted makers" list. I think for me it's going to be though decision between ATA and (if I'm really willing to afford it) TM, or maybe RWA as compromise if he can beat the price of TM. I'd like my armour to be really smooth and glossy, without any bumps or warts. Are there any differences regarding this aspect, between those 3 makers?1 point
-
Hello my fellow Stormtroopers. I am attaching a bunch of pictures for your input. I looked on different threads and tried to get the important points on my armor that might need to be fixed before I submit my photographs for the EIB approval process. I look forward to your feedback and all of your helpful hints. Thank you!! FULL ARMOR: TORSO: HELMET: SHOULDERS, ARMS, AND HANDS: LEGS AND FEET: BELT, HOLSTER, BLASTER, AND DETONATOR: JUST FOR FUN: I am 5'2", my son is 5'9", and my daughter is 5'3". I look like a mannequin that they are adjusting. Thank you for your time and patience!1 point
-
Congratulations Tyrone, Welcome to the ranks!1 point
-
Thanks for the warm welcome, troopers! I'll let you all know once I've decided, and then start a buil thread eventually1 point
-
Thanks CableGuy. I have a big butt so I think I’ll keep the butt plate as is. It keeps it all in and I Don’t want to scare anyone the thigh ammo belt will be trimmed today. I left it up to now as one of the reference photos I saw showed it sticking out past the rear edge so I thought I was good. I like to suggestion about the back plate. Will trim the sides of that down as well.1 point
-
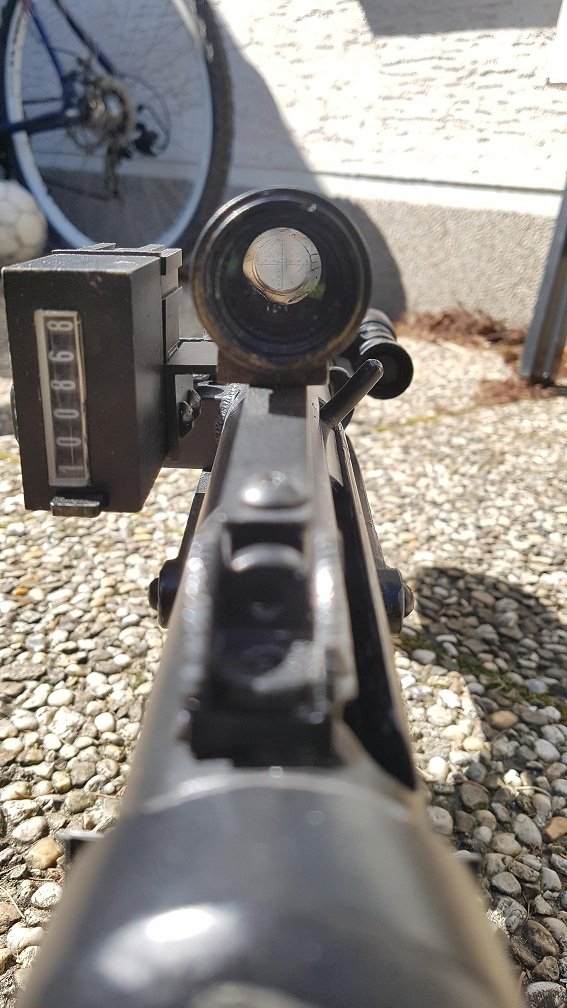
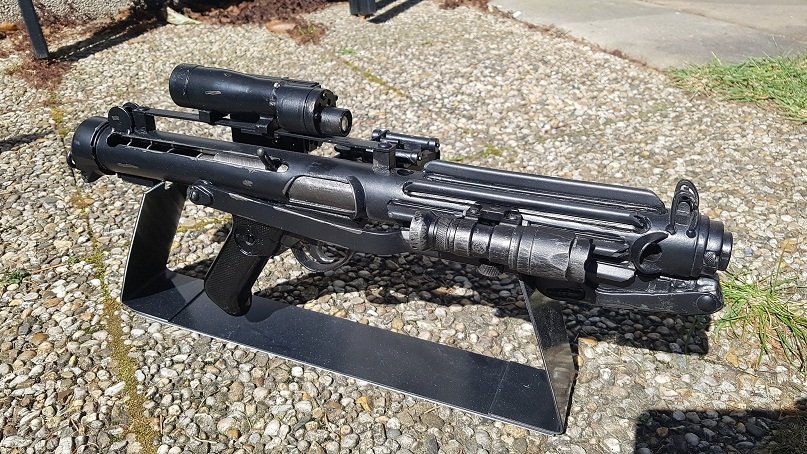
The tactical light is the main feature to identify a Rogue One blaster. Glad to hear you have it now and completed this build. Oh, and the view through the scope is fantastic!1 point
-
Hi Diana, Great to see you're going for higher levels, that's the attitude! overall you looks good in your armor, well done I would like to give you a couple of suggestion from my view for EIB Level, Centurion level would requiere some more adjustments : :As the crl states for basic level : 1- Frown is painted gray and does not leave the teeth area. A total of 8 cut outs in the teeth area of the frown are present. You may want to add some a gray paint to the extremes and remove some from the edges , take a look to the reference photos included. 2- Vocoder (vertically ribbed chin detail) is painted black. you may want to reshape your vocoder as the reference photos, just a few minutes with and toothpick and mineral spirits can be usefull. 3- Thermal detonator belt clips are positioned with little to no gap between the clips and the end caps. You would like to adjust your TD clips as the references Cheers1 point
-
Another try-on. This time I didn’t lose power in the middle of it! Lol Still got some trimming to do (cod is still way too big) and still waiting on my blaster holster ordered from @R2Dan. Then another fitting and hopefully finish adding greeblies and painting. So far tho...
 1 point
 -
It really depends on you as the S&t e11 still needs work doing to it T tracks and the counter and scope or the s&t stirling as your need to buy all the parts it really depends on what level of Accuracy you’re looking for if your looking at resin parts for the T tracks,scope,counter and power cylinders or the real deal I personally got the sterling and got the parts and made it my own Sent from my iPad using Tapatalk1 point
-
I've already taken care of the cover strips on my calves. Spent some time fixing up my previous paint job on my helmet as well. I think it is a big improvement over what I had before! http:// http://1 point
-
How to attach flexible hand guards to rubber gloves For those aiming for Expert Infantry/Centurion level or just screen accuracy, the flexible hand guards will be need to be attached to your rubber (chemical style) gloves. Many folks have asked me the best way to do this, so here is my preferred method. Note that I am using the silicone guards that I make which have a heavy-duty cloth backing in order for glue to adhere to, but this should work for most other types including ones made from natural latex. ****Instructions for Nomex gloves at bottom Supplies needed: 1. E-6000 glue- I highly recommend using this product instead of CA (super) glue or epoxy, both of which can (and will) get brittle over time, causing the bond to fail. 2. Rough grit sandpaper (80 to 120 grit) 3. 2 or more heavy books. 4. Thin point Sharpie marker or soft lead pencil. 5. Blue painter's tape. Step one- Determine placement. The front end of the guard should sit right at the end of your knuckles, and in the center of the back of your hand. NOTE: Placing them too far forward will put undue stress on the glue in that area when you bend your fingers down and may cause separation. Step two- After measuring both sides and determining proper alignment, attach the blue tape to mark where the bottoms will be. Note distance between end of guard and bottom of glove fingers. Reference image Make sure that there are no wrinkles in the rubber glove. Step three- Using the Sharpie or pencil, mark a line around the guards. Step four- Sand down the area inside your lines. Doing this will rough-up the surface and allow for better adhesion. NOTE: Clean the area thoroughly afterward and allow it to dry. Step five- Place a generous amount of E-6000 around the perimeters and inside, then rub it around the entire center/edges to even it out (you can go a little heavier on the edges). Leave a small area around the edge to prevent seepage. Step six- Lay the gloves side by side and place the hand guards glue down in the outlined areas. Place at least TWO large books or other heavy, flat objects in top. This is necessary for proper adhesion. IMPORTANT: Leave them under the weight for at least 12-24 hours to allow the glue to completely cure/set. If you do have any seepage of the E-6000 it can be removed by rubbing it off with your thumb. DONE! NOMEX GLOVES- When attaching to Nomex gloves, use the same method as above But be SURE to put a piece of wax paper inside the gloves. Otherwise, the glue will seep through and bond them closed. NOTE: Please be aware that Nomex gloves are not permitted for Expert Infantry/Centurion approval.1 point
-
Thanks Glen. I took a toothpick to the teeth to make a more definitive gap between gums and teeth. Think it’s a little better. Let me know if there needs to be more taken off. as for the bucket itself, I managed to significantly lower the brow. before: after: The angle of the photo is a little off here. The brow sits lower in person but there is a little more gap between the face plate and the bucket top than before. here’s the left: the right: the interior: My plan is to put on the seal tonight. You’re probably noticing the different angle between the two ears. The left angle is higher in order to cover the fairly significant repair work underneath but also to ensure that the ears (which were cut to the bucket before repairs) still sit flush. Thoughts and comments are always appreciated.1 point
-
Finally the rail for the small tactic light arrived. Now the blaster is complete.
 1 point
 -
Welcome to the FISD, Jakob! Glad to hear that you have started your research, and know that we are here to help every step of the way, sir. Aiming for Centurion is actually easier (and better) to do right from the start, as you may have to make modifications down the road. When you eventually receive your kit, I highly suggest starting a build thread where you can ask all the questions you want to as well as add photos of your progress and any issues. Another suggestion while you wait is to copy your present post into the "New Member Introductions" thread located here. With it posted in this thread you may not get many responses, so moving it there will definitely help. Best of luck on your white armor journey, and keep us in the loop!1 point
-
Welcome back, Tyrone, and thank you for your Centurion application! CRL and Centurion Application Requirements: All required submission photos are present, and GREAT job on your build Trooper We are pleased to announce your armor displays all the necessary requirements as set out in the CRL. On behalf of the Sha Sha and myself, congratulations and welcome to the rank of Centurion! Other-Armor Fit/Assembly: Nothing to see here... move along. Buckets off to you, Tyrone... you did a brilliant job on not only the required items but the suggestions as well, and for that, kudos to you brother! Your hard work has paid off, and I am very proud to welcome you to our highest level. Good on ya"!! Once you are able to get out and troop again, I'm sure you will make both the Redback Garrison and the Empire proud as it's newest Centurion. You earned it, sir.1 point
-
Hi William! Sorry for the delay. @ABS80 (Mark) does have a point in that we're basing the L3 requirements on a small set of data, which in this case is mostly the photos that came out of the Shepperton Studios/LFL lawsuit, because those were some of the clearest images we had ever seen of a screen used ANH suit. The language in the CRL is a little ambiguous, but the idea is that the button paint should really stop short of the edges of the ABS button, as you can see in the following photos (all of the same suit): I think it is certainly a possibility that this particular suit was actually an outlier, but as it is, it represents the clearest images we have access to. That said, the CRL is always in flux, and as we learn more about the armor (which is incredible given they're 40+ years old now) you'll see requirements come and go. I did go back and look at the last several EIB approvals for AP suits and we have consistently requested the button paint change, so if we're wrong, we're at least consistently wrong. In the end L2 and L3 approvals are always optional and should never be source of stress, just a nice way to try to get a consistently high quality look across all armor types in the 501st. Hope this helps, Sha Sha1 point
-
After a series of adjustments, here’s where we are. We’ll see how the ears go on. They were originally trimmed for my bucket as it was. The biggest issue is going is going to be getting the ears to cover the ABS paste fixes and trying to get them to lie flat on the cheeks.1 point
-
Jajajaja ... Gracias hermano @justjoseph63 ... Really, now, I have an arm bigger than the other because the sandpaper job, Best regards...1 point