
Leaderboard


Popular Content
Showing content with the highest reputation on 03/24/2020 in Posts
-
Just split the difference, brother.... make it the same on both sides and you are golden.4 points
-
I'm approved!3 points
-
Although it's not specifically listed in the CRL, for Level 3 we normally require the edges to be equal distance on both sides, even if it is a bit short.3 points
-
Also a good thing the FISD is not about prop replication, can you imagine gaffers tape on seams that don't want to play nice?3 points
-
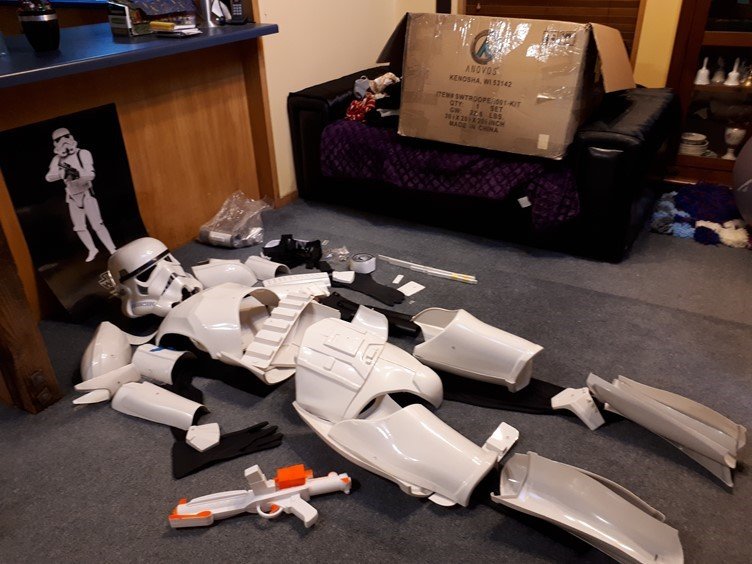
Hello all, I am new to the stormtrooper costuming world, recently discovered the 501st Legion and then Outpost 42 where I live. Thanks to the wonderful help there I have now purchased and acquired a ANOVOS stormtrooper kit ANH, the previous owner has already cut out the pieces, I didn't realise how much of a head start that meant till I was looking at some threads head, but looks like they have saved me some time. With COVID19 causing a 4 week lock down here I am hopefully I have a good stint ahead of me to have a good try at getting the TK kit put together or at least well on the way?! Anyway I am about to begin....as part of the process and recommendations I've read/been given I am beginning this thread/post to record my progress and get help as needed. I have found a basic instruction manual online (https://www.anovos.com/pages/star-wars-product-instructions - Imperial Stormtrooper Kit - DPF instruction download) and printed, plus I have read a number of the ANH Build threads here although the number of threads are quite overwhelming. I am going to get back in touch with GML, Outpost42 re hopefully narrow down a good instruction thread to follow?! Any recommendations welcome. ALso I printed the FISD Acroymns and TK glossary as its all a bit foreign too! And while the saying isn't strictly what a stormtrooper would say - May the force be with you! especially in this time of unprecedented circumstances.
 2 points
 -
Not a lot happening this past... month? Jeez, where does the time go... Between chemo, COVID, and just a particularly rainy last few weekends, things have been moving slowly, but I try to put time in each day into some aspect of the suit. Many of my updates either don't photograph well, or I just forget to take photos in my fervor. Apologies! Also, the convention (WonderCon) that I wanted to debut this suit at ended up being postponed/cancelled, so... oh well... Hopefully Celebration still? Anyways, I went back and filled any pinholes that materialized from my last round of primer (particularly around the edges of panels), then resprayed primer on top. Most of the main body panels are now FULLY prepared for final paint - the insides are reinforced with resin and sprayed flat white with all noticeable pinholes filled, and the outsides have been primered and wet-block-sanded to 1000 grit to level any dust nibs, small insects (ha), etc. that would prevent a (hopefully) excellent final spray of gloss white once the rain stops (this weekend?). I also was able to finally psych myself up, bite the bullet, and trim several of the panels. I'm about 6ft, 160lbs, so on the slightly tall and slightly slim side - I got Jim's regular height kit, (not the Tall version) and ended up taking 1" off the top of the cod, 1" off the top of the barrel and added the underarm cutouts, and 3" or so off the black side connectors. This kit really would fit a pretty big range of people! Arms and legs are also still in their first coat of primer and will probably get their second soon. I know it's not exciting, but I can't tell you how much time I've spent in paint prep on this suit, sanding and priming - really hoping it pays off! (I totally should have paid someone to do it, but I guess I get the pride of knowing it was my work when all is said and done!). Attempted my first round of glossy white on my first (easy) panel, but got a weird paint reaction already. Unsure what caused it, but I'll sand it out with like 1500 and try again. Everything will likely get at least two coats anyways. My rear zipper closure, ultra thin velcro, and flexible shoulder straps also all arrived, here's some photos IRL! Doing more sanding and priming, spraying final gloss on some panels, and figuring out strapping/test fitting things in the next go around! Belt assembly soon and also gonna try to get my HWT submitted for EIB. On the health front, had my (hopefully) LAST chemo infusion last week and am nearly fully recovered from it. The hospital keeps trying to push out my next PET scan, but my doctor and I have been pushing back to get me in next week - the scan will let me know where I stand, and where to go from here (even if I delay radiation while the world settles down). Fingers continue to be crossed for good results!2 points
-
Update: your GML has the pictures and the application process has begun2 points
-
Hi, I had the same issue recently building an Anovos armor for a fellow trooper. If you take a look to the Anovos EIB approvals all of them have short thigh ammo pack . cheers2 points
-
Definitely not going for 100% accuracy. But I do appreciate the little details, especially if they’re easy to execute. Sent from my iPhone using The Force2 points
-
I am about to instal the thigh ammo pack for my Anovos kit but noticed the ammo pack is quite short in length. If I try to align it so there is an even amount of space one each from the rear corners the placement ends up quiet a distance from those rear corners. Basically setting the right side at 1/4 inch from the rear corner, the inner thigh side of the ammo pack is roughly 1 inch from the rear corner. My RS kits did not have this problem. Is this common with the Anovos kits? It’s a first wave kit. Wondering if I should just get the position correct for the outer right side and just deals with the inner thigh side being far off from the rear corner.1 point
-
@LEGOeatPokemon Welcome to the Legion Trooper!!! , Enjoy being a bad Guy doing Good !!1 point
-
Welcome to the ranks trooper1 point
-
Great armor, can't go wrong. Q. Most armor yellows over time unless coated with a UV polish or similar and even then you may get some yellowing. That said if it's away from direct sunlight you should be ok for a long time.1 point
-
Awesome set of armor Daniel, good luck on your application1 point
-
1 point
-
Jonas - I would like to welcome you to the 501st Legion and the Nordic Garrison Great job on that SDS suit and I hope to Troop with you one of these days1 point
-
Cheers. I always assumed the right side corner of the ammo pack had to be positioned close the rear edge. Even spacing is okay even if the gap to rear edge is more than a 1/4? Just want to be sure. My RS ammo pack was long enough to so it was easy to install, no fuss. Thanks. Had a look at several EIB approvals. Each builder positioned their ammo packs slightly different.1 point
-
My build has sadly stalled for the past couple of months for health reasons, but hoping to get back to it this week! It’s definitely a slow burn. While the current build is ESB, ultimately I’d love to be able to switch between ANH stunt, HWT, and ESB. Gotta be true to the OG stormie and guess 421!1 point
-
Hi Gretchen welcome to FISD. I would like to recommend you to take a look to the following Anovos armor building Tutorial , I'm pretty sure you're going to find it very helpful. Good look with your build and looking forward for photos of your progress Cheers1 point
-
looking good !1 point
-
Left corner/inner thigh Right side/outer thigh With the magnets I am able to stretch the edges further so it’s not as bad as it looked when I first mocked it up. Left side still about 3/4 inch but much better.1 point
-
Nice work Chris. Good thing you said no to the zipper it would require some serious alterations on your part.1 point
-
BBB DAY!!!!!!!1 point
-
Here are the requested corrections: 1. Fixed TD and used correct screws 2. Corrected rivet placement on ammo belt 3. Used correct screws on belt1 point
-
Got a few things scratched off the list this morning. -Trimmed up all of the greeblies. -Completed my belt along with all of the boxes. -Mounted my thigh holster from Dan Waiting on some different bits to be delivered for the 6 point security screws. I ordered 5 point bits by accident because someone suggested it in the holster thread. For some reason 5 doesn’t work on a 6... Those should be here Wednesday, along with the nylon bolts and nuts I’m using for the ab boxes. Sent from my iPhone using The Force1 point
-
This is an awesome thread. Thank you for the time you’re putting in and the detail you are including. I’m learning while I continue waiting for Anoshow... One question about the bolts for the belt boxes and shins, etc. how do you get the placement of the bolts right when glueing them? Am I right in assuming that you temporarily hold or affix the boxes in place, with the bolts sticking through their holes? I know this might seem obvious - but it’s somethng I’ve been pondering in the virtual build inside my head.... thanks1 point
-
I actually sewed mine, was quite time consuming sat in front of the machine do all 18ish straps. I guess I am lucky as I only use 1" as well and there's been no issues with "pull". Maybe the best course is start with elastic, but if there are areas that you can already tell will need pulling in or show they need it later in use swap to webbing.1 point


