Leaderboard


Popular Content
Showing content with the highest reputation on 07/02/2019 in Posts
-
Hey Gary! I don't see anything glaring that should keep you from approval on the armor, but to be frank, the paint on your helmet leaves much to be desired. The frown will definitely need cleanup for higher levels of approval as well as the traps, ears, and vocoder. Have you considered using decals? While hand painted is more accurate, decals are acceptable even at Centurion and will look much cleaner. A couple places sell them, but these from Trooperbay should work: https://trooperbay.com/decals/prop-replica-decals/star-wars-props/troopers-tk/new-fx-replacement-helmet-decals I also use his ear pinstripe and rank bars and have been very pleased with the result. https://trooperbay.com/decals/prop-replica-decals/star-wars-props/troopers-tk/trooper-helmet-ear-pinstripe-tape https://trooperbay.com/decals/prop-replica-decals/star-wars-props/troopers-tk/ear-rank-decals If you want to go hand painted, he also has stencils available. https://trooperbay.com/decals/prop-replica-decals/star-wars-props/troopers-tk/trooper-helmet-masking-templates Hope this helps! You're in the home stretch, buddy!1 point
-
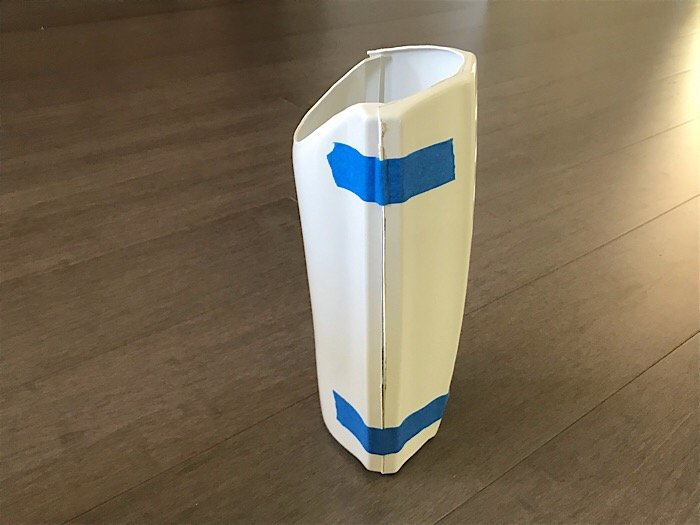
Midsummer update, before a build party with friends this weekend. Life intervened as it sometimes does and this kind of goes in fits and starts. I am working with the "butt strip and join" method, and had a few starts and stops. Fortunately E-6000 is forgiving if you need to start and stop. After a few misfires, I trimmed and assembled forearms and biceps. The shoulder bells are trimmed to where I think they need to be. Fortunately I have introduced no cracks or scores where they don't belong (but If I do I am building an impressive collection of ABS "trims" from which to make paste/spare parts. One thing that has helped - I invested in a belt sander. This really helps in "planarizing" where I have made trims and rough smoothing/deburring. I know I will have to finish the forearms a bit - I've seen some of the cover strips nicely beveled and (I think) the wrists are sanded WITH the cover strips on so that the cover strips are nicely flush with the ends of the wrists (so they are not jagged.) In general, I am using the TrooperBay videos as a general guide (keeping in mind that the armor in the videos is not mine). Hopefully another update with progress this weekend!1 point
-
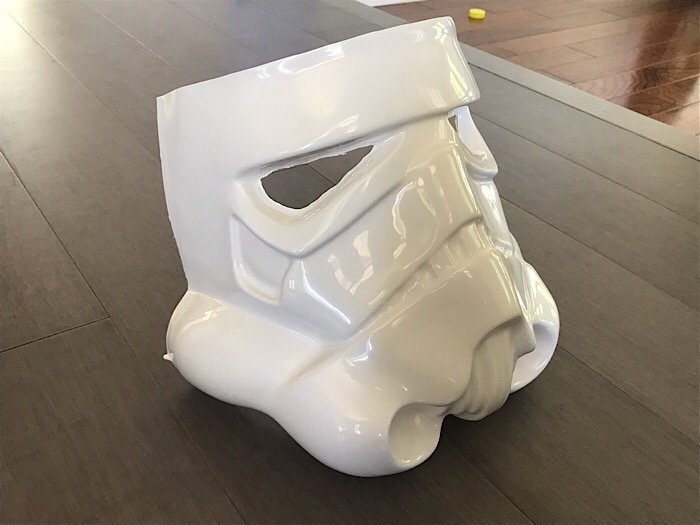
Good luck with the build. I’m in year 2 of mine. It’s daunting but a lot of fun. Looking at at your helmet build it might be helpful to take a look at my build thread for the helmet. Basically so you can learn from my mistakes. Take your time with the helmet, but visualize and know what you want you want it to look like. If you want a low brow, put the bucket on the face plate and use painters tape to secure it so you can get a feel for where everything should be. You can measure from there and start to put everything together. Just know you’re going to make mistakes, but that’s part of the process. You can fix just about anything, so don’t let perfection grind you to a halt (it did for me for about a year). Have fun with it and good luck!1 point
-
After you wear this armor you will start to understand why we take off as much as return edge as we can! If you are needing some help we are having an armor party here in Portland on the 20th. We’d love to help you get this closer to being ready for submission. Here are the details from our forum: https://www.cloudcitygarrison.com/forum/index.php?topic=12617 I look forward to assisting in making your dream a reality! Jim Moser TK508991 point
-
1 point
-
You have to wonder how he manages to get all of these suits. You'd think the armor makers would have him on the 'do not sell to this guy' list by now.1 point
-
Hello everyone! I know it’s been a long time but I had so much going on including school, hockey, a trip to Galaxy’s Edge, and a bunch of other stuff, but now it’s summer and I have lots of time to work on my build! Yesterday, I went to a garrison-wide build party where I got to meet plenty of the members of the SoCal Garrison for the first time. I had a blast and got lots of great advice and tips as well as the confidence to continue on my build. I was able to get plenty of work done on the forearms and the helmet which is very exciting especially cutting out the eyes, which was the scariest part of the build(for me). I’d like to say a big thank you to @Oztrooper(Jeff) and @TheRascalKing(Justin)for helping me out with the helmet and the rest of the SoCal Garrison for the warm welcome and all the great tips and advice.
 1 point
 -
I've made some photos for you. I think I won't try to trim the flash guard and the ejector port guard I’ve assembled the rear sight and the end cap clip (haven't understand what is it for until now ). Screws go beyond in the receiver. I’ll trim them (grew arrows). But I can’t trim the screws which maintains the connection between the folding stock and the receiver (red arrows). I can unscrew them, insert the bolt and screw again. But the bolt can’t move in the receiver. It seems that the solution is to solder the folding stock connection. Any other tip ?1 point
-
I’ve gotten all the limbs assembled and tried a few test fits: I have some ideas on how to suspend the thighs, however trying to keep the shins from shifting around and maintaining the appropriate space from the thighs I’m still researching. If anyone has suggestions, please let me know. Thanks! Sent from my iPhone using Tapatalk1 point
-
Just a little bit of video from Supanova setup 1/2 hour before the doors open, it was a shame the 25 meter space we had been told we would get was only 19 meters so had leave a bit of the display out, would have loved to expand the Galaxy's Edge section but people still seemed to enjoy it, and the Coke section definitely caught a few out 3.30 am (stupid pain) and day 2 is 6 and 1/2 hours away, going to be a long day.1 point
-
1 point
-
Your Centurion Badge is waiting Sr.1 point
-
1- I haven't used Imgur to upload photos, I used Google Photos, but I think it wuold be because the photos are collage? I'm not sure. 2- I Would recommend to waut to the D.O. team to ask you if they prefer updeted individual photos. 3- As I can see the photos quality is ok, but I'm not the D.O. 4- A little patientce is needed for the D.O team can start the review, remember thay are volunteers and have work and family. But I'm sure they wont forget you. 5- I shuold suggest for one more photo, as the CRL says. Two male snaps are present on the lower center tab of the Posterior Armor. Snaps do not need to be functional. Snaps are silver in color with the bottom of the snap facing outward and are not painted. I thik I did'nt see a photo of this part, mainly for the silver color of the snaps. please check this up. Good Luck, I'm sure you're going to get Centurion fast.1 point
-
Yeah Adeshir !!! Great to see your Centurion Application so soon. Good Luck Trooper!!!1 point
-
Tonight: Trimmed and added the AB buttons that were finished: Added the shoulder straps to the chest: Finally got to add some outer cover strips to the biceps: Started trimming up some more strips for forearms and the calfs: Also tinkered around with the TD some... LETS GET THIS DONE! Also my black compression top came in... Its from TESLA, its very snug but it looks good. Just waiting for the bottoms to come in tomorrow.1 point