
Leaderboard


Popular Content
Showing content with the highest reputation on 03/27/2019 in Posts
-
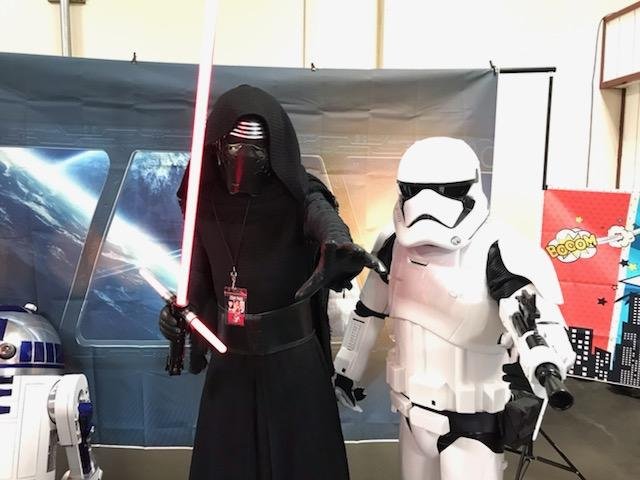
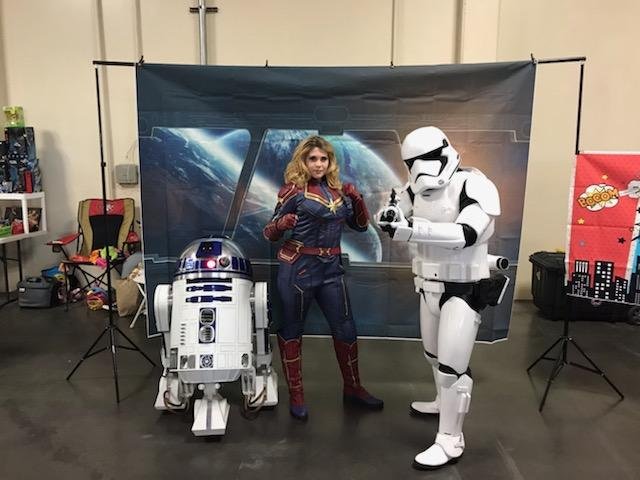
I had this idea today. Kind of fun. Hope y'all enjoy!7 points
-
Hi Dave The smaller plate is not meant to have any return left, here´s a good reference on how it idealy should look and you can see the corners are straight3 points
-
Nice work, you have too much time on your hands, you need more armor to build2 points
-
Dang that's an old thread Just goes to show how long we've been working on these1 point
-
Oh, don't post that. I really phoned it in on Matt's stuff. The time constraints and relentless pressure was just too much to bear.1 point
-
I'll take two glitter-farting unicorn patches please!1 point
-
haha. Funny - I got some new software with my graphics tablet - makes designing these things way easier. Plus, doing Matt's coins has given me a chance to learn some Illustrator skills. The first patch was a learning experience - I have high hopes for version 2. However, this time you or Matt can deal with the sales... and PayPal. I'll do another run when PayPal becomes more transparent about their service agreements, their customer service becomes more accountable, and glitter-farting unicorns emerge from morning rainbows.1 point
-
That's true. Haha!1 point
-
Yeah I meant for both panels- thanks for clarifying1 point
-
Awesome kit trooper you will make the first order proud!1 point
-
Just remember that the stencils have a left and right. The tips on the inside (closest to eyes) should naturally fall forward (toward vocoder). Hope that makes sense. And no further than a pencil width away from cheek mould line.1 point
-
Ugh. Of course. Two steps forward, one step back on my March to EIB. Thanks for the feedback. Trooperbay D-ring ordered! Sent from my iPhone using Tapatalk1 point
-
I used a backer and some ABS paste to fill it in. I stuck the end of a scrap bit of ABS into some Acetone until it became like a runny crayon, then used it to fill in.1 point
-
Thanks. Not as terrible as I thought it woud be. Oh, I have the correct rivets coming as well.1 point
-
Ok, as pointed out by ukswrath[TK] I need to change the rivet locations. I talked with a few troopers and the consensus is that I leave the top rivet as is, space the bottom closer to the step in the AB ABS. So here goes. First thing I did was cut the elastic straps to separate the front from the back. This makes it easier to work with. Easier is better when you have a difficult task like this. The two halves ready for disassembly. I used a dremel and grinding tip to take the head off the riviet. Heat is an issue here so go in short bursts and let it cool between them. The rivet will melt ABS so I always grind on the hinge and not on the outside armour. Also remember that heat transfers through the rivet and can melt the armour if your not patient. I used side cutters to peel of the remaining rivet head. With all the heads off the rivets can be pushed through. Here they are sticking out. Gently wiggle the rivets out Patience will save time repairing damage. This is a nice and clean removal. I cut in with a good sharp blade to separate the pieces. Prying might break the armour. Gently pry with your fingers and saw through the E6000. It comes off fairly easily. I used the old hinge to mark the lower hole position. The AM Armor is much larger, which is why I’m making this modification, and as such the lines differ somewhat from the Lucas kits. For this build I’m matching the rivet spacing to the top rivet, 20mm x 10mm. I measuerd the distance from top to bottom and marked out the four pieces to fit in the length. Scoring and snapping is all it takes to make the hinge strips. I used cover strip material. I drilled the bottom hole, measured and divided the length by 2 to find the center rivet location, then drilled it. The old holes will be filled with ABS paste after the hinge is installed. I clqmped one strip in and drilled the holes. Then I clamped all four and drilled. Four perfectly matched pieces to work with. I lay the elastic strap across two to make getvyhe length I need. I cut three and mark them for rivet holes. I use a soldering iron to burn the holes in them. I used the strap to mark the spots where the straps go. Then I cut and glue spacers to make cover strips. I use ABS trimmed from the shins for the spacers. It’s a bit thinner and will allow a slight pinch on the strap when assembled. The spacers are glued and drying. I’ll trim the excess when they’re dry and set. This is how the strapping will sit in the hinge. I put a bead of E6000 around the rivets where the strap will sit. I don’t want the strap loose in the hinge. Setting it with the glue will place the most load into the hinge and away from the armour. Lay the straps in and mush them around a bit to spread glue on them. I put some more on the other side, a light skim on the spacers and a good amount on the base shim. Make sure the edge that will be along the edge of the armour is perfectly lined up. This will make a strong return edge as a byproduct of the install. Clean off the excess E6000 along the edge. For the other half, push the rivets through the strips, then push the rivets through the holes in the straps, with glue to hold them, put the base strip on and clamp the whole thing together. NOTE: the caps on the rivets are only there to hold everything together while it is being built. They are not crimped. I’m replacing them with centurion level split rivets when I install the hinge. I ordered a set on eBay, they are from Trooperbay. Got the correct split rivets and washers from Trooper Bay. The rivets are too short to go all the way through the armour, hinge and washers. I drilled out the hinge holes. Not all the way through. I ground out the holes with a round Dremel tip. This keeps the hole aligned. Just enough to make the washer fit in. Next I use a flat tip grinding tip that is just the same size as the washer…I think I got lucky here. With a flat base to sit the washers into and a dab of E6000 I set the washers in permanently. They are flush with the surface of the hinge. A nice bit of E6000 and it’s ready to set in. The inset washers let the rivets through, but just barely. Since they are basically only for appearance it won’t matter. The hinge will carry the entire load and leave the armour unstressed. I originally set the hinge in with the rivets in place and clamped to hold it. After I set the kidney plate in I replaced them with small screws with washers and nuts on the inside to pull it all together. After the glue set nicely I put the rivets in and hammered the bifurcated ends over. I might cover them with clear glue with my glue gun so they won’t snag the undersuit. This is how the hinge looks closed… …with the mag latches set in on the right side. I also replaced all of the Chicago screws with the correct slotted flat head screws and nuts. Just to keep them from coming loose I put a dab of hot glue on them with my glue gun.1 point
-
Awesome! We'll be with you shortly.1 point
-
This is only a minor set back Dave, you got this easy brother. I must compliment you on a very detailed build thread, nice work overall.1 point
-
First troop was great! It wasn't officially for the 501st, just for a friends booth at Anime Con. But it was great practice for the first real troop this Sunday. I was able to fix some of the bunching at the knees by setting my spats up higher on my calves prior to this troop. During the troop, I found a bunch of other small things that needed addressing. 1. My fans died in under 30 mins off of 9 volt batteries. could have been just bad batteries, but I currently have my fan system apart to use a USB power bank in place of the 9 volts. 2. My spats had trouble staying together. I am replacing the velcro with some snaps. It just wasn't enough surface area for the hook and loop to grab. Easy fix. 3. Thermal fell off when bumped! I have it on magnetically to make for good Jawa-bait, but in tight spaces I was bumped into and it came off. Currently adding more magnets, considering hook and loop as well. 4. Per @gmrhodes13 mentioning, I moved the shoulders forward, after these pictures. 5. Bunching is an issue. When I can spend the time getting velcro placed correctly it is not, but when trying to hurry so other troopers can suit up, its not ideal. I'm thinking about hemming in places so that it stays tighter on me- any suggestions? 6. Forearms are very restricting in movement. I can barely reach my helmet, but I don't see any way to shorten them with the detailing on both sides. I'm only 5'7, so its just a size thing. I'd like to go for level 2 certification. Maybe starting that thread can help me with some of these issues? Anyway, I had a great time, and welcome any input!
 1 point
 -
I know I should be focusing on completing my TK, but I'm having so much fun making progress on the T-21 this weekend! I needed to find a cup or something to create the taper from the 3" to the 2.5" barrel. I don't have anything here at home for it, so I made a trip to Target to see what I could find there. Happily, I found some kids party cups that were a pretty good shape and size. And on clearance for just $0.50 each, too! Oh, and they're Star Wars themed. Perfect. I picked up two in case I mucked one up. Once home, I cut out the bottom and top parts of the cup off to create approximately 2 3/8" length of the taper. Here's a test fit. Hello, Poe. And the small barrel, taper, and large barrel test fit together. In order to secure the smaller barrel securely in the middle of the taper cup, I decided to craft a gasket of sorts inside the cup. I made cuts of two pieces of EVA foam (1cm x 6mm, and 1cm x 1cm). I wrapped the 6mm piece snugly around the inside of the taper cup and made my cut so the ends met together. Using hot glue, I secured the ends. Then I hot glued the ring inside the taper cup and fit the smaller barrel inside. It is a really snug fit and will not be going anywhere soon. Next I attached the larger strip of foam to the small barrel with hot glue. I stretched this piece a bit as I glued it on. Then I fit the small barrel into the larger barrel. It's another very tight fit here. I had to coax the foam to cooperate. And everything fits really well! Oh, hai Rey! I put the whole thing together to see how it looks. I put a little blue tape on the end of the small barrel so you can see it more easily in the pic. Once I verified that everything test fitted well, I added some construction adhesive inside the gaskets to permanently secure them to the barrels. I weighed everything so far as it is, including the feed plate thingy (not shown in the pic above). It all weighs... 1lb, 12oz! It's a little heavier in the front, but the overall balance of the blaster isn't bad at all because the PVC barrels are thin-walled. I know the weight will increase a bit as I add greeblies and bondo, but I'm really happy that it's so light at this stage.1 point


