Leaderboard


Popular Content
Showing content with the highest reputation on 11/04/2018 in Posts
-
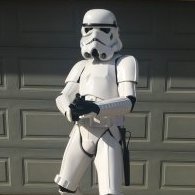
Name: Daniel Melin TK ID: 99665 Garrison: Nordic Garrison Forum name: TheSwede Member page: http://www.501st.com/members/displaymemberdetails.php?userID=25259 Armor maker: KB Helmet maker: Anovos Blaster: SE 44C (3d print, KB) Hight: 5'10 Weight: 205lbs My "are you talking to me" action shot Thank you for your consideration2 points
-
Hello Troopers, Oops - I appear to have missed this introduction way back at the beginning of summer when my amor passed basic approval. So I thought I’d wait to post until I was approved for Centurion! I’m very pleased to be part of this community. If Only You knew: Build to Centurion L3 straight out of the box. Each of our bodies is unique, the armour fits everybody differently. Be patient with yourself. Don’t set yourself an unrealistic deadline. This will cause you to make panic mistakes. You will hopefully have this armour for life. Build it right the first time! If you don’t feel 100% comfortable making that cut today, then wait a day. It will be so much easier tomorrow. There are no shortcuts! They will come back to bite you hard. Trust that it will all come together perfectly in the end. Strapping will be the most satisfying part of the process. OCD will be your biggest enemy! Nobody will notice that small blemish or sight imperfection. All they see is a very cool Stormtrooper Oops! A small crack appeared in the bottom return edge of one of my shoulder bells. The plastic bucked very easily here even when merely picking the bells up! I read in the forums about various fixes but decided to go it alone! BIG MISTAKE, Big Mistake! Coincidentally, I had just made up some ABS Paste to test out the process and look at the results. So smartypants here thought it would be a great idea to reinforce the inside return edges of the shoulder bells with ABS Paste. They would then have firm support and not crack again! Well… after applying the paste a little at a time over about 15 mins I packed up for the night. In the morning TO MY HORROR I found that the outside walls of the bells had buckled and were no longer a flat smooth surface! Devastation, my jaw dropped! New bells!! Or… I then begin the tedious process of using my freshly made ABS paste to very slowly build up the outside shape of the shoulder bells one small application at a time. Once I had "over-built" the shape of the bells I proceeded to sand back the shape and blend into the existing armour surface! OMG what a process. I CANNOT recommend this. But the result was awesome and hardly noticeable as the colour and texture matched nearly perfectly once sanded smooth with 800 grit and polished. Shout outs: Tony’s build threads are amazing. Always trust that it will work out if you follow what he’s done - even if you don’t really understand them : ) I can’t thank Tony (Ukswrath) enough. His Anovos build thread was my bible! I literally printed it out and followed every single page carefully. Slightly adapting as I built, to match what I was seeing right in front of me with my armour. My wife has the patience of an angel and knows nearly as much as me when it comes to dressing and adjusting armour. She’s one awesome photographer and handler. A big thank you to Greg (Wook1138). After acting as his handler on May 4th and seeing Stormtrooper armour in person for the first time it gave me a huge boost of confidence. My build after that point went much more smoothly! Thanks for reading — See you all out there!1 point
-
about mid-December, like the 16th, was the projected time1 point
-
Looking good !1 point
-
Got my new Imperial Boots!!! comfortable and they fit really well
.jpg.847a0e0de31517164a0696a595661a69.jpg) 1 point
1 point -
I remember I screwed up (hah, bad screw pun) this part quite massively, I ended up just glueing the screws into the holes that I made way too big. It's still looking alright, so given the effort that you're putting into this scope it's gonna look fantastic1 point
-
Adding these screws is something I really like when building scopes. More tricky than one would think, but absolutely rewarding to see real metal screws on a painted scope. Side note: remove them again for painting the scope and later add a black washing onto the screw heads. This makes shiny steel appear aged. Good luck mate.1 point
-
Great story Giles and well written. Thank you for taking the time to post this and share it with us.1 point
-
Thanks for the reference photo. Seeing the amount of return edge on that real example actually makes me feel a lot better! I'll get that cover strip trimmed down before gluing - this was just one of my many test-fits to see how it looks. I'm hoping to start gluing later this week.1 point
-
You definitely don't need sew-in snaps for any level, Matt. There are a lot of areas on the average Centurion that are not "screen accurate", i.e. hook closures on the back of the calves, sew-in snaps, bracket fasteners, etc. We realize that not everyone sews, and allow snaps to be set in nylon/elastic for strapping, Velcro on the calves and so on. You have done an outstanding job on this build, and at this point I can't see anything holding you back from reaching Expert Infantry level should you choose to apply.1 point
-
Work in progress! Giant Thnaks to my friend who helped me) https://d.radikal.ru/d09/1811/f5/bf14d2689537.jpg https://a.radikal.ru/a01/1811/2a/61528a3d1d16.jpg1 point
-
Doing the shins was daunting and took multiple reads on crickets how-to in order to understand how to build them. And you really should leave them for the 72 hours so they can fully cure. For me, it is seeing the other TK's put on their shins and make sure they line up, and all I have to do is snap mine one and I am onto the next piece of armor.1 point
-
Nice work. I'm sure you won't have any issues, there are a couple of things to be aware off: The positioning of the knee armor, they don't appear very central but I think the bagginess of the knee gaskets isn't helping that, could reduce the excess material. You could also add a little foam on the inside sides of the shins to bring them more in alignment with the thighs. Back plate and butt plate seem to be angled too. Good luck with approval.1 point
-
Velcro is indeed a viable option for most troopers! I wrestled with deciding either hook/elastic or velcro for my closures, but neither appealed much to me. As a handler, I helped a fair amount of troopers close and re-close their shins (or adjust them) while out trooping. I didn't like how velcro could pop open and shift, then closing at odd angles on its own. I didn't like how screen-accurate hook/elastic/hole closures looked, either. Magnetic closures are a personal preference, really. For me, I wanted a super sleek and clean closure that was strong, and magnets were the way to go for that. Also, I don't like having to ask for assistance while kitting up. With magnetic shins, there is no need to ask for help or to struggle to get them closed- once on, they simply lock on their own, and never need to be adjusted once they are on. And they are also very fast to put on and take off. All that said, if velcro works for you, then velcro away! But for every trooper who has handled my magnetic shins, every one has said, "I really need to convert mine to this!".1 point
-
A bit more progress. Finished assembling the left forearm. It went a bit more smoothly than the right, but still had to do weird brackets. I'll likely need to add more, or I might use a bit of milliput to fill some of the seams and help hold things together. With all arm pieces together, I tried the arms on with the shoulder gaskets. It was all right, but I think I'll need to take in the shoulder gasket a bit, because my bicep piece circumference is pretty small. And a shoulder bell for good measure: Moving along, I decided to go ahead and assemble the back and yoke. (Forgot to take many photos.) It actually wasn't as bad as people had made it out to be. I'll definitely have to do some heavy seam/gap filling, but overall it was relatively straightforward. I started by gluing the yoke to the connector piece, let that dry overnight, then glued everything to the back. I know the chest/yoke/back is going to be one of the most challenging parts of the build because it is just *so* big. KB claims it's meant for average sized people, but it's really quite barrel chested. The first thing I did is trim off a bunch of excess material from the...wings? I don't know what they're called: Next up, a *lot* of heat bending with my trusty heat gun. My goal was to wrap the wings more tightly around me, and greatly reduce the width of the back and chest. As with my TK, I set the heat gun around 450F-500F and slowly heated up the areas I wanted to bend. When the ABS just starts to lose it's springiness, I'd turn off the heat gun. Incidentally, the KB kit is much thinner than my WTF original TK, so I had to be careful not to overheat. Back before: Back after: No individual photos of the chest, but here's everything on me: This whole build has been kind of a rollercoaster for me - I flip flop between feeling really encouraged and being totally convinced it's impossible to fit this kit to someone my size, especially with how tough my GML is. For now I'll soldier on.1 point
-
Thank for the suggestion, guys. I will remove the top padding and replace it with a much thinner foam layer.1 point
-
Heres one idea - perhaps use a clear acrylic tubing to house the LED strip? If so, the tubing cannot be larger than 2cm OD. Because it is clear, the lights can be clearly seen. Sent from my SM-G390W using Tapatalk1 point